Oak Frame Construction

UKworkshop.co.uk

Help Support UKworkshop.co.uk:

This site may earn a commission from merchant affiliate links, including eBay, Amazon, and others.

rfdesigner

Member
Joined
16 Oct 2013
Messages
6
Reaction score
0
Location
New Forest, UK
Hi.

I'm new here, attracted by many of the knowledgeable posts I've seen in other threads.

I'm looking at making a small oak framed building.. a glorified shed. I'm an engineer by training and temperament and tackled a wide variety of jobs. Early this year I handled oak for the first time, putting in some gate posts (8' long, 8"square), weathering the tops, fitting the hooks and planing down. Was amazed to find out just how strong the stuff is. (a 100mm M10 screw will shear before the oak fails.. according to the calculations.. I didn't shear an M10 bolt!)

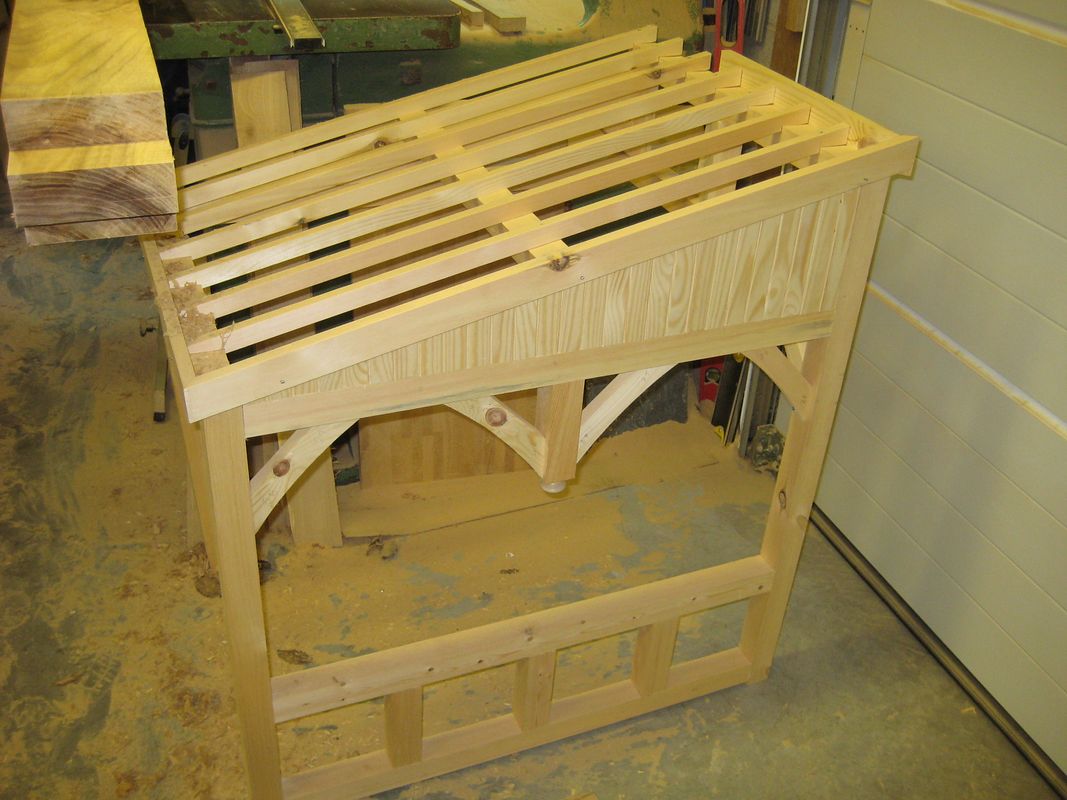
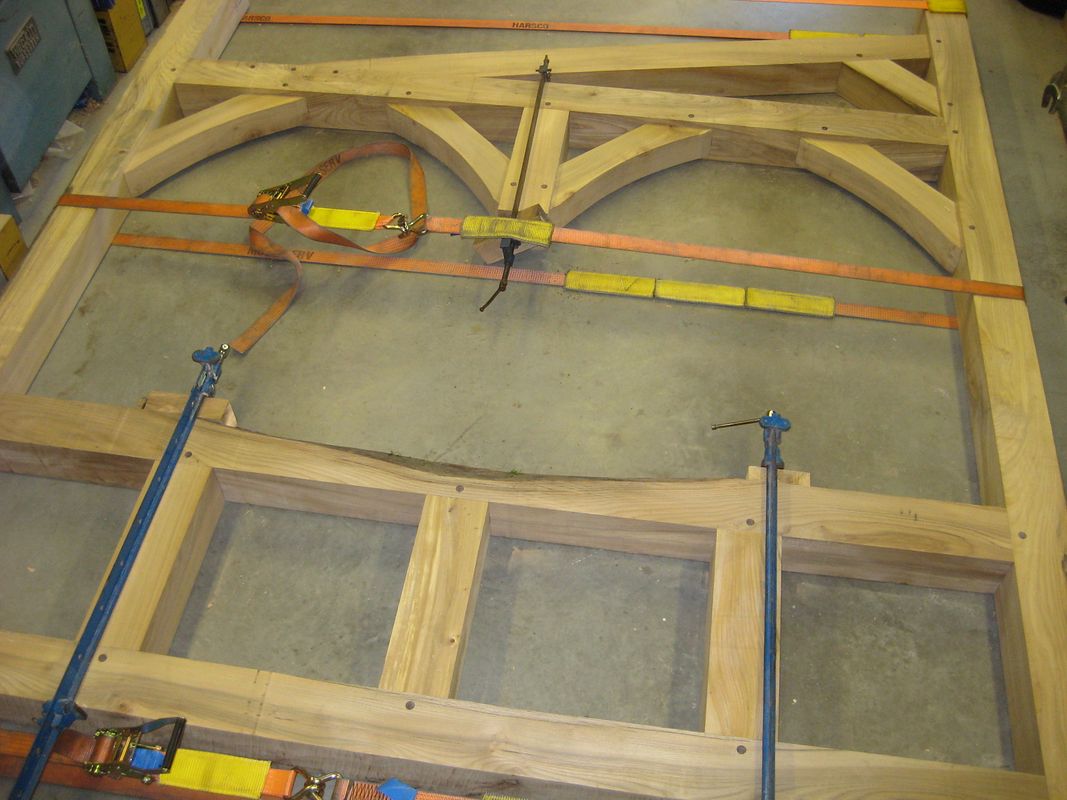
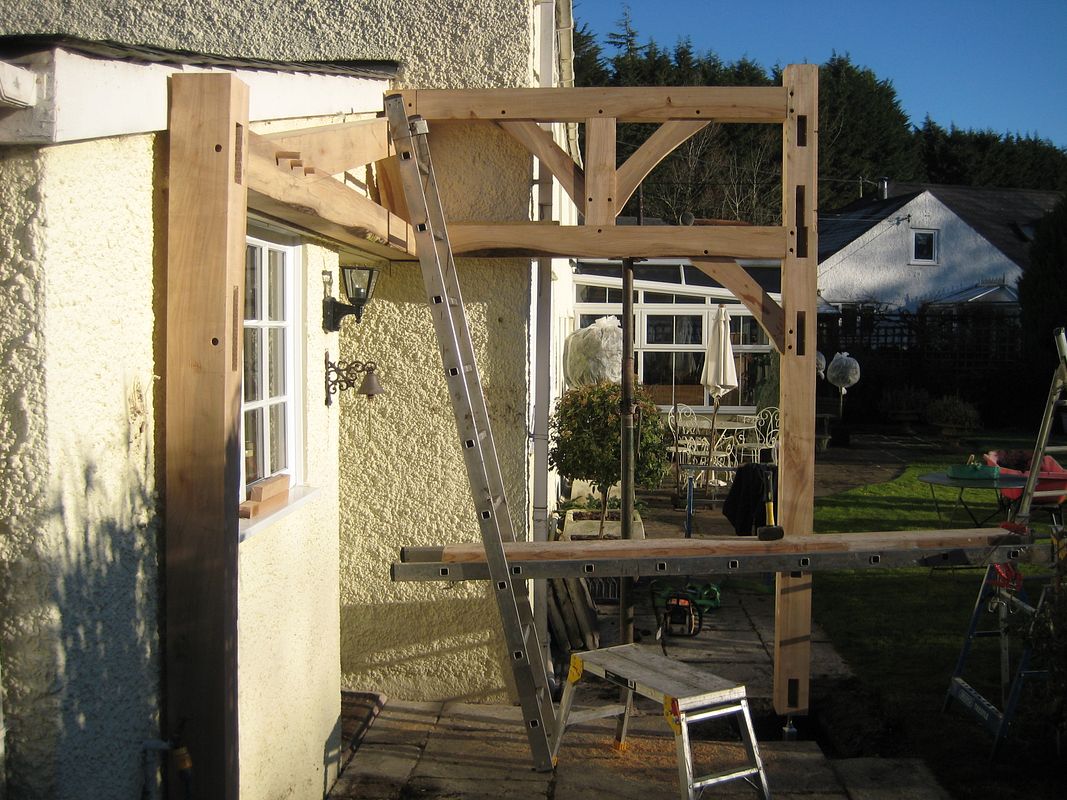
Anyway I'm now looking at an 8 post oak frame, ~8mx2.7m x 2m high (on a brick base)

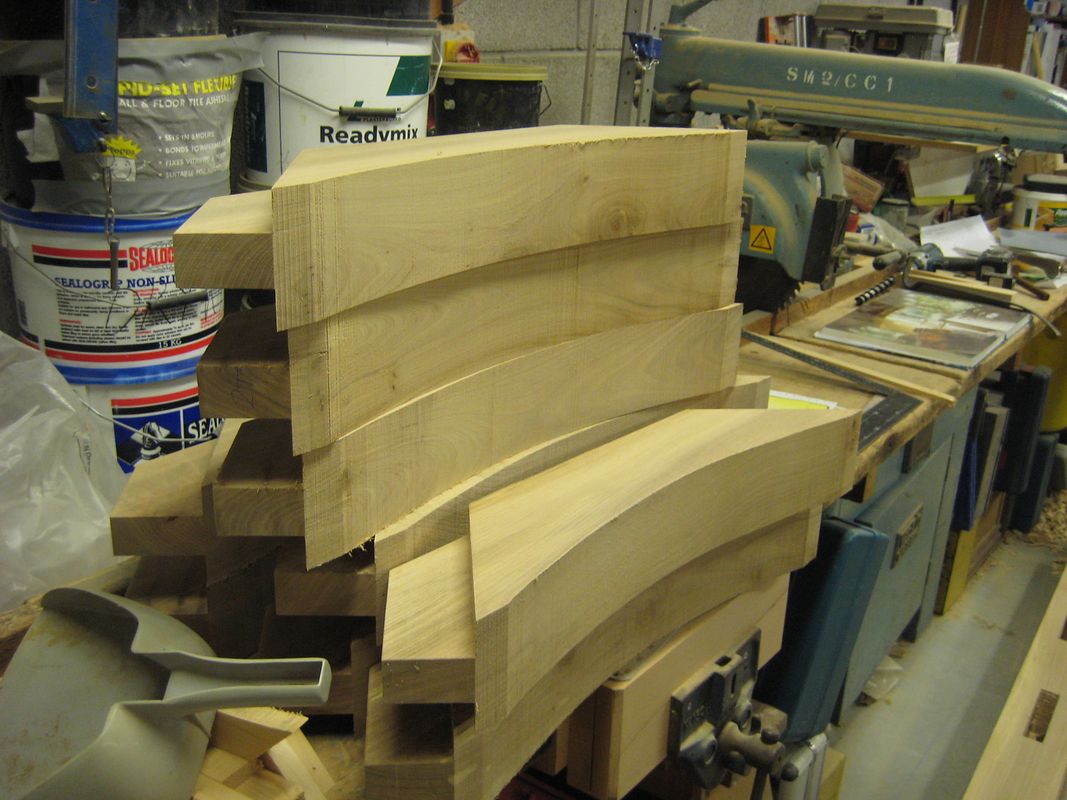
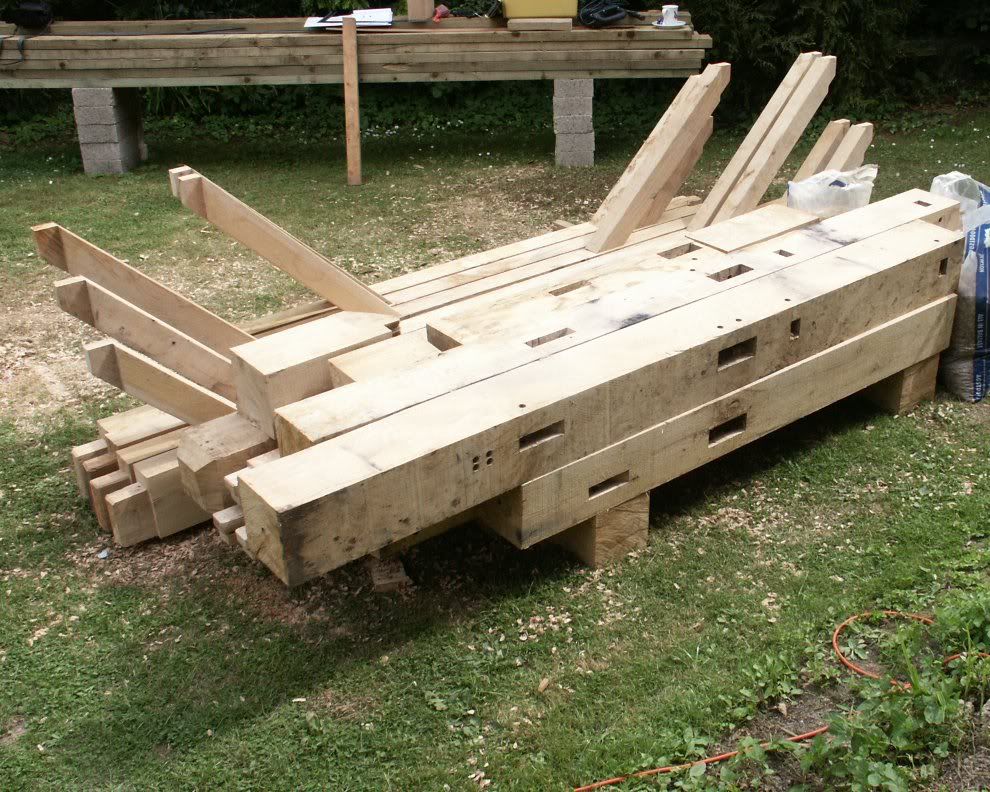
I've calculated that my posts should be 6"x6" with the eaves beams being 6"x4" and the sill beams being thinner still, so a darn sight lighter to handle than the gate posts. I'll have two ~8m lengths to handle but the rest can all be 2.7m or less... my long 6x4beams will have to be quarter sawn, but I should be able to get my local sawmill to do that.

I have several decent tools, including router, pillar drill + lots of hand tools, and an area big enough to act as dedicated workshop at least for the shorter lengths. The mortices aren't a major worry, the pillar drill will get me near perfectly square holes and I can chisel the rest by hand.

I'm looking at two issues:

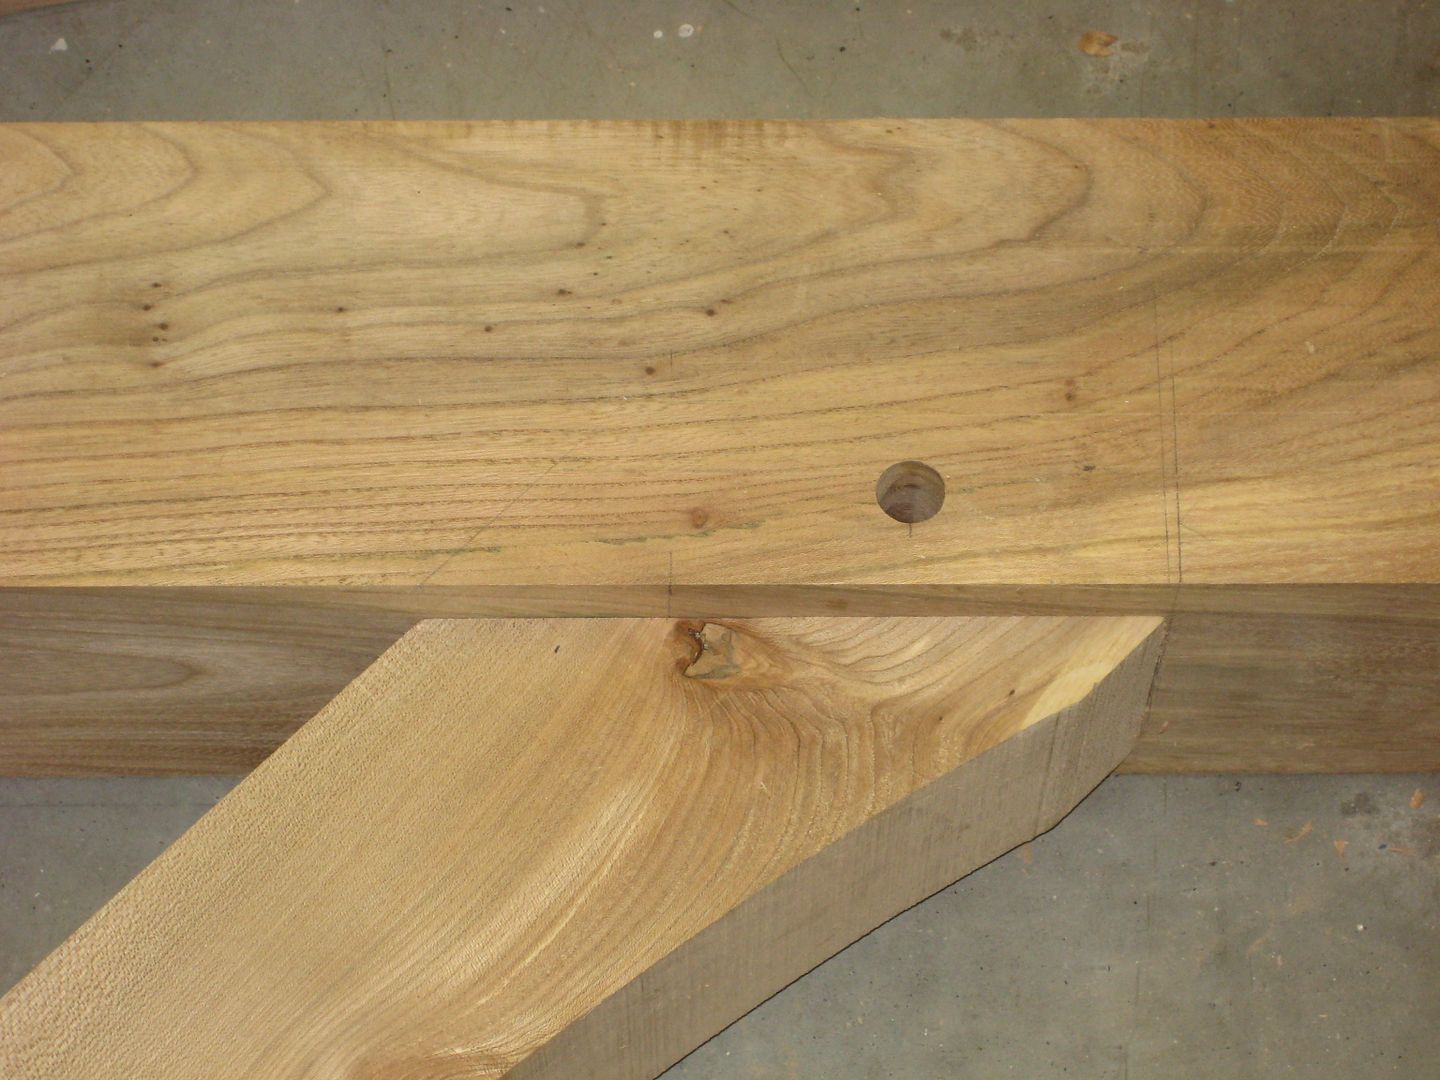
A: how to get the tenons cut accurately.. The oak will be green but dry to the touch.. at least the outside surface will be. I've cut various mortise and tenon joints in pine etc.. but never oak. Ideally I'd like to avoid blackening the wood.. something to do with steel reacting with the oak oils... so any guidance on that is very welcome.
Can I route green oak?.. is there a special saw for this more intricate stuff?

B: how long would this take any of you?.. I can't expect anyone to second guess my build time, but at least I'll get an idea.

thanks in advance.

Derek
 
Trying to get an 8m long beam onto a bench drill ios not easy. I tend to use a 20mm auger in an SDS+ drill, cuts very easily into the green wood.

You probably don't really need to use a full 8m beam, put a halving joint above one of the posts and use the tennon to get the joint together.

Several cross cuts with a circular saw and then knock off the waste befor a final trim with a large chisel will do the tennons, make a simple jig to run the saw against so you get the shoulder of the tennon square.

Are you putting in any diagonal corner braces as they take a while to cut.

J
 
Thanks for the link, that could be helpful, I've found a lot of US stuff which has helped with the design, but hadn't found that forum.

RE 8m.. there is a requirement for that beam not to have any major wiggles in it.. hence 1/4 sawn and one piece. I'm building a roll off roof observatory, but in keeping with the 300/400 year old houses in the area, one of which is ours. The roof will run on stainless steel gate rollers and the tracks need to be kept stable and true.. ish. 10% shrinkage will be fine just so long as it's fairly even.

What I don't want is a step developing at a joint, hence preferring a single section.

I had a ballpark estimate for the work, but it's looking too much, sufficiently so that I'd rather do it myself, I always did enjoy woodwork just I've never done anything on this scale before.

I am planning rather a lot of bracing.. because the whole roof will move.

Derek
 
rfdesigner":1hgsqo7d said:
Thanks for the link, that could be helpful, I've found a lot of US stuff which has helped with the design, but hadn't found that forum.

RE 8m.. there is a requirement for that beam not to have any major wiggles in it.. hence 1/4 sawn and one piece. I'm building a roll off roof observatory, but in keeping with the 300/400 year old houses in the area, one of which is ours. The roof will run on stainless steel gate rollers and the tracks need to be kept stable and true.. ish. 10% shrinkage will be fine just so long as it's fairly even.

Derek

I'm far from an expert, but I would think green oak will distort over time and split as well as shrink, I seem to remember reading that it takes about a year an inch to dry out too, so that could be 6 years. If the tracks are on top of the timber, you may want to stand them off with "double wedges" at frequent intervals and check them every now and again. This would keep the track true. Whichever way it is you might need the fastenings to be adjustable up and down and side to side. Wood shrinks across the grain a lot more than along it, so length wise may be less important.
 
This sounds like a really interesting job.I made a porch out of 6x6 elm a few years ago, the client supplied the timber which was very rough out of square and twisted .To make my life easier i had my local joinery pse it all as i didnt now how to deal with it being out of square.Green timber is a joy to work soft and creamy heres a few photos.
I made a modle of the job
IMG_0938_zpsa343acf5.jpg


IMG_0943_zpsc8248116.jpg


IMG_0945_zpsaf2ac593.jpg


IMG_0939_zps769d1bb8.jpg


IMG_0950_zpsf7574eb6.jpg


Sorry thats it for photos can't seem to find the rest ,hope this helps anyway Cheers Bern.
 
Wow.. that porch is quite something, thanks for posting, real inspiration.

I'm far from an expert, but I would think green oak will distort over time and split as well as shrink, I seem to remember reading that it takes about a year an inch to dry out too, so that could be 6 years. If the tracks are on top of the timber, you may want to stand them off with "double wedges" at frequent intervals and check them every now and again. This would keep the track true. Whichever way it is you might need the fastenings to be adjustable up and down and side to side. Wood shrinks across the grain a lot more than along it, so length wise may be less important.

Yes I'm expecting the oak to move, but I think I can control things.. I'm anticipating 5% radially across grain, 10% round the grain, and about 0.5% along the grain. Both my gate posts are 1/2 sawn, although the core just creaps into one of them, and of course this is the one that's showing the big splits. Otherwise they are very stable, just short minor shrinkage splits. But a few wedges under the tracks are a very good idea.. they have to take a fair bit of weight so I'll need to Excel up again.

The difference between radial and circumference shrinkage is what gives rise to splitting, by avoiding the core you avoid most of the problems, and by going 1/4 sawn with no core you are supposed to get very predictable behaviour, certainly the gate posts are behaving according to theory. For me the biggest problem will be having 1/3 of the frame exposed and 2/3rds under cover, So was planning on fitting galvanised steel 'hats' to the exposed timbers to keep the rain and most of the sun off them, I'd go for a sacraficial wood plank on top if it wasn't for the track. I've also discovered that you can pre-slit oak to the core to relieve the strain and prevent weird and wonderful splitting, then that slit opens steadily and predictably as it dries, so that's another option.

I found a paper on the construction of Swiss wooden bridges, some 500 years old, and it showed that so long as you paid attention to detailing the bridges did not require undue maintenance. Key was keeping the worst of the elements off key members, so that's what I'm planning.

So.. back to the original questions, cutting mortises.. I have a hand held circular saw, would it be better to get one in a saw table or would the hand held do?

thanks for all the help and sorry for rambling

Derek
 
There are many ways to make a tennon, one way would be to use your circular saw against a fence to cut the shoulders then split the bulk away with a chisel. If you are more comfortable with power tools than hand tools then after you split the bulk away with a chisel you can machine the tennon cheeks quite precisely with a router sled, otherwise just use a chisel or plane.

Considering the size and weight of the pieces you're working with I would take the tool to the wood as much as possible.
 
Without wishing to sound a philistine.....

Could you not use a steel frame and overclad with oak? It would probably work out cheaper and you won't have the movement issues to worry about.
 
I would say dont get too hung up on "being an engineer", calcs etc. Timber framing isnt precision cabunet making. Its good to do extensive studies of traditional frames if you havent already. The best ways of doing it were worked out long ago, if it aint broke dont fix it so to speak...The English tying joint is engineering genious, hasnt been bettered for 500 years or so, even though a few modern day sketch it up framers have tried to reinvent the wheel..
As for cutting tennons, I cut the shoulder/s with a big old disston crosscut saw. Then I use a big old disston rip saw to cut the cheeks. Sometimes I use an axe to chop the cheek waste, I rarely perfectionise it by paring with a slick chisel...you can pare good with a sharp axe any way if you really need to!
Dont panic about a "step" on a scarf joint. The oak will shrink at the same rate. This is a timber frame, not chipenndale furniture, imperfection is part of the deal! They used them lots of times in past centuries with no bother.
Why not post a pic of your plan? It would make it a lot easier to comment...


Berncarpenter":1ihzxqbi said:
To make my life easier i had my local joinery pse it all as i didnt now how to deal with it being out of square.
Check out English scribe or French scribe carpentery. (Its where the concept of a joiners "rod" comes from btw). The carpenter draws a full scale drawing of the bent (section of building) on the floor, then lays the timbers directly over it in their structural positions using a string and special plumb. Then salient points are marked, positions for mortises, tennons, braces etc. If 5 bents are needed they use the same drawing 5 times. The tennon shoulders are scribed to match exactly those of the motrises even if it has out of square timber, this allowed them to utilise even hewn timbers or ones that are twisted, crowned etc. Its the Americans who obsess about "square rule" and "mill rule" everything square level plumb....Scribe carpentry doesnt necessarily have to have the regular 90 degree face side/face edge arrangement. "off" timbers can be joined just as neatly and soundly as if PSE was being used.
Did you draw peg those joints or did you pull them up with the straps then drill peg holes through the mortise and tennon in one hit? Nice frame btw!
 
Cottonwood":g0ic2ywq said:
I would say dont get too hung up on "being an engineer", calcs etc. Timber framing isnt precision cabunet making. Its good to do extensive studies of traditional frames if you havent already. The best ways of doing it were worked out long ago, if it aint broke dont fix it so to speak...The English tying joint is engineering genious, hasnt been bettered for 500 years or so, even though a few modern day sketch it up framers have tried to reinvent the wheel..
As for cutting tennons, I cut the shoulder/s with a big old disston crosscut saw. Then I use a big old disston rip saw to cut the cheeks. Sometimes I use an axe to chop the cheek waste, I rarely perfectionise it by paring with a slick chisel...you can pare good with a sharp axe any way if you really need to!
Dont panic about a "step" on a scarf joint. The oak will shrink at the same rate. This is a timber frame, not chipenndale furniture, imperfection is part of the deal! They used them lots of times in past centuries with no bother.
Why not post a pic of your plan? It would make it a lot easier to comment...


Berncarpenter":g0ic2ywq said:
To make my life easier i had my local joinery pse it all as i didnt now how to deal with it being out of square.
Check out English scribe or French scribe carpentery. (Its where the concept of a joiners "rod" comes from btw). The carpenter draws a full scale drawing of the bent (section of building) on the floor, then lays the timbers directly over it in their structural positions using a string and special plumb. Then salient points are marked, positions for mortises, tennons, braces etc. If 5 bents are needed they use the same drawing 5 times. The tennon shoulders are scribed to match exactly those of the motrises even if it has out of square timber, this allowed them to utilise even hewn timbers or ones that are twisted, crowned etc. Its the Americans who obsess about "square rule" and "mill rule" everything square level plumb....Scribe carpentry doesnt necessarily have to have the regular 90 degree face side/face edge arrangement. "off" timbers can be joined just as neatly and soundly as if PSE was being used.
Did you draw peg those joints or did you pull them up with the straps then drill peg holes through the mortise and tennon in one hit? Nice frame btw!
I had never tried to joint unsquare timber and it just seemed far easier and quicker for me to work with it true .The braces were small enough to get in the tenoner and all the mortices were cut on the multico mortice machine .The larger tenon cheeks were band sawn and the shoulders cut with hand held circa saw.If i had left the timber as it was i would have not been able to use my normal methods of joinery and as i was on a price for this job i could not afford to experiment with the hand tools.Tenons were draw bored pulled everything up tight with the straps to mark the positions of the holes in the tenons .Cheers Bern.
 
Thanks for all the feedback.. I've now got my first design modification, anyway.. Now that I'm up to 3 posts.. I can post a sketch.

primary frame_s.jpg


Note, the eaves beams are acting as roof ties, the crown ties stablalise the structure, allowing the use of the space between the eaves beams and the crown beams to be utilised.

The partial gable will continue up to the roof line with a fold down top to allow maximum view of the southernmost part of the sky.

roof structure_s.jpg


RE 8m beams.. I realised that as the roof only needs to move ~2.7m and there are only 3 eaves wheels on each side it means I could do 3 separate rails and hence a 3 section main beam... always good to discuss ideas.. cleans up designs no end.

Derek
 

Attachments

  • roof structure_s.jpg
    roof structure_s.jpg
    141.4 KB · Views: 476
  • primary frame_s.jpg
    primary frame_s.jpg
    132.3 KB · Views: 471
MMUK":2cxuh9yx said:
Without wishing to sound a philistine.....

Could you not use a steel frame and overclad with oak? It would probably work out cheaper and you won't have the movement issues to worry about.

I'll admit part of me just wants to have a go at an oak frame... but also I'm very nervous of steel in this construction as Observatories have a bad habit of getting very damp. When I'm imaging water can be almost running off the scope there's so much dew, in cold conditions I end up looking like the Yeti as ice forms over all my clothing, keeping steel in conditions like that I'd want lots of air round it to get it dry ASAP, cladding could cause water to be trapped. Also steel tends to attract dew at a higher rate compared to wood. I know the forth bridge is steel.. equally I don't want to be doing a forth bridge paint job :D

Steel is great for the scope pier, but then it's fully exposed so can be dried off very easily and is easy to galvanise fully.

Good point though, thanks, keep them coming!
 
Cottonwood":1t8z4x5c said:
I would say dont get too hung up on "being an engineer", calcs etc. Timber framing isnt precision cabunet making. Its good to do extensive studies of traditional frames if you havent already. The best ways of doing it were worked out long ago, if it aint broke dont fix it so to speak...The English tying joint is engineering genious, hasnt been bettered for 500 years or so, even though a few modern day sketch it up framers have tried to reinvent the wheel..
As for cutting tennons, I cut the shoulder/s with a big old disston crosscut saw. Then I use a big old disston rip saw to cut the cheeks. Sometimes I use an axe to chop the cheek waste, I rarely perfectionise it by paring with a slick chisel...you can pare good with a sharp axe any way if you really need to!
Dont panic about a "step" on a scarf joint. The oak will shrink at the same rate. This is a timber frame, not chipenndale furniture, imperfection is part of the deal! They used them lots of times in past centuries with no bother.
Why not post a pic of your plan? It would make it a lot easier to comment...

Having been round the loop with the calculations it's interesting to see how close new joints are to the original designs. Certainly the joint designs aren't something I've overly worried about.

I'm much happier with hand tools than power tools.. but my arms aren't.. so I'm coming down to using the hand held circular saw against a fence for the shoulders and a chisel to finish off, very similar to what you suggest.

The main thing the calculations have given me is confidence to skim the eaves level beams down to 6x4, which is a lot less wood than 6x6 all round.

Derek
 
As I said for the tennons your easiest way is to use the handheld circular saw with the depth of cut set to what needs removing from one face against a rightangle guide to cut the sholder and then freehand a series of parallel cuts. Hit the bits that stick up with a hammer and they will break off. You can then refine the face with chisel and/or plane using the bottom of the saw kerfs as a depth guide. Repeat for each side

tennon.JPG


tennon2.JPG


These were done in that way

pic12.jpg
 

Attachments

  • tennon.JPG
    tennon.JPG
    42.5 KB · Views: 395
  • tennon2.JPG
    tennon2.JPG
    50.5 KB · Views: 394
jasonB":3cml9sdq said:
As I said for the tennons your easiest way is to use the handheld circular saw with the depth of cut set to what needs removing from one face against a rightangle guide to cut the sholder and then freehand a series of parallel cuts. Hit the bits that stick up with a hammer and they will break off. You can then refine the face with chisel and/or plane using the bottom of the saw kerfs as a depth guide. Repeat for

If it's green oak, and it is straight enough, you can skip all the kerf cuts and split down the end grain to the shoulder with a chisel.
 
I would go with the saw kerfs and chisel unless the grain is very straight.
We have just been doing some repointing of the lime mortar around the brickwork infill panels which are now three years old after the major conversion we undertook to our barn. Three years in the air dried Oak we used has settled down and just doing some prep before the weather changes. We are also doing some redecoration internally including cleaning down some of the Oak beams with a wire brush and bleaching out any iron staining with Oxalic acid. Looking good but smelling strong tonight before neutralizing with clean water tomorrow.
 

Latest posts

Back
Top