Noobs needs help with hand planing!!

UKworkshop.co.uk

Help Support UKworkshop.co.uk:

This site may earn a commission from merchant affiliate links, including eBay, Amazon, and others.
LuptonM":2ofqc34x said:
Well I can get good shavings like ... then I know my hand plane is properly tuned and sharpened ready for me to finally start making something.


I don't believe that you need a perfect plane to start making something. That are two parallel operations. Perfect tools don't build furniture on their own. :)

BTW, your endgrain shavings look really good.

Cheers
Pedder
 
LuptonM":bf7f8md5 said:
Well I can get good shavings like this guy on you tube ( http://www.youtube.com/watch?v=EKotbPE22lo ) then I know my hand plane is properly tuned and sharpened ready for me to finally start making something (just a hand plane would save alot of time)

If you look at that Rob Cosman video clip carefully you will notice two things. First, he is using a very sharp blade. Second, he has flattened the sole of the plane. If you look when he rubs some candle wax on the sole, you will see that the sole still has some hollows but is flat in all the important places - the toe, the heel and in front and behind the mouth.

Keep at it and there's no reason why you can't get shavings as good as Rob's.

As BugBear said, that end-grain shaving looks good.

Cheers :wink:

Paul
 
Good stuff - 'honing' normally refers to the process of polishing both of the surfaces that make up the cutting edge, 'grinding' is what you do to move the primary bevel back after you've honed it several times and the secondary bevel is getting too big, and 'sharpening' is the collective for both. Sanding is normally reserved for the use of abrasives on wood. Don't worry, what you are doing is perfectly correct, just a nomenclature thing.

Sounds as though your plane is now doing the biz but we haven't really considered technique yet.

Starting from a sawn board without any warp, twist cupping etc it usually takes me about three or four sets of passes with a fairly heavy set, maybe three or four thou (0.075 - 0.1mm) before I even start looking at shaving width. I am then only looking for the shavings to give me an analysis of what is going on on the surface. At all stages you need to begin the cut with your weight pressing on the front of the plane and finish the pass with your weight over the back bearing down on the handle.

Retract the blade slightly for a finer setting, perhaps 1-1/2 thou, remembering to advance it into the cutting position to eliminate any backlash in the threads and the yoke which could otherwise cause your blade to move after you have set it. Now you can start looking at the width of your shavings or at least symmetrical changes in width as evidence that all is well.

Once the board looks reasonably flat I'll start taking shavings within the length the board (starting after the beginning and lifting off before the end) until the blade won't cut anymore. The board is now hollow by the depth of cut over the length of the plane. A smoother will still get a shaving after a fore plane has stopped cutting but you will get a deeper hollow; hence the reason for different sized planes - long for flattening, short for smoothing the flattened surface.

Finally I'll take a couple of passes over the full length of the board to bring us back towards flat but remaining just on the hollow side of it.

This face of the board now becomes the referance surface (marked with a P), so the sides are shot with it facing down on the shooting board or planed and checked against it for square. the line between the referance surface and the first side to be planed becomes the referance edge, (marked with a V), all other measurements, gauge lines etc are taken relative to these surfaces.

If you can manage that you've cracked it and can foursquare a board by hand to an accuracy of less than 2 thou - and if we ever have the pleasure of meeting in person I'll shout you a pint to celebrate.
 
LuptonM":38utc4h5 said:
Well I can get good shavings like this guy on you tube ( http://www.youtube.com/watch?v=EKotbPE22lo ) then I know my hand plane is properly tuned and sharpened ready for me to finally start making something (just a hand plane would save alot of time)

Shavings just tell you the condition in which your plane is in and no I don't have a shaving fetish
Thinking about R Cosman's video, it occurred to me that I had never planed a bit of birch before (he is using birch), but I've got some birch logs in the firewood pile so I had a go. It's very wet, spalted a bit and short lengths between knots.
It's really easy to plane. Full width shavings a doddle. Not quite as perfect as his, but a worse piece of wood to start with. With an ordinary Record no 4. Even better with a 5 1/2. Full width of the wood that is - just as he is doing (his plane is wider than the wood - another little trick!) but not quite as perfect as the A2 blade (I have to admit).

You certainly don't need an expensive blade to plane birch, or a plane makeover, flat bottom etc.

So if you want to get good shavings like this guy start with a solid bench and vice, a nice clean dry straight piece of birch, and any old plane, well sharpened and with a quick candle scribble on the bottom.

These geezers are selling stuff remember! These flash demo's are all part of the act.

PS I agree with Matthew's stuff above, except I mark an "f" on the face side, with the tail reaching the face edge, where it encounters the point of an upside-down V on the best edge. This way they are linked, the round part of the f is away from the best edge, the v points towards the best face. Then when rebates, mouldings etc are taken off you can still see enough of either or both marks to identify which way round things are.

PPS
Is it the plane or the blade? I tried the reverse operation - an ordinary stanley blade in a QS no 4. It wasn't as good as the QS blade.
 
Yes, Rob Cosman has always been careful about what stock he chooses to show his various techniques on, but you do seem to need to apply increasing amounts of salt to his demos these days. :?
 
Sorry that was oversimplified. Here's
an article from Jeff Gorman's site showing face and edge marks:

The only thing I could think to add is that the referance face is usually on the inside of the piece as this is most likely to be the surface involved in joinery - also it means that the pretty side never needs to be placed face down on the bench.

Jacob, the QS blades are T10 which is closer to W2 or Japanese white paper steel than than the gauge plate or tungsten vanadium steels that the old blades were often made from. It's more difficult to work with but gets a couple of points harder before it becomes brittle. QS quench them in distilled water (their factory in a hard water area and you need soft water to achieve the best quench). They may be inexpensive but they are not made on the cheap. Glad you were able to appreciate the difference in performance.
 
realise now the main reason I can't get full width shavings is that the bar of the jig on my wetstone grinder is a touch too small (and probably not rigid enough) such that it adds a big enough chamfer in the grinding process to effect the width of the shaving. Not only that it is pretty slow (about an hour to grind a chisel in bad shape)
I guess any chamfer produced in the honing process will be minimal due to the amount of material removed.

To fix this I was thinking of maybe getting the veritas tool rest and jig some when in the future to use with the dry wheel- told my dad about it as he will be way too lazy to use the wetstone but when I told him the price he told me to go away nicely (it is nearly the price of the grinder). Any thoughts on this?

matthewwh":2lsizzx0 said:
If you can manage that you've cracked it and can foursquare a board by hand to an accuracy of less than 2 thou - and if we ever have the pleasure of meeting in person I'll shout you a pint to celebrate.

sounds like a challenge. Better make a shooting board first then

Alf":2lsizzx0 said:
Yes, Rob Cosman has always been careful about what stock he chooses to show his various techniques on, but you do seem to need to apply increasing amounts of salt to his demos these days. :?
I like the way he sneaks a sales pitch in each of his videos; anyone can easily afford his £192 dovetail saw - bargain

Mr G Rimsdale":2lsizzx0 said:
So if you want to get good shavings like this guy start with a solid bench and vice, a nice clean dry straight piece of birch, and any old plane, well sharpened and with a quick candle scribble on the bottom.
I realise I got the whole candle thing wrong. I covered the whole sole in candle wax and it just made things harder. I'll try a scribble next time (just realised since I watched Robs video again). I guess it wouldn't please you that I planed the end grain while clamping it in a drill press vice that sat freely on a red devil bench!! I realise the importance of a good bench but there would be no room to put it if I could afford one (also don't have the skills to make one yet). My dad's shed is pretty small so its more like a tool storage area- I just move whatever I want on to a portable bench if I want to use it. I swear he's endorsed by nu tool and red devil- he hasn't worked out buying cheap isn't always cost effective, though the red devil router is pretty light and nimble
Is it really worth getting a better blade for the stanley in future- what one would u choose (hock ect)?
Kinda like me oldish stanley, seems better made then some others; brass adjuster wheel, 1 piece thingy that sits in the chipbreaker that adjusts the depth of the blade- making the front handle soon (anyone like london plane wood?)
 
matthewwh":2cndxhaa said:
Sorry that was oversimplified. Here's
an article from Jeff Gorman's site showing face and edge marks:

The only thing I could think to add is that the referance face is usually on the inside of the piece as this is most likely to be the surface involved in joinery - also it means that the pretty side never needs to be placed face down on the bench.
That's exactly what I was trying to describe; f and inverted v. Best face/edge pointed in the appropriate direction - out for a box, in for a frame, posh or external side for a door etc.
Interesting about the blades. What I haven't yet tried is a "posh" blade in a normal plane. It's on my list. Those thin jap ones can't remember the name. Can't spend too much time effin abt with planes though!
 
LuptonM":2n4w8u0x said:
...
To fix this I was thinking of maybe getting the veritas tool rest and jig some when in the future to use with the dry wheel- told my dad about it as he will be way too lazy to use the wetstone but when I told him the price he told me to go away nicely (it is nearly the price of the grinder). Any thoughts on this?
Don't waste your money. Spend ten minutes on practicing freehand sharpening - a much better investment.
 
Quick Update

Since I thought that my blade was not straight enough I decided to grind the blade flatter using my honing guide and sand paper. I have also devised a good way to test how flat the end of your blade is:

-Hold the blade edge on some float glass above, looking towards a bright source of light from about 2 feet away (ie. a light bulb). The extent of light you can see through your blade tells you how flat your blade is.

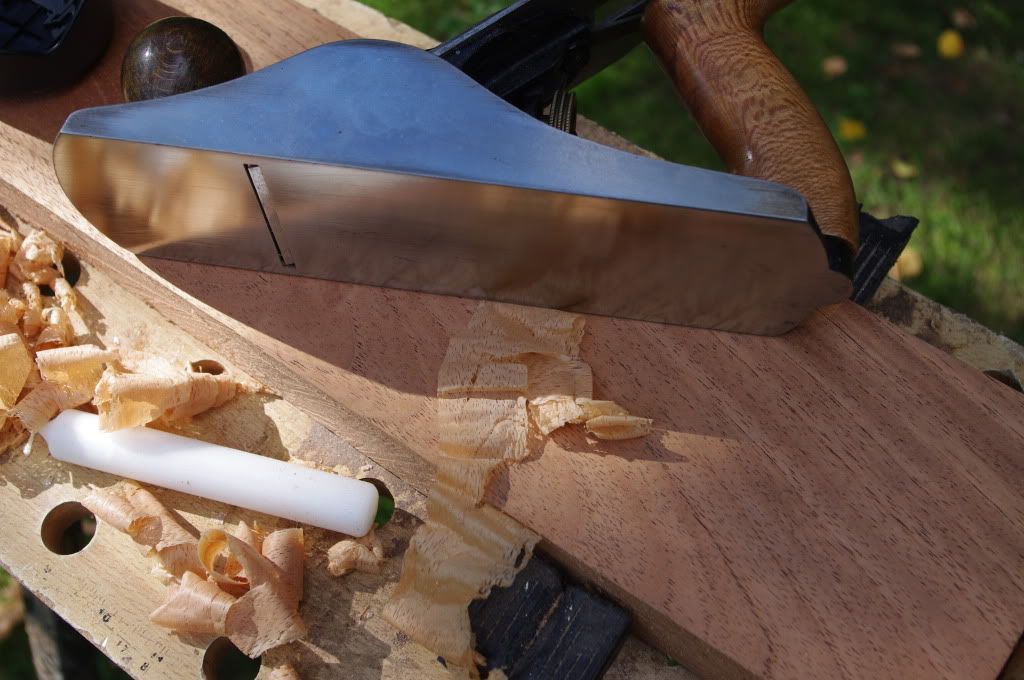
My blade is not flat but is much improved. I've noticed also that my secondary bevel looks alot neater than before. After honing I went outside to test the ease of planing. You'll note I found some bench 'dogs' to hold the wood on the amazingly sturdy red devil bench

IMGP1647.jpg


Mini Conclusion
-Remember I said earlier that the blade used to get jammed at the start of planing a board.Well it happens no matter what condition your blade/plane is in; I figured it out.
When my blade was not as straight, in order to get a ok width shaving I had to increase the depth to such a depth planing becomes hard and hence the jam at the start (tis a wee bit harder to plane all the way along as well).
SO why is my blade not straight after grinding. Its simple the jig on my wetstone grinder sucks as it went in straight (I used a bench circular sander and a square(to check for blade squareness) to pre straigthen it since I strongly suspected the grinding jig) and it came out camfered

-Wax helps a little (only if u use it sparingly), noticably but still a little

PS: I've tried to grind free hand (on another blade) and the results are not too great to behonest. Could be ok for chisels but for plane irons, the blade is much wider than the tiny tool rest making it difficult. I can undertand free hand sharpening but free hand grinding yikes

I'll think I stick to honing guides and anything that makes my life easier
I guess Mr Rimsdale would be biased towards anything freehand due to the site in his link easier but for wierd chisels like skews I might try and learn free hand sharpening.
LOL oilstones.......I thought free hand sharpening was supposed to quicken things up - joke :D

Anyone notice when u try and type stuff and submit it, the site muddles up all your words? I've had to edit this 100x, sorry for any grammar mistakes
 
Back
Top