my dovetail problem

UKworkshop.co.uk

Help Support UKworkshop.co.uk:

This site may earn a commission from merchant affiliate links, including eBay, Amazon, and others.
DW

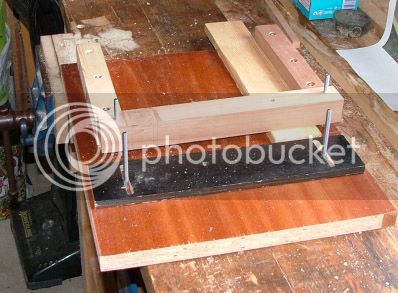
Yes, the brown inlay is indeed a fence - against which you place the side of the timber.

I do have a modification for this jig. When you build the fence, don't attach it to the base (as in the picture), but rather attach it to the cross fence. That way you automatically line up the cross fence perpendicular to the sides.

The front section is a depth gauge. This allows you to turn the timber over, after chiseling half way through it, and locating the same line on the other side.

Make the cross fence deep enough to act as a guide when you pare/chop the end of the dovetail.

Regards from Perth

Derek
 
Philly

Very nice pics. 8)

I've always wanted to know how one gets pictures of oneself working. You have an Assistant? :p Must be aristocracy :D

Regards from Perth

Derek
 
A tip for flattening the (slightly) raised pins at the end of work. Until a little while ago I was using a LA block plane. The problem here was that sometimes I would cause tearout in surrounding timber. More recently I have been using a 2" wide chisel with the bevel ground at 20 degrees. This works very well.

Regards from Perth

Derek
 
DW - I would second everyone's comments about cutting dovetails (or any close fitting joint) in pine - much harder than doing it with hardwoods - in my experience. I also find (and this could just be me) - that if I ever do anything that isn't the real thing (ie a pratice run) I never do it half as well as I'll do it for the real thing! You take an awful lot more care when it counts. Just make sure you keep you machine dust and have some glue handy for mixing in and filling in any gaps!

Derek - great jig!

Philly - proper job - and you look the part too!

Cheers

Gidon
 
Thanks-i try and keep myself looking good :roll: :roll:
Yup-timer and tripod is my assistant-rubbish when you need another pair of hands though! :lol:
I find practise 1 a day for a week and you will be flying!
Cheers
Philly :D
 
HOWZATT

I have got one over the Aussies at last :D

Now when's the next test match series :lol: :lol: :lol:


Woody

I have given it a bit more thought and now see your jig differently. You will too if you turn it around 90 degrees!!

Instead of using it in the horizontal, clamp it in your vise and use it in the vertical. See your picture below, which I have rotated 90 degrees, and imagine that it is clamped in the vise.

Used this way it is perfect as a fence for the top end of the pins. You will still need to use my jig to line up the bottom end of the pins.

I think that I will make one for myself!! Well done.

Regards from Perth

Derek
 
Spent a couple of pleasant hours yester afternoon knocking up the Aussie dovetail jig, made up the side guide rail as per amended suggestion (tenoned onto crossrail) but was unhappy with the bulkiness of the jig so went back to Derek Cohen original design plus a second screwed on guide rail (which can be repositioned if 90 degree accuracy should disappear).
Picture attached and as you can see is awaiting some wing nuts (will use ordinary nuts in the meantime)
So today I will put the jig to a running test.

newdovetailjigperth.jpg
 
Received my dovetail saw and Kerchel bevel chisel metric size set within the 24 hour delivery.

chiselssaw.jpg


Now these chisels look like chrome, so I telephoned axminster technical dept. and said do I have to flatten the back side of blade ( I was scared to rub the chrome off) The advice given was only to hone an edge to the chisel and remove burr. However when I run my fingernail along the rear of blades I can detect very slight projections on the finish.

Is this normal?

seeking your comments before I start to sharpen and commit a purchase.
 
DW
I believe the chisels are just very highly polished, not chromed. So flatten away (although you will lose that high polish.....)
The little Jap dovetail saw is a gem, I use mine for loads of things-its just such a handy saw!
Good luck,
Philly :D
 
Devon,

It's not chrome - just polished steel. You should definitely flatten the backs - if you do a good job you will still have a mirror finish. Also, if this results in a sharp arris between back and bevel, ease this slightly unless you want to cut yourself.
 
DW, Do you mind me asking how much that little lot was?
 
Hi Woody

I really don't know why manufacturers polish chisels until they look like chrome when all we are going to do is then grind it away. Yes I know, they look better - and sell better - when they are polished. But what we really want is Flat, and this ideally means the Entire back of the blade, not just the immediate area around the blade. You cannot backbevel a chisel blade as you can a plane blade. So get to it - make sure the entire back is flat. Fortunately you only have to do this once. This is what you pay for when you buy good (=expensive) blades: Time not to spend on flattening their backs.

If you really want a chrome-look, then continue polishing the metal to 600 and even 1200 wet-and-dry.

Regards from Perth

Derek
 
DW
Best of luck with the chisels. I use my Jap ones all the time. Just remember when you are flattening, that you are not trying to remove the hollows! :)

BTW, I've been trying the Scary Sharp routine lately, up to 2000 grit. Well pleased.

Cheers
Steve
 
However when I run my fingernail along the rear of blades I can detect very slight projections on the finish.

Is this normal?

dw,

This is normal. Even for high quality tools, you can expect to have to sharpen and hone them to a final edge. You don't have to flatten the entire back of the chisels - it's a pretty pointless waste of energy IMO since the top end of the chisel has little bearing on the work in hand.

Just focus on the sharp end and back maybe 3/4". The important bit is to remove any "roundedoffness" caused by the polishing. It's probably not more than couple thou but can look worse cos of the reflection. It'll be easy to see when you've got the back flat right to the cutting edge, as the stone (I finish with a 6000 grit) will leave a dull grey finish in contrast to the shiny polishing. :wink:

cheers

Ike (waiting to be attacked by slavering woodhounds)
 
Ike wrote:
You don't have to flatten the entire back of the chisels - ........ Just focus on the sharp end and back maybe 3/4".

It really depends on what you are going to do with the chisel. Remember that the chisel back acts at a guide to the bevel, and this will determine how accurately you can pare. If the fence (e.g. on the dovetail jig) you guide the chisel along, plus the depth you plan to pare to, is deeper in total than 3/4", then the non-flat area on the chisel will cause it to deviate off-course. Can you say for certain that you will not use more than 3/4" of the chisel back ever again? Better do it all now, then it is no longer an issue.

Regards from Perth

Derek
 
Oh dear, looks like its going to be another week before I can get stuck into my cabinet, 5 chisels, one day each, Yandles next week, more money needed.

To Wizer £68 incl tax. chisels and saw. Almost one weeks OAP gone.
 
Hi DW

Nice purchase :shock:

Looking forward to that first DT :wink:

I too have a set of those chisesl and flattened the backs quite quickly. I would say that you should be thinking of flattening the entire back except the last inch or so before the handle. I use my chisels a lot and one often rests the back of the blade against a guide block or the workpiece to help with a cut.

The flattening won't take you long if you start on course grit and work through to fine - maybe 20-30 minutes per chisel :p

have fun
 

Latest posts

Back
Top