Mitre issue-ette

UKworkshop.co.uk

Help Support UKworkshop.co.uk:

This site may earn a commission from merchant affiliate links, including eBay, Amazon, and others.

Farm Labourer

Established Member
Joined
20 Aug 2019
Messages
245
Reaction score
369
Location
Norfolk
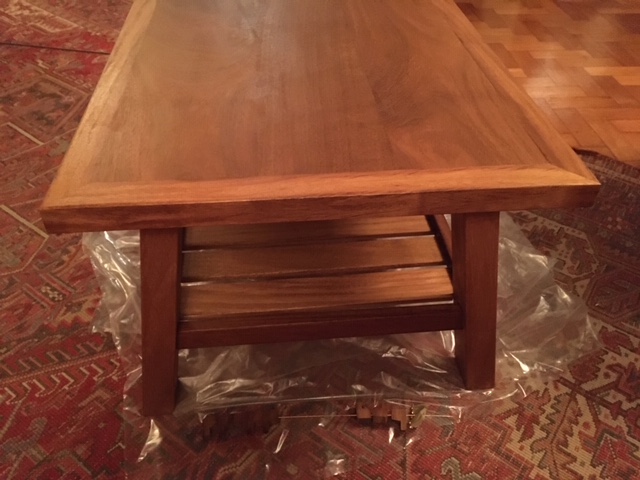
A couple of weeks ago, I finished an iroko coffee table for my "God-son". I brought the various elements into the house from my unheated workshop when gluing to ensure adhesion. The parts then went back out to w/shop for finishing and then came indoors for Osmo.

It's been in the house now for a couple of weeks and I've noticed that some of the mitres are moving - probably about a quarter of a millimetre but it's obvious.

I'm thinking of taking the top back out to the workshop and routing some dovetail grooves across the mitres and fitting dovetail pins of iroko.

Is this a sensible approach or are there better options?
 

Attachments

  • IMG_1003 (002).jpg
    IMG_1003 (002).jpg
    1 MB · Views: 334
Apologies - much better at cutting myself with a chisel than I am with cutting-edge technology :D
 

Attachments

  • IMG_1022.JPG
    IMG_1022.JPG
    104.1 KB · Views: 315
Ah, right. They're a bit of a nightmare in that situation. If there is any movement in the table top it will either bust a corner apart, or curve the edge piece leaving a gap adjacent to the corners. I've avoided that detail for years now after a bad experience.
 
I'm a furniture maker, I often try and bump up the revenue on a commission by including a mirror in a matching timber.

Mirror.jpg


I cut lots of mitres, but it's mirrors that count for the majority.

You don't need to go from an unheated workshop to a domestic location to cause problems. Mitres are notorious for opening up and just normal seasonal humidity changes can be enough for a tiny gap to open, which will then fill with dust and over the years look increasingly unsightly.

The solution is to mechanically support the mitre across as much of the joint as possible. There are lots of ways of achieving this, a half lap mitre, splines either blind or through, or the rugby ball shape of a biscuit are all common solutions. A lot depends on the application, the budget, and what equipment you have available. But for your table I would have suggested either hidden plywood splines, or if I needed a quicker solution then a through spline that would have been visible from the edge, you could even make this into a feature by using a contrasting timber.

You may hear suggestions that modern glues are capable of dealing with the problem. Not in my experience they're not. Even with the kind of sophisticated cramping solutions that you're unlikely to have access to, the glue joint on a mitre is basically end grain, and it's very unlikely to protect against the constant seasonal working of the timber across a mitre joint. That's why I say the real solution is to beef up the glue's strength with mechanical assistance across as much of the joint as possible.

Good luck!
 

Attachments

  • Mirror.jpg
    Mirror.jpg
    44.3 KB · Views: 383
Thanks Mike. It did cross my mind that I might spline them on the inside (or even biscuit them as they must be about 60mm deep on the 45degree line). I actually found it a bit of a pipper to clamp up dry and it was even harder when glued - so was temporarily pleased that I'd not introduced further buggeration.

Any helpful repair suggestions?
 
I think part of your problem is that the table is still new and may not have settled down from its recent changes of temperature and humidity. So it could make sense to wait and not do anything permanent yet.

So if the gap bothers you, I'd suggest some wax repair sticks. Heat a tiny screwdriver in a lighter flame and use it to heat the end of the stick so a drip goes into the hole. Smooth it down with the same tool and polish off when it's all cool.

This has the advantage that if there is more movement - and if the crack closes again - the wax will give, and the wood won't split.

Use wax a shade darker than the wood.
 
Custard - our posts crossed! Yes, I do have some offcuts but this is a five-year overdue wedding present - so no way I can capitalise!

Andy - good idea but I'd like to hand over something quasi-stable at the end of this month, the big reveal, I think they call it across the pond!

So.... are my routed dovetail "tails" a sensible and appropriate solution?
 
Before you do anything, stick a clamp across the joint and see if it will pull up. If it won't, the question of how to hold the mitre together is moot. If it will, well, it's simpler to just glue in a flat spline rather than a dovetail.
 
ST - the top is three wide-ish boards of iroko, from memory - 9" centre and two at 7" and out of the thicknesser at about an inch. However, these have been on the shelf for at least a year, so I'm hoping movement will be minimal in iroko.
 
Farm Labourer":lzxzx21g said:
ST - the top is three wide-ish boards of iroko, from memory - 9" centre and two at 7" and out of the thicknesser at about an inch. However, these have been on the shelf for at least a year, so I'm hoping movement will be minimal in iroko.
You've got nearly 600mm of solid timber to make the top; with the best will in the world, I suspect that it will move. If it expands just a smidge, it'll burst the mitres; if it contracts it'll pull away from the edge lipping(s) so whatever you do, you could be in for problems in the long run.
Many years ago I built a solid oak coffee table about 800mm dia from several boards that had been in a warmish school workshop for many years so I thought that all the movement in the boards was done n'dusted. Once the table encountered a change of environment, the total shrinkage across the grain was about 5mm - Rob
 
woodbloke66":15h3icrt said:
You've got nearly 600mm of solid timber to make the top; with the best will in the world, I suspect that it will move. If it expands just a smidge, it'll burst the mitres; if it contracts it'll pull away from the edge lipping(s) so whatever you do, you could be in for problems in the long run.

+1

I'd assumed the centre section was veneered, if it's solid then chasing a mitred lipping is really just a fool's errand. No matter what you do some movement is inevitable with the changing seasons (even though here in the UK with our maritime climate there's far less actual movement than you'd experience in the continental climate that prevails across much of the USA or Canada), but even that relatively small amount of movement means a gap free mitre is unachievable.

You could make the centre section "float" within a mitred frame, but then you're looking at a pretty substantial gap between the frame and the centre panel, so whatever you do a tight, gap free solution isn't really viable.
 
A close friend now sadly deceased had made a dining table with a similar design top except it was all oak. The "frame" part was roughly 100mm wide and the table over time moved constantly, not too much but it drove him nuts.
Eventually he took his router with a V bit and routed a shallow groove between the join of frame and centre section as well as across the mitre on each corner. It looked OK to me when I saw it and though the table still moved he said it was barely noticeable.
 
Iroko is one of the world's least volatile movers as far as expansion and contraction in response to changes in moisture content, i.e., ~3.8% tangentially and ~2.8% radially throughout the 'Shrinkage Zone', that being from 30% - 0% MC of the wood. So that's a decent start.

However, even if your iroko top swings 2 percentage points either side of a fair median of ~10% MC over the typical annual seasonal response to changes in relative humidity found in habitable buildings, i.e., ~8% MC (winter) and ~ 12% MC (summer) in the UK you're likely to see shrinkage of up to 1.5 mm and expansion of a similar 1 to 1.5 mm, i.e., a total change in width of up to 3 mm, but more likely about 2.25 - 2.5 mm.

Given that, I wouldn't have framed your top as you've done because the mitres are highly likely to fail, or the two end cross pieces (mitred end clamps) might cause the top to split, all depending upon how well and solidly they're attached to the end of the panel. My suggestion is to remove that mitred framing if you can assuming that leaves enough length and width in the remaining top. If not, you'll just have to live with what you've got, and take on board the lesson about wood movement for the future.

I'd like to point you towards what I think might be a half decent source of information about woody topics ... but for the life of me I can't recall where I saw such a source, ha, ha. Slainte.
 
Sgian Dubh":3jq3q90z said:
I'd like to point you towards what I think might be a half decent source of information about woody topics ... but for the life of me I can't recall where I saw such a source, ha, ha. Slainte.

I can't remember that source either but for all your woody information I'd thoroughly recommend 'Cut & Dried' by some bloke called Jones :lol: :lol: - Rob
 
You are right in saying that Iroko won't move as much as most other timbers, but it does still move enough to make the mitred edges an impossible task. No measurable movement occurs along the grain, but across the grain it cannot be restrained by any method. As the moisture content increases so does the width of the top. The mitres will gape as it expands or split off the side pieces as it contracts.
Those who use bread board ends learn to live with the fact that the ends are usually a different size to the width of the top. My suggestion is to rejoin the the top after ripping the boards used down to about 75mm wide, these are then arranged so that they alternate heart side up then down right across the width, that will prevent any distortion pulling the top out of shape and the ends won't need to be held straight.
The oily nature of the timber means that the only really suitable glue is two pack epoxy, other glues are prone to early failure. Please ignor the myths about degreasing the glue faces with solvents, it's nonsense.
I am hoping that you have fastened the top to the frame with buttons or expansion brackets to allow movement of the top to occur. If it's just fastened directly to the frame movement of the top could destroy that nice looking frame.
 
Mike - if you look really closely at the second pic, you'll see the buttons on the plastic in front of the legs!

Really appreciate everyone's input. I was trying to avoid any end grain showing - what other methods would acheive this aim?
 
Farm Labourer":1ddk9jti said:
Really appreciate everyone's input. I was trying to avoid any end grain showing - what other methods would acheive this aim?
The only other way to avoid seeing the end grain is to use so called 'bread board' ends. Personally, I would just opt for seeing the end grain and have done with it as there's nothing intrinsically wrong with that approach - Rob
 

Latest posts

Back
Top