


Wood Monkey
Established Member
Finding the time to do as much woodworking as I would like is difficult and even when I do it’s virtually impossible to find the time to submit a decent post. I enjoy reading about other people exploits and in particular the workshop build threads have been immensely helpful to me over the last 2 years (yes I did say 2 years) whilst I built, fitted out and equipped my own workshop.
The Christmas holidays gave me a rare opportunity to tackle a ‘start must finish’ job. The reason I describe it this way is that it necessitated a complete workshop dismantle…. Yup, it was time to upgrade the workshop floor. Then it dawned on me that I may as well put a post together to show the whole build and not just the floor upgrade and include lots of pictures (at least those that survived a PC failure). So here it is.
Early 2006… The theory was pretty simple, remove the existing 6x10 shed, remove a few small trees and dig out an area to fill with hardcore over which I could pour a concrete slab large enough to accommodate the desired size building.

As soon as the spade hit the ground, I found an existing slab and other assorted hardcore.….!
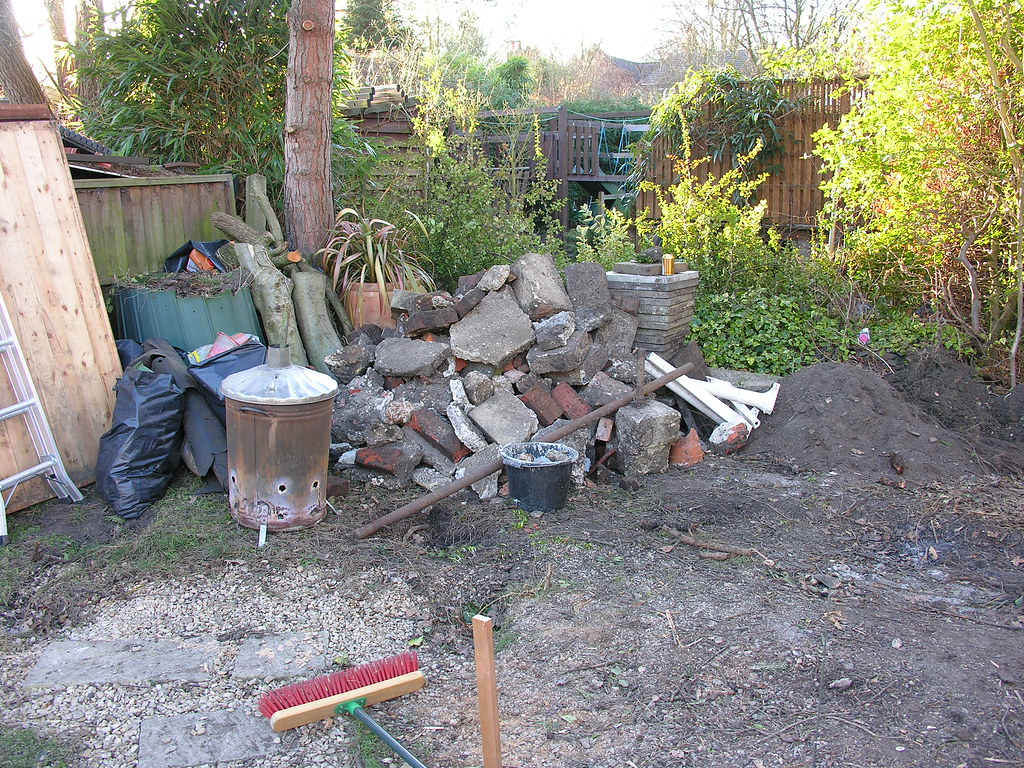
After the initial clearing it was apparent that I had a little more space than first though. So I did the decent thing and increased the size of the workshop from the planned 16x12 to 18x14. I now wish I’d gone a little larger but at the time we were worried it may look out of place, but it doesn’t.
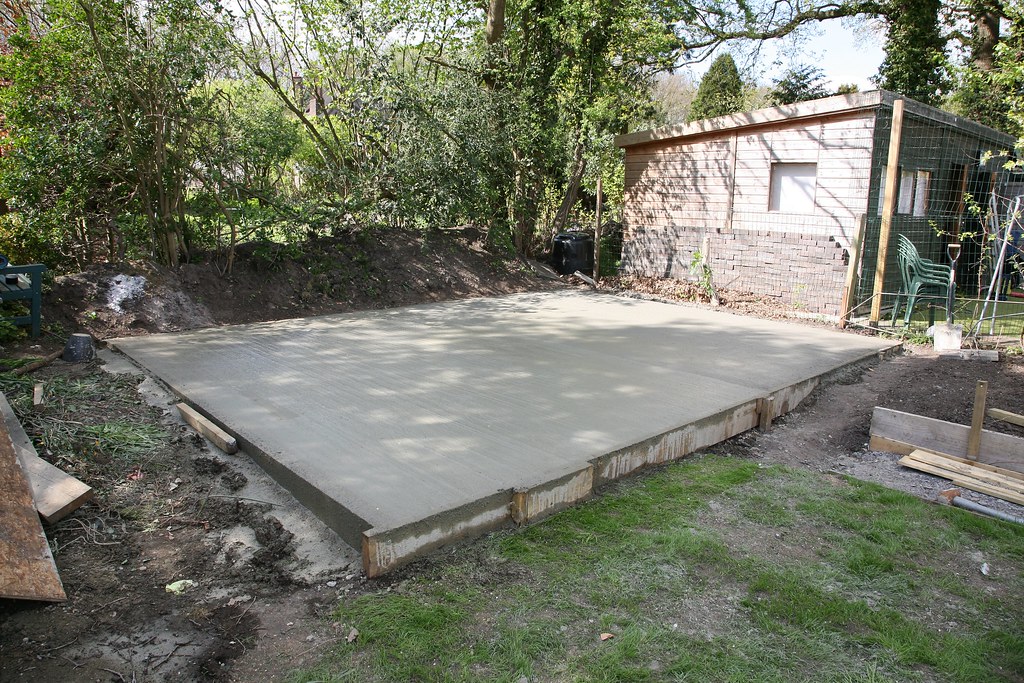
I lost lots of photos at this stage, so no pictures of the hardcore and shuttering so instead you’ll have to take my word for it. The site looks flat, but there is a gentle slope and this necessitated some levelling which meant 18 inches of digging at the back of the site reducing to 6 at the front. Into this hole went the hardcore that was dug out plus 6 bulk bags of type 1 (600kg each I think). After compacting all the hardcore a DPM went down then 5 cubic meters of concrete with steel reinforcing mesh for good measure. Everything was moved using wheelbarrows and the total run from driveway to site is about 150 feet.
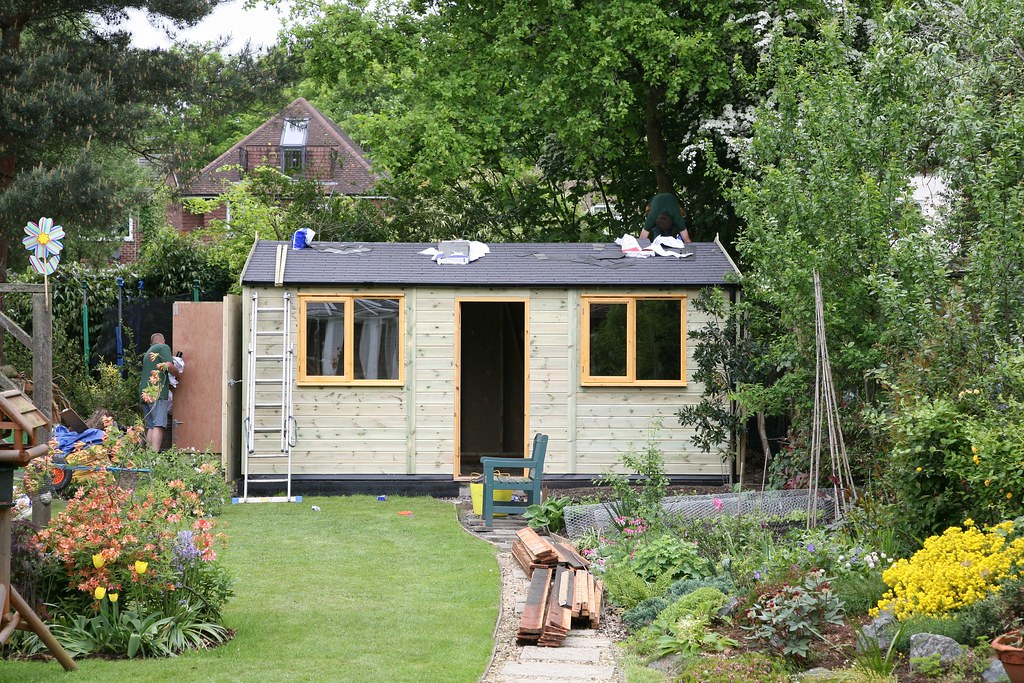
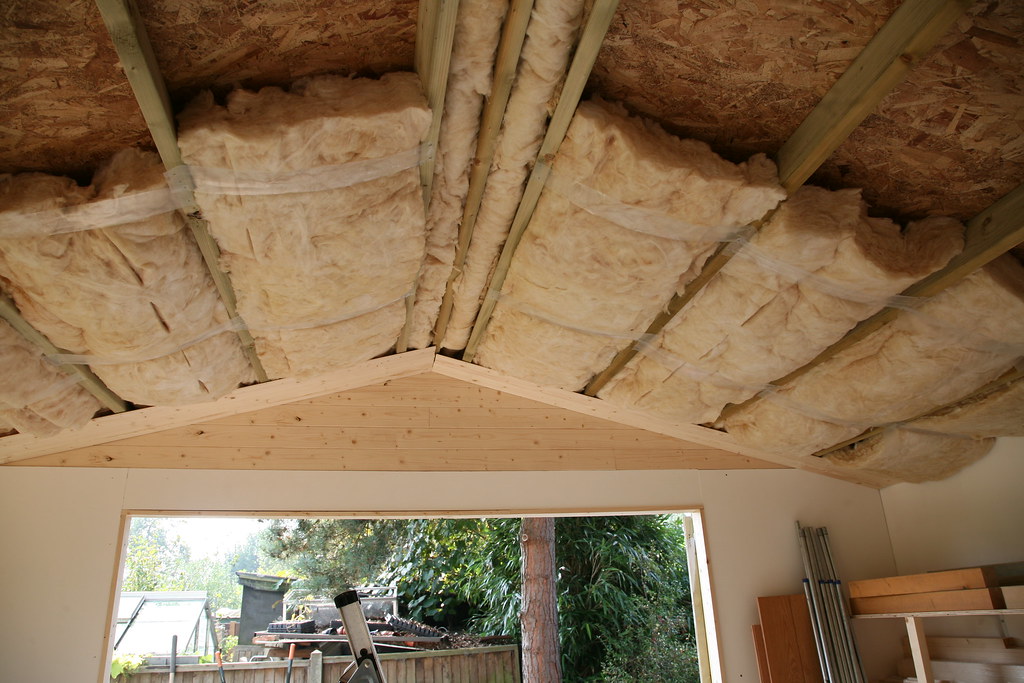
I considered building my own building from scratch but dismissed it due to the time it would have taken. Eventually I selected a company who specialize in stables but have diversified in to other garden buildings and timber garages. They offer a lot of flexibility for building size and options, the spec was good and the cost was reasonable. I selected one of their standard garage buildings, coz I wanted 7ft double doors on one end, and upgraded the doors, windows and roof. Final building is 18x14ft and 7ft to the eves. Construction is ¾ pressure treated shiplap on a 4x2 pressure treated frame and includes a vapour barrier. Roof is ¾ OSB on 5x2 bearers and then felt shingles. The entire building stands on a single course of semi engineering bricks and is then bolted down (my first ever attempt at bricklaying).
The price included erection.

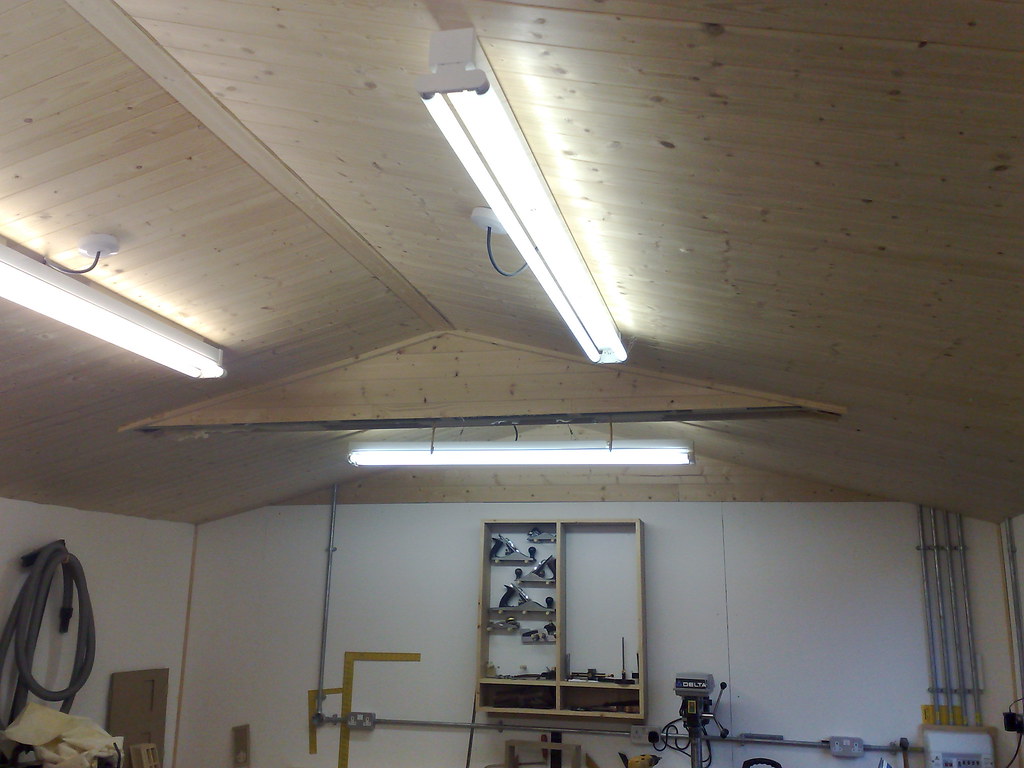
I decided to clad the interior with 12mm ply as it would be substantial enough to apply fixings directly for small wall mounted items with fixing directly into the frame for heavier items. The cavity was filled with 100mm insulation. I painted the whole interior white and I can’t stress enough what a massive difference this made – so much brighter.
You can just see in the picture a full length bench at one end with storage space under.
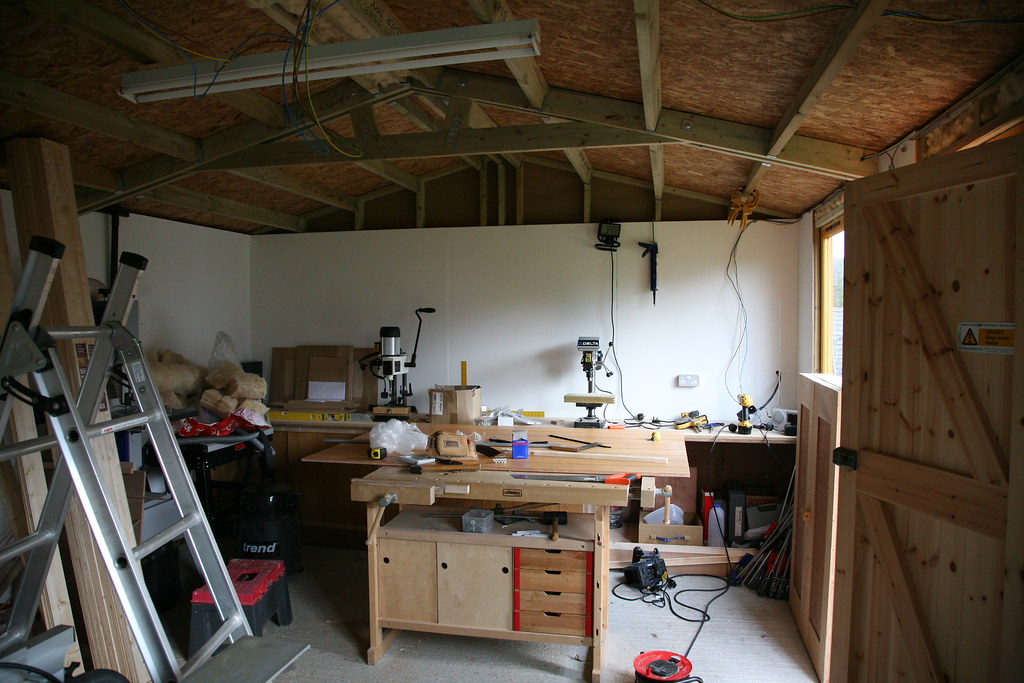
A local DIY shed was doing a 2 for 1 deal on T&G pine cladding, so I elected to use this instead of sheet material on the ceiling.
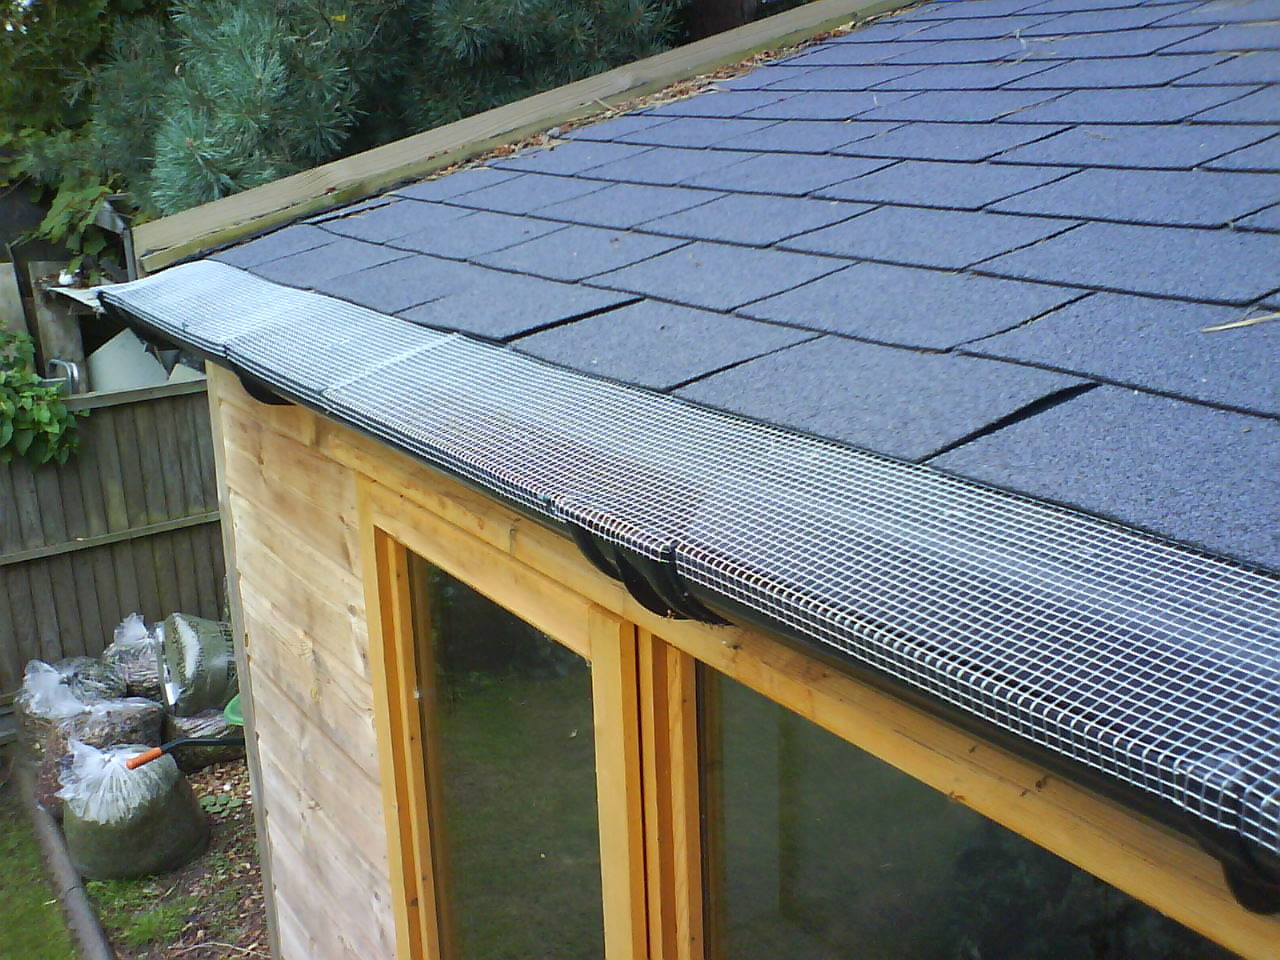
The workshop has trees on 3 sides including some large Oak trees and this soon became a problem, especially in the autumn when I had to clear the gutters weekly. The solution was 5mm steel galvanised mesh pushed under the last row of shingles and secured with wire clips through small holes drilled in the gutter lip. It’s been very effective and this autumn I didn’t need to clear them once.
The outside was painted with Sadolin Extra after a year or so. I guess this wasn’t completely necessary as the cladding is pressure treated, but it stops water take up by the cladding and looks much better as the cladding was fading unevenly.
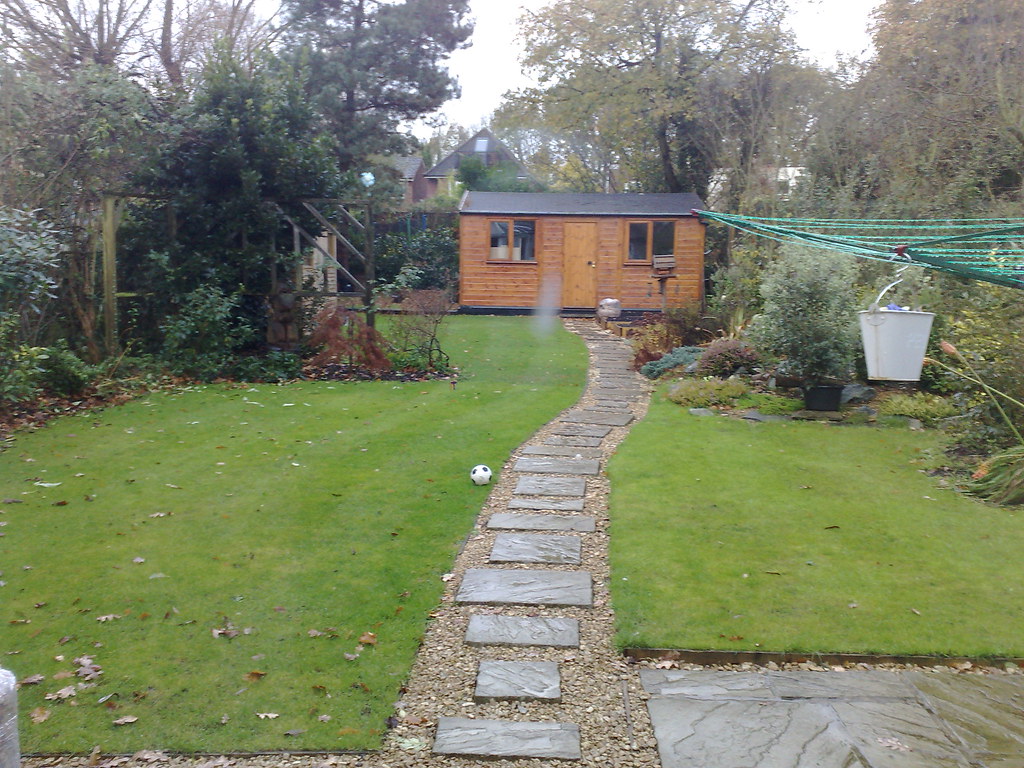
The pathway also required re-routing so that it met the door and some new grass needed to be laid as the old pathway veered off left.
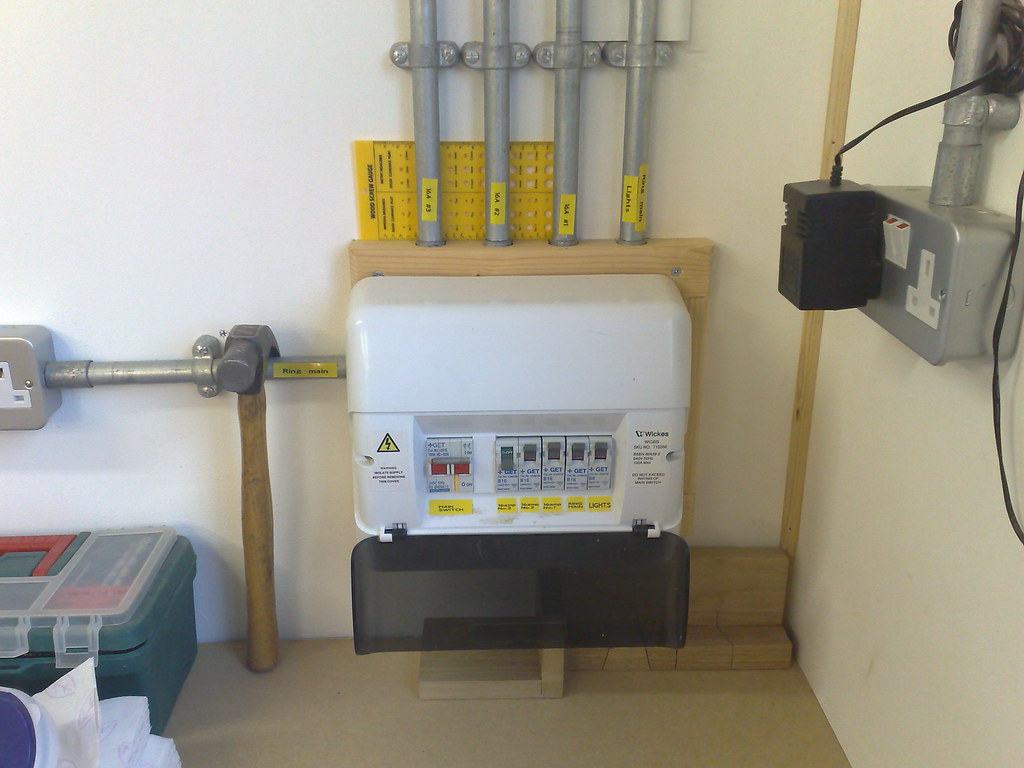
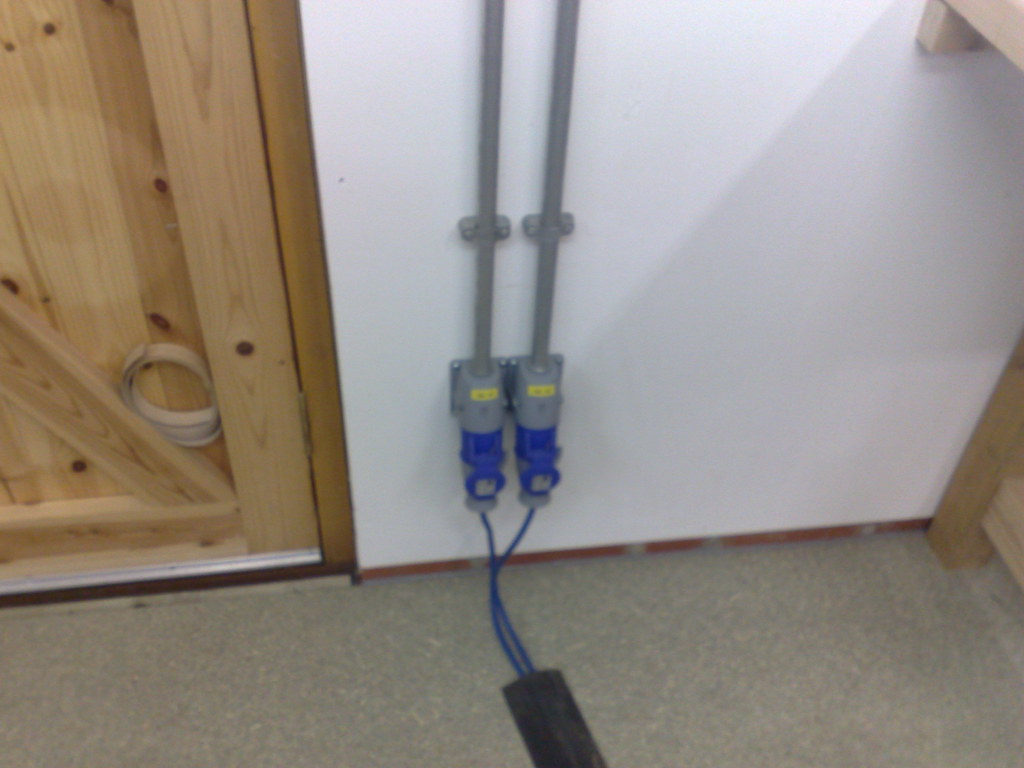
Possibly the most difficult job was the electrics, partly due to part P and the unhelpfulness of my local building control office and partly because I kept putting it off. Initially I was going put the cable behind the internal cladding and flush mount the sockets. However a job lot of steel galvanised conduit, fittings, steel clad sockets and four 5ft twin strip lights came my waycompletely free. I also managed to obtain 50m of 10mm SWA from the same source.
The electrics comprise of a 10mm SWA (RCD protected) back to house consumer unit. There is a consumer unit in the workshop which serves a socket ring (6 double sockets), a lighting circuit with 4 twin 5ft strip lights and 3 16amp sockets individually protected.
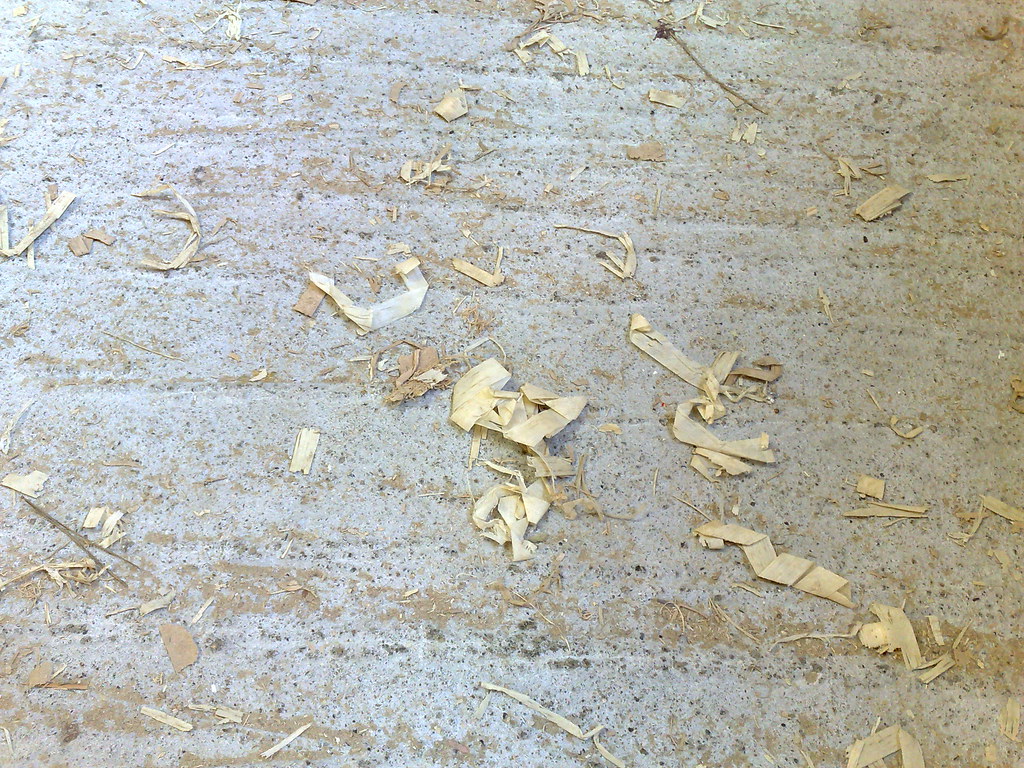
There are still lots of small jobs that keep getting put off, but the last sizable job, the floor upgrade, was completed during this Christmas holiday. I decided to do this for three reasons; the concrete wasn’t the best finish and made clearing up dust and shavings really difficult, it helps to insulate the workshop and lastly some good advice read on this very forum – a wooden floor is so much kinder to a dropped plane than concrete…!
Before - Bare concrete can cling onto dust and shavings like its life depends on it.
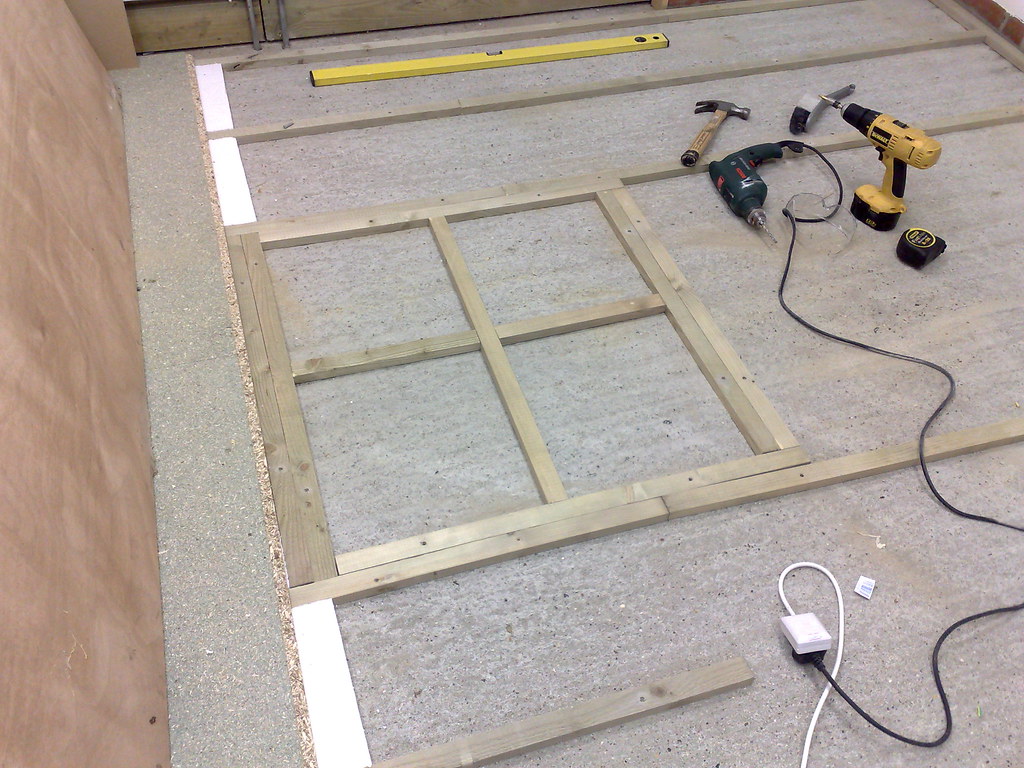
25mm pressure treated battens screwed to the concrete making sure not to go deep enough to pierce the DPM and in-filled with polystyrene sheet. I would have liked 50mm, but couldn’t afford to lose the height and it would have failed the bottom of the door. The battens are at 300mm centres which is probably overkill, but it was easier to over do it now than to try and rectify a bouncy floor later.
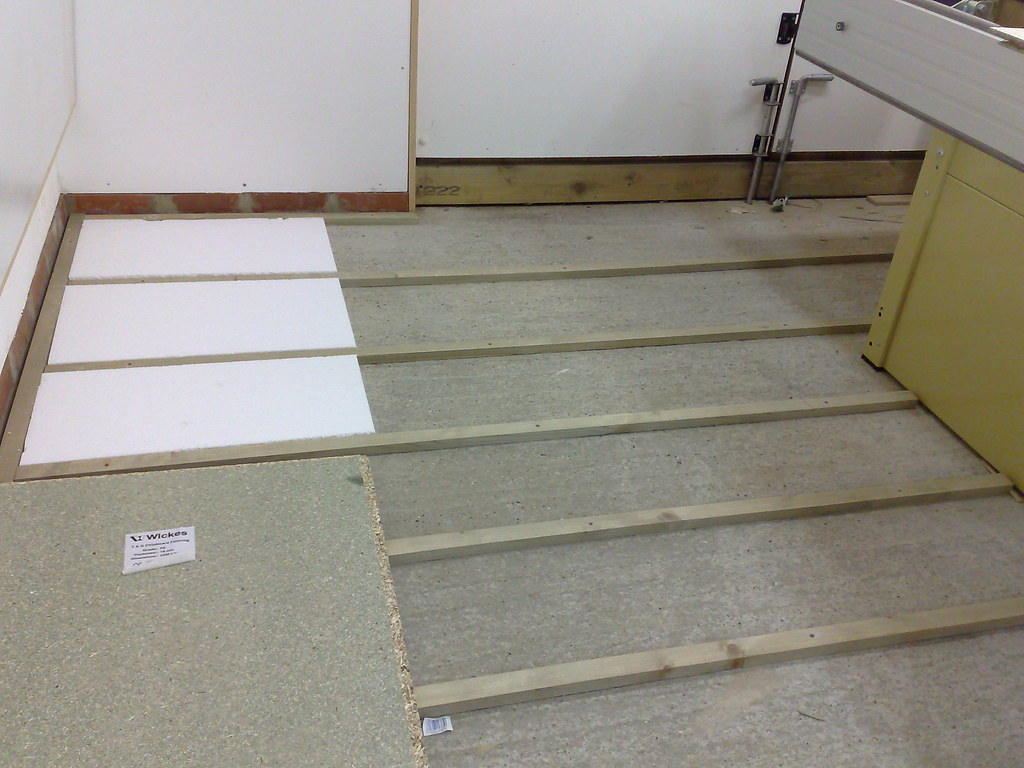
Additional battens were placed where the table saw stands. Bandsaw, bench and (yet to be purchased) drill press get the same treatment.
Job finished and I cannot believe the difference. It’s warm to touch, cleans easily, looks good and there is no bounce. I used P5 moisture resistant flooring that comes in 8x2 T&G sheets and was reasonably priced at the local shed.

Now I’ve got the hang of posting, I’ll share some pictures of future projects. If I ever get round to making anything…
Jon
The Christmas holidays gave me a rare opportunity to tackle a ‘start must finish’ job. The reason I describe it this way is that it necessitated a complete workshop dismantle…. Yup, it was time to upgrade the workshop floor. Then it dawned on me that I may as well put a post together to show the whole build and not just the floor upgrade and include lots of pictures (at least those that survived a PC failure). So here it is.
Early 2006… The theory was pretty simple, remove the existing 6x10 shed, remove a few small trees and dig out an area to fill with hardcore over which I could pour a concrete slab large enough to accommodate the desired size building.
As soon as the spade hit the ground, I found an existing slab and other assorted hardcore.….!
After the initial clearing it was apparent that I had a little more space than first though. So I did the decent thing and increased the size of the workshop from the planned 16x12 to 18x14. I now wish I’d gone a little larger but at the time we were worried it may look out of place, but it doesn’t.
I lost lots of photos at this stage, so no pictures of the hardcore and shuttering so instead you’ll have to take my word for it. The site looks flat, but there is a gentle slope and this necessitated some levelling which meant 18 inches of digging at the back of the site reducing to 6 at the front. Into this hole went the hardcore that was dug out plus 6 bulk bags of type 1 (600kg each I think). After compacting all the hardcore a DPM went down then 5 cubic meters of concrete with steel reinforcing mesh for good measure. Everything was moved using wheelbarrows and the total run from driveway to site is about 150 feet.
I considered building my own building from scratch but dismissed it due to the time it would have taken. Eventually I selected a company who specialize in stables but have diversified in to other garden buildings and timber garages. They offer a lot of flexibility for building size and options, the spec was good and the cost was reasonable. I selected one of their standard garage buildings, coz I wanted 7ft double doors on one end, and upgraded the doors, windows and roof. Final building is 18x14ft and 7ft to the eves. Construction is ¾ pressure treated shiplap on a 4x2 pressure treated frame and includes a vapour barrier. Roof is ¾ OSB on 5x2 bearers and then felt shingles. The entire building stands on a single course of semi engineering bricks and is then bolted down (my first ever attempt at bricklaying).
The price included erection.
I decided to clad the interior with 12mm ply as it would be substantial enough to apply fixings directly for small wall mounted items with fixing directly into the frame for heavier items. The cavity was filled with 100mm insulation. I painted the whole interior white and I can’t stress enough what a massive difference this made – so much brighter.
You can just see in the picture a full length bench at one end with storage space under.
A local DIY shed was doing a 2 for 1 deal on T&G pine cladding, so I elected to use this instead of sheet material on the ceiling.
The workshop has trees on 3 sides including some large Oak trees and this soon became a problem, especially in the autumn when I had to clear the gutters weekly. The solution was 5mm steel galvanised mesh pushed under the last row of shingles and secured with wire clips through small holes drilled in the gutter lip. It’s been very effective and this autumn I didn’t need to clear them once.
The outside was painted with Sadolin Extra after a year or so. I guess this wasn’t completely necessary as the cladding is pressure treated, but it stops water take up by the cladding and looks much better as the cladding was fading unevenly.
The pathway also required re-routing so that it met the door and some new grass needed to be laid as the old pathway veered off left.
Possibly the most difficult job was the electrics, partly due to part P and the unhelpfulness of my local building control office and partly because I kept putting it off. Initially I was going put the cable behind the internal cladding and flush mount the sockets. However a job lot of steel galvanised conduit, fittings, steel clad sockets and four 5ft twin strip lights came my waycompletely free. I also managed to obtain 50m of 10mm SWA from the same source.
The electrics comprise of a 10mm SWA (RCD protected) back to house consumer unit. There is a consumer unit in the workshop which serves a socket ring (6 double sockets), a lighting circuit with 4 twin 5ft strip lights and 3 16amp sockets individually protected.
There are still lots of small jobs that keep getting put off, but the last sizable job, the floor upgrade, was completed during this Christmas holiday. I decided to do this for three reasons; the concrete wasn’t the best finish and made clearing up dust and shavings really difficult, it helps to insulate the workshop and lastly some good advice read on this very forum – a wooden floor is so much kinder to a dropped plane than concrete…!
Before - Bare concrete can cling onto dust and shavings like its life depends on it.
25mm pressure treated battens screwed to the concrete making sure not to go deep enough to pierce the DPM and in-filled with polystyrene sheet. I would have liked 50mm, but couldn’t afford to lose the height and it would have failed the bottom of the door. The battens are at 300mm centres which is probably overkill, but it was easier to over do it now than to try and rectify a bouncy floor later.
Additional battens were placed where the table saw stands. Bandsaw, bench and (yet to be purchased) drill press get the same treatment.
Job finished and I cannot believe the difference. It’s warm to touch, cleans easily, looks good and there is no bounce. I used P5 moisture resistant flooring that comes in 8x2 T&G sheets and was reasonably priced at the local shed.
Now I’ve got the hang of posting, I’ll share some pictures of future projects. If I ever get round to making anything…
Jon