


After being a long time lurker, I feel its about time I posted a finished project and I hope its of interest...
I have done a few little bits around the house etc... but not anything like this.
My Fiancée is just completing her third year of a degree in exhibition and museum design & for there dissertation they have to design an exhibition in a subject they are interested in and also design an exhibition/show of there own work for that project.
For this end of year show she decided that she would like a display here written dissertation on a lectern, preferably of Japanese design as the subject was Geisha, and I was the numpty that thought this sounded interesting, forgetting that it was me who would end up making it!!! #-o
She decided on the idea of a backlit Shoji middle was the way forward. I modelled and rendered with sketch-up

Having researched Shoji construction and now only having 5 days (in between work) to make them item, proper Shoji paper construction was out of the question. So after a phone call to the local plastic stockiest, opal perspex was the suggested way forward.
After a few long evenings I finally finished it ready to pack in in the car for the journey to Lincoln to deliver it and help erect the rest of her work for the show
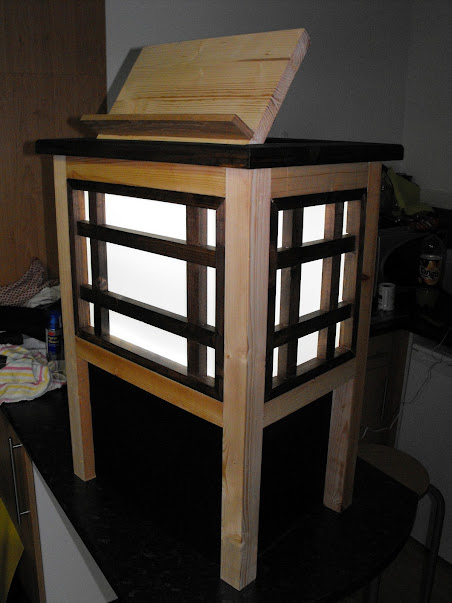

The frame is constructed as 50mm x 50mm pine, dowel jointed together. The top was pine stained dark 20mm thick mitred and then biscuit jointed together. The centre of the top was natural pine, hinged with a hidden dowel in the bottom corner, with a piece of 10mm thick oak dowel jointed to the top (dry/no glue to allow removal).
The Shoji bars around the edge of the perspex panels where mitred, with the centre bars lap jointed together and secured to the edge with a panel pin then centre joints are just held in with friction. All stained dark to match the top, the perspex was fitted to the inside of the cabinet, with panel pins to hold it in. Plywood trim to the top and bottom side to stop the light escaping or people putting things inside of it. All given a coat of bees wax and a good buffing!
Back lighting it now became a problem as I had a placed a torch inside the box for 20 mins to check that it all looked ok, and touch the staining up where needed. But it was getting so so hot inside, after a lot of thinking on the car journey up from Suffolk, I decided to try LED lights on side so there are four white LED strip lights fitted to the top and bottom of the unit to create the backlit effect.
And the last minute request, was a piece of black oil cloth stapled to the bottom section to hide the electrics sockets and a CD player.

All finished and installed along with the other bits of wood work (the 'Can you justs.....')
I now have the bug, oops....
I have done a few little bits around the house etc... but not anything like this.
My Fiancée is just completing her third year of a degree in exhibition and museum design & for there dissertation they have to design an exhibition in a subject they are interested in and also design an exhibition/show of there own work for that project.
For this end of year show she decided that she would like a display here written dissertation on a lectern, preferably of Japanese design as the subject was Geisha, and I was the numpty that thought this sounded interesting, forgetting that it was me who would end up making it!!! #-o
She decided on the idea of a backlit Shoji middle was the way forward. I modelled and rendered with sketch-up
Having researched Shoji construction and now only having 5 days (in between work) to make them item, proper Shoji paper construction was out of the question. So after a phone call to the local plastic stockiest, opal perspex was the suggested way forward.
After a few long evenings I finally finished it ready to pack in in the car for the journey to Lincoln to deliver it and help erect the rest of her work for the show
The frame is constructed as 50mm x 50mm pine, dowel jointed together. The top was pine stained dark 20mm thick mitred and then biscuit jointed together. The centre of the top was natural pine, hinged with a hidden dowel in the bottom corner, with a piece of 10mm thick oak dowel jointed to the top (dry/no glue to allow removal).
The Shoji bars around the edge of the perspex panels where mitred, with the centre bars lap jointed together and secured to the edge with a panel pin then centre joints are just held in with friction. All stained dark to match the top, the perspex was fitted to the inside of the cabinet, with panel pins to hold it in. Plywood trim to the top and bottom side to stop the light escaping or people putting things inside of it. All given a coat of bees wax and a good buffing!
Back lighting it now became a problem as I had a placed a torch inside the box for 20 mins to check that it all looked ok, and touch the staining up where needed. But it was getting so so hot inside, after a lot of thinking on the car journey up from Suffolk, I decided to try LED lights on side so there are four white LED strip lights fitted to the top and bottom of the unit to create the backlit effect.
And the last minute request, was a piece of black oil cloth stapled to the bottom section to hide the electrics sockets and a CD player.
All finished and installed along with the other bits of wood work (the 'Can you justs.....')
I now have the bug, oops....