January Challenge - POST YOUR ENTRIES HERE

UKworkshop.co.uk

Help Support UKworkshop.co.uk:

This site may earn a commission from merchant affiliate links, including eBay, Amazon, and others.
Status
Not open for further replies.

henton49er

Established Member
Joined
16 Sep 2010
Messages
1,241
Reaction score
1
Location
Beautiful, but wet, Mid-Wales
PLEASE POST YOUR ENTRIES FOR THE JANUARY CHALLENGE HERE

The Challenge is:-

A Pierced Turning

This month’s rules are:-

The Challenge is open to anyone and everyone
Your entry must be new and made specifically for the Challenge
Entries must be turned on a lathe using wood turning tools.
There are no minimum or maximum size restrictions.

Decoration, colouring, texturing is allowed, but remember this is first and foremost a woodturning Challenge.

Your entry must be pierced in some way (either before or after turning), either as artistic decoration or as part of the function of the piece.

Please post 4 images of your work along with a brief note about how you made it, particularly the piercing aspect, what tools and finish you used, what wood (if known) and the objects dimensions etc.

1 showing a general view
1 showing a top down/ internal view
1 showing a side view
1 showing a bottom view
Make sure that at least two of your photos show the piercing(s) clearly

Image size - please use image size 640 x 480 0.3 mp, as in previous challenges

Please upload your pictures and description between 10pm on the 27th January and 10pm on the 29th January.

Please also send me a PM giving me your own opinions of 1st, 2nd and 3rd places amongst the entries (other than your own :roll: ) between 10pm on 29th January and 10pm on 31st January (for me to compile the entrants’ scoring :lol: ).

Roundup
 
An earring tree/ stand.
Made from a small branch of Yew, finished to 600 and a coat of Chestnut MC wax.
Branch put between centres, turned to a cylinder with spigot at the base, mounted in chuck and worked from the top down. Knob turned and top of top shelf created, then freehand drilling of holes to random depth. Then underside of shelf and then the rest. The lower shelf is dished to hold backs etc.
Tools used: spindle gouge apart from top of bottom shelf with half round scraper. 240, 320, 400 red and yellow pads. Chestnut sanding sealer and microcrystalline wax.
Parted off and base left 'natural' so one can see the wood finished and unfinished.

earring tree1.jpg


earring tree 2.jpg


earring tree 3.jpg


earring tree 4.jpg
 

Attachments

  • earring tree1.jpg
    earring tree1.jpg
    207.7 KB
  • earring tree 2.jpg
    earring tree 2.jpg
    201.9 KB
  • earring tree 3.jpg
    earring tree 3.jpg
    197.2 KB
  • earring tree 4.jpg
    earring tree 4.jpg
    206.5 KB
A Tealight holder.

Approximately 4'' x 4'' made from a tough old piece of Oak lintel.
Lintel cut to a rough blank using a chainsaw, hot glued (and screwed) to faceplate.
Turned to a cylinder, removed from faceplate, mounted under pillar drill then used a 32mm Forstner to hollow to required depth.
Remounted on faceplate, then had to re-turn to a cylinder as I couldn't get it to run true again for some reason!
Mounted outboard and finished hollowing using a 1 1/4'' square nose scraper.
Finished to 400 and then just a tad of MC wax.
Removed from Lathe then held with a clamp and vice to make it easier for freehand piercing using a dremmel pendulum attachment and a 2mm rasp bit.
 

Attachments

  • tealight01.jpg
    tealight01.jpg
    123.2 KB
  • tealight04.jpg
    tealight04.jpg
    102.2 KB
  • tealight06.jpg
    tealight06.jpg
    122 KB
  • tealight07.jpg
    tealight07.jpg
    86.3 KB
Ok so this is not what I was supposed to enter! !!
It was untill this afternoon a tea light holder with triangular piercings around the sides with around 1/2" above the piercings slightly curving in......

But due to my butter fingers
... its ended up looking like this.... don't laugh! Can now say a points a point...... just re read the marking regime! !
It does however do what I wanted and put triangles on the wall When lit... would have been better with lots of triangles but hey ho!

Wood is elm. Turned using a bowl gouge and spindle gauge on a faceplate. Reversed onto my k10 and hollowed.
Piercings done with a dremel..... and bodge shaping a bansaw and dremel!
Size is approx 4" tall by 4" round.

Finished in sealer friction polish and wax
 

Attachments

  • 20140127_115818.jpg
    20140127_115818.jpg
    137.8 KB
  • 20140127_115933.jpg
    20140127_115933.jpg
    154.2 KB
  • 20140127_120023.jpg
    20140127_120023.jpg
    173.3 KB
  • 20140127_120037.jpg
    20140127_120037.jpg
    165.6 KB
Hope I got the photo sizes right

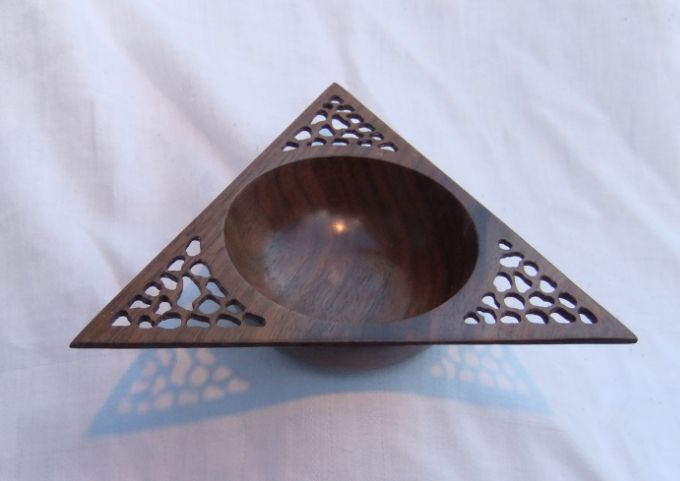
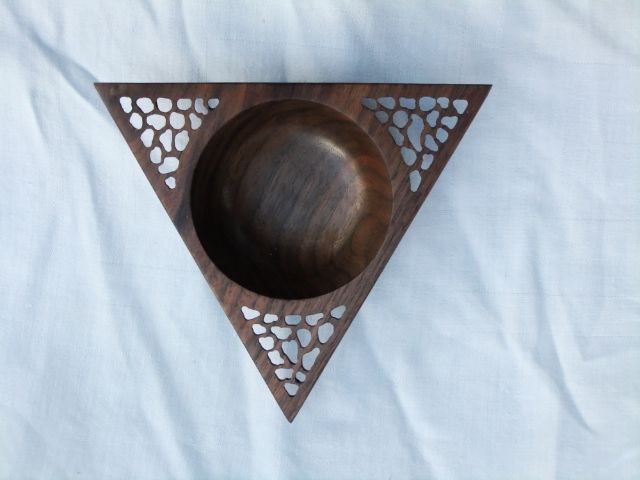
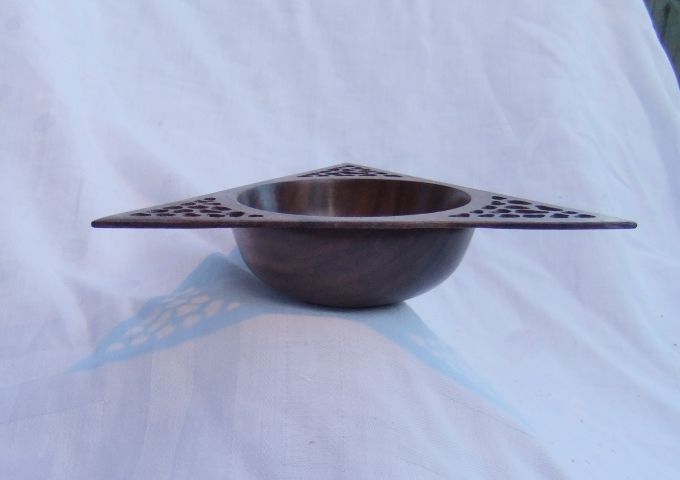
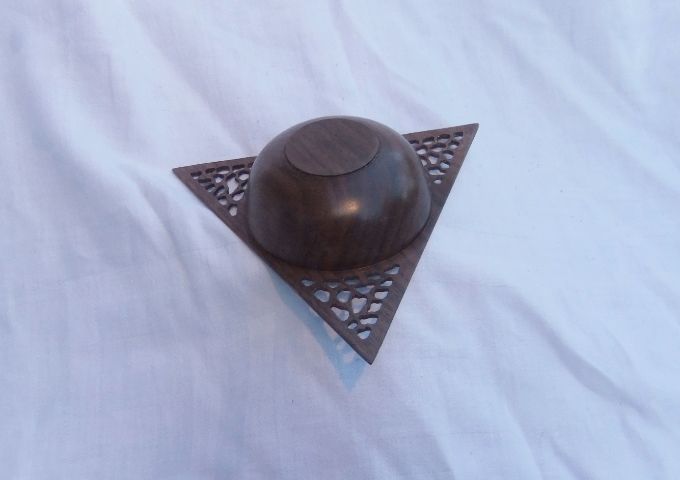
This bowl is made from American Black Walnut. I cut out a equilateral triangle and carfully centred it on a screw chuck shaped the outside and the underside of the wings. reverse chucked in a scroll chuck skimed the wings and turned the bowl inner, reverse chucked again this time in the cole jaws to finish the foot.
The whole thing was sanded on the lathe to 400grit, removed from the lathe and marked out for piercing. I used a dremel with a fine diamond burr to do the piercing followed by more sanding to 400 grit to remove any stray wood fibres.
Finish is Danish oil.
Measurements are 6" along each edge stands 1 3/8" tall the wings are 1/8" thick

de93cb7c-7efa-42b2-8936-89a693835e2c_zps3f4ecb13.jpg


5090fda2-339a-49cb-9fd6-58bca7d1c4e4_zpsfdef3578.jpg


052612e7-c64a-4ba7-b062-3c04a834d781_zpsbc1692e8.jpg


76848de8-0978-4861-a9e9-b66f9c990bd9_zps78277224.jpg
 
My first entry into this contest so here goes:

Earing stand made from one piece of Yew with a Rosewood finial. 71/2" tall and 31/4" wide at the top. Turned between centres with spindle gouges, spigot mounted in a chuck and then 3/8" bowl gouge used for sweeping curves. Sharp detail done with a skew and a bit of smaller spindle gouges. Sanded to 600G then cellulose sanding sealer followed by Chestnut woodwax 22. The holes were done on a drill press after turning by making equidistant indentations using dividers after measuring the circumference and dividing that by 18 (for 9 pairs of earings.) The rosewood finial was turned from a small block, 10mm spigot created and receiving hole bored out in the top of the disc of the yew....glued home. Spigot on base removed with a gents saw then sanded flush by hand through the grits. Hope I haven't missed anything.
 

Attachments

  • Bottom view.jpg
    Bottom view.jpg
    92.2 KB
  • Top down view.jpg
    Top down view.jpg
    57.1 KB
  • General view.jpg
    General view.jpg
    59.6 KB
  • Side view.jpg
    Side view.jpg
    56.8 KB
Bowl in, you guessed it, manitoba maple. This small blank had a nice bark inclusion in it so i thought i would have a bowl naturally and artificially pierced. Screw chuck to put a stub on the bottom and rough out and finish the exterior, then into the stronghold to finish inside and use the wonderful indexing capacity on the Titan to drill all the holes. Sprayed with many light coats of laquer and then remounted on the stronghold from the inside to finish off the bottom. I used a 1/2 and 1/4 bowl gouge mainly, with a little bit of shear scraping on some of the funny grain inside. It measure 5" by 2 3/4",and is finished with laquer. Thanks to all involved.
 

Attachments

  • P1020172.JPG
    P1020172.JPG
    175.7 KB
  • P1020171.JPG
    P1020171.JPG
    178.2 KB
  • P1020173.JPG
    P1020173.JPG
    154 KB
  • P1020170.JPG
    P1020170.JPG
    167 KB
Not sure if this strictly adheres to the category of Pierced but it is a solid object with holes pierced into it with a forstner bit after turning so worth a try. My first entry so please be gentle. I have called it Home Sweet Home

The apple is a punky old piece of sycamore I had lying around and the caterpillar is some small sections of sapelle I rescued from an old divan bed.
The apple was turned between centres and I have deliberately left the top with a small stub and rough end grain around it to represent the apple stalk. The caterpillar is made in several sections then glued into place.
All the turning was done with a 1/2" spindle gouge and it was sanded to 400 grit. I then stained it to look like a ripe apple using Keda wood dyes. Finally it was hand polished using MC wax as I unfortunately removed any means of holding it on the lathe before staining it. Lesson learnt. The apple is about 2" diameter by 3" tall
applefront.jpg

appleside.jpg

Appletop.jpg

applebot.jpg
 

Attachments

  • applefront.jpg
    applefront.jpg
    98.5 KB
  • appleside.jpg
    appleside.jpg
    103.9 KB
  • Appletop.jpg
    Appletop.jpg
    119.7 KB
  • applebot.jpg
    applebot.jpg
    108.3 KB
My first challenge effort of the year is a pierced turning for pierced ears, an ear ring tree in Walnut, 70mm diameter by 100 mm high

A 150mm long by 75mm square of Walnut, spindle turned to a cylinder and a chucking tenon made to one end. Remounted in the chuck with tailstock support the top was shaped, undercut and stem formed down to the splayed foot. A quarter of the depth of parting cut was made to define the piece. Tailstock removed and short finial formed at the top. A rim detail was added and 18 x 2mm holes were drilled around the circumference at 20 degree spacing. I had filed a small v grove 3mm in from the end of a tool rest to align the drill bit and used the lathe indexing. All sealed and sanded to 600 and polished with Renaissance wax, parted off and buffed on a wheel. The base was finished by making a simple friction mount shaped to seat the pointed top, with a layer of non slip mat holding and protecting the top whilst it was lightly held in place with finger pressure and finished.

1.jpg


2.jpg


3.jpg


4.jpg
 

Attachments

  • 1.jpg
    1.jpg
    66 KB
  • 2.jpg
    2.jpg
    72.5 KB
  • 3.jpg
    3.jpg
    56.1 KB
  • 4.jpg
    4.jpg
    83.9 KB
A tea light holder

Made from a small spalted beech blank that has been sat on the shelf for the last year. Finished with a light going over with friction polish. Approximately 85mm tall and 58mm in diameter

Blank put between centres to form a spigot, then turned round and mounted in my chuck. Turned into a cylinder and sanded down to 400 grit and finish applied. 14mm diameter hole drilled down 80mm in the centre of the blank, initial hollowing done using my new Hope carbide hollowing tool. Inside then finished with a square scraper, sanded down and finish applied.

I then parted the 'cylinder' from the blank and turned the base with its rebate from the blank, sanded, finished and parted from the blank. Finished the bottom of the base using a jam chuck made in the remains of the blank still in the chuck.

I then created a mould for the pewter ring using a dry piece of pine mounted in my chuck. Poured in molten pewter and once cool turned the ring down to the right size before glueing onto the base.

For the piercings I wrapped a piece of masking tape around the cylinder cutting it so that it went around exactly once, removed it and marked out the stars evenly before re-applying. I then drilled 8mm holes as the centre of the stars marked on the tape and a mixture of random 1mm and 2mm holes. As I don't have a large selection of tools I made the pointy bits of the stars using a scalpel (carefully) luckily the cylinder was thin enough that this was a fairly simple process.

Lastly I cut 2 bits of 3mm glass at 50mm diameter and fired them in my other half's glass fusing kiln. Placing this on the base (on three little rubber feet) protects the base from the heat of the candle.

I am pleased with how it tuned out and it throws 'stars' on the wall when lit as planned, and, it is always nice when a plan comes together.

Thanks for looking

Andy
 

Attachments

  • general.jpg
    general.jpg
    166.7 KB
  • bottom.jpg
    bottom.jpg
    188.5 KB
  • top.jpg
    top.jpg
    172.7 KB
  • side.jpg
    side.jpg
    194.8 KB
This is my Bowl,it is 4.5 inches x 7 inches and 3 inches deep. I turned it to a rough shape, I then drilled the holes on the lathe using my electric drill on the lathe. It was then turned to the finished shape using a spindle gouge and scraper, then sanded to 800 grit finished with sanding sealer also done on the lathe.
 

Attachments

  • 000_0012.JPG
    000_0012.JPG
    22.8 KB
  • 000_0013.JPG
    000_0013.JPG
    21.9 KB
  • 000_0014.JPG
    000_0014.JPG
    22.3 KB
  • 000_0015.JPG
    000_0015.JPG
    19.2 KB
This is my entry for the January Challenge.

Made from sycamore, a relatively huge lump which got smaller and smaller while I was sawing out and turning out the shakes. The finished object measures about 18cm in diameter and 6 or 7 cm high.

I planed one face and put the lump on a faceplate ring, finished the outside apart from the foot which I had to leave as a spigot to reverse it, and turned it round. Then came the delicate bit, I had to get most of the bowl to a bit less than 3mm in order to pierce it. I'd already done a trial in a 3mm sycamore veneer from the bandsaw, and I knew which tools could be used, so my decoration was more or less driven by this (ie not having to buy anything new). The bowl now weighs nothing, and the floor is completely covered with shavings.

Piercing was done by drilling where I wanted the hole on a drill press using a 2.5mm bit and then enlarging the hole with a couple of Foredom bits on the Axminster multitool. They work much better than the cheapo diamond bits I got from Axminster, but I don't know what they're made from. Finish is sanding sealer and wax.

DSC_0087.JPG


DSC_0090.JPG


DSC_0091.JPG


DSC_0092.JPG
 

Attachments

  • DSC_0087.JPG
    DSC_0087.JPG
    70.5 KB
  • DSC_0090.JPG
    DSC_0090.JPG
    66 KB
  • DSC_0091.JPG
    DSC_0091.JPG
    67.3 KB
  • DSC_0092.JPG
    DSC_0092.JPG
    65.5 KB
I borrowed Stuart Mortimer's spiral work book from the club library over Christmas, and had a go at spiral work. [fantastic book]
This is my first successful atempt, and I thought ah, this could qualify for the challenge this month, so here it is.
The wood is cherry size is height 250mm base width 110mm stem thickness 25mm.
Tools used roughing gouge, spindel gouge, skew chisel, many files, rasps, and any thing I could find to carve wood, and a lot of sand paper!!.
Have not yet done it,s mate, with the left hand spiral.
 

Attachments

  • phpBLDJK7AM.jpg
    phpBLDJK7AM.jpg
    44 KB
  • phpaZL6cQAM.jpg
    phpaZL6cQAM.jpg
    42.1 KB
  • phpqEdfGYAM.jpg
    phpqEdfGYAM.jpg
    70.7 KB
  • shrunk pictures.jpg
    shrunk pictures.jpg
    47 KB
One failed attempt to create a tea light holder with "flames" pierced through the side - exploded when sanding.
So tried a goblet with holes set to look like the paper game of squares - but I miss measured the depth of the bowl and of course turned through the bottom of the goblets bowl!

So back to the drawing board - with not a lot of time left I decided on a bowl with a simple pierced rim.

I first shaped the bottom of the bowl then, using the indexing system marked out where I would drill through - I used 3 different drill sizes (from memory) 12mm / 10mm / 8mm (but could well have been 10/8/6)

Then back on the lathe - turned the inside of the bowl - and got a very pleasing shape, however I was getting tear out on some of the holes - so had to sand each individually. I then painted the inside of each hole black - to give the impression of depth and shadow.

I used Horse Chestnut for the bowl. A bowl gouge and french curve scraper - sanded to 400, then finished with sanding sealer, and wax - finally buffed using the 3 mop system.

Really learnt a lot from this challenge - and realise that sometimes ambition out strips capability, that said I know where I went wrong with my two failed attempts and when I have time I will re-do the tea light, as that (IMO) looked good.
 

Attachments

  • Bottom View.jpg
    Bottom View.jpg
    93.1 KB
  • Side View.jpg
    Side View.jpg
    66.9 KB
  • Top View.jpg
    Top View.jpg
    96.1 KB
Status
Not open for further replies.
Back
Top