Inlay methods, router inlay kits any good?

UKworkshop.co.uk

Help Support UKworkshop.co.uk:

This site may earn a commission from merchant affiliate links, including eBay, Amazon, and others.

OscarG

Established Member
Joined
3 Jun 2016
Messages
988
Reaction score
3
Location
London
I'm looking to improve my current inlay technique of.... cut out the shape, mark the shape on target, sneak up to the marking line with router, fill in all the (many many!) gaps with sawdust+glue before sanding it and doing a lot of swearing.

It's ok, but suspect there's huge room for improvement. Gotta be a better way!

Research on youtube has led me to these router inlay kit things, this one seems to come up a lot >>

accessory-kits-solid-brass-inlay-kit-9500.jpg


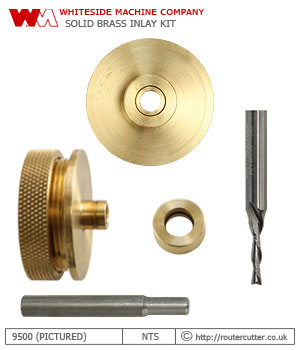
Has anyone had any joy with these kits? I can see how they'd work with relatively smooth shapes but can't see how it would much use with anything with pointy edges.

How do you chaps do your inlays?
 
I VERY RARELY do this kind of work so what I have to say is really worth nil vs someone who actually knows how to do it .

I always will route to within 1mm of the line and finish it off to the line with a series of chisels and incannel gouges. And keep test fitting the piece and taking off the waste piece by piece until it is a perfect fit. I’ve found it helps to chalk/charcoal around the inlay when test fitting so it leaves a mark as a guide for removal.

As I said, I’m really only ever winging this kind of work and don’t do it often enough to give you a definite answer to your problem.
 
Oscar, I regularly inlay pointy escutcheon plates like these,
Jwllry-Box-2.jpg


And pointy butterfly cleats like these,
Butterfly-Cleats.jpg


I'd recommend you stay well away from any kind of template or guide bush system. They're just too restrictive, too inflexible, and too slow.

I promise you can reliably and confidently inlay with zero gaps. Probably the most important thing is getting into the correct mindset for meticulous and precise work. You need to be focused and patient, with all your tools freshly sharpened and neatly laid out. Get the right head space and inlay work really isn't hard.

Incidentally, if you do make the odd tiny error and have to fill in a gap, then sawdust mixed with glue isn't a great solution. The sawdust will behave like end grain, so even though it may sound like a cunning plan it just won't match the long grain inlay wood. Far better is get some crystal clear (it must be clear) quick setting epoxy and dribble some into the gap with nothing added. When it's set firm, but not rock solid, flush off the proud bead with a chisel or a card scraper. The clear epoxy levels the surface and refracts the colour of the wood, so it'll deliver a genuinely invisible repair.
 

Attachments

  • Jwllry-Box-2.jpg
    Jwllry-Box-2.jpg
    82.5 KB · Views: 447
  • Butterfly-Cleats.jpg
    Butterfly-Cleats.jpg
    109.4 KB · Views: 344
I've used the system several times with satisfactory results. Here is my last effort:-
IMG_0086.jpg
I use a 10mm dia cutter so it's a bit cumbersome, ie can't get into restricted corners. So final shaping of sharp corners is finished by hand. The design above is perhaps an extreme example of this problem.
The set you have shown has a much smaller cutter so should be less of a problem.
Remember that you will need to make a pattern which will be bigger or smaller than the finished shape depending on whether it's internal or external.
Brian
 

Attachments

  • IMG_0086.jpg
    IMG_0086.jpg
    891.3 KB · Views: 337
custard":2xlcvge3 said:
Oscar, I regularly inlay pointy escutcheon plates like these,


And pointy butterfly cleats like these,


I'd recommend you stay well away from any kind of template or guide bush system. They're just too restrictive, too inflexible, and too slow.

I promise you can reliably and confidently inlay with zero gaps. Probably the most important thing is getting into the correct mindset for meticulous and precise work. You need to be focused and patient, with all your tools freshly sharpened and neatly laid out. Get the right head space and inlay work really isn't hard.

Incidentally, if you do make the odd tiny error and have to fill in a gap, then sawdust mixed with glue isn't a great solution. The sawdust will behave like end grain, so even though it may sound like a cunning plan it just won't match the long grain inlay wood. Far better is get some crystal clear (it must be clear) quick setting epoxy and dribble some into the gap with nothing added. When it's set firm, but not rock solid, flush off the proud bead with a chisel or a card scraper. The clear epoxy levels the surface and refracts the colour of the wood, so it'll deliver a genuinely invisible repair.

Cheers Custard!

So when your marking out, do you use a pencil or marking knife?

Do you rout most of it then use a chisel when you get close?

Good tip about the epoxy!
 
I use a marking knife. The first strokes all around are little more than a scratch, if the knife has a bevel on both sides then you need to hold the knife at an angle in order to compensate. Sometimes I'll very, very slightly undercut the inlay male component, I say undercut but it's really no more than a few strokes of sand paper. Just enough to guarantee a really snug fit.

I excavate the waste (power router or manual router plane) to within about 0.5mm of the knife line, then chop out the final bit with a really sharp chisel and a manual router plane. The little router planes often have a really useful pointed cutter which can get right into corners.

When I insert the male component I'll chalk the grain direction on the upper surface so I know which way to plane, a load of tear out at this late stage would be a bit tedious.
 
I have not done complex inlays for years. I used to set abalone and mother of pearl shapes of various sorts into ebony and occasionally rosewood guitar fingerboards. These were always radiused rather than flat. I would mostly do the cut outs by hand using X-acto knives and sharp small chisels, as one slip with a router wrecks a fingerboard.

Towards the end of my time doing this I used an early Dremel on a flexible wand to do some of it. That was quite quick and effective, especially on simpler shapes, and affords a lot of fine control.
 
custard":lowrj6m1 said:
Oscar, I regularly inlay pointy escutcheon plates like these,


............clear epoxy levels the surface and refracts the colour of the wood, so it'll deliver a genuinely invisible repair.

Sorry to jump into this post with an unrelated matter, but I'm partway through making a similiar box to Custards design (the one with the green felt), and am yet to find a nice catch/lock.

Does that mechanism have a special name? It looks ideal for my purposes.

Thank you,
 
If you want to do a lot of very intricate inlay then a great way to get the bulk of waste removal done is to use a rotary tool (Dremel etc) with a plunge base. I use the base from Veritas (link below) with my tools. There is a Dremel version but I found it to be pants for accuracy and stiffness in use. Using a 3.2(1/8") collet in the tool you can get mill bits right down to 0.2mm in dia for use in it. These allow you to get right into corners/point to such a sharpness that the human eye doesn't perceive any roundness to the point unless deliberately looking for it.

plunge base :https://www.alwayshobbies.com/tools/power-tools/veritas-plunge-base-for-rotary-multi$9tools?utm_source=google&utm_medium=cpc&utm_campaignid=6727975578&utm_campaign=Shopping-Research_Campaign&utm_term=&adid=388174523725&addisttype=gpla&matchtype=&gclid=CjwKCAiA27LvBRB0EiwAPc8XWcrhiGWPHDqgpiXmOVI9y5Gj1B-eaTqH4yLbthBlPh2huqwyb6hG_BoCdloQAvD_BwE

example mill bits: https://uk.banggood.com/Drillpro-10pcs- ... rehouse=CN

hth
 
Back
Top