


This review was meant to be done a long time ago, but as usual my health has put paid to any plans I make, and so my apologies go out to Charley and Incra for the rather slow progress.

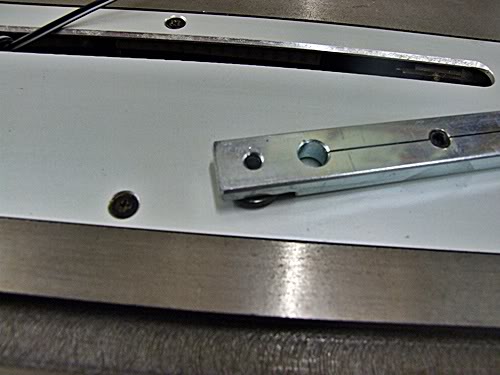
The piece of junk that came with my saw
Even though manufacturers have been making table saws since Noah built his ark (well maybe not that long) most of them still refuse to take notice of their customers and supply a decent mitre gauge with their product. The internet is full of disappointed buyers (myself included) who after opening up the box to their shiny new cast iron saw find a cheap bit of plastic stuck on top of a crude length of steel or aluminium, which is often a sloppy fit in the slot.
I
f these companies are incapable of producing a good one themselves, then I am sure that they could do a deal with someone like Incra or Osborne to supply one of their gauges with each saw, and because of the large amounts purchased it should not add much to the overall cost. That way after setting up their new toy, the owner can put it through its paces and do a whole range of cuts, instead of first having to look to the aftermarket industry to get an accurate gauge before they can really use their saw. The piece of junk that came with my saw
As if bin-able gauges are not bad enough , for reasons only be known to themselves, we also have a few manufacturers who supply their customers with non-standard size mitre slots. Now come on, these companies know that 99% of aftermarket accessories are made to fit the standard 3/4”x3/8” slot, so why the hell would they cut a different size slot in their machine and then only produce rubbish accessories to fit it? So because of this the owner is either stuck with the gauge, or they have to go out and buy a new one and either modify it or the saw itself, which will I am sure will void the warranty on either of them.
I say modify the saw because I have read that some owners have gone to such drastic lengths as to have their mitre slots re-cut to the standard size. Lets face it if your mitre gauge is not spot on it does not matter how good or expensive your saw is, your never going to get decent mitres. I do not know how feasible it would be, but I wonder if mitre gauge manufacturers could make the fence and protractor with a detachable bar, and then make a selection of different size bars to fit the non standard mitre slots. It should not be that hard to compile a list of saws with these slots.
Well that’s my rant over and done with. Now a few questions that seem to come up time and time again on this forum are “Are they that much better then the standard gauge ?” “Will they fit my mitre slot?“ Is the Osborne better than the Incra?” “What £££! I could buy another power tool or hand plane for that, are they really worth it?” With this in mind we thought that an in depth review of a few gauges was in order, and so below you will find my thoughts on the Incra V27, Incra 1000SE and the Osborne EB3. I do hope that if you are in the market for a mitre gauge you find the reviews useful.
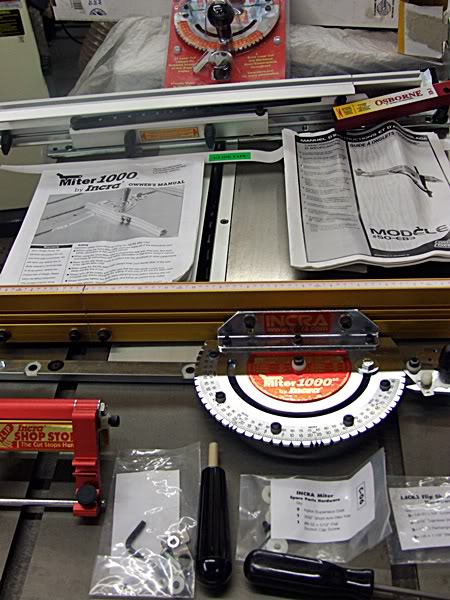
Incra1000se, Osborne EB3, Incra V27
INCRA V27
At around half the cost (£50 to £60 depending where you shop) of the next model in line you would be forgiven for thinking that Incra have used cheaper components in the production of their entry level model the V27, but you would be wrong, because the second that you remove it from its sealed plastic packaging, you can see and feel that it has been made from quality heavy gauge steel, and the V shaped indexing teeth are so perfect they can only have been laser cut on a top class CNC machine. In other words, even before use, I felt that the construction and finish of this model was very good.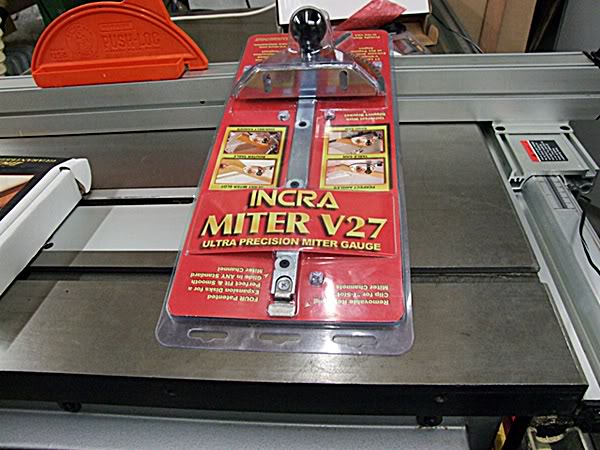
Along with the 15 ¾” gauge the package also includes instructions and two Allen keys. The instructions maybe very short but let me assure you that they give you all the information you need to setup and use your V27. The first Allen key is a 1/8” and by way of the 4 screws that secure the faceplate to the protractor it allows you to square the gauge to the blade. The second one is a 3/32” and you use this to adjust the 4 expansion disks.
SETTING UP
Although the V27 was set at 90 degrees to the blade straight out of the package (I may have been lucky), I thought that for the benefit of this review I would go through the full setting up procedure, just to see how easy it would be and how long it would take.
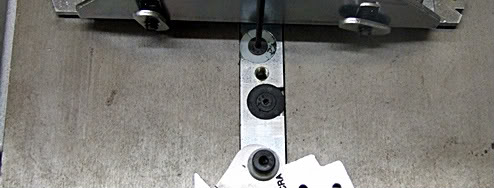
On looking along the Glidelock mitre bar you will see 4 white adjustable expansion disks (the forth is hid under the protractor), and these can be used to give you a perfect fit and stop any side to side movement of your V27 in the mitre slot. Right at the end of the bar is what Incra call a T-clip, and this clip is only needed if you have a T shaped mitre slot. If your do not, then just undo the single screw and remove it. May I suggest so that you do not lose the screw you tape it to the clip and pop it in the drawer, just in case you change your table saw in the future, or you need it for your router table or band saw. Next, when I first got my saw I found 2 or 3 burrs along one of the mitre slots and the other one was a little bit tight at one end. As both of these could have caused the expansion disks to wear prematurely (I had the Incra 2000 at the time), I wrapped some wet n dry around the poor excuse for a mitre gauge which I got with the saw and ran it up and down the slots until the tight spot and burrs were removed. If you need to do this yourself, a block of wood cut down to ¾”x3/8” would also do the same job and may even be better.
Now once the mitre slots are smooth its time to adjust the expansion disks for zero-play. This is done by taking the 3/32” Allen key and turning the screw in a clockwise direction to expand the disks until there is no lateral movement and the gauge runs smoothly up and down the full length of the mitre slots. To get at the fourth disk I had to remove the large black clamping knob and disengage the indexing tooth from the protractor. I then pivoted the protractor head which allowed me to access the last disk. When adjusting the white expansion disks in any of the mitre gauges make sure that the spilt is 1/16th above the opening or they will not expand properly. If the gauge is too tight, then you can cure this by turning the disk screws anti-clockwise direction. These expansion disks can take an average machine with over sized mitre slots and turn it into an highly accurate table saw. After you have finished replace and tighten the large clamping knob, reengage the indexing tooth and tighten the smaller knob.
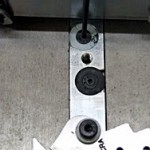
Expansion Joint Under Protractor
Finally if the gauge is not set at 90 degrees to the blade you have to adjust the faceplate which is connected to the protractor with 4 screws. So before you re tighten the two knobs above, set the indexing tooth to 0, and then re tighten them. Next along with the 1/8” Allen key undo the 4 screws and using a reliable square adjusted the faceplate to 90 degrees. After this re tightened the screws and using the larger of the black knobs as a handle, take a bit of scrap wood and made a cross cut to confirm the setting is correct. Incra claim that this is a one off adjustment, but you will only find out if this is true after you have used it for a number of months.
Your V27 is now ready to use, but before you do you really need to fit an auxiliary fence, which Incra states should be roughly between 18” and 24”. Now you can buy an Incra track fence extrusion, although I suspect that unless you have a friend in the USA (where they are around $20) who can buy one and send it to you, now that the goverment has made sure we get charged VAT no matter where in the world we shop, this will be expensive to have it shipped to the UK, and buying one over here will cost even more. You could buy a piece of aluminium extrusion which is not that expensive, especially if you have a double glazing company near you who will sell or even give you an off cut. You can also use a piece of thicknessed and planed hardwood, but don’t forget to rout a countersink slotted line for the coach bolts. Whatever you use the V27 faceplate has two slotted holes that will accept bolts and washers. To save time for this review I used the fence from the 1000SE. After fitting the fence I gave it, the Glidelock bar and the mitre slot itself a thin coat of wax to make sure everything ran smoothly.


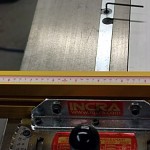
 Blade Shows a Correct 90 Lee Valley Digital Angle Finder Confirms Black Plastic Slides Very Well
Degrees the 45 Degrees Is Correct
Incra have covered the underside of all their protractors with black plastic which is intended to give it a very smooth gliding action and it succeeds very well in doing this.
Set at some of the most commonly used angles the Incra has 27 V shaped notches laser cut into the 6 3/4” protractor at 5 degrees apart. And attached to the protractor is the big black knob which is not only to set and lock the Incra at the chosen angle, but can also be used to push and pull the gauge up and down the mitre slot. When setting an angle (which run from +60 to -60) it is a simple matter of placing the indexing tooth into one of the V notches and then locking the small black knob followed by the large one. The angles are clearly marked and once set and locked will repeat the angle cut again and again without any movement. I cut a number of different angles, and although I did not abuse the gauge (I could not’t as it is going to be a prize in a competition) I did make sure it was well used, and it took everything I threw at it without fault or any of the angles moving from their set position.

Mitre Cut Made By V27
Even using the non standard angles, or the ones in between the notches where the indexing tooth is not used it held firm and fast no matter how many cuts I made.
If you are building your own router table then may I suggest that you install Incra or another manufacturers ¾”X3/8” T track so that you can use the same mitre gauge in both tables. In fact if the slots are the right size you can also use the same one in your band saw.
Final Thoughts
If you want all the bells and whistles with extend-able fence, adjustable end stops and more laser cut notches (like the one below), then you are going to have to pay at least £70 more. But if you are happy to make/add your own fence, the V27 would be an excellent accessory to anybodies workshop. Once setup (around 15 minutes) you will be cutting perfect mitres from a very well made tool for as long as you own it.
INCRA 1000SE
If mitre gauges strutted their stuff along the catwalks of this fair land then on looks alone with it’s trade mark red and gold, the Incra 1000SE would be a supermodel. As many of you will already know the SE stands for Special Edition, and is the updated version of the Incra 1000. At around £130 to £150 (again depending where you shop) it is about £30 to £50 dearer then the standard 1000, but in my honest opinion the updates make it worth the extra expense.


Parts Out Of Box Incra 1000SE
These updates include replacing the basic non extendable 18” Track Fence with their extendable Telescoping Incra Lock Cut Off Fence which extends from 18” to 31”, and removing their very basic plastic sliding stop positioner and replacing it with the far superior FlipShopStop, which I must say I am a big fan of.
As you can see it comes well packed, and along with the gauge the box contains 3 bags of parts which are labelled with their contents. It also comes with a 91/2” long screwdriver type Allen key for adjusting the fence, and as per normal for Incra, the quality of the materials used and their fit and finish are excellent.
INSTRUCTIONS
I must say that I was rather surprised that the instruction manual that came with the 1000SE was for the 1000 and that Incra had not produced a new one for this model. But maybe this is just me being too picky, because they have put a few individual pages in the bag. One is a addendum for the new telescoping fence, one for the Flipshopstop, and there is also a page which shows you how to set the 1/10th of a degree Vernier Cursor, because they have also upgraded this and so it reads slightly different then the ½ of a degree shown in the manual for the standard Incra 1000. Even though the manual is for the 1000, the instructions are very clear with good quality pictures, and most of it still relates to the SE.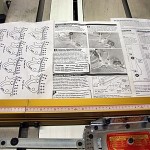
SETUP
To be honest the gauge arrives virtual assembled and does not take long to set up. All you need to do is attach the Flipshopstop to the fence and fit the handle, and if your saw has a “T” slot there is also an adaptor included with the kit which you simply screw onto the end of the bar. The steel bar, or as Incra call it the “Glidelock”, is made to fit a standard ¾”x 3/8” mitre slot, but as you will see below Incra have a very clever and ingenious system which allows the bar to be adjusted using a grub screw in four pairs of expansion disks to fit mitre slots which are slightly over or under the standard size.
The “Glidelock” arrives with 3 white washers/disks fitted down the left hand side and 3 black ones fitted on the right, and both sets are held in with grub screws. The white ones have a small slit in them, which allow them to be adjusted by means of turning the grub screw with a small Allen key (provided). As the instruction state, make sure that the slit is about 1/16” above the opening in the bar and not in the opening itself, otherwise you will not be able to adjust them properly. These little things are an excellent idea, and with a few turns of the Allen key can save you a lot of heartache in trying to get a decent mitre gauge to fit a badly manufactured mitre slot. On my saw the adjustments took no time at all and I was up and running in minutes. One thing to mention is that 2 of these washers/disks are hidden under the protractor head, and it is a simple matter of removing the fence and large black know and turning the protractor to one side and then do any adjustment that is needed . When finished reattach the fence and knob. Incra suggest that if your slot is undersize that you remove the 3 black washers/disks and leave the holes empty, and then as above adjust the whites until the bar runs smoothly. Finally if the slot is oversized you again remove the black disks but this time replace them with 3 of the white one’s so that you have adjustment on both sides of the bar.
Adjusting Expansion Disks
To some this will probably sound like “Teaching Granny To Suck Eggs” and if it does then I am sorry, but I feel that for those who are new to the hobby it is good and vital advice, and so better said, because lets face it when we first take up woodworking and spend many hundreds of pounds on a machine, we rightly or wrongly expect it to at least cut a straight piece of wood right out of the box (I know I did), but sadly as many of us will know this is often not the case So if your table saw is new, which is when most of us find out about the rubbish mitre gauge the manufacturers have sent us, make sure that your blade is square to the mitre slots before you try and set your gauge up, or you will be fighting a losing battle.
Talking about squaring, after setting up your Incra to run smoothly in the slot, all you need to do now is square your gauge to the saw blade. This is easily done by first setting it to 0 and locking the handle. Then grab the long Allen key and loosen the 3 bolts that secure the protractor to the fence, after checking with a square that the fence is at 90 degrees to the blade, retighten the bolts and you are ready to go.
The angle range on the 1000SE protractor is 180 degrees, with 41 precision cut V notches set at every 5 degrees. There are marks from 0 to 90 both to the left and the right and a further 2 unmarked notches at 95 degrees. On either side of the zero there are also notches at 22.5 and 67.5. Also printed on the protractor is a “Quick reference angle chart” which tells you that if for instance you want a frame with 18 sides you should set the gauge to 10 degrees or for 6 sides set it to 30 degrees. A nice idea I thought, especially for the newcomer to the hobby.
 Extended Fence
 Flipshopstop
 Flipshopstop
Vernier Cursor
Mounted on the 1000SE is a vernier cursor, which scale allows you to change angles by as little as 1/10th of a degree easily and accurately. This suburb device can be moved back out of the way when not in use or locked in position when needed. Not being the brain of Britain (some would say that I have no brain at all) when I first looked at it, it looked to complicated and I was sure that I would not be able to use it. But once I understood the principle, the whole idea of making the tiny adjustments was surprisingly easy. To help you understand, as I have already said Incra have included a page dealing with this in the instructions.
Final Thoughts
From it’s multi channel aluminium extrusion to it’s protractor and FlipShopStop the Incra 1000SE is near on the perfect mitre gauge. Whether you are new to woodworking or a pro, the Incra 1000SE cannot fail to be an asset to your workshop. Once set up for the review it continued to give perfect results and not once did I have to reset it, and I can assure you while putting it through its paces, I did for want of a better phrase “Give it some stick” to see if it would knock itself out of setting through over work so to speak, but it never, and in my honest opinion it is £130 better than the gauge that came with my saw, and is highly recommended.
OSBORNE EB-3 MITRE GAUGE
Now we come to the Osborne EB-3, which with its triangular shape and lack of a protractor gives it a completely different look to any other mitre gauge on the market. The updated model of the patented EB-2 was again designed by David Osborne but this time it was in conjunction with Excalibur Tools (a General International Company) who are now the exclusive manufacturers, and they have so much confidence in their product that they have given it an unheard of (or at least unheard of in the world of mitre gauges)“Life Time Warranty”. Although strangely enough the user manual states that the warranty is only for 24 months I have checked with the company and can confirm that as written on the box it does have a life time guarantee. In my opinion this in itself speaks volumes about the two companies confidence in their tool. Sadly at the moment you cannot buy the gauge in the UK, but as many forum members will attest, depending on the interest rate and whether you get caught in the Custom and Excise coffee and tea fund trap (touch wood I never have) you can easily get one imported from the Osborne website for just under/over £100*, and although it is not needed to place an order, if you contact David himself you will find him very helpful.


DESCRIPTION
As with the Incra‘s, it is very easy to see that Excalibur have used quality material’s in their construction of the EB-3 and this has left a first class fit and finish. They have also updated a few things from the previous model, which includes adding a third expansion slot in the 21 ½” guide bar. These can be adjusted with the Allen key supplied and even with the smallest of turns the gauge can go from a sloppy fit to one with no lateral movement at all. In other words if your mitre slot is roughly around 3/4”x3/8” the adjustment on the Osborne will ensure a good fit. Like incr, if you have an inverted “T” shaped mitre slot, Osborne have got this covered by fitting a T-slot retaining washer to the front end of the bar, which can be easily removed if it not needed.
The most commonly used angles have an indent drilled into the underside of guide bar, and eight of these are 45+, 30+, 22.5+, 15+, 45-, 30-, 22.5-, 15-. To select a setting all you have to do is loosen the angle clamp knob and then depress the indent plunger which is situated on the bottom of the red “Outer Brace” and move the fence along until the plunger seats itself in the desired hole, after which you must retighten the
angle clamp knob.
Extended Fence
There are also angle lines engraved along the top of the black bar and to help them stand out clearly, they have been painted in white. The heavy duty aluminium extrusion fence has also been updated and is now 24” long, 2 ½” tall and can be extended to a massive 42“. It also has a flip stop which can be set anywhere along this length.
Unlike a lot of mitre gauges the Osborne can not only be used on both sides of the blade, but reversing it to sit in the other mitre slot can also be achieved without the need of tools.
Also like the Incra the EB-3 has a label on it which tells you what angle to set the gauge for say a ten sided frame.
Another update over the EB-2 is a calibration mechanism which allows you to make any adjustments needed and then lock them off.
SETUP AND CALIBRATION
As with the other mitre gauge’s in this head to head, the Osborne needs very little setting up, and what there is is covered in good fashion by their excellent 10 page instruction manual which has very clear photos and diagrams.
After removing it from the box and unfolding it, you have to slide the black inner brace into the red outer brace and tighten the angle clamp knob. You then have to install the black handle by screwing it into the guide bar, and assemble the flip stop in one of two positions depending on which side of the blade you are going to use the gauge. The EB-3 comes with a length of self adhesive backed sandpaper which is there to hold the work firmly against the fence. I have read elsewhere that some owners do not use this, but in my honest opinion it is a no brainer, because without it on the smooth and shiny surface the work piece has got every chance of slipping a few millimeters (without you even noticing until it is to late) or being pulled into the blade. (I have just bought another length of sandpaper and glide tape as mine was wearing out, hence the reason for the new ones in the pictures.) It is far easier to affix the sandpaper with the fence removed from the rest of the gauge and placed on a flat firm surface. But before this is done you will need to clean any grease or other contaminants from the face of the fence using Acetone or a cleaning alcohol. When you have finished take a J roller, a thick piece of dowel, or if the wife is not looking cut the top off her broomstick and to stop any air bubbles forming and make sure it is stuck down firmly, after removing a couple of inches of the backing paper at a time, stick the sandpaper squarely in place using the roller. Then take a Stanley knife and using the edge of the fence as a guide trim the excess paper off. Next is the measuring tape, and again after removing the backing paper stick the tape along the top of the fence.
They also provide a length of glide tape which can be fixed to the guide bar if needed. Next after refitting the fence place the gauge into the mitre slot and if there is any lateral movement take the Allen key place it in the nearest hex screw and make small adjustments until the movement has gone. Now take the mitre gauge and check that it runs smoothly over the complete length of both slots.
The final part of setting up is to square the gauge to the blade/mitre slot by loosening the eccentric screw at the rear of the red outer brace using the allen key provided, and then with a spanner turn the ¾“ nut below it in either a clock or anticlockwise position. Then confirm the setting is correct using a reliable square.
Final Thoughts
I must admit before using it I did have my reservations about the EB3. The big triangular beast looked like it would suffer from flexing**, but how wrong could I have been. Ever since I first took delivery of it a few years ago I have made a number of repeat cuts on all sorts of the angles and I cannot fault it.
One piece of advice. Until you get used to using the EB3, when making angled cuts make sure that you check that the fence is not in the path of the blade, as you will be surprised at how easy it is to cut the tip of the fence off. *I checked the price a while ago now, so although you can still easily import them, please do not reply on the price mentioned **This is my own personal gauge and so this comment was my thoughts when the gauge first arrived after I purchasing it.
Head-to-Head – Results
So we come to the stage where I have to pick a winner. Well to be perfectly honest the gauges are all so good in their own way I cannot do that. The best that I can do is pick the one I prefer.
1st Incra 1000SE. but as I have said it is only my preference, and a tiny part of this preference goes on looks as well as the way the mitre gauge performs.
2rd Osborne EB3. This is almost as good as the 1000SE, and it has the benefit of being able to be used on both sides of the blade without any tools. If I could only have this one I would still be happy.
3rd Incra V27. Do not under estimate this gauge, the only reason that it is third on my list is because it does not have the accessories of the other two, but remember that it is only £50 or £60 and a home made fence and stop can cure this problem.
I would like to thank Incra & also Lee Valley who supplied their 30th Anniversary Digital Angle Finder so that I could check and show how accurate the mitre gauges are, and also Incra for supplying the gauge.
The piece of junk that came with my saw
Even though manufacturers have been making table saws since Noah built his ark (well maybe not that long) most of them still refuse to take notice of their customers and supply a decent mitre gauge with their product. The internet is full of disappointed buyers (myself included) who after opening up the box to their shiny new cast iron saw find a cheap bit of plastic stuck on top of a crude length of steel or aluminium, which is often a sloppy fit in the slot.
I
f these companies are incapable of producing a good one themselves, then I am sure that they could do a deal with someone like Incra or Osborne to supply one of their gauges with each saw, and because of the large amounts purchased it should not add much to the overall cost. That way after setting up their new toy, the owner can put it through its paces and do a whole range of cuts, instead of first having to look to the aftermarket industry to get an accurate gauge before they can really use their saw. The piece of junk that came with my saw
As if bin-able gauges are not bad enough , for reasons only be known to themselves, we also have a few manufacturers who supply their customers with non-standard size mitre slots. Now come on, these companies know that 99% of aftermarket accessories are made to fit the standard 3/4”x3/8” slot, so why the hell would they cut a different size slot in their machine and then only produce rubbish accessories to fit it? So because of this the owner is either stuck with the gauge, or they have to go out and buy a new one and either modify it or the saw itself, which will I am sure will void the warranty on either of them.
I say modify the saw because I have read that some owners have gone to such drastic lengths as to have their mitre slots re-cut to the standard size. Lets face it if your mitre gauge is not spot on it does not matter how good or expensive your saw is, your never going to get decent mitres. I do not know how feasible it would be, but I wonder if mitre gauge manufacturers could make the fence and protractor with a detachable bar, and then make a selection of different size bars to fit the non standard mitre slots. It should not be that hard to compile a list of saws with these slots.
Well that’s my rant over and done with. Now a few questions that seem to come up time and time again on this forum are “Are they that much better then the standard gauge ?” “Will they fit my mitre slot?“ Is the Osborne better than the Incra?” “What £££! I could buy another power tool or hand plane for that, are they really worth it?” With this in mind we thought that an in depth review of a few gauges was in order, and so below you will find my thoughts on the Incra V27, Incra 1000SE and the Osborne EB3. I do hope that if you are in the market for a mitre gauge you find the reviews useful.
Incra1000se, Osborne EB3, Incra V27
INCRA V27
At around half the cost (£50 to £60 depending where you shop) of the next model in line you would be forgiven for thinking that Incra have used cheaper components in the production of their entry level model the V27, but you would be wrong, because the second that you remove it from its sealed plastic packaging, you can see and feel that it has been made from quality heavy gauge steel, and the V shaped indexing teeth are so perfect they can only have been laser cut on a top class CNC machine. In other words, even before use, I felt that the construction and finish of this model was very good.
Along with the 15 ¾” gauge the package also includes instructions and two Allen keys. The instructions maybe very short but let me assure you that they give you all the information you need to setup and use your V27. The first Allen key is a 1/8” and by way of the 4 screws that secure the faceplate to the protractor it allows you to square the gauge to the blade. The second one is a 3/32” and you use this to adjust the 4 expansion disks.
SETTING UP
Although the V27 was set at 90 degrees to the blade straight out of the package (I may have been lucky), I thought that for the benefit of this review I would go through the full setting up procedure, just to see how easy it would be and how long it would take.
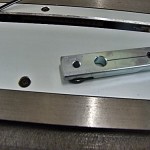
On looking along the Glidelock mitre bar you will see 4 white adjustable expansion disks (the forth is hid under the protractor), and these can be used to give you a perfect fit and stop any side to side movement of your V27 in the mitre slot. Right at the end of the bar is what Incra call a T-clip, and this clip is only needed if you have a T shaped mitre slot. If your do not, then just undo the single screw and remove it. May I suggest so that you do not lose the screw you tape it to the clip and pop it in the drawer, just in case you change your table saw in the future, or you need it for your router table or band saw. Next, when I first got my saw I found 2 or 3 burrs along one of the mitre slots and the other one was a little bit tight at one end. As both of these could have caused the expansion disks to wear prematurely (I had the Incra 2000 at the time), I wrapped some wet n dry around the poor excuse for a mitre gauge which I got with the saw and ran it up and down the slots until the tight spot and burrs were removed. If you need to do this yourself, a block of wood cut down to ¾”x3/8” would also do the same job and may even be better.
Now once the mitre slots are smooth its time to adjust the expansion disks for zero-play. This is done by taking the 3/32” Allen key and turning the screw in a clockwise direction to expand the disks until there is no lateral movement and the gauge runs smoothly up and down the full length of the mitre slots. To get at the fourth disk I had to remove the large black clamping knob and disengage the indexing tooth from the protractor. I then pivoted the protractor head which allowed me to access the last disk. When adjusting the white expansion disks in any of the mitre gauges make sure that the spilt is 1/16th above the opening or they will not expand properly. If the gauge is too tight, then you can cure this by turning the disk screws anti-clockwise direction. These expansion disks can take an average machine with over sized mitre slots and turn it into an highly accurate table saw. After you have finished replace and tighten the large clamping knob, reengage the indexing tooth and tighten the smaller knob.
Expansion Joint Under Protractor
Finally if the gauge is not set at 90 degrees to the blade you have to adjust the faceplate which is connected to the protractor with 4 screws. So before you re tighten the two knobs above, set the indexing tooth to 0, and then re tighten them. Next along with the 1/8” Allen key undo the 4 screws and using a reliable square adjusted the faceplate to 90 degrees. After this re tightened the screws and using the larger of the black knobs as a handle, take a bit of scrap wood and made a cross cut to confirm the setting is correct. Incra claim that this is a one off adjustment, but you will only find out if this is true after you have used it for a number of months.
Your V27 is now ready to use, but before you do you really need to fit an auxiliary fence, which Incra states should be roughly between 18” and 24”. Now you can buy an Incra track fence extrusion, although I suspect that unless you have a friend in the USA (where they are around $20) who can buy one and send it to you, now that the goverment has made sure we get charged VAT no matter where in the world we shop, this will be expensive to have it shipped to the UK, and buying one over here will cost even more. You could buy a piece of aluminium extrusion which is not that expensive, especially if you have a double glazing company near you who will sell or even give you an off cut. You can also use a piece of thicknessed and planed hardwood, but don’t forget to rout a countersink slotted line for the coach bolts. Whatever you use the V27 faceplate has two slotted holes that will accept bolts and washers. To save time for this review I used the fence from the 1000SE. After fitting the fence I gave it, the Glidelock bar and the mitre slot itself a thin coat of wax to make sure everything ran smoothly.


Degrees the 45 Degrees Is Correct
Incra have covered the underside of all their protractors with black plastic which is intended to give it a very smooth gliding action and it succeeds very well in doing this.
Set at some of the most commonly used angles the Incra has 27 V shaped notches laser cut into the 6 3/4” protractor at 5 degrees apart. And attached to the protractor is the big black knob which is not only to set and lock the Incra at the chosen angle, but can also be used to push and pull the gauge up and down the mitre slot. When setting an angle (which run from +60 to -60) it is a simple matter of placing the indexing tooth into one of the V notches and then locking the small black knob followed by the large one. The angles are clearly marked and once set and locked will repeat the angle cut again and again without any movement. I cut a number of different angles, and although I did not abuse the gauge (I could not’t as it is going to be a prize in a competition) I did make sure it was well used, and it took everything I threw at it without fault or any of the angles moving from their set position.
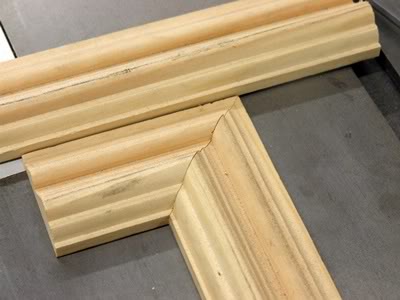
Mitre Cut Made By V27
Even using the non standard angles, or the ones in between the notches where the indexing tooth is not used it held firm and fast no matter how many cuts I made.
If you are building your own router table then may I suggest that you install Incra or another manufacturers ¾”X3/8” T track so that you can use the same mitre gauge in both tables. In fact if the slots are the right size you can also use the same one in your band saw.
Final Thoughts
If you want all the bells and whistles with extend-able fence, adjustable end stops and more laser cut notches (like the one below), then you are going to have to pay at least £70 more. But if you are happy to make/add your own fence, the V27 would be an excellent accessory to anybodies workshop. Once setup (around 15 minutes) you will be cutting perfect mitres from a very well made tool for as long as you own it.
INCRA 1000SE
If mitre gauges strutted their stuff along the catwalks of this fair land then on looks alone with it’s trade mark red and gold, the Incra 1000SE would be a supermodel. As many of you will already know the SE stands for Special Edition, and is the updated version of the Incra 1000. At around £130 to £150 (again depending where you shop) it is about £30 to £50 dearer then the standard 1000, but in my honest opinion the updates make it worth the extra expense.


Parts Out Of Box Incra 1000SE
These updates include replacing the basic non extendable 18” Track Fence with their extendable Telescoping Incra Lock Cut Off Fence which extends from 18” to 31”, and removing their very basic plastic sliding stop positioner and replacing it with the far superior FlipShopStop, which I must say I am a big fan of.
As you can see it comes well packed, and along with the gauge the box contains 3 bags of parts which are labelled with their contents. It also comes with a 91/2” long screwdriver type Allen key for adjusting the fence, and as per normal for Incra, the quality of the materials used and their fit and finish are excellent.
INSTRUCTIONS
I must say that I was rather surprised that the instruction manual that came with the 1000SE was for the 1000 and that Incra had not produced a new one for this model. But maybe this is just me being too picky, because they have put a few individual pages in the bag. One is a addendum for the new telescoping fence, one for the Flipshopstop, and there is also a page which shows you how to set the 1/10th of a degree Vernier Cursor, because they have also upgraded this and so it reads slightly different then the ½ of a degree shown in the manual for the standard Incra 1000. Even though the manual is for the 1000, the instructions are very clear with good quality pictures, and most of it still relates to the SE.
SETUP
To be honest the gauge arrives virtual assembled and does not take long to set up. All you need to do is attach the Flipshopstop to the fence and fit the handle, and if your saw has a “T” slot there is also an adaptor included with the kit which you simply screw onto the end of the bar. The steel bar, or as Incra call it the “Glidelock”, is made to fit a standard ¾”x 3/8” mitre slot, but as you will see below Incra have a very clever and ingenious system which allows the bar to be adjusted using a grub screw in four pairs of expansion disks to fit mitre slots which are slightly over or under the standard size.
The “Glidelock” arrives with 3 white washers/disks fitted down the left hand side and 3 black ones fitted on the right, and both sets are held in with grub screws. The white ones have a small slit in them, which allow them to be adjusted by means of turning the grub screw with a small Allen key (provided). As the instruction state, make sure that the slit is about 1/16” above the opening in the bar and not in the opening itself, otherwise you will not be able to adjust them properly. These little things are an excellent idea, and with a few turns of the Allen key can save you a lot of heartache in trying to get a decent mitre gauge to fit a badly manufactured mitre slot. On my saw the adjustments took no time at all and I was up and running in minutes. One thing to mention is that 2 of these washers/disks are hidden under the protractor head, and it is a simple matter of removing the fence and large black know and turning the protractor to one side and then do any adjustment that is needed . When finished reattach the fence and knob. Incra suggest that if your slot is undersize that you remove the 3 black washers/disks and leave the holes empty, and then as above adjust the whites until the bar runs smoothly. Finally if the slot is oversized you again remove the black disks but this time replace them with 3 of the white one’s so that you have adjustment on both sides of the bar.
Adjusting Expansion Disks
To some this will probably sound like “Teaching Granny To Suck Eggs” and if it does then I am sorry, but I feel that for those who are new to the hobby it is good and vital advice, and so better said, because lets face it when we first take up woodworking and spend many hundreds of pounds on a machine, we rightly or wrongly expect it to at least cut a straight piece of wood right out of the box (I know I did), but sadly as many of us will know this is often not the case So if your table saw is new, which is when most of us find out about the rubbish mitre gauge the manufacturers have sent us, make sure that your blade is square to the mitre slots before you try and set your gauge up, or you will be fighting a losing battle.
Talking about squaring, after setting up your Incra to run smoothly in the slot, all you need to do now is square your gauge to the saw blade. This is easily done by first setting it to 0 and locking the handle. Then grab the long Allen key and loosen the 3 bolts that secure the protractor to the fence, after checking with a square that the fence is at 90 degrees to the blade, retighten the bolts and you are ready to go.
The angle range on the 1000SE protractor is 180 degrees, with 41 precision cut V notches set at every 5 degrees. There are marks from 0 to 90 both to the left and the right and a further 2 unmarked notches at 95 degrees. On either side of the zero there are also notches at 22.5 and 67.5. Also printed on the protractor is a “Quick reference angle chart” which tells you that if for instance you want a frame with 18 sides you should set the gauge to 10 degrees or for 6 sides set it to 30 degrees. A nice idea I thought, especially for the newcomer to the hobby.
 Extended Fence
 Flipshopstop
 Flipshopstop
Vernier Cursor
Mounted on the 1000SE is a vernier cursor, which scale allows you to change angles by as little as 1/10th of a degree easily and accurately. This suburb device can be moved back out of the way when not in use or locked in position when needed. Not being the brain of Britain (some would say that I have no brain at all) when I first looked at it, it looked to complicated and I was sure that I would not be able to use it. But once I understood the principle, the whole idea of making the tiny adjustments was surprisingly easy. To help you understand, as I have already said Incra have included a page dealing with this in the instructions.
Final Thoughts
From it’s multi channel aluminium extrusion to it’s protractor and FlipShopStop the Incra 1000SE is near on the perfect mitre gauge. Whether you are new to woodworking or a pro, the Incra 1000SE cannot fail to be an asset to your workshop. Once set up for the review it continued to give perfect results and not once did I have to reset it, and I can assure you while putting it through its paces, I did for want of a better phrase “Give it some stick” to see if it would knock itself out of setting through over work so to speak, but it never, and in my honest opinion it is £130 better than the gauge that came with my saw, and is highly recommended.
OSBORNE EB-3 MITRE GAUGE
Now we come to the Osborne EB-3, which with its triangular shape and lack of a protractor gives it a completely different look to any other mitre gauge on the market. The updated model of the patented EB-2 was again designed by David Osborne but this time it was in conjunction with Excalibur Tools (a General International Company) who are now the exclusive manufacturers, and they have so much confidence in their product that they have given it an unheard of (or at least unheard of in the world of mitre gauges)“Life Time Warranty”. Although strangely enough the user manual states that the warranty is only for 24 months I have checked with the company and can confirm that as written on the box it does have a life time guarantee. In my opinion this in itself speaks volumes about the two companies confidence in their tool. Sadly at the moment you cannot buy the gauge in the UK, but as many forum members will attest, depending on the interest rate and whether you get caught in the Custom and Excise coffee and tea fund trap (touch wood I never have) you can easily get one imported from the Osborne website for just under/over £100*, and although it is not needed to place an order, if you contact David himself you will find him very helpful.


DESCRIPTION
As with the Incra‘s, it is very easy to see that Excalibur have used quality material’s in their construction of the EB-3 and this has left a first class fit and finish. They have also updated a few things from the previous model, which includes adding a third expansion slot in the 21 ½” guide bar. These can be adjusted with the Allen key supplied and even with the smallest of turns the gauge can go from a sloppy fit to one with no lateral movement at all. In other words if your mitre slot is roughly around 3/4”x3/8” the adjustment on the Osborne will ensure a good fit. Like incr, if you have an inverted “T” shaped mitre slot, Osborne have got this covered by fitting a T-slot retaining washer to the front end of the bar, which can be easily removed if it not needed.
The most commonly used angles have an indent drilled into the underside of guide bar, and eight of these are 45+, 30+, 22.5+, 15+, 45-, 30-, 22.5-, 15-. To select a setting all you have to do is loosen the angle clamp knob and then depress the indent plunger which is situated on the bottom of the red “Outer Brace” and move the fence along until the plunger seats itself in the desired hole, after which you must retighten the
angle clamp knob.
Extended Fence
There are also angle lines engraved along the top of the black bar and to help them stand out clearly, they have been painted in white. The heavy duty aluminium extrusion fence has also been updated and is now 24” long, 2 ½” tall and can be extended to a massive 42“. It also has a flip stop which can be set anywhere along this length.
Unlike a lot of mitre gauges the Osborne can not only be used on both sides of the blade, but reversing it to sit in the other mitre slot can also be achieved without the need of tools.
Also like the Incra the EB-3 has a label on it which tells you what angle to set the gauge for say a ten sided frame.
Another update over the EB-2 is a calibration mechanism which allows you to make any adjustments needed and then lock them off.
SETUP AND CALIBRATION
As with the other mitre gauge’s in this head to head, the Osborne needs very little setting up, and what there is is covered in good fashion by their excellent 10 page instruction manual which has very clear photos and diagrams.
After removing it from the box and unfolding it, you have to slide the black inner brace into the red outer brace and tighten the angle clamp knob. You then have to install the black handle by screwing it into the guide bar, and assemble the flip stop in one of two positions depending on which side of the blade you are going to use the gauge. The EB-3 comes with a length of self adhesive backed sandpaper which is there to hold the work firmly against the fence. I have read elsewhere that some owners do not use this, but in my honest opinion it is a no brainer, because without it on the smooth and shiny surface the work piece has got every chance of slipping a few millimeters (without you even noticing until it is to late) or being pulled into the blade. (I have just bought another length of sandpaper and glide tape as mine was wearing out, hence the reason for the new ones in the pictures.) It is far easier to affix the sandpaper with the fence removed from the rest of the gauge and placed on a flat firm surface. But before this is done you will need to clean any grease or other contaminants from the face of the fence using Acetone or a cleaning alcohol. When you have finished take a J roller, a thick piece of dowel, or if the wife is not looking cut the top off her broomstick and to stop any air bubbles forming and make sure it is stuck down firmly, after removing a couple of inches of the backing paper at a time, stick the sandpaper squarely in place using the roller. Then take a Stanley knife and using the edge of the fence as a guide trim the excess paper off. Next is the measuring tape, and again after removing the backing paper stick the tape along the top of the fence.

They also provide a length of glide tape which can be fixed to the guide bar if needed. Next after refitting the fence place the gauge into the mitre slot and if there is any lateral movement take the Allen key place it in the nearest hex screw and make small adjustments until the movement has gone. Now take the mitre gauge and check that it runs smoothly over the complete length of both slots.
The final part of setting up is to square the gauge to the blade/mitre slot by loosening the eccentric screw at the rear of the red outer brace using the allen key provided, and then with a spanner turn the ¾“ nut below it in either a clock or anticlockwise position. Then confirm the setting is correct using a reliable square.
Final Thoughts
I must admit before using it I did have my reservations about the EB3. The big triangular beast looked like it would suffer from flexing**, but how wrong could I have been. Ever since I first took delivery of it a few years ago I have made a number of repeat cuts on all sorts of the angles and I cannot fault it.
One piece of advice. Until you get used to using the EB3, when making angled cuts make sure that you check that the fence is not in the path of the blade, as you will be surprised at how easy it is to cut the tip of the fence off. *I checked the price a while ago now, so although you can still easily import them, please do not reply on the price mentioned **This is my own personal gauge and so this comment was my thoughts when the gauge first arrived after I purchasing it.
Head-to-Head – Results
So we come to the stage where I have to pick a winner. Well to be perfectly honest the gauges are all so good in their own way I cannot do that. The best that I can do is pick the one I prefer.
1st Incra 1000SE. but as I have said it is only my preference, and a tiny part of this preference goes on looks as well as the way the mitre gauge performs.
2rd Osborne EB3. This is almost as good as the 1000SE, and it has the benefit of being able to be used on both sides of the blade without any tools. If I could only have this one I would still be happy.
3rd Incra V27. Do not under estimate this gauge, the only reason that it is third on my list is because it does not have the accessories of the other two, but remember that it is only £50 or £60 and a home made fence and stop can cure this problem.
I would like to thank Incra & also Lee Valley who supplied their 30th Anniversary Digital Angle Finder so that I could check and show how accurate the mitre gauges are, and also Incra for supplying the gauge.
Attachments

Last edited by a moderator:
