Fettling an Axminster TS-200 Tablesaw

UKworkshop.co.uk

Help Support UKworkshop.co.uk:

This site may earn a commission from merchant affiliate links, including eBay, Amazon, and others.
Status
Not open for further replies.
Harlequin":2fvspp0h said:
watching this one with interest

BTW is there a riving knife with this one and are you going to shorten it as described in a recent thread?
Any safety issues with doing this mod? can't see any negatives myself

I've already trimmed the top of the riving knife when I first got the saw. The reason I did it was that the top did not lower beneath the table fully. This meant I couldn't lay a board over the top to use as another work surface. I can still fit the guard to it. But I want to find a way to make the guard quicker to remove and replace. There are no safety issues as far as I can see.
 
I was just Reading through the responses and it occured to me mikes dusty box would be a big help with dust as long as it has a door to pick out the little bits that get sucked in. As far as fetting the saw Can you put a blade stablizer on it and measure if it is the angle of the whole housing or if it is a wobble in the spindle?
 
Well I can check the runout of the arbour.

Do you mean integrating a 'dropout' box under the saw? That might be an interesting idea actually.

This is actually what I want to do with the saw:
2239605711_797260bb6c.jpg

(LarryS's TS Cabinet)

But the dust extraction upgrades will remove the drawers under the saw.
 
I'm in the process of redoing my table saw station. It'll be similar to the one wizer showed but the top drawer will be used to collect dust that the extractor misses.
 
Success!

I'd love to tell you a tale of toil and trouble (I could tell you lots about toilet trouble..), But I went into the workshop, loosened the 4 screws, gave it a moderate kapow and...

DSC_0488.JPG


DSC_0489.JPG


\:D/

I considered getting it bang on, but I thought it best to quit while I was ahead. That's a vast improvement on how it was. Seeing as the back is angled away from the back a tiny amount, I assume this will help a bit with kickback?

The rest of today's session was spent clearing up a bit and then taking lots of measurements from the saw to draw it up to scale in sketchup. (I know, I know.. I just want to :p).

Next I need to look at the blade rise mechanism because it's become very stiff. It was always stiff and I'm not sure if it's worse since I've adjusted the blade\motor alignment. It might need flipping upside down again. I tried WD40, but it didn't seem to make a difference.

Then it's on to fitting the AM fence.

Thanks for all the help so far! ;)
 
Well it won't bind on the fence any more. It might throw a little more dust above the table though. Good job. When you measured the front and back did you mark on the bland and rotate it to the back to measure that same spot or did you just measure the blade as it was? I'd also be curious if when you move the blade if there is any variation.

I like your little measuring jig by the way. I will be making one of those this spring. That and one for measuring guitar top thickness. I wish more people would share machinery set up threads. Very interesting stuff and educational.
 
Yes I checked all around the blade front and back and the pics above show the worst reading. It fluctuated between 0.001 and 0.004mm. To I assume this could be unevenness in the paint, particles of dust, etc. Essentially it's much better than it was, so I'm happy.
 
Nice one Tom...and as you say...the error is in the right direction...not that it is huge anyway! I think the fact that you are aware of exactly HOW to adjust it now is key. It's all very well saying that it is only 10 thou off and giving up but your tenacity has paid off and will help if it were to be a problem

One other interesting thing to come out of this is the dust extraction issue again. I have had the same nightmare as you trying to get the Scheppach dust extraction better and it is very similar to the TS200.

I like the hopper ideas...a LOT....and also have been working on the SUVA idea...I have got this far...with bits from the bootfair again...this time a DJs gooseneck and a window opener...

DSC_0080.JPG


The plexiglass cowling will simply bolt to the bottom of the brass opener plate and it will ride up and down with the wood:

UP.......

DSC_0083.JPG


DOWN.....

DSC_0082.JPG


This works fine with the side extension down...but I am scratching my head on where to put it without drilling holes when the extension is up...

If I get this prototype working I will do some more WIP pictures...

Jim
 
yep keep us updated on that Jim. I like the goose neck idea. Ideally, I would like my guard to come down from the ceiling. The problem with using a side mounted solution is that I want to use the surface for assembly, or another dumping ground (;)). So anything attached to the side of the unit will be in the way. I either need to commit to a permanent place to have the unit when sawing or forget the idea and try to improve the riving knife mounted guard somehow. If I did the latter, I'd like to remake the guard itself to upgrade dust extraction efficiency, make it transparent for better visibility and make it easy to to remove when I want the saw back as a work surface.
 
wizer":8hxnxl97 said:

Well done Tom!!

wizer":8hxnxl97 said:
Next I need to look at the blade rise mechanism because it's become very stiff. It was always stiff and I'm not sure if it's worse since I've adjusted the blade\motor alignment. It might need flipping upside down again. I tried WD40, but it didn't seem to make a difference.

WD40 is not a lubricant. It has some lubricating properties when freshly applied but when it dries out it will cease to work.
WD stands for Water Displacement!!

If you are going to cover the screw then use grease otherwise the dry ptfe spray is the stuff to use.

Bob
 
Cheers Bob, it was all I had to hand. My dodgy guts feeling is that it's not a lubrication issue. The wheel has become very difficult to move. So I'm going to flip it back over on it's back on Friday (baby sitting tomorrow :() and see what the bally hoe is going on.
 
Mr Ed":30dumx4w said:
Heres the hopper I made for my kity 419. Basically nicked Robs design, but used an Axminster plastic outlet for the bottom

3842620909_e51635d795.jpg


Ed

Ed,

As a fellow 419 owner and really fed up with the almost complete lack of dust extraction I'm wondering if you took the internal blade 'shroud' off or modified it in any way?

Tom,

Interesting to follow your experience, - glad you managed to achieve a good result.
 
Yep, I'm sad. Tonight I are bin mostly drawing my table saw

ts200_rev1.png


:D
 
stuartpaul":3rdqgow4 said:
Ed,

As a fellow 419 owner and really fed up with the almost complete lack of dust extraction I'm wondering if you took the internal blade 'shroud' off or modified it in any way?

Tom,

Interesting to follow your experience, - glad you managed to achieve a good result.

I did the mod a few others have done where you grind the side off the blade shroud where it is spot welded together, leaving the bit on the side where the motor and pulleys are. This allows the dust to drop into the hopper - its not perfect but a lot better than the as sold setup.

Ed
 
Mr Ed":2xrigmfm said:
stuartpaul":2xrigmfm said:
Ed,

As a fellow 419 owner and really fed up with the almost complete lack of dust extraction I'm wondering if you took the internal blade 'shroud' off or modified it in any way?

Tom,

Interesting to follow your experience, - glad you managed to achieve a good result.

I did the mod a few others have done where you grind the side off the blade shroud where it is spot welded together, leaving the bit on the side where the motor and pulleys are. This allows the dust to drop into the hopper - its not perfect but a lot better than the as sold setup.

Ed

I've done the same to my saw. Took the below the blade guard out and used the Axminster Dust Hood on the bottom of the saw to 100mm extractor. It does ok but I find the vast majority of the waste on my saw escapes out the front!
 
jlawrence":3ixo3f0y said:
Wizer, I don't suppose you fancy sharing that sketchup model ?

Certainly. I just need to finish it first. It needs the rails adding. I have drawn it for my own needs. So it's missing one of the side panels and obviously the sliding gear is missing. The measurements are pretty much spot on but I'd advise you check my working if you are building anything from it.

Should be ready tonight
 
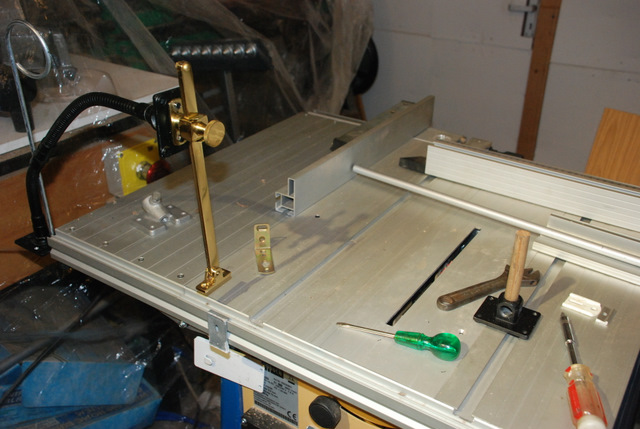
Micro Progress today. My fault, I didn't go out there with a pre-prepared plan and ended up just pottering about. I flipped the saw over again because the rise and fall had become very stiff. I've still not bought any PTFE but did find some silicone spray which seems to have done the trick. It's only stiff on the last turn which is no bother really. However, now the tilt has become stiff and the silicone didn't seem to fix that. Will try the PTFE when I get it.

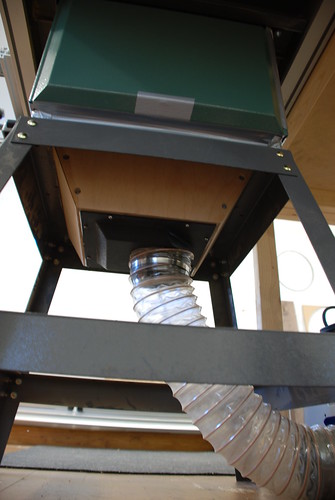
When looking at Bean's old thread where he upgraded the dust extraction on his K419, I noticed he also removed the blade cowl but he used a grinder to remove the bit that goes round the blade, leaving a cover for the pulley and belt. I'm not entirely sure if this is necessary? Comments? As it stands the belt and pully are exposed for dust to freely flow over them:

DSC_0497.JPG


Should I try to cover this? I tried using a dremel to cut through the welds of the cowl but it wasn't that simple and I'll have to take my mini grinder to it if needed.

Something else which is odd to me. When you wind the blade down the pulley is pushed against a cranked metal bar:

DSC_0498.JPG


It might be hard to work out what I'm talking about. But basically the belt then runs on the cranked metal bar. This seems like a bad idea to me? Won't it cause the belt to wear?

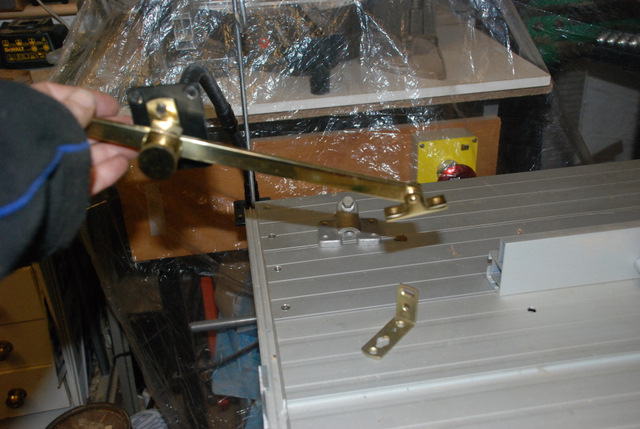
Finally I noticed that with the blade tilted fully, part of the motor mounting protrudes out the side of the case.

DSC_0501.JPG


The manufactuerers bright idea was to make a side panel so that it could swing free into this space. Maybe I'm missing something, but surely it would have cost less for them to just trim it to fit inside the case? Anyway, that's what I did:

DSC_0503.JPG


My mini grinder is setup with the abortech at the moment, so as I had the dremel out, I thought I'd do it with that. Big mistake. I went through at least ten 'heavy duty' discs! To top it off, I didn't remove enough! There's about 1mm sticking out the side now. The reason wanted to do this was so I could fit my own flat panel on there in order to fit it in a cabinet. So I'll either setup the mini grinder or more likely, rebate a section out of the panel to it will fit flush. :roll:

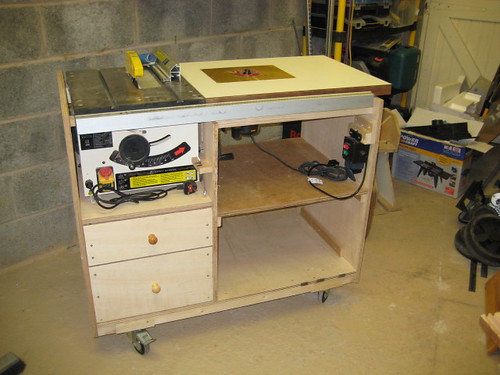
At least it's progress, of sorts. Next is to design the 'hopper'. That's another head scratcher for my pea sized brain. I think trial and error is the order of the day. As hard as I try, I just can't seem to draw it in SU.
 
Good LORD Tom!!!

Good job you don't have a warranty on it!!

There look like a huge number of design faults there.......

I wonder if - after all - it might be worth putting this whole story to Axminster...I know that you didn't buy it from them but SURELY they would be interested since they still sell these!

I would be interested to know what they had to say.

Jim
 
I dunno, but Axminster watch these forums and are sure to notice the thread with their name in the title. As you say, there's no warranty on it. So I'm free to do whatever I like to it. Yes, hacking bits of metal off the internals is a bit scary. But I can't honestly think why they decided to fabricate a curved panel rather than trim 20mm of the corner of the motor assembly. I do understand that 99% of people who bought this saw won't really give a hoot about the side panels. It just interferes with my designs to insert it into a rolling cabinet. Of course, this machine is not made nor designed by Axminster. It's a generic clone that they have badged as their own. So I doubt they are at all interested in changing the design. To be honest I think to improve this machine from a manufacturing point of view, it needs to be redesigned from the ground up. But saying that, people who own this saw, generally appear to be happy, which is why I bought it. But I found a lot of niggles that ordinarily would have prompted me to get rid. But funds are tight and so is space. So I'm making my own frankenwizer. Hopefully it will be for the better, we'll see. ;)
 
Status
Not open for further replies.
Back
Top