Edge Jointing Thin Stock

UKworkshop.co.uk

Help Support UKworkshop.co.uk:

This site may earn a commission from merchant affiliate links, including eBay, Amazon, and others.

custard

Established Member
Joined
20 Aug 2008
Messages
7,162
Reaction score
665
Location
Hampshire
There was a post recently about edge jointing. I don't want to re-hash that, but one thing that didn't get much attention was edge jointing thin stock, and I'd class anything below 18mm or 3/4" as thin stock for edge jointing purposes.

It's worth emphasising that edge jointing, joining two narrow boards together to make a wider board, is the absolute primary woodworking joint. Unless you can do it confidently and consistently then your woodworking career is pretty much over before it's begun. Furthermore, it's one of the areas of woodworking where hand tool skills are still critical, edge jointing with machine planed, saw cut, or router formed edges will always be inferior to those made with a hand plane. In fact if you apprentice as a cabinet maker, or sign up on a furniture making course, it's almost certain that the syllabus will start as follows. Step one, fettle and sharpen a hand plane. Step two, plane a board so all six faces are square and true. Step three, edge joint two or three boards together and make something simple like a chopping board. The real lesson to take from that is that you can't seriously begin to even learn about furniture making until you're reasonably proficient at edge jointing by hand.

Edge jointing moderately thick boards is the sensible place to start. A typical cabinet or side table top will usually be about 21/22mm thick, or about 7/8". And this is what a 5 1/2 plane looks like balanced on a 21mm thick board.

Edge-Shooting,-21mm-Board.jpg


Anything in the range 18-25mm thick will let the plane balance nicely, so is fine for your first attempts.

But once you advance in furniture making you'll find that you frequently need to edge joint thinner stock. And then things start to get progressively trickier.

This is what a 5 1/2 plane looks like balanced on the edge of a 12mm thick drawer side.

Edge-Shooting,-12mm-drawer-side.jpg


This is pretty much as thin as I'd like to go for edge jointing with the board held vertically in a vice. Sure I can plane a much thinner board smooth, but edge jointing demands planing it smooth, straight and true. And despite being a full time furniture maker with many years experience under my belt, this is the limit of my own personal skill. For the average hobbyist I'd suggest 18mm is a sensible minimum. The problem is that the board starts to flex as it gets thinner, and so the plane begins to wobble, which means you're introducing wind to the edge, also it's probably going to be complex wind that will go one way and then the other and then switch back again.

Even if you think you're skilled enough to go thinner than 12mm with the workpiece held in a vice, the board thicknesses commonly used in cabinet making will still catch you out before long.

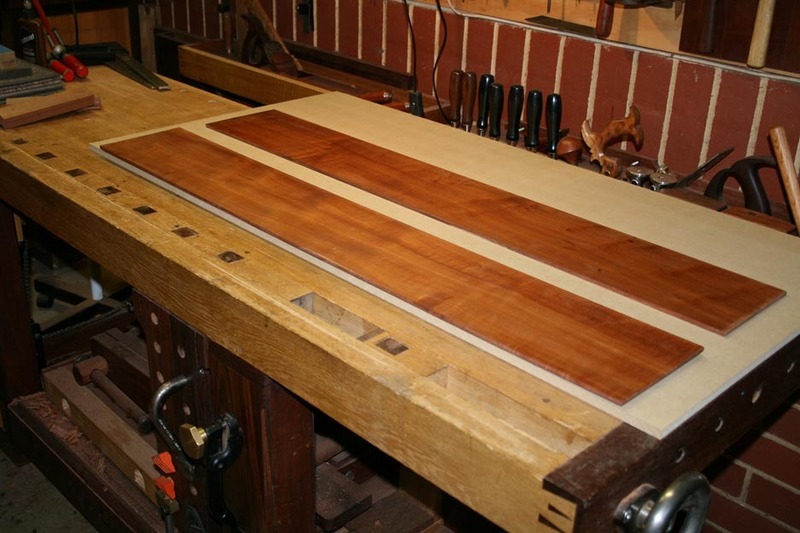
This is an edge jointed, 8mm thick, "standard" drawer bottom in Cedar of Lebanon,

Edge-Shooting,-8mm-Drawer-Bottom-(2).jpg


And this is a 5 1/2 plane balanced on that 8mm edge, that's now really looking unstable

Edge-Shooting,-8mm-Drawer-Bottom.jpg


And the problem doesn't stop there. At some point you'll certainly need 6mm or 4mm thick stuff for your furniture. Until eventually you'll be faced with edge jointing 2mm thick saw cut veneers!

Edge-Shooting,-2mm-Saw-Cut-Veneers.jpg


And top end furniture makers usually edge joint together even 0.6mm thick commercial veneers as a matter of course!

That's as many photos as will go in one post, so I'll follow on with a separate post on practical solutions to this problem.
 

Attachments

  • Edge-Shooting,-21mm-Board.jpg
    Edge-Shooting,-21mm-Board.jpg
    79.4 KB · Views: 2,351
  • Edge-Shooting,-12mm-drawer-side.jpg
    Edge-Shooting,-12mm-drawer-side.jpg
    73.9 KB · Views: 2,348
  • Edge-Shooting,-8mm-Drawer-Bottom-(2).jpg
    Edge-Shooting,-8mm-Drawer-Bottom-(2).jpg
    72.7 KB · Views: 2,347
  • Edge-Shooting,-8mm-Drawer-Bottom.jpg
    Edge-Shooting,-8mm-Drawer-Bottom.jpg
    83.2 KB · Views: 2,348
  • Edge-Shooting,-2mm-Saw-Cut-Veneers.jpg
    Edge-Shooting,-2mm-Saw-Cut-Veneers.jpg
    70.5 KB · Views: 2,348
How an earth do you keep the edge square all along? One tiny off-movement and you'll get a massive gap? (btw, I know there are planers with fences)
 
The way I do it is fold boards over (so to speak) and plane as a pair. When you fold back the joints match perfectly. This is how I used to do guitar tops and backs.
 
12 is about where comfortable stops for me, but I will do down to a quarter of an inch in a pinch, if it means taking a shot at it and not having to fixture a board to shoot the edge laying down. Plane has to be sharp if the board edge is much above the top of the bench.

I don't have a power jointer, so there's really no choice in getting things in order other than to plane them.

If I have a bunch of quarter inch boards the same length (for drawer bottoms, or a flat panel on a cabinet, etc) and I don't feel like match planing all of them, I will just clamp them together and plane them all reasonably close to straight end-to-end, and square as a bunch - I've never had any come apart despite not match planing them.

But I don't have the same pressure for perfection and durability as a professional maker would.

Interested in seeing what your solutions are.
 
Many people are tempted to get a plane that has a built in 90 degree fence, thinking that'll be their "get out of jail" card for edge jointing.

Those devices can sometimes work. But they're so limited in terms of practical application that you're far better off acquiring the skills and know how to do the job with your regular bench plane. One obvious problem is that the fence needs space above the vice jaws, and you'll frequently want to edge joint boards that are too narrow to permit this. Another problem is that you have to exert side pressure to keep the fence tight against the workpiece, and on thinner boards that pressure will be enough to distort the workpiece and scupper accuracy. I'm not knocking those tools, they're great for bevelling edges for example, but a fenced plane will never be a silver bullet solution.

The real answer is to rotate the workpiece through 90 degrees and lay it down flat on the bench. I've shown before one style of shooting board that I use regularly that is very good for edge shooting,

Shooting-Board-1.jpg


This is the best solution if your bench isn't particular flat, or if you're really fussy about not marking your bench by running the side of a plane along it.

But if your bench is flat then there are plenty of other alternatives. The starting point is to lay a length of 9mm or 12mm good quality ply or any old MDF on the bench top,

Bench,-Edge-Shooting-01.jpg


Then cramp the workpiece on top of that, with just a couple of mill protruding over the edge of the ply/MDF. This raises the workpiece enough so that your plane iron will fully engage against it.

Bench,-Edge-Shooting-02.jpg


Carefully set the apex of the iron's camber at the mid point of the workpiece thickness. You can then follow your normal edge shooting routine until you've taken your final full length shaving. As always in furniture making you should never just hope that the job's been done right, you should always check.

Bench,-Edge-Shooting-03.jpg


I'm not entirely happy about testing for squareness in this fashion, I prefer to have the stock of the square resting on the edge and then take a reading from the blade. On a really critical piece I'll put the work piece back in the vice and test that way, but for an initial check this is better than nothing, but it pays to do it really carefully, with a light behind to reveal any inaccuracies. Obviously you do this at several point along the board, but the beauty of running the plane along the flat bench is that any inaccuracy should at least be consistent.

You then need to check that the edge is straight (or has a minute hollow if you so prefer). I like to position a couple of chocks to support my straight edge at the right height,

Bench,-Edge-Shooting-04.jpg


And then offer up the straight edge,

Bench,-Edge-Shooting-05.jpg
 

Attachments

  • Shooting-Board-1.jpg
    Shooting-Board-1.jpg
    139.5 KB · Views: 2,322
  • Bench,-Edge-Shooting-01.jpg
    Bench,-Edge-Shooting-01.jpg
    77.4 KB · Views: 2,320
  • Bench,-Edge-Shooting-02.jpg
    Bench,-Edge-Shooting-02.jpg
    73.3 KB · Views: 2,321
  • Bench,-Edge-Shooting-03.jpg
    Bench,-Edge-Shooting-03.jpg
    68.3 KB · Views: 2,320
  • Bench,-Edge-Shooting-04.jpg
    Bench,-Edge-Shooting-04.jpg
    63.8 KB · Views: 2,319
  • Bench,-Edge-Shooting-05.jpg
    Bench,-Edge-Shooting-05.jpg
    58.1 KB · Views: 2,319
But what if you have a Nicholson or English Style bench, so that the front apron prevents cramping from the front?

Well, you can have some holes towards the back and use holdfasts to secure the workpiece onto the ply/MDF.

Bench,-Edge-Shooting-06.jpg


But on my bench there are trays in the tool well,

Bench,-Edge-Shooting-07.jpg


These trays lift out to give you cramp access from the rear,

Bench,-Edge-Shooting-08.jpg


There are large size F-Cramps which look like this,

Bench,-Edge-Shooting-09.jpg


And they can reach well past the mid point of the bench to provide very flexible work holding,

Bench,-Edge-Shooting-10.jpg
 

Attachments

  • Bench,-Edge-Shooting-06.jpg
    Bench,-Edge-Shooting-06.jpg
    81.4 KB · Views: 2,309
  • Bench,-Edge-Shooting-07.jpg
    Bench,-Edge-Shooting-07.jpg
    69.8 KB · Views: 2,309
  • Bench,-Edge-Shooting-08.jpg
    Bench,-Edge-Shooting-08.jpg
    71.9 KB · Views: 2,309
  • Bench,-Edge-Shooting-09.jpg
    Bench,-Edge-Shooting-09.jpg
    78.9 KB · Views: 2,308
  • Bench,-Edge-Shooting-10.jpg
    Bench,-Edge-Shooting-10.jpg
    74.4 KB · Views: 2,308
To use this approach you have to have a flat bench. Which means checking it's flat with a straight edge. I make my own long, wooden straight edges from quarter sawn, straight grained, ultra stable Mahogany. But you could equally rip a length from the factory edge of an undamaged sheet of MDF,

Bench,-Straight-Edge.jpg


And you also have to check for any twist with winding sticks,

Bench,-Winding-Sticks.jpg


You might think that it's just not worth trying for a flat bench because of seasonal movements. Fair enough, and in some parts of the world, like the Eastern Seaboard of the USA, I suspect it would become too much faff. But here in the UK I don't find our seasonal changes are all that extreme, in a maritime climate it's fairly damp all year round and the temperature variations aren't that severe.

Bottom line is that I've had a fair few benches in a few different workshops, and I've always managed to keep them flat enough for this style of shooting. The first year or two might require a bit more effort, but once they settle down I've never found flattening too much of a hardship. In fact I designed my latest bench so I could remove all the hardware and pass it through my 405mm thicknesser, but after five or six years that's not been necessary.
 

Attachments

  • Bench,-Straight-Edge.jpg
    Bench,-Straight-Edge.jpg
    75.3 KB · Views: 2,294
  • Bench,-Winding-Sticks.jpg
    Bench,-Winding-Sticks.jpg
    68.1 KB · Views: 2,293
One thing I should have added, for veneers it's the same basic approach, but you sandwich the veneer between two sheets of MDF to keep it all flat.

In case you're wondering why anyone would bother gluing the edges of veneer together, in the same way as with regular boards, the answer is this. Saw cut veneer will be in the range 1-2mm thick, the bottom face is firmly attached to the ground and will therefore resist shrinking, but the top face has a fraction more latitude. Consequently an unglued seam can very slightly open up at the top face. The problem then is normal household dust will enter this minute gap and produce a fine black line. Gluing up the seam prevents this from happening, and really top-end craftsmen and women, especially when working with pale timbers, will take the same approach even with 0.6mm thick commercial, knife cut veneers. Their rationale is that they don't just want their work to look good when it leaves the workshop, they want it stay looking good for generations to come.
 
Excellent thread custard. I have learnt something here. Most of my jointing has been thin stock to make guitars, so this is around 5 or 6mm thick but not terribly long so a home made shooting board worked fine. Or the other extreme of jointing 40mm thick board when making worksurfaces) - I could have done with your methods then.
 
Very nice!

Benches stay flat here if they're laminated, but as you suggest, there's a little bit of moving around that is due to who knows what? (Maybe all of the wood in the bench didn't start at the same moisture level?). My entire bench isn't flat, but the front half is, and that flatness is too useful to forgo it.
 
All you do is clamp the thin board to a thick board and joint the whole shebang in the vise, like any other board 3/4" or thicker. You can clamp the thin board between two other boards or just along side. Whatever makes you feel good. For veneer, clamp the packet between two pieces of cheap lumberyard pine and plane away, again, upright in the vise. When doing veneer clamp it just below the edges of the pine so that you plane away a little of the pine before the plane hits the veneer pack and at that point the plane is hitting both pieces of pine plus the veneer pack in the middle. This is when you'll want a No. 8. or wider vintage woodie jointer, which makes the process practically a no-brainer. I like the heft and extra length, but a No. 7 will still work too. Sharpen up. Again, all this is done upright, in the vise on your bench.

The thick board doesn't have to be all that wide, just wide enough to keep the clamps out of the way. Keep $30 worth of cheap pine around just for these purposes. When you've jointed it all away, buy $30 more. Obviously this wood is sacrificial so don't spend a lot of money on it. Cost of doing business. Bid it in the job.
 
Match planing 1/4" panels ...

OneStepBack_html_m801f75.jpg


Got to keep them flat and aligned ...

OneStepBack_html_3607e799.jpg


#7 jointer ...

OneStepBack_html_m15577872.jpg


Blue tap used to pull the edges together. The tape has a little stretch. The panels have a spring joint ...

OneStepBack_html_m34b74f22.jpg


Do it whatever way it works.

Regards from Perth

Derek
 
CStanford":fhlpqrwu said:
All you do is clamp the thin board to a thick board and joint the whole shebang in the vise, like any other board 3/4" or thicker. You can clamp the thin board between two other boards or just along side. Whatever makes you feel good. For veneer, clamp the packet between two pieces of cheap lumberyard pine and plane away, again, upright in the vise. When doing veneer clamp it just below the edges of the pine so that you plane away a little of the pine before the plane hits the veneer pack and at that point the plane is hitting both pieces of pine plus the veneer pack in the middle. This is when you'll want a No. 8. or wider vintage woodie jointer, which makes the process practically a no-brainer. I like the heft and extra length, but a No. 7 will still work too. Sharpen up. Again, all this is done upright, in the vise on your bench.

The thick board doesn't have to be all that wide, just wide enough to keep the clamps out of the way. Keep $30 worth of cheap pine around just for these purposes. When you've jointed it all away, buy $30 more. Obviously this wood is sacrificial so don't spend a lot of money on it. Cost of doing business. Bid it in the job.

So obvious! Despite this, I have never thought of doing it that way. Thanks for the tip. AJ
 
CStanford":3q6thg72 said:
All you do is clamp the thin board to a thick board and joint the whole shebang in the vise, like any other board 3/4" or thicker. You can clamp the thin board between two other boards or just along side. Whatever makes you feel good. For veneer, clamp the packet between two pieces of cheap lumberyard pine and plane away, again, upright in the vise. When doing veneer clamp it just below the edges of the pine so that you plane away a little of the pine before the plane hits the veneer pack and at that point the plane is hitting both pieces of pine plus the veneer pack in the middle. This is when you'll want a No. 8. or wider vintage woodie jointer, which makes the process practically a no-brainer. I like the heft and extra length, but a No. 7 will still work too. Sharpen up. Again, all this is done upright, in the vise on your bench.

The thick board doesn't have to be all that wide, just wide enough to keep the clamps out of the way. Keep $30 worth of cheap pine around just for these purposes. When you've jointed it all away, buy $30 more. Obviously this wood is sacrificial so don't spend a lot of money on it. Cost of doing business. Bid it in the job.

Side question, Charlie - you have a plano clamp or three, don't you?

I'm raking my brain trying to remember if the last cabinet I did with thin panels was clamped in one - it wouldn't have mattered because they went into a frame, so if they weren't dead flat after glue up, the frame flattened them out no problem. It's one thing to joint the thin boards, another thing to clamp them together - I'm a big fan of the plano gadget because you can dump the panels in it, take them out every couple of hours and put another one in it, and there's less fumbling and no heavy lifting or moving.

Just comes to mind because of thin boards.
 
Sadly, I no longer have the Planos. Can't recommend them highly enough though. Of course you still have to joint edges for them to work well. I used to have a hand-held RF wood welder too which made the Planos really make sense. Different business model, and all that.
 
Custard
Does that rounded profile on your wooden straight edge actually prevent it from warping ?
I have often seem them, but was skeptical
Lovely bench
Tom
 
One usually rounds or profiles the un-trued edge to prevent using the wrong edge. Only one edge is typically trued when these are made.

I just use the edge of a Stabila 4' level tipped at an angle, FWIW. Any of the four arrises will do.... :wink: It's in the shop, why not?
 
Interesting stuff.
Not to forget the trad way of joining thin panels; needs no square, shooting board, straight edges or straight benches, or clamps, no piles of bricks, no sticky tape.
Does need hot glue, though it will work with PVA with a tiny bit of clamping.
This is a huge advantage as no clamps also means no bending of boards, and is quick and easy.

To get the edges to fit, after planing up as best you can by eye very quickly, you match them up against each other - not to an external straight edge.

It's called "offering up" and is a very trad way of making many all sorts of things fit against each other.
Then plane one or both panels to improve the fit - concentrating on just removing the 'bumps' which are keeping them apart.
Then hot glue to both faces, rub the two panels together and hey presto job done. It grips in seconds. It's called a 'rubbed' joint. The rubbing squeezes out excess glue and bubbles and surface tension (or something)* keeps the joint tight for the few seconds needed for the glue to go off a bit.
Can be done with PVA but it takes longer to grip and may come apart whilst you are not watching - so some very light clamping will help here but not always needed.

* It's like sheets of glass left stacked outside with water between - you can have a job separating them even though the water has zero 'glue' effect.

PS 'capillary action' http://forums.finewoodworking.com/fine- ... /rub-joint

PPS it's likely that the millions of joined panels found in old doors, and musical instrument backs/fronts - none of them were joined with the aid of clamps, all done with a rubbed joint.

Easiest way to match up two board edges is in the vice. Hold one, balance the other on top - it becomes immediately obvious what/where needs planing. Perhaps swap them over. Mark faces and edges so you are matching the same edges same way around, otherwise it gets impossible. A no.5 comes into it's own here.
NB you are not aiming to get two dead straight square edges - you are aiming for two edges which will fit together closely and give a flat panel. Not the same process but the same result obtained much more easily.
 
CStanford":21vwy1kp said:
Sadly, I no longer have the Planos. Can't recommend them highly enough though. Of course you still have to joint edges for them to work well. I used to have a hand-held RF wood welder too which made the Planos really make sense. Different business model, and all that.

Never saw an RF wood welder before, and I worked at Aristokraft in college! (I was in the mill and assembly area, though, and doors and face frames were done elsewhere, so I wouldn't have seen something like that there, anyway).

Kind of a nifty device for a small shop. If you had several similar panels, you could put them in the planos to line them up and zap them with the wood welder.
 
Back
Top