


Actually this is not really a WIP since to avoid making a fool of myself I’ve finished and tested the cyclone already, so this is more a reverse-engineering report ")
I know it’s been done before but it’s a while since anyone posted theirs so I thought I’d show this anyway.
After suffering for many years with various shop-vacs and their inherent blocked filters I’d decided to go for a Super-DD combined with a Camvac 2-motor 286. This idea soon became a non-starter however when the shipping quote came in from Oneida :shock:
The alternative could have been a Record RX5000 but I thought it would at least be worth a try to construct my own cyclone provided I could do it cheaply and it worked :wink:
It also had to be structurally sound and built to last a good while. That meant better that a paint bucket, 3 pipes and a load of glass fibre car body filler (no offence meant to those who’ve done that !).
As a start point I bought a bright orange traffic cone, new ! (yes, really !!) :shock: :roll: + a black plastic concrete mixing pail (which cost next to nothing).
And this is how I put it together as a dust cyclone :-
First I removed the rubber foot from the cone which revealed a moulded flange perfect for attaching an upper cylinder. I also cut the top off the cone to suit a 4” waste pipe.
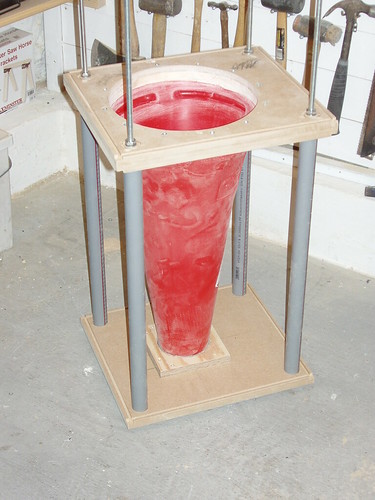
I then made a flange ring from 18mm timberboard and glued and screwed it to the flange on the cone. On top of that I glued and screwed a 12mm MDF square plate. A similar MDF plate, but 19mm, supports the outlet pipe and will form the lid of the waste box (which I havn’t made yet).
To tie the 2 plates together I used 4 lengths of M10 threaded rod inside 4 lengths of 32mm plastic pipe which sit in routed locating grooves in the support plates.
Here’s the complete cone assembly with top and bottom plates and outlet/waste pipe at the bottom of the cone.

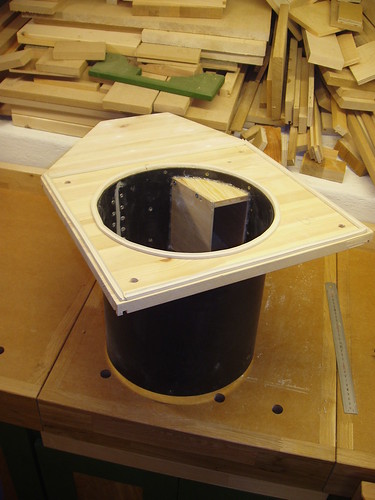
The upper cylinder is cut from the concreting pail and then rolled to fit the inside diameter of the cone flange and joined with a metal strip pop-riveted and glued. The cylinder is then screwed into the edge of the timeberboard flange ring from the inside with small countersunk screws.
The side intake pipe I made as a box from ½” ply that narrows to a rectangular funnel directing the air/dust stream around the outside of the top cylinder instead of just squirting it in like a fountain. The whole box then hangs from another plate made from 18mm timberboard which also forms a top flange for the upper cylinder. Again, small countersunk screws from the inside.
Here’s the complete upper cylinder and side intake assembly :-
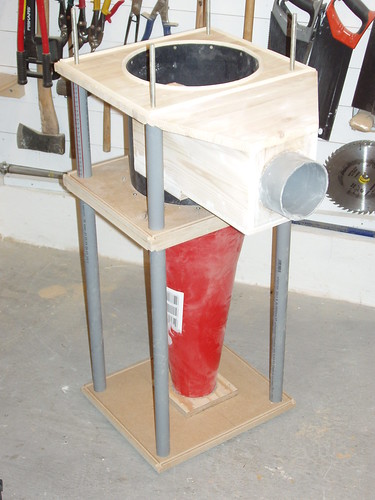
To keep the upper assembly rigid and to avoid any structural load being placed on the plastic cylinder, I mounted the whole cylinder arrangement on the threaded bars with 4 more plastic tube spacers in locating grooves.
Here’s the complete cone and upper cylinder assembly :-
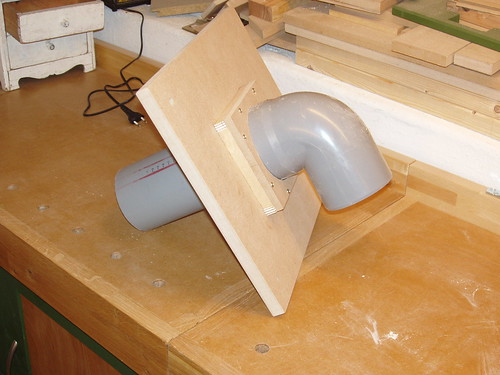
I wanted to be able to easily access the inside of the cyclone in case of blockages so the top vacuum pipe is mounted through another MDF plate which then fits over the side outlet support plate and is sealed with rubber weather seal strip (white strips in previous picture). The plan is to hang the whole cyclone from the ceiling so on the top I used ring nuts.
Finally I sealed all the seams and joints with loads of hot glue.
Here’s the vacuum extract pipe arrangement and the complete cyclone :-
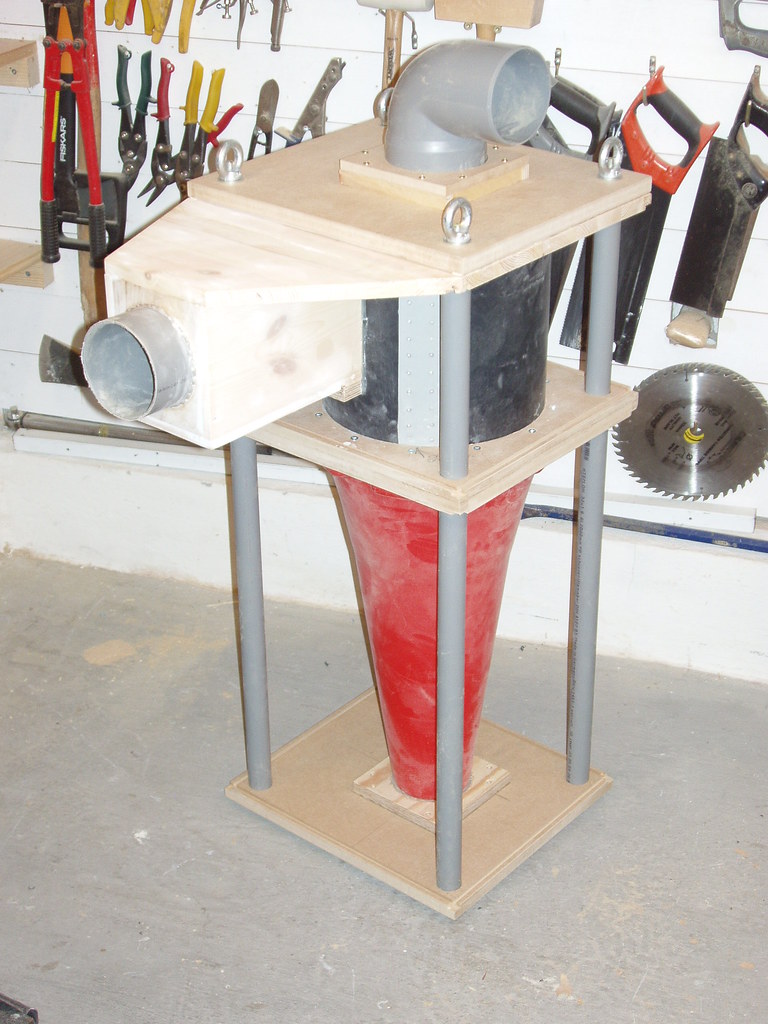
So, what we’ve got now is a contraption that looks like an upturned traffic cone with a black plastic bucket stuck on top. Not very pretty, but I have a plan to do something about that next ……………. Watch this space !
And the 6 million $ question; “does it work ?”
I didn’t want to buy the planned Camvac if the cyclone didn’t work so I havn’t been able to run a proper test yet. I did however borrow a small 3/4hp chip collector with 4” inlet and connected to that the cyclone sucked up everything I threw at it whilst the chip collector only spat out a small amount of fine dust.
So I think the answer is yes it does work, probably ……………..
Mark
I know it’s been done before but it’s a while since anyone posted theirs so I thought I’d show this anyway.
After suffering for many years with various shop-vacs and their inherent blocked filters I’d decided to go for a Super-DD combined with a Camvac 2-motor 286. This idea soon became a non-starter however when the shipping quote came in from Oneida :shock:
The alternative could have been a Record RX5000 but I thought it would at least be worth a try to construct my own cyclone provided I could do it cheaply and it worked :wink:
It also had to be structurally sound and built to last a good while. That meant better that a paint bucket, 3 pipes and a load of glass fibre car body filler (no offence meant to those who’ve done that !).
As a start point I bought a bright orange traffic cone, new ! (yes, really !!) :shock: :roll: + a black plastic concrete mixing pail (which cost next to nothing).
And this is how I put it together as a dust cyclone :-
First I removed the rubber foot from the cone which revealed a moulded flange perfect for attaching an upper cylinder. I also cut the top off the cone to suit a 4” waste pipe.
I then made a flange ring from 18mm timberboard and glued and screwed it to the flange on the cone. On top of that I glued and screwed a 12mm MDF square plate. A similar MDF plate, but 19mm, supports the outlet pipe and will form the lid of the waste box (which I havn’t made yet).
To tie the 2 plates together I used 4 lengths of M10 threaded rod inside 4 lengths of 32mm plastic pipe which sit in routed locating grooves in the support plates.
Here’s the complete cone assembly with top and bottom plates and outlet/waste pipe at the bottom of the cone.
The upper cylinder is cut from the concreting pail and then rolled to fit the inside diameter of the cone flange and joined with a metal strip pop-riveted and glued. The cylinder is then screwed into the edge of the timeberboard flange ring from the inside with small countersunk screws.
The side intake pipe I made as a box from ½” ply that narrows to a rectangular funnel directing the air/dust stream around the outside of the top cylinder instead of just squirting it in like a fountain. The whole box then hangs from another plate made from 18mm timberboard which also forms a top flange for the upper cylinder. Again, small countersunk screws from the inside.
Here’s the complete upper cylinder and side intake assembly :-
To keep the upper assembly rigid and to avoid any structural load being placed on the plastic cylinder, I mounted the whole cylinder arrangement on the threaded bars with 4 more plastic tube spacers in locating grooves.
Here’s the complete cone and upper cylinder assembly :-
I wanted to be able to easily access the inside of the cyclone in case of blockages so the top vacuum pipe is mounted through another MDF plate which then fits over the side outlet support plate and is sealed with rubber weather seal strip (white strips in previous picture). The plan is to hang the whole cyclone from the ceiling so on the top I used ring nuts.
Finally I sealed all the seams and joints with loads of hot glue.
Here’s the vacuum extract pipe arrangement and the complete cyclone :-
So, what we’ve got now is a contraption that looks like an upturned traffic cone with a black plastic bucket stuck on top. Not very pretty, but I have a plan to do something about that next ……………. Watch this space !
And the 6 million $ question; “does it work ?”
I didn’t want to buy the planned Camvac if the cyclone didn’t work so I havn’t been able to run a proper test yet. I did however borrow a small 3/4hp chip collector with 4” inlet and connected to that the cyclone sucked up everything I threw at it whilst the chip collector only spat out a small amount of fine dust.
So I think the answer is yes it does work, probably ……………..
Mark

