Dewalt Bandsaw DW739 Setup and Maintenance

UKworkshop.co.uk

Help Support UKworkshop.co.uk:

This site may earn a commission from merchant affiliate links, including eBay, Amazon, and others.
yebaws":kba422ui said:
Very old thread, but you never know. I recently bought a dead dewalt dw739 on ebay and have got it going by buying a new stator for the motor. Howeve, I'm not sure I've put the pulleys together properly. It goes, but makes a lot of noise and lacks power. Maybe I've not put them together right or maybe I'm missing some washers. If you're still subscribed to this thread Jim (can't see here how to pm) and still have your bandsaw, I'd be really grateful if you could post a close up pic of the pulley with drive belt attached.

Thanks!

Hello

Yes...I still get notification for this thread and happy to help if I can but if you can post a picture of your setup with some indication as to what you want me to photograph on mine I shall be happy to do this for you.

Cheers

Jimi
 
Hello Jimi,

That's great thanks. Please see pics attached. One with the motor at its closest to the wheel and one furthest away. Basically, the way it is set up, the outer pulley wheel, furthest from the motor, is fixed. The innermost one is pushed towards the outer one by the spring. With the engine running, the two wheels don't run parallel to each other - they are further apart from each other on the side where the drive belt is. This means that they bang against each other as they go round and it makes a lot of clattering. Maybe this is normal (I've never had a bandsaw before) and the polish on the pulley wheels implies that they have done a lot of banging or rubbing against something in the past, but it seems an odd setup to me, and it means the drive belt is prone to slip and sometimes doesn't start without the wheel being given a spin by hand. When I got the bandsaw, the motor was burnt out, so I worry that it may not be running as smoothly as it should be. All of the expanded parts diagrams I have found are pretty unclear, but they show 3 washers in the pulley assemblage - one one the side closest to the motor, one between the pulleys, and one between ouside pulley wheel and the retaining nut. I have just this last washer, but can't honestly see what difference the other 2 would make. A close up of your pulley assemblage, with and without the belt on would might give me some clues as to whether I'm missing something...

IMG_1686.JPG


IMG_1683.JPG
 

Attachments

  • IMG_1683.JPG
    IMG_1683.JPG
    125.6 KB · Views: 85
  • IMG_1686.JPG
    IMG_1686.JPG
    161 KB · Views: 85
Hi

This is the variable speed mechanism. Basically as you swing the motor further way from the main wheel the moving "half" of the pulley pushes against the spring and moves outwards allowing the belt to dig deeper into the "V" thus altering the speed.

Conversely, if you adjust the motor towards the main wheel...the pressure on the drive belt is lessened and the moving half of the pulley is able to be pushed in towards the fixed part by the spring pressure and thus creates a bigger effective "V" pulley thus reducing the drive ratio and slowing the machine down.

In order for this to work there has to be two critical things happening.

1) The spring must not be weakened and still be strong enough to do its job

2) The shaft against which the moving half of the V pulley runs must be well lubricated without getting this lubrication on the inner surface of the "V"

What I suggest you do is ignore the spring for the moment and take the pulley halves apart and clean the shaft and the inner hole of the moving part really well with alcohol or other solvent and get everything nice and clean. Put a LIGHT coat of oil on the shaft and spring and then reassemble.

You need to adjust the motor spacing so that the outer fixed part of the pulley lines up with the bandsaw wheel so they are co-planer (in the same plane when you look down the two). The moving pulley must not rub against the back casing when the spring is fully depressed i.e. fastest speed....motor moved fully away on the rear adjuster.

Without power to the machine and with the blade removed, rotate the bottom wheel by hand and at the same time slowly adjust the rear speed control.

The belt should force the rear moving V plate back against the spring and the belt should sit further down between the two halves.

As you adjust the speed controller the other way...make sure the reverse happens and the spring is able to push the belt to ride higher on the two halves.

If this works manually and there is no fouling of the back plate against the chassis and the mechanism works as it should you can then add the blade...adjust the tension and power up the machine.

Bandsaws have a very specific order in which they need to be adjusted and aligned and this is only one part of many which could cause the problems you are experiencing.

I wholeheartedly suggest you purchase the DVD by fellow UKW Forumite Steve Maskery " BANDSAW ESSENTIALS...it's worth ten times the cost of the DVD in the time it saves you and the "new" bandsaw that you will acquire by following the tips therein.

Also...get a TUFFSAW blade or three for it...from another grand master of the UKW..Ian. TUFF SAW BLADES.

These two things will transform your non-working machine into a machine you will love...trust me or trust the others who have found this out over the years UKW Review on Workshop Essentials DVD

Try this out and if you are still having problems come back here and report and I will strip mine down and take suitable pictures.

Cheers

Jimi
 
Hello Jimi,

Thanks for that. Can't be sure without any pics, but I guess that I have the pulleys assembled correctly and with all of the pieces....

Will try some adjusting and lubricating and see if it runs more smoothly. New blad might help also...
 
Ok...apologies up front for the poor quality of the pictures but I just grabbed these on my phone as I am rather busy in the observatory at present.

This is the variable speed controller at the back of the chassis above the motor:

20140328_124814.jpg


Once you have stripped the pulley from the motor shaft and ensured it is clean and free of any corrosion or burrs etc...lightly oil and reassemble.

Put the belt back on but not the blade so you have the bottom wheel free to turn by hand using the spokes.

First set the knob (above) towards the slow setting and this should move the motor along the rack towards the bottom band wheel.

This will cause the belt to be loose and therefore the rear pulley half gets pressed towards the fixed half and push the V-belt to the outer edge of the V:

20140328_125017.jpg


WHILE ROTATING THE LOWER BAND WHEEL CLOCKWISE....reach round and turn the adjuster knob to slowly move the motor to the fast position...away from the band wheel.

This will cause the belt to tighten and push the moveable part of the pulley against the spring and the V-belt will sink into the V:

20140328_125113.jpg


Note how the two halves of the pulley are now much wider apart. By moving the belt to an effectively smaller pulley size you increase the ratio between the diameter of the pulley itself and the lower band wheel. This makes it go faster.

This is similar to the Variomatic gearbox of a car.

This is a closeup of the nut holding the fixed part of the pulley onto the end of the motor shaft. You need a new locking nut for this to absolutely ensure that it does not work loose but I hardly ever bother if it looks in good nick.

20140328_124905.jpg


Here are another couple of things that can improve the performance of your saw:

20140328_125318.jpg


Firstly you can take that plastic rubbish out of the table insert and throw it in the bin but not before measuring the thickness and get a piece of thin plywood and make a zero clearance insert (ZCI). Mine is a bit worn but you make it and use the blade to carefully cut the slot and then insert it where the old plastic one was and that way the blade and stock have a much better support which aids the cut.

Secondly..see the blade guide..the old steel ones are removed and copied in Lignum Vitae wood offcuts which is wonderful. It is will quieten down the machine hugely and also it has natural oil which will lubricate the blade passing across it.

There is one on the other side too...

20140328_125309.jpg


....and two on the bottom.

Again...I hope you can make out what's going on from these rubbish pictures but I didn't have time to get the DSLR out and set up.

Cheers

Jimi
 
Hi Jimi,

Thanks for that - very helpful and I appreciate your time taking the pictures (perfectly good quality). Will take your advise about the insert (there's not much left of mine anyway) and I'll have a look at the guides, although I have to confess that Lignum Vitae is a new one for me (wonder where I'll get hold of some of that - ebay I suppose...)

Re the pulley wheels - I see in your pics that yours run parallel to each other, unlike mine that are at and angle to each other. I think this is my problem as they pinch the drive belt, which means that there's often not enough power in the motor to start the thing up, although once running it goes more or less fine. I think this must be something to do with me having something missing (washers?) in the pulley assemblage. I may just go and buy a new assemblage. Having shelled out for a new stator for the motor, I don't want to burn it out again by jamming it...
 
yebaws":39g5foq9 said:
Hi Jimi,

Thanks for that - very helpful and I appreciate your time taking the pictures (perfectly good quality). Will take your advise about the insert (there's not much left of mine anyway) and I'll have a look at the guides, although I have to confess that Lignum Vitae is a new one for me (wonder where I'll get hold of some of that - ebay I suppose...)

Re the pulley wheels - I see in your pics that yours run parallel to each other, unlike mine that are at and angle to each other. I think this is my problem as they pinch the drive belt, which means that there's often not enough power in the motor to start the thing up, although once running it goes more or less fine. I think this must be something to do with me having something missing (washers?) in the pulley assemblage. I may just go and buy a new assemblage. Having shelled out for a new stator for the motor, I don't want to burn it out again by jamming it...

Hi....

There is something seriously wrong other than just missing washers as the two halves of the variable speed pulley are on the same motor shaft and therefore should run parallel to each other throughout the speed range.

Looking at your pictures again more closely..I can see what you mean. Also I see that the moving pulley half appears to be very highly polished and somewhat thinner at the outer edge which would seem to mean that the belt is slipping badly on it and polishing the surface.

Can you take the motor out again and take it all apart which you will need to do anyway to check and lube...and then take a few photos of the various parts.

I can then get a better impression of what's going on and perhaps advise you what is needed.

Cheers

Jimi
 
Hi Jimi,

Some more pics:

All the bits:
IMG_1688.JPG


And in the order they came off the spindle:
IMG_1690.JPG


Close up of the innermost pulley wheel. To me the inside of this looks as though it is worn and perhaps should be narrower (which might help to keep it parallel to the other one on the spindle), but without knowing what it should look like I don't know.
IMG_1689.JPG


The spindle before taking off the spring cup:
IMG_1687.JPG
 

Attachments

  • IMG_1689.JPG
    IMG_1689.JPG
    239.5 KB · Views: 75
  • IMG_1690.JPG
    IMG_1690.JPG
    198.8 KB · Views: 74
  • IMG_1688.JPG
    IMG_1688.JPG
    211.1 KB · Views: 74
  • IMG_1687.JPG
    IMG_1687.JPG
    224.9 KB · Views: 75
Hi

Yes...there is the remains of a bronze bush in the hole of the moving half which appears to be extremely worn.

This is made of soft bronze so that it is self lubricating when it moves in and out but I think something happened to yours and it's basically destroyed.

You will need to replace the pulley or get a new bronze bush machined and pressed in.

I will dismantle mine to confirm later but I'm pretty sure that's the problem.

Sorry....

Jim
 
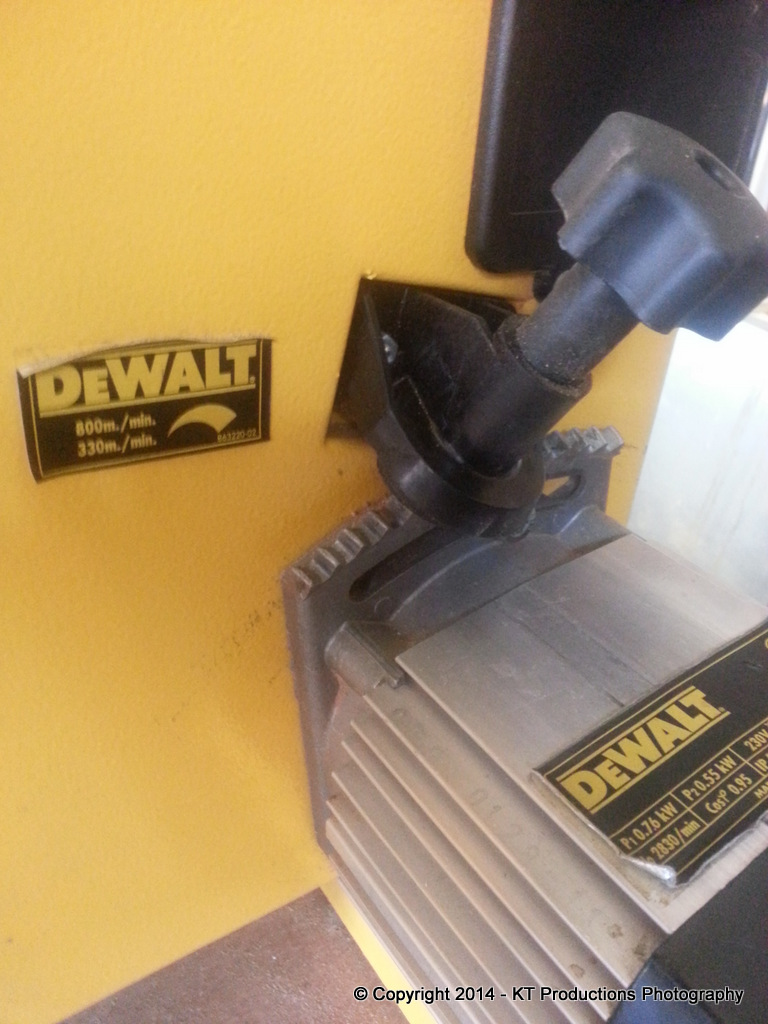
Ok...I finished the installation I was doing in the observatory a little faster than I thought...so I got a few spanners out and took mine apart to show you how it fits together...I had quite forgotten what a BAR STEWARD the design is on these things but it's good because it needed lubricating anyway so you did me a favour!

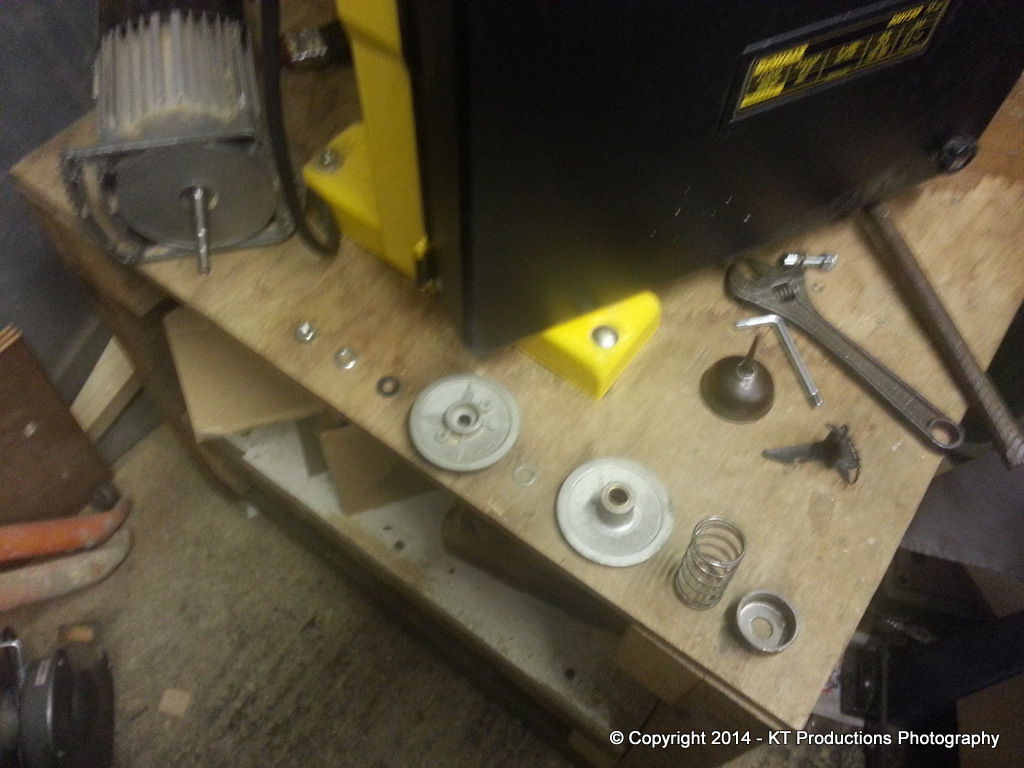
Here is the train laid out from left to right...first off to last off....

20140328_201639.jpg


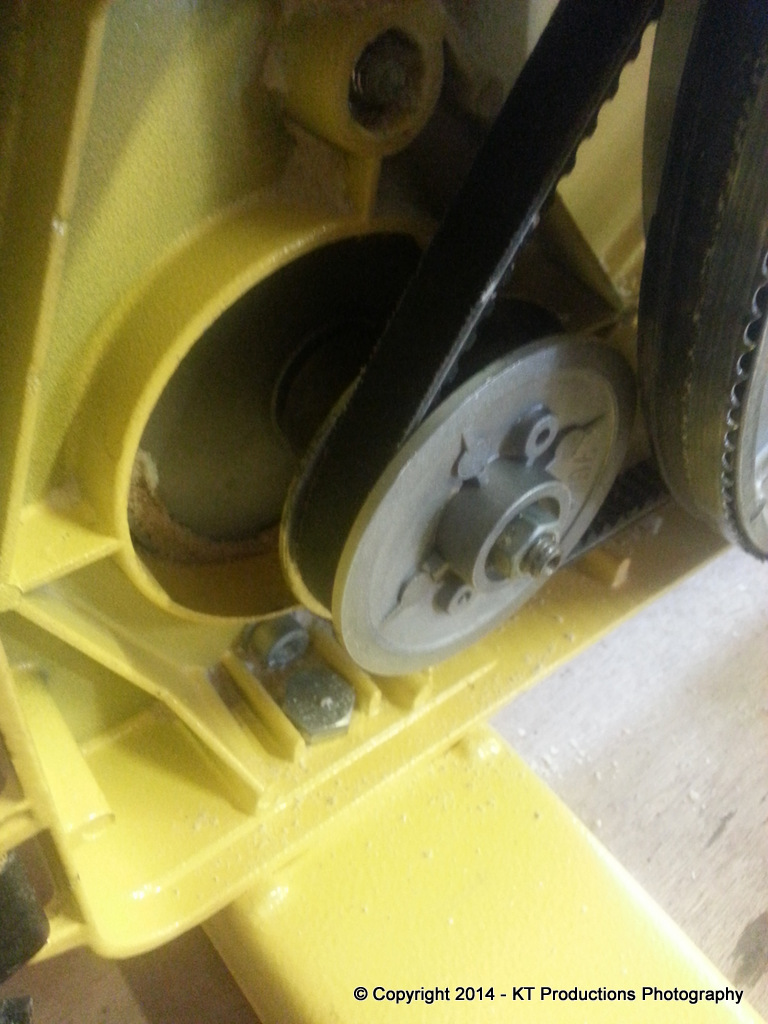
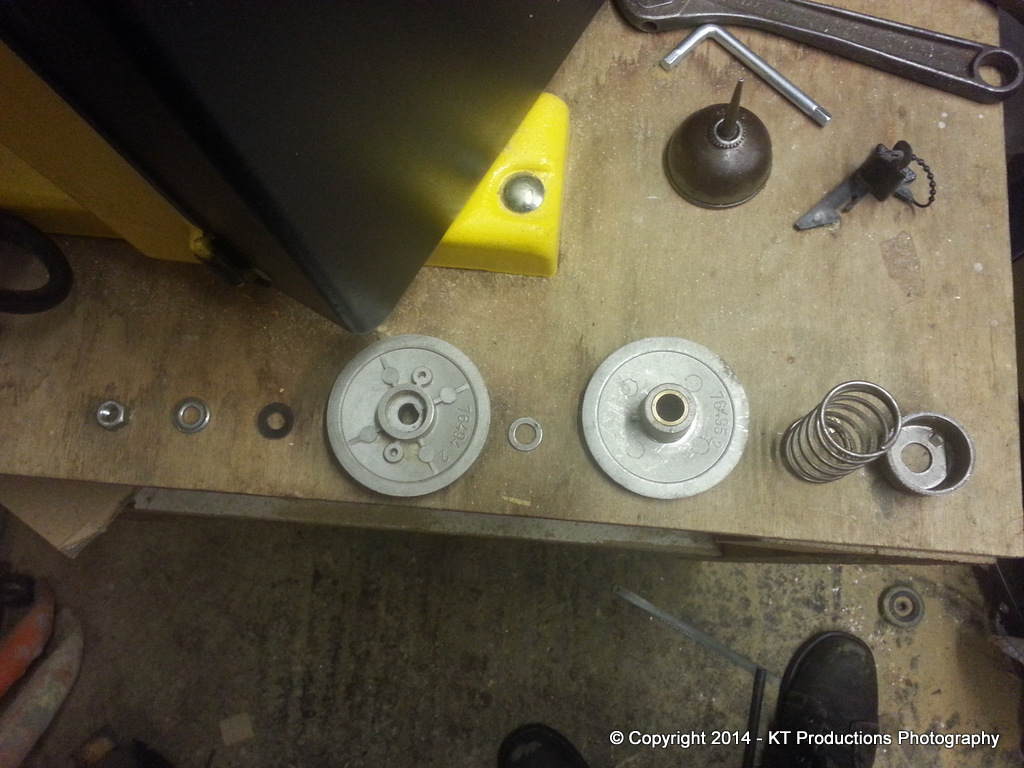
So what do we have...

20140328_201647.jpg


Going from the left...

Remove nut but hang on to the outer pulley and push down on the spring otherwise you will get the whole lot in your face at high speed!

Take the outer two washers off...there is a silver one for the nut and a strong black one below for the pulley...

Holding on to the inner pulley half push down so that you can lift off the outer pulley half.

SLOWLY release the inner pulley taking the spring pressure off and remove the plain silver washer sitting on top of the inner pulley above the bronze bush. This washer is important to separate the two halves when running a tad.

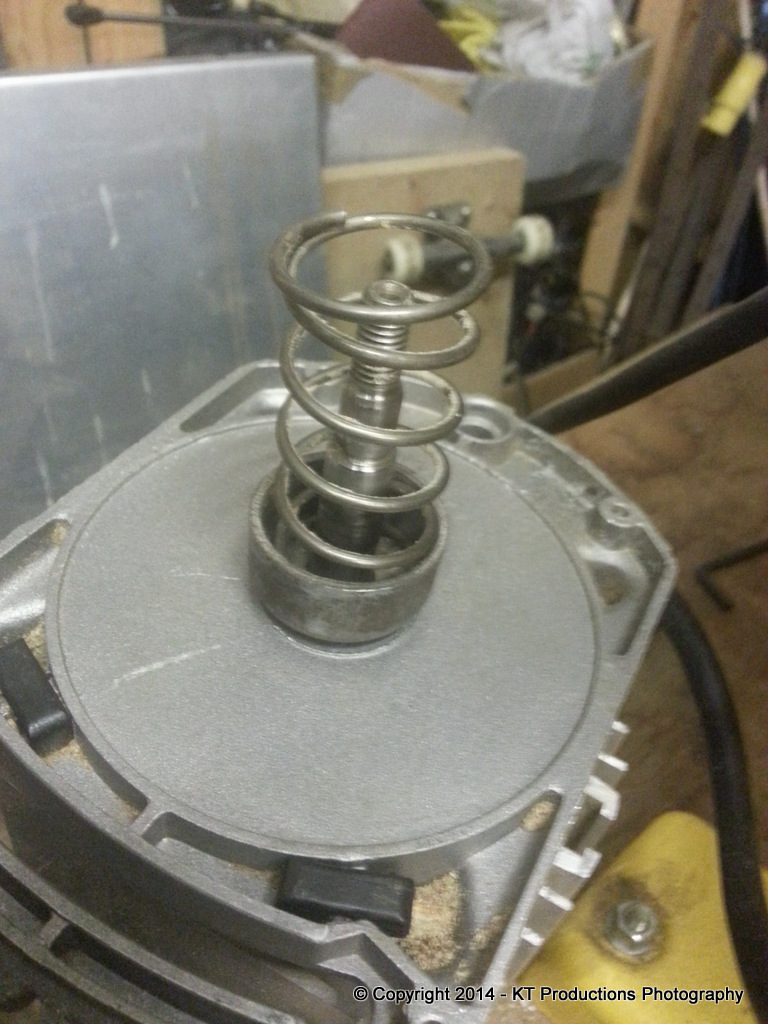
Remove the bottom pulley half and then you can lift out the spring and the spring cup.

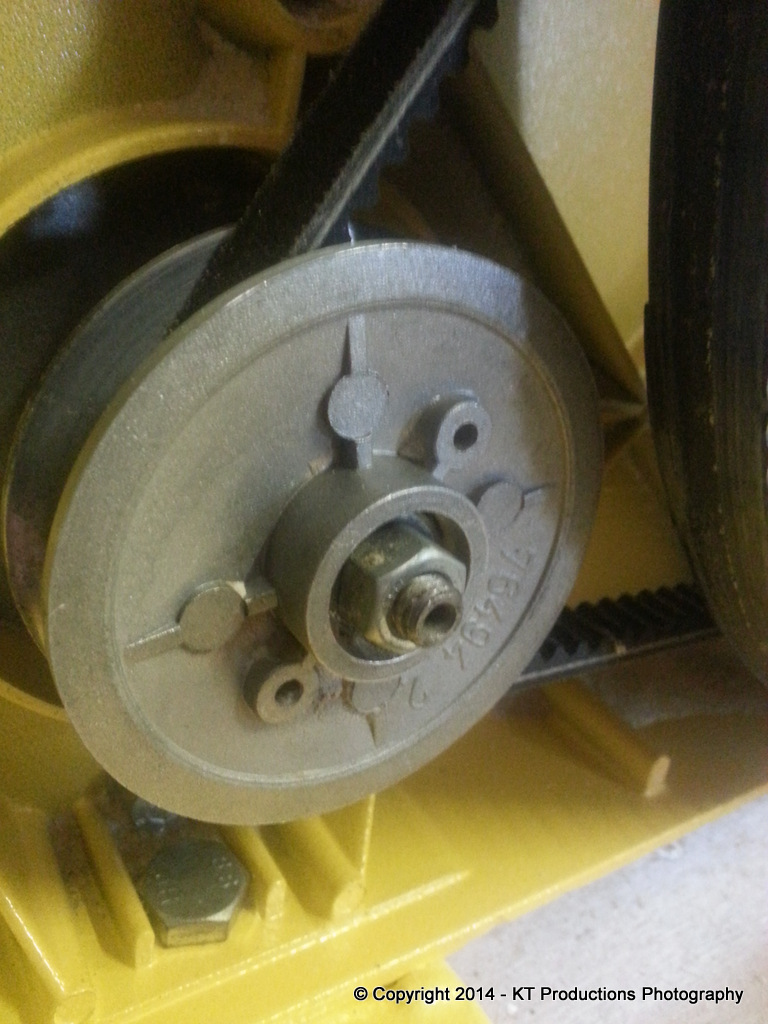
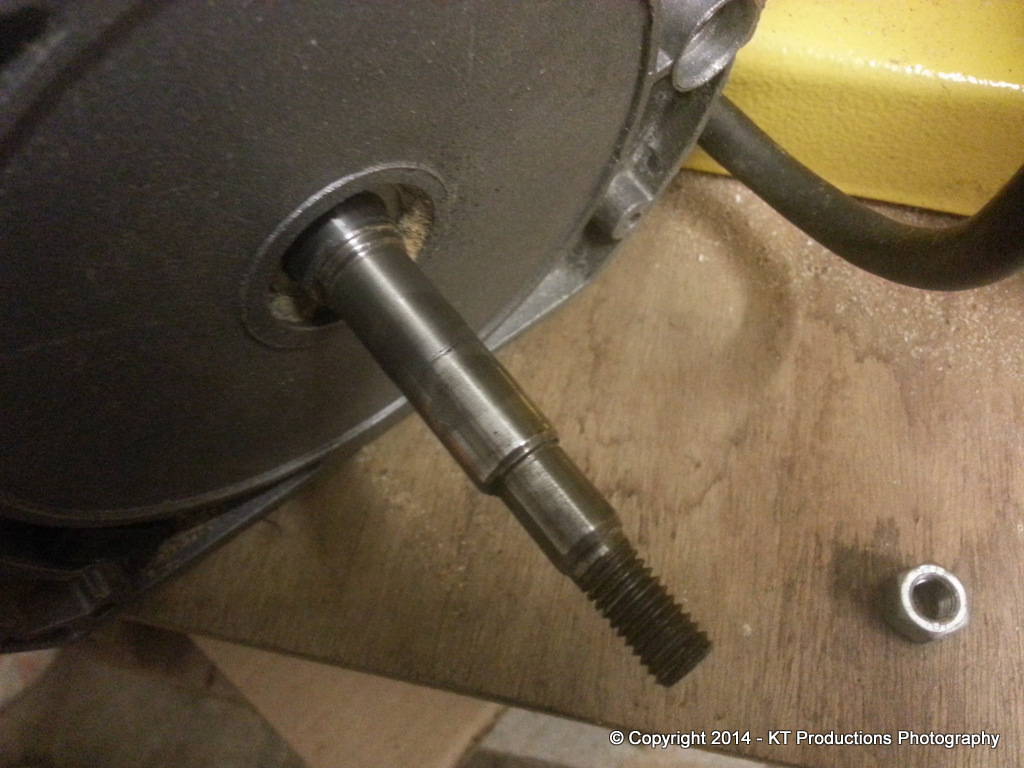
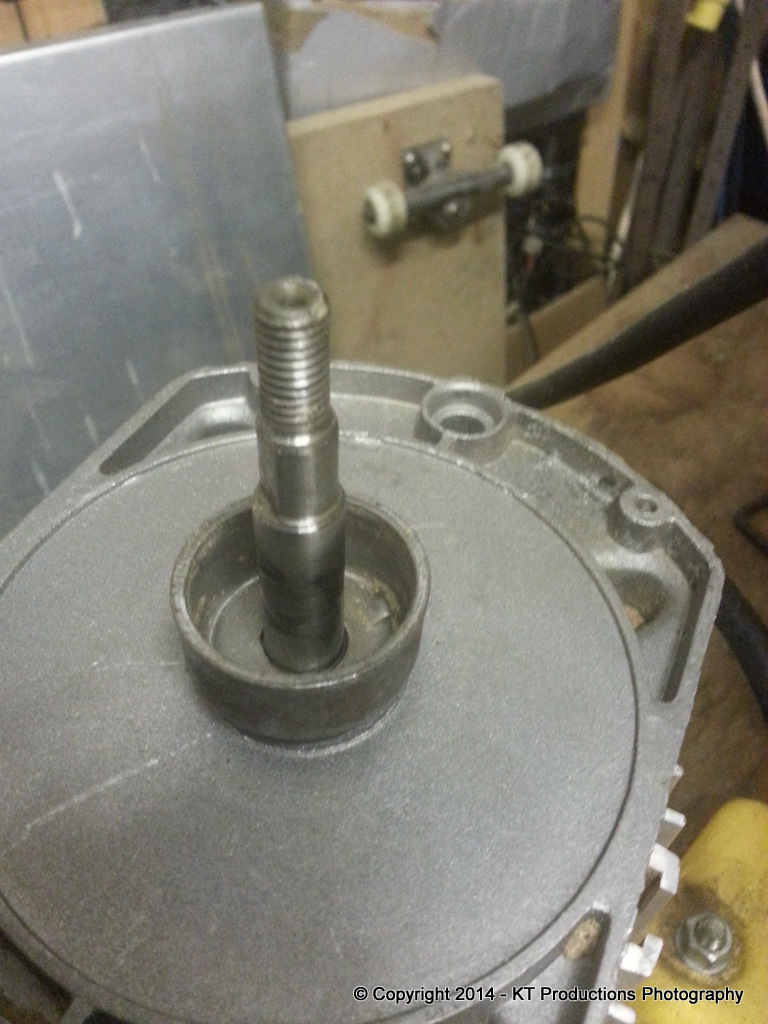
Now you can examine the motor shaft...which should be clean and shiny...

20140328_201707.jpg


You're not worried about the thread (although it's nice that this is clean too..!) but the critical bit is the inner fatter part of the shaft which the bronze bush of the inner pulley half slides on.

Mine is worn and is no longer a good fit but acceptable for now. There should be little play if you dry fit this back without the spring.

If you can offset the inner pulley on the shaft a huge amount...that bronze bush is shot. You need to replace the inner pulley and bush or get a new bush pressed in by a local machine shop.

Reassembly:

Ok here is the sequence of reassembly:

Sit the motor on its end and put the spring cup back so that the tiny flange on it locks into place....you have to hold this in place to ensure it stays there throughout the assembly process...don't let it fall out of lock!

20140328_201856.jpg


Now put the spring back in the cup and turn anti-clockwise and you will see the end of the spring coil will lock into a little indent inside the cup.

20140328_201914.jpg


Now the difficult bit!

You have to locate the bottom pulley half on the shaft and push down hard on it to compress the spring and hold it there without the cup going out of it's flange.

20140328_201932.jpg


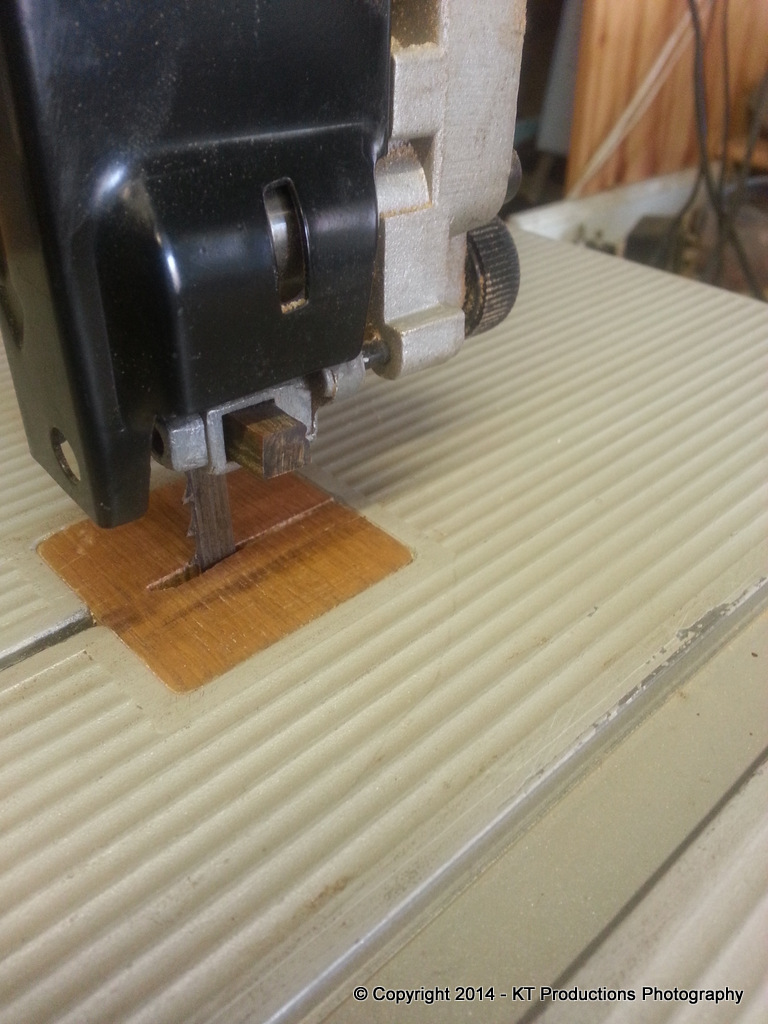
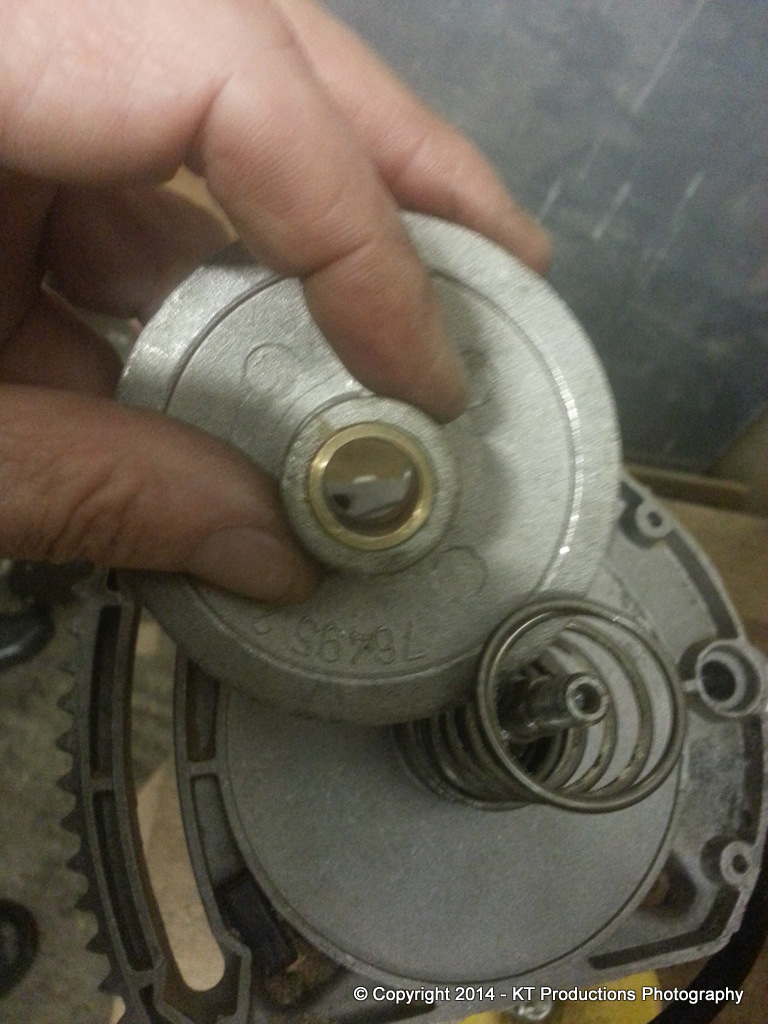
I took the photo above just before inserting so that you can see the thickness the bush should be with little play. Clearly you insert the pulley the other way up!

Once it is completely compressed you put the plain washer on the shaft and it sits high on a shelf of the thicker part of the shaft.

Then still holding the whole thing you have to add the outer pulley half and spin to locate that in the cutout on the threaded part and it drops right down.

Now you have to hold this down so that the whole thing keeps the spring compressed while you grab the thicker black washer...the thinner silver washer and finally the nut and put them on in that order and tighten the nut hand tight.

NOW you can release the assembly and it won't spring out again.

20140328_202129.jpg


Obviously I couldn't take pictures of the assembly and hold the spring down so I hope you get the instructions.

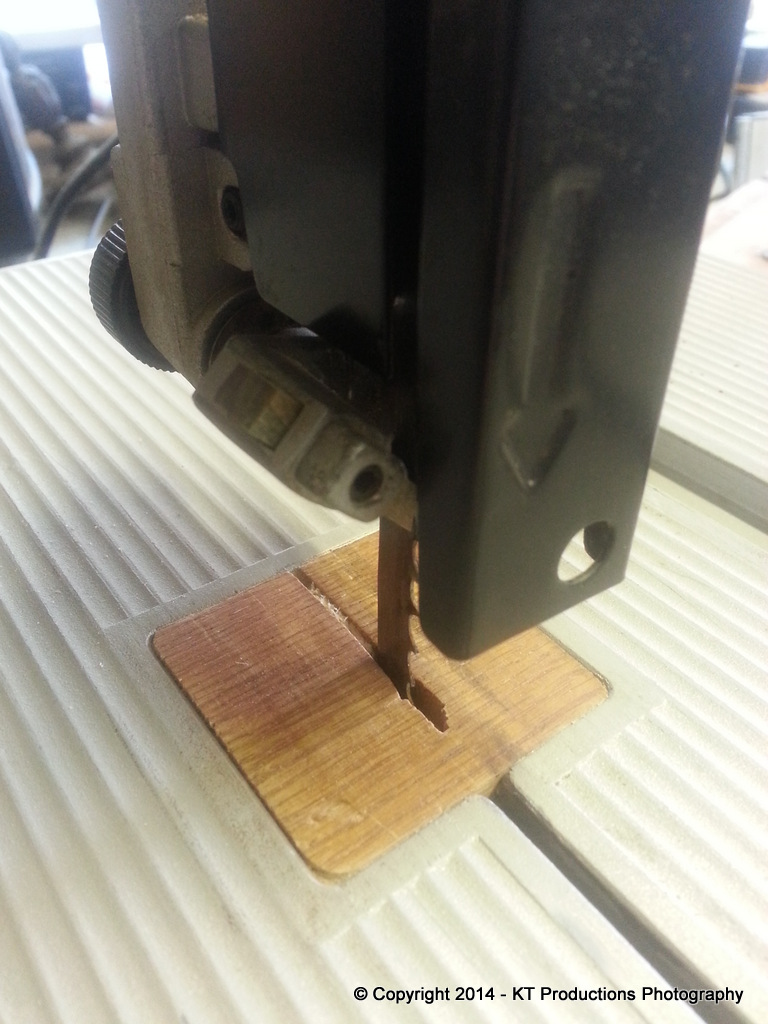
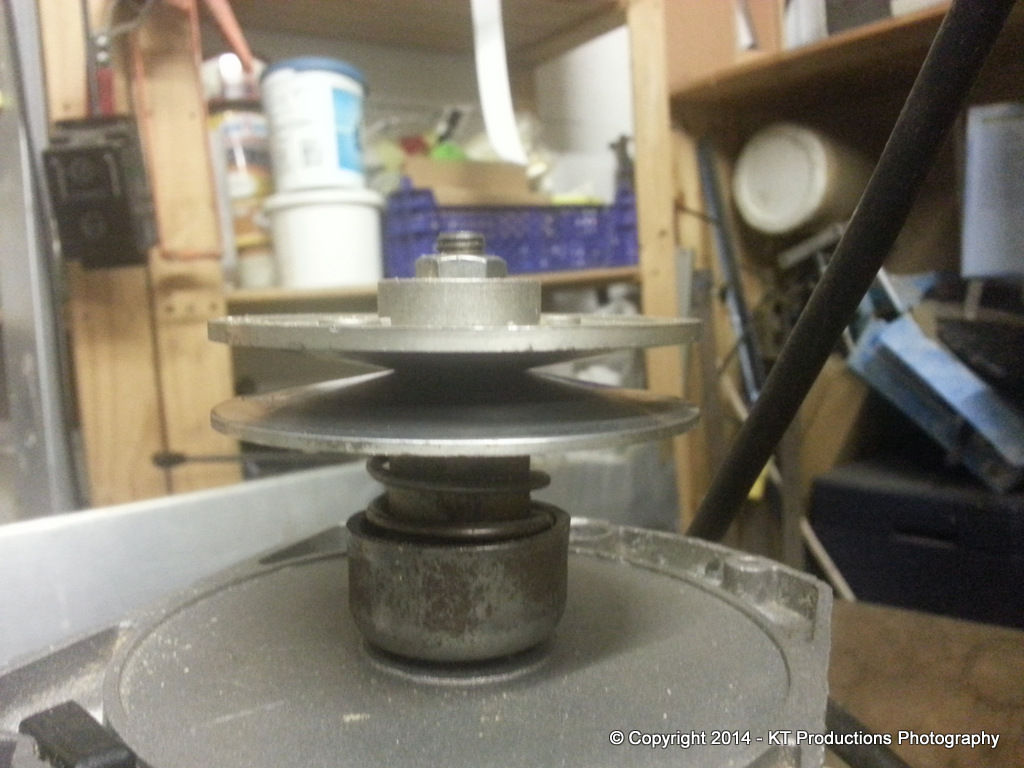
Similarly, I couldn't photograph testing the spring action so I put a bit of wood in it to take this picture:

20140328_202223.jpg


As you can see...you should be able to push the inner half of the split pulley down against the spring and it should go down smoothly and parallel to the outer half.

I took the opportunity to put two drops of machine oil on the shaft before I inserted the inner pulley.

Again...the pictures aren't as clear as I would have liked but I hope this helps you somewhat.

Any questions, please do not hesitate to ask.

I did manage to get some help putting the CCTV in the observatory so that's probably how I managed to catch up...ALFIE helped me!!!

20140328_161604.jpg


:mrgreen: :mrgreen: :mrgreen: :mrgreen:

Jimi
 
Hello Jimi,

Thanks for all of your time taking that to pieces. I'm sure it was much quicker to put together with help from Alfie...

You've confirmed my suspicions that the problem was with the inner pulley wheel - my brass bush is almost non-existent - hence the wheels not running parallel to each other, clattering together and pinching the drive belt. Don't know anybody locally who could set a new bushing for me but it's about £15 for a spare pulley wheel, so not too bad, and I can get the missing washers at the same time.

Noticed further up the tread that you were considering re-coating your running wheels. Did you ever do that?

Thanks again,

Justin
 
yebaws":31bdxytp said:
Hello Jimi,

Thanks for all of your time taking that to pieces. I'm sure it was much quicker to put together with help from Alfie...

You've confirmed my suspicions that the problem was with the inner pulley wheel - my brass bush is almost non-existent - hence the wheels not running parallel to each other, clattering together and pinching the drive belt. Don't know anybody locally who could set a new bushing for me but it's about £15 for a spare pulley wheel, so not too bad, and I can get the missing washers at the same time.

Noticed further up the tread that you were considering re-coating your running wheels. Did you ever do that?

Thanks again,

Justin

Indeed...as I said...the bush on yours looks shot to pieces but it's difficult to tell from photographs.

I wouldn't bother getting a custom made insert...£15 for a new pulley is nothing compared with the labour cost to even contemplate refurbishing the old one. And in any case there seems to also be some wear damage to the aluminium part of the wheel as well where it has seized.

In the end the rubber tyres were fine...it was the rubbish blade which was causing my original problems and once I got a new Tuff Saw blade, everything worked fine.

A worn or cheap blade is a major cause of performance drop with these things. You'll be surprised how beautifully it cuts with the right sharp blade.

I don't actually use this saw very much now. Since getting the little Burgess, I tend to just pick that up and use it around the workshop wherever it's needed and it is a surprisingly good saw...again..with the right blade and a tune-up. All the tips I got were from Steve's DVD and I have to say...getting a bandsaw working to it's top performance is difficult without this sort of logical, sequential setup.

Let us know how you get on...

Jim
 
Hi Guys

I realise that this an old thread but I've a similar problem and need some advice as I have never taken this type of motor apart and not sure what to expect. My spring looks like the one in the pics in the thread. I've the motor out but cant see how to remove the plastic cover to get at the shaft to sort the spring? As you have realised I dont have a clue about this but my saw is not working and I really need it to be so any help would be really appreciated. I'm not sure if I can attach pics but I'll try.

Thanks

Joe
 

Attachments

  • spring.png
    spring.png
    143.8 KB · Views: 31
joemcerlane":2cr46qkc said:
Hi Guys

I realise that this an old thread but I've a similar problem and need some advice as I have never taken this type of motor apart and not sure what to expect. My spring looks like the one in the pics in the thread. I've the motor out but cant see how to remove the plastic cover to get at the shaft to sort the spring? As you have realised I dont have a clue about this but my saw is not working and I really need it to be so any help would be really appreciated. I'm not sure if I can attach pics but I'll try.

Thanks

Joe

Hi Joe

Not sure what plastic cover you mean but if you mean the plastic cover on the other side of the motor then you don't take that off.

Go back through the pictures and follow the disassembly instructions taking care to take pressure off the spring as stated and remove the separate parts of the automatic pulley from the INSIDE side of the shaft.

Hope this helps

Jimi
 
Hi Jimi

Many thanks for replying! I dont know how but I missed the page with the pics and instructions and only caught on after I made my post and by that time I was too busy cursing the design of the bandsaw to reply!

I followed your pics and got it back together and back in...eventually. All was well for about an hour then a noise and spring out again!

I'm kinda happy enough with the speed its stuck at and will leave it for another while before I could be bothered to do it again although it should be pretty straight forward as I know what to do now.

Your pics and instructions were bang on and once again thanks for replying. I'm sure this thread will be used many times for this bandsaw.
 
joemcerlane":1khbxq0y said:
Hi Jimi

Many thanks for replying! I dont know how but I missed the page with the pics and instructions and only caught on after I made my post and by that time I was too busy cursing the design of the bandsaw to reply!

I followed your pics and got it back together and back in...eventually. All was well for about an hour then a noise and spring out again!

I'm kinda happy enough with the speed its stuck at and will leave it for another while before I could be bothered to do it again although it should be pretty straight forward as I know what to do now.

Your pics and instructions were bang on and once again thanks for replying. I'm sure this thread will be used many times for this bandsaw.

Hi Joe

Glad to be of help..

Just make sure that everything is very clean...and the internal (not the faces of the pulley!!) are properly lubricated with white grease and then it should work well.

Unfortunately the design needs regular maintenance as the dust gets in and fouls it all up again.

Dust extraction from the port is key to ensure that dust that ends up inside is reduced quite a bit...if you haven't already fitted extraction you need to consider this...you only need a standard wet and dry vacuum cleaner...cheap one from Rutlands is usually enough....or a secondhand VAX from eBay.

Cheers

Jim
 
Back
Top