


There are a number of ways to design patterns for the scroll saw. Often it can be as simple as finding an image on the internet that is in the public domain (ie no copyright) and tracing round the outline. Nowadays, most scroll saw pattern designers seem to use graphics software to produce their patterns. The software does not need to be particularly sophisticated but the process is easier if it is more advanced than the basic Paint package supplied as part of Microsoft Windows. Popular commercial programs are CorelDraw (which Steve Good uses), Adobe Photoshop and Corel Paint Shop Pro. The latest releases of these packages are rather expensive and a scroll saw pattern designer doesn't need all their features, so often it's better to look for an old version which is being retailed more cheaply. In the past, I've used Paint Shop Pro v9 which only cost me a few pounds and was absolutely superb with Windows XP. Then I got a new computer and found it was incompatible with Vista :x .
Now I tend to use graphics software which is open source and therefore free. It is as good as the commercial packages although not necessarily quite as intuitive. Inkscape is great for segmentation patterns and scaleable vector graphics (which need not concern us at present) and the Gimp is a very good general graphics software package. I now use the Gimp for all my shadow portrait patterns.
A shadow portrait is a representation of a subject whereby a top layer is cut away. The image is emphasised by placing a backing board of a contrasting colour underneath the cut-out. Here's an example of a shadow portrait which I derived from a familiar photograph; since the original photograph is copyrighted, it's a pattern I've only ever used once and is solely for my personal use:
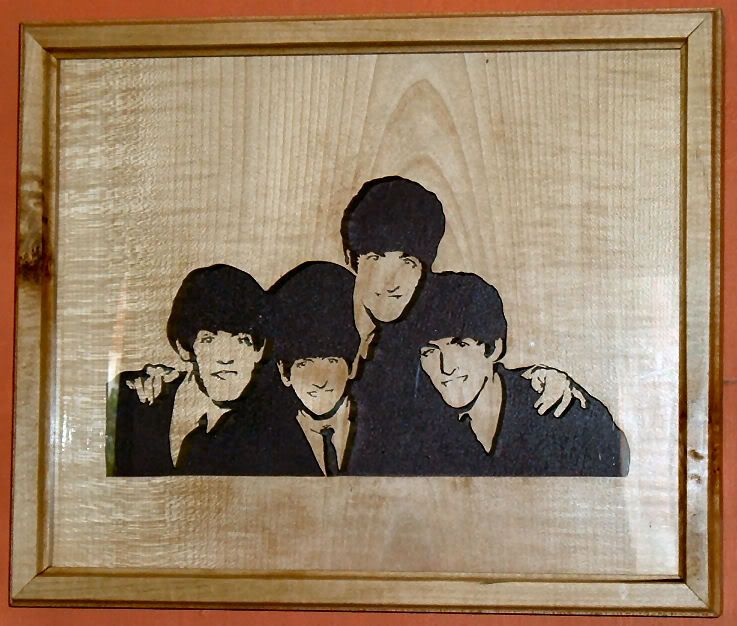
In fact, this was the first shadow portrait pattern I ever designed and it taught me a lot. One of the perils of shadow portrait design is that some parts of the pattern might become separated and literally drop out of the finished project because there is nothing to connect them to the main wood. These unconnected areas are commonly known as 'floaters' and are to be avoided at all costs. Another problem is that some areas have such fragile links ('bridges') to the main body of wood that they cannot survive the action of the scroll saw and break off. That was a problem I encountered with my Beatles portrait; none of the bridges broke but I consider myself to have been very fortunate indeed. I had a few nervous moments, especially with John's hand over George's shoulder, the connection below George's ear, and John's hand over Paul's shoulder. It helped that I followed the proven advice of cutting the most fragile parts first and working away from the centre towards the edges.
I learnt how to make shadow portraits from a tutorial written by Andy Deane, an American pattern designer who I respect enormously. Although the tutorial is written for Paint Shop Pro, it can easily be adapted for most other programs . The actual tutorial used to be here, and it was a few days ago when last I checked, but it doesn't seem to be loading now . There are a few free tutorials floating around on the internet, and the best way to locate them would be to ask on a forum such as Free Patterns By Design.
In simplistic terms, the procedure is to choose an original image which has good contrast. This helps to define edges. Open a duplicate of it in your graphics package - never work directly on the original. The next step is to smooth the edges a little by applying a bit of Gaussian blur. I usually find that a setting of 1 or 1.5 is enough for this. Then convert the image into grayscale to give a monochrome image.
This is where the fun begins! The next step is to convert the image into pure black and white. This is done by adjusting the Brightness and Contrast of the picture but, unfortunately, there's no simple click of a computer button to do this. Within each picture will be areas of different brightness and contrast; the pattern designer has to judge how much tweaking different areas will need. For instance, if you are converting a portrait into a pattern, you might find your subject's forehead and nose require very little adjusting whereas the ears and neck are in shadow and need more adjusting. This is why only a small area of the picture should be selected at any time and worked upon. Then the pattern designer can move onto the next area and tweak that slightly differently. This is where the individual skill and experience of the designer is critical, and even the best pattern designer who uses a computer will acknowledge the importance of the 'Undo' computer button.
The next step is to check for floaters using the graphics software's 'Flood-fill' feature. Any areas which don't flood with a contrasting colour will be floaters and the pattern will require further adjustment. Finally, the pattern designer checks the bridges and decides if they are strong enough. Often, the best way to do this is to print the pattern and inspect it because the image that appears on the computer monitor can be misleading. Bridges that look perfectly substantial on computer often become ephemeral on paper.
I was recently asked by the widow of Brian Naylor (White House Workshop) to convert a photograph of him into duplicate shadow portraits the size of a business card to be used as geocache travel bugs. Working from this original photograph:

I was able to use the techniques I've described to produce these:

I hope this gives an insight into what's involved in creating a shadow portrait pattern. No doubt other pattern designers have their own little wrinkles and tips (which I'd love to share ) . There are also other ways of producing scroll saw patterns which don't involve computer software, such as simply copying the outline of an image using a pencil and tracing paper or by using a 'lightbox'. Gary Browning wrote an excellent book which teaches shadow portrait pattern design called Scroll Saw Portraits which contains some excellent patterns of well known personalities as well as more detailed advice for designing your own shadow portraits.
Gill
Now I tend to use graphics software which is open source and therefore free. It is as good as the commercial packages although not necessarily quite as intuitive. Inkscape is great for segmentation patterns and scaleable vector graphics (which need not concern us at present) and the Gimp is a very good general graphics software package. I now use the Gimp for all my shadow portrait patterns.
A shadow portrait is a representation of a subject whereby a top layer is cut away. The image is emphasised by placing a backing board of a contrasting colour underneath the cut-out. Here's an example of a shadow portrait which I derived from a familiar photograph; since the original photograph is copyrighted, it's a pattern I've only ever used once and is solely for my personal use:
In fact, this was the first shadow portrait pattern I ever designed and it taught me a lot. One of the perils of shadow portrait design is that some parts of the pattern might become separated and literally drop out of the finished project because there is nothing to connect them to the main wood. These unconnected areas are commonly known as 'floaters' and are to be avoided at all costs. Another problem is that some areas have such fragile links ('bridges') to the main body of wood that they cannot survive the action of the scroll saw and break off. That was a problem I encountered with my Beatles portrait; none of the bridges broke but I consider myself to have been very fortunate indeed. I had a few nervous moments, especially with John's hand over George's shoulder, the connection below George's ear, and John's hand over Paul's shoulder. It helped that I followed the proven advice of cutting the most fragile parts first and working away from the centre towards the edges.
I learnt how to make shadow portraits from a tutorial written by Andy Deane, an American pattern designer who I respect enormously. Although the tutorial is written for Paint Shop Pro, it can easily be adapted for most other programs . The actual tutorial used to be here, and it was a few days ago when last I checked, but it doesn't seem to be loading now
. There are a few free tutorials floating around on the internet, and the best way to locate them would be to ask on a forum such as Free Patterns By Design.In simplistic terms, the procedure is to choose an original image which has good contrast. This helps to define edges. Open a duplicate of it in your graphics package - never work directly on the original. The next step is to smooth the edges a little by applying a bit of Gaussian blur. I usually find that a setting of 1 or 1.5 is enough for this. Then convert the image into grayscale to give a monochrome image.
This is where the fun begins! The next step is to convert the image into pure black and white. This is done by adjusting the Brightness and Contrast of the picture but, unfortunately, there's no simple click of a computer button to do this. Within each picture will be areas of different brightness and contrast; the pattern designer has to judge how much tweaking different areas will need. For instance, if you are converting a portrait into a pattern, you might find your subject's forehead and nose require very little adjusting whereas the ears and neck are in shadow and need more adjusting. This is why only a small area of the picture should be selected at any time and worked upon. Then the pattern designer can move onto the next area and tweak that slightly differently. This is where the individual skill and experience of the designer is critical, and even the best pattern designer who uses a computer will acknowledge the importance of the 'Undo' computer button.
The next step is to check for floaters using the graphics software's 'Flood-fill' feature. Any areas which don't flood with a contrasting colour will be floaters and the pattern will require further adjustment. Finally, the pattern designer checks the bridges and decides if they are strong enough. Often, the best way to do this is to print the pattern and inspect it because the image that appears on the computer monitor can be misleading. Bridges that look perfectly substantial on computer often become ephemeral on paper.
I was recently asked by the widow of Brian Naylor (White House Workshop) to convert a photograph of him into duplicate shadow portraits the size of a business card to be used as geocache travel bugs. Working from this original photograph:
I was able to use the techniques I've described to produce these:
I hope this gives an insight into what's involved in creating a shadow portrait pattern. No doubt other pattern designers have their own little wrinkles and tips (which I'd love to share
) . There are also other ways of producing scroll saw patterns which don't involve computer software, such as simply copying the outline of an image using a pencil and tracing paper or by using a 'lightbox'. Gary Browning wrote an excellent book which teaches shadow portrait pattern design called Scroll Saw Portraits which contains some excellent patterns of well known personalities as well as more detailed advice for designing your own shadow portraits.Gill