DBT85s Workshop - Moved in and now time to fit it out

UKworkshop.co.uk

Help Support UKworkshop.co.uk:

This site may earn a commission from merchant affiliate links, including eBay, Amazon, and others.
First fascias cut to length and test fitted to height. I just taped the 3 tiles that will sit on top of it together to give me less to juggle.

Anything looking stupid here?

50082070303_fb51ba2b7b_b.jpg


50082894712_7648520d50_b.jpg
 
Looks to be laid out perfect. The line looks flat between three battens and the fascia. Slates look a few mm low, but I guess you’re lining the fascia up here, not tile finish line.

Definitely need scaffold tower. I hired a 2.4 metre one for a fortnight, cost £120 though. Couldn’t have got the slates on the roof to load out, let alone lay them without it. You can lay first five or six rows from the scaffold as you move along, then climb the battens to fix the diagonals as you go up.
 
if you have the gutter and brackets check that the tile edge ends roughly in the middle of the gutter before fixing them down
 
I'll arrange a scaffold tower then, hopefully I can get it done in a week but no bother if longer.

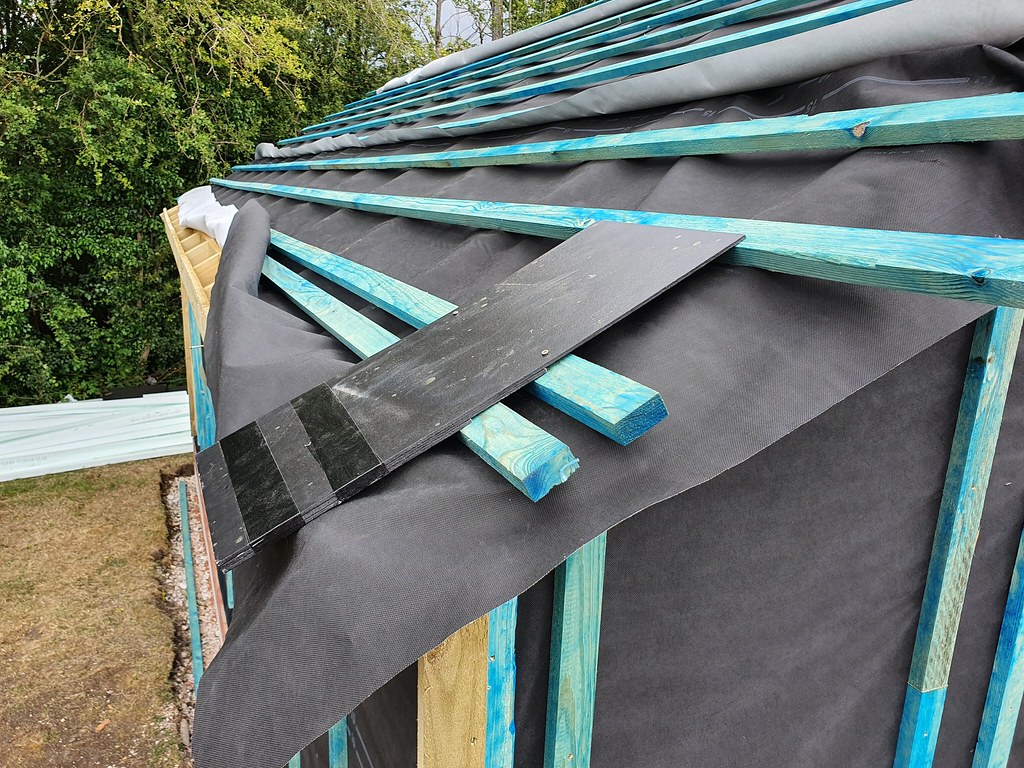
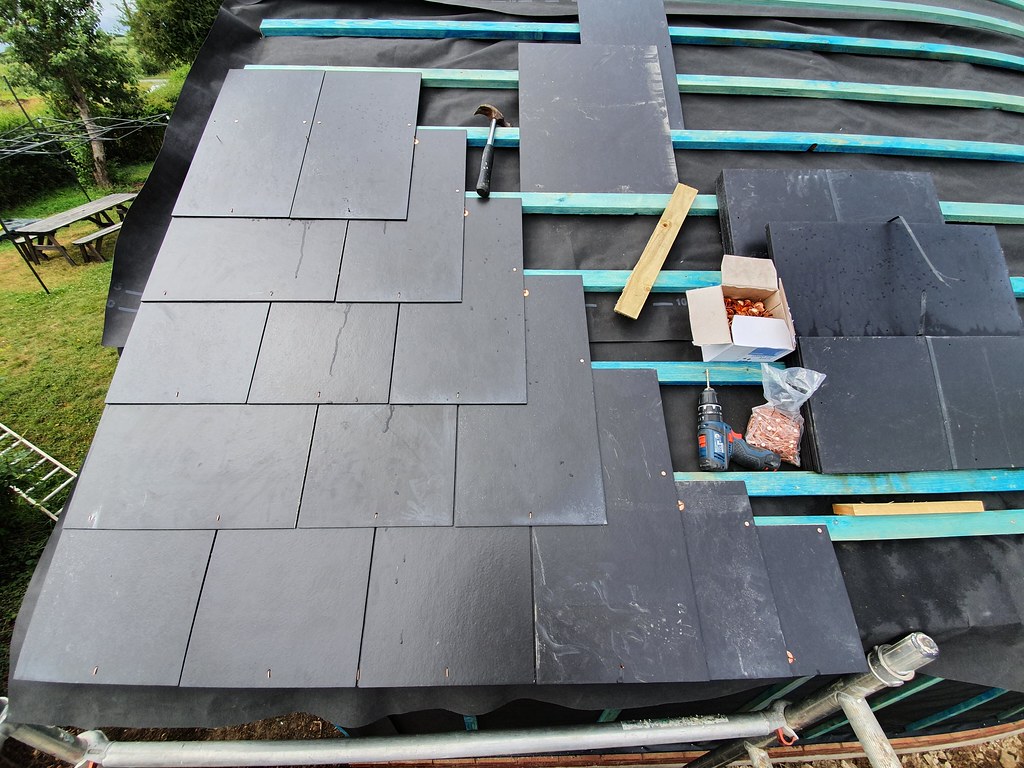
I don't have the gutter yet, but cembrit advice is to have the tiles overhang 50mm for 100mm gutters and thats what I marked up for my initial batten placement. I didn't measure the tiles into the exact correct place for this, I just screwed them down to get a line to work to.

Its feeling like slow days despite tinkering away most of the day, though I was on shopping duty first thing this morning. A couple of muffins and pan au raisins later work began.

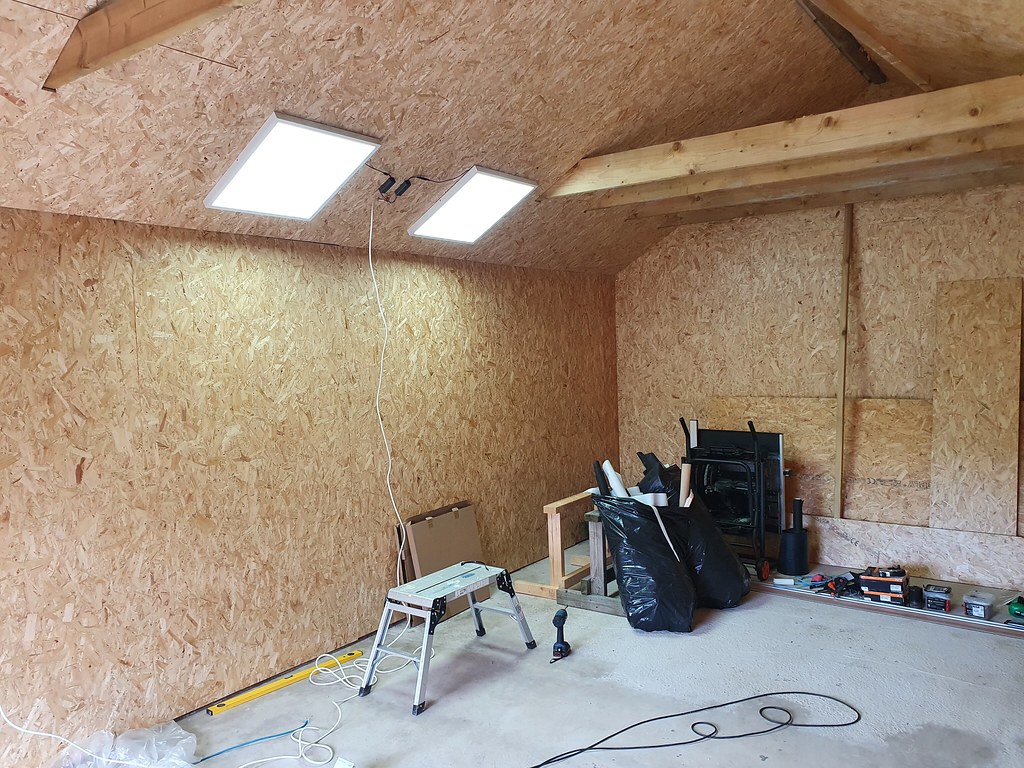
I started off by finishing off the emergency lighting. I can now at least potter in there with light of an evening until the electrician comes in 3 weeks. Some of the 12 panels I have will be mounted like this, though not necessarily in this exact position. So this gives me an idea of how much light I'm working with and where it's being cast. When I do it properly the drivers will be hidden, though the flex will have to be on show albeit white against a white wall. I'll have to notch the frames to allow the flex in and out but it's only thin metal.

Emergency lighting
50084250836_769af49c03_b.jpg


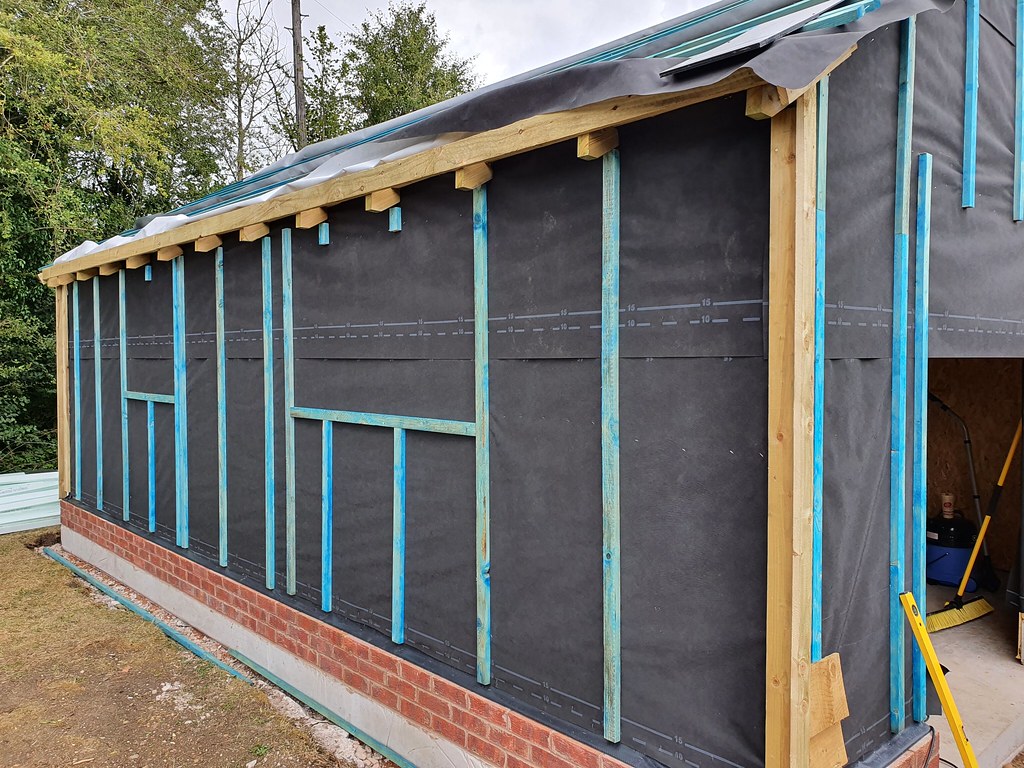
With that done I finally cut my fascias after first screwing up some offcuts to give me a position to work to. Faffing around trying to measure with a tape over 5-7m is a pain in the butt, so I just cut the first one to end on a rafter foot and then offered up a second to make it where it needed to be cut. Tidy.

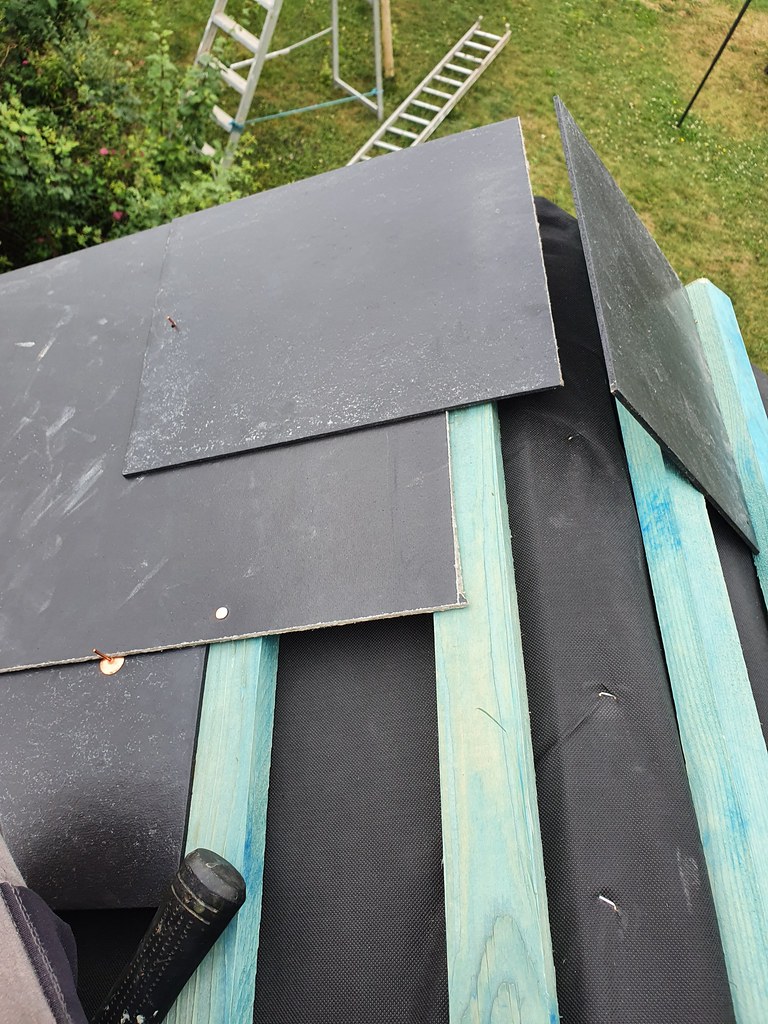
With the length sorted I taped together my 3 tiles which will form the eaves and secured them to a batten, from there I could see how high the fascia needed to be and put a couple of screws in along the fascia to hold it there. It'll come off for painting.

Eaves tiles taped, though I guess I could have just used a straight edge for this bit.
50082070303_fb51ba2b7b_b.jpg


Fascia on and lots of rafter foot on show. Too much?
50084486477_8f15553ede_b.jpg


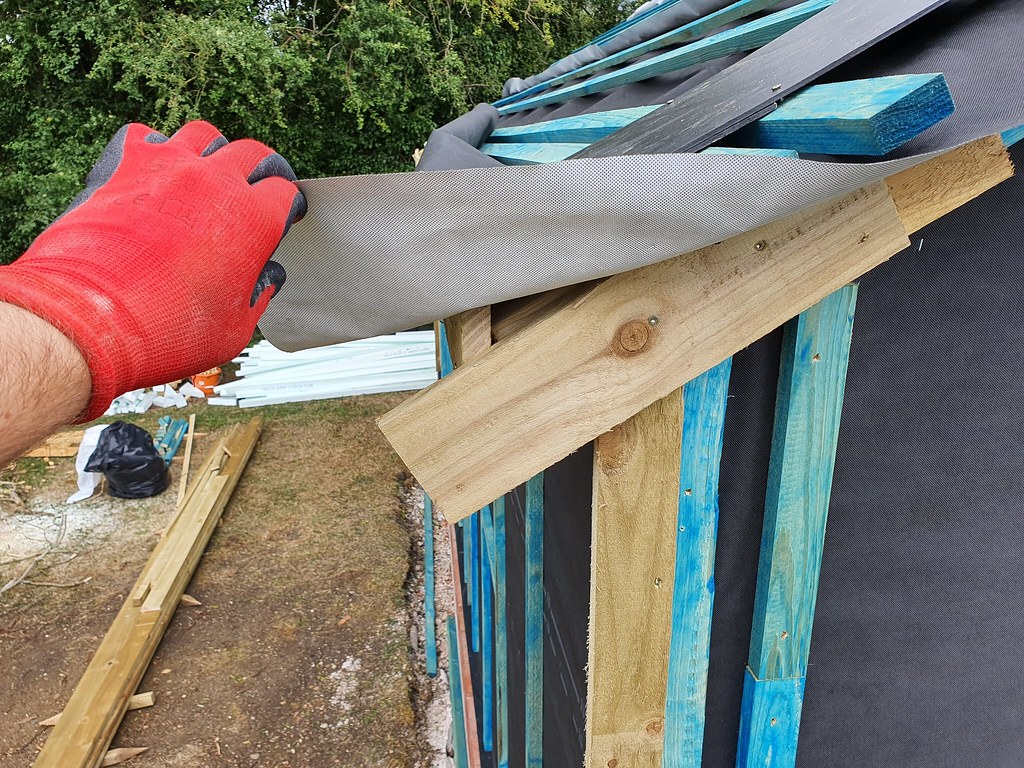
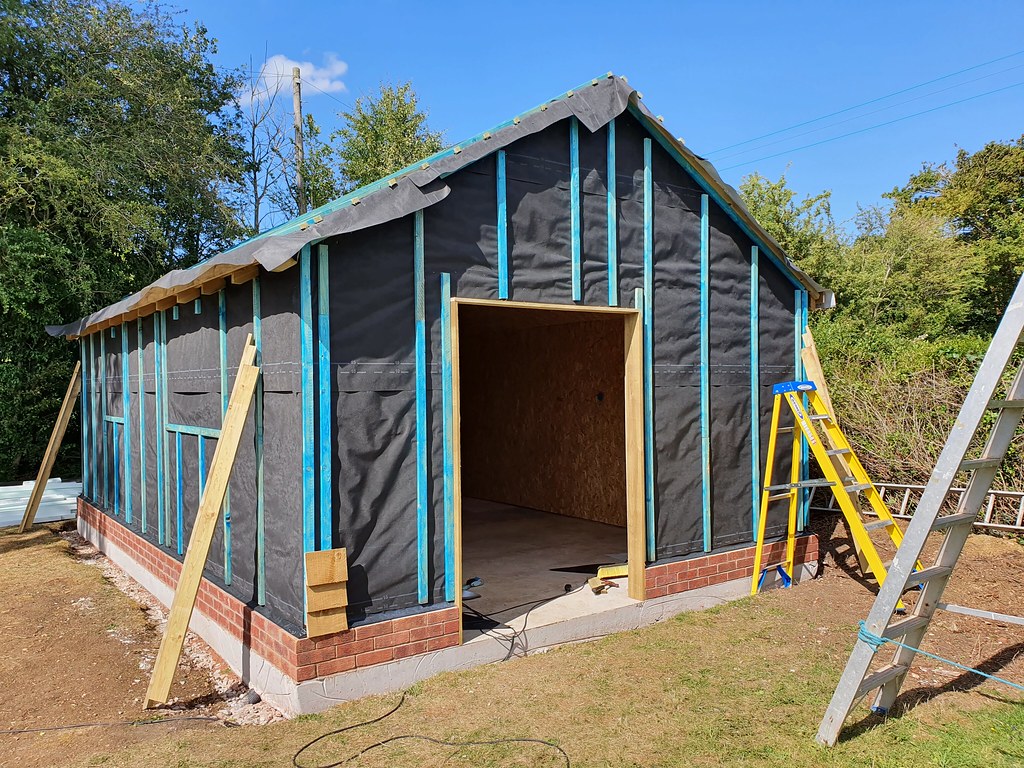
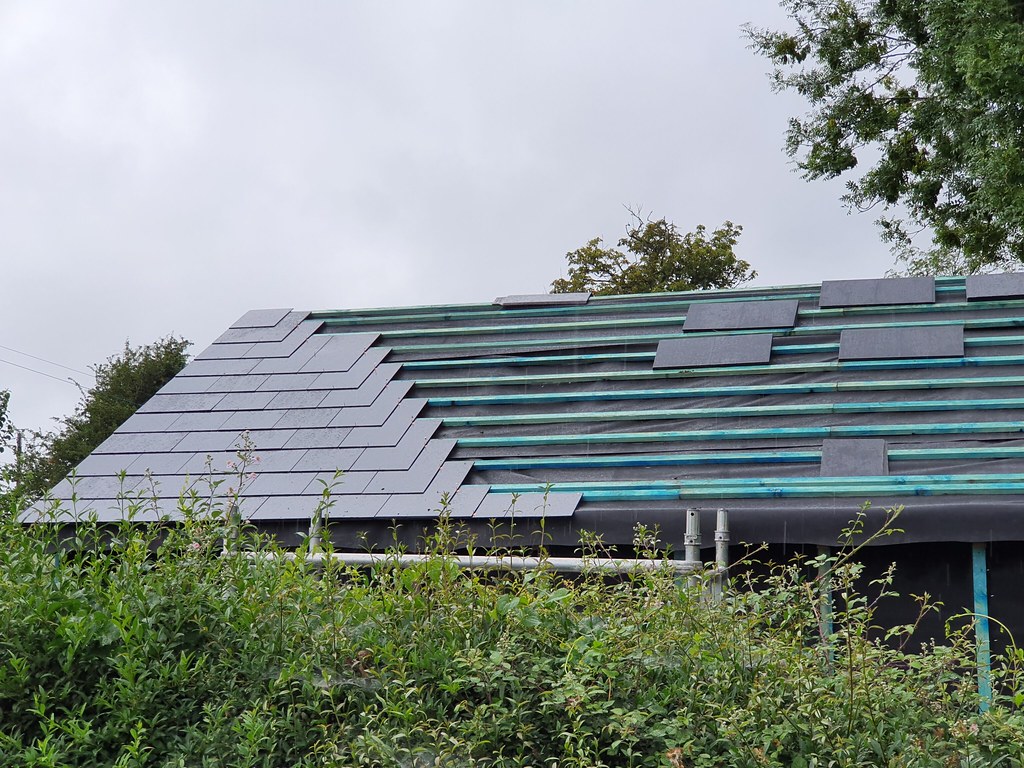
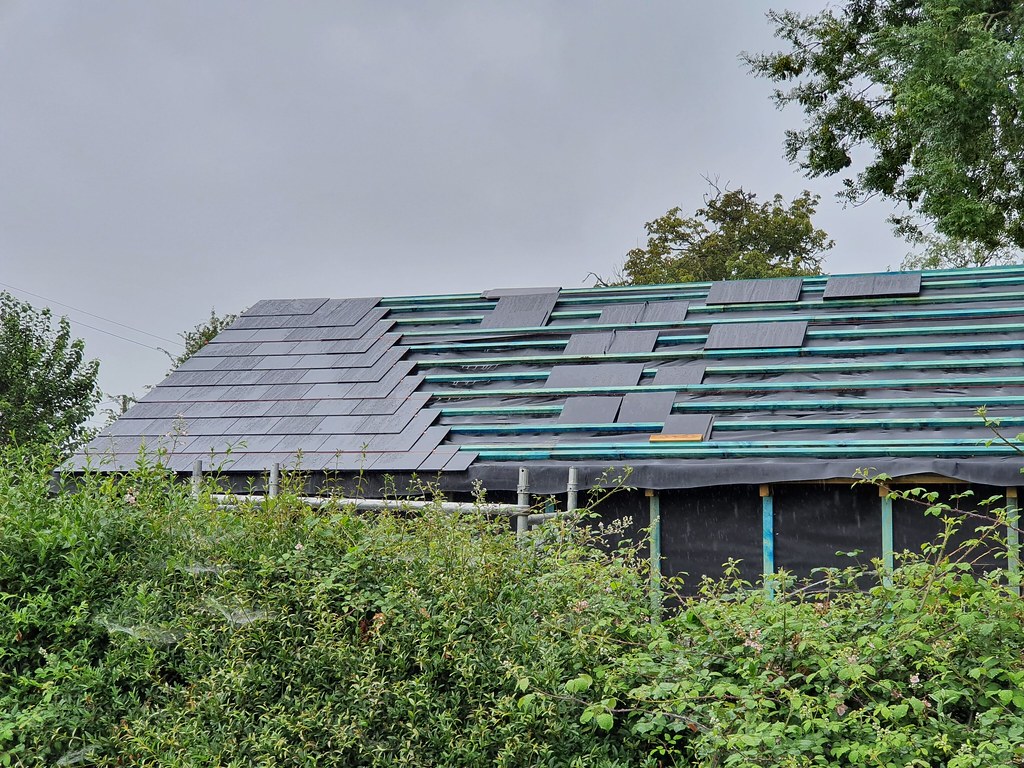
Next was the joyus job of trimming all the roof battens. 23 (I think) on each side so 92 all in. Most cut from atop the roof with the couple nearer the eaves done from the ladder. I sat and thought about it for about 10 minutes before cutting, pondering not only whether I should just use the tracksaw (I didn't), but also whether my brain was working right and I was correct in my thinking of where I needed to cut them. Checking a few reference photos and yes, they need to be behind the barge board and I know exactly where that needs to be.

Off they all came and then I stuck some treatment on the ends just in case.

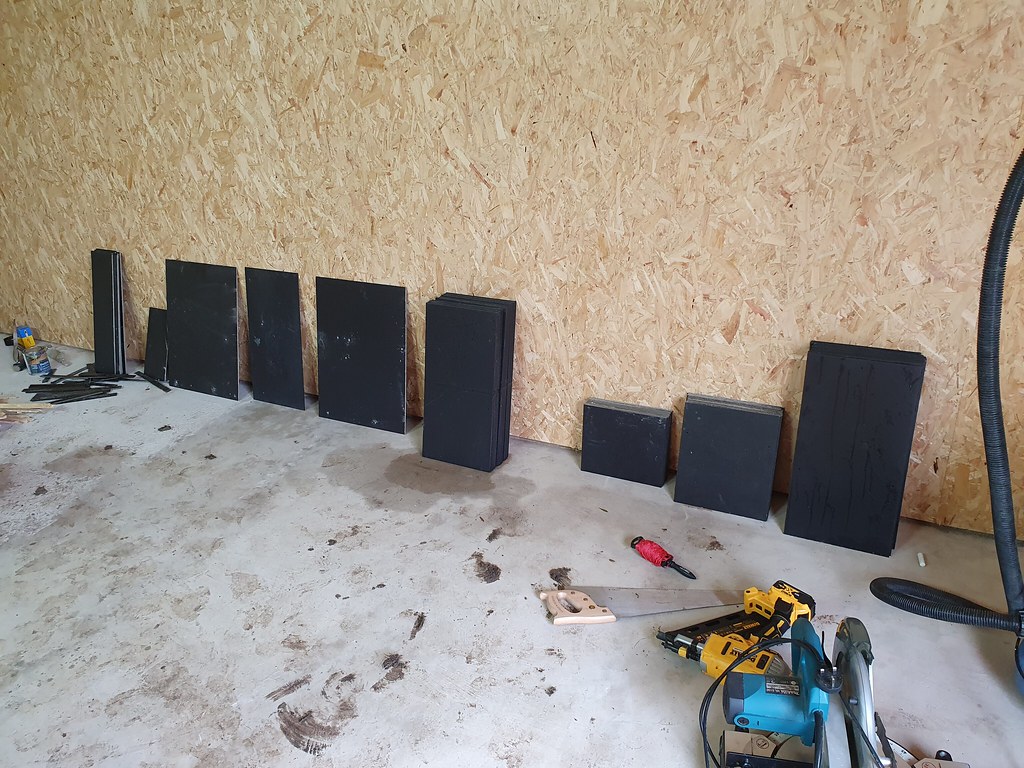
Next up was to cut those tiny filler bits for the corner details I questioned about the other day. Easy job. Then I got the corner details off, fitted the fillers and added a few more screws to hold everything together.

Onto the door hole and at last I cut some of the 25x150 to size and secured it in place. I only put a bit of 25x100 at the top becase I don't have any more 25x150. Since I have to add extra to the 25x150 anyway to span the whole distance required I'll just do the same at the top with whatever I have left.

Battens cut, fascias fitted, door defined
50084250436_f558b09a5a_b.jpg


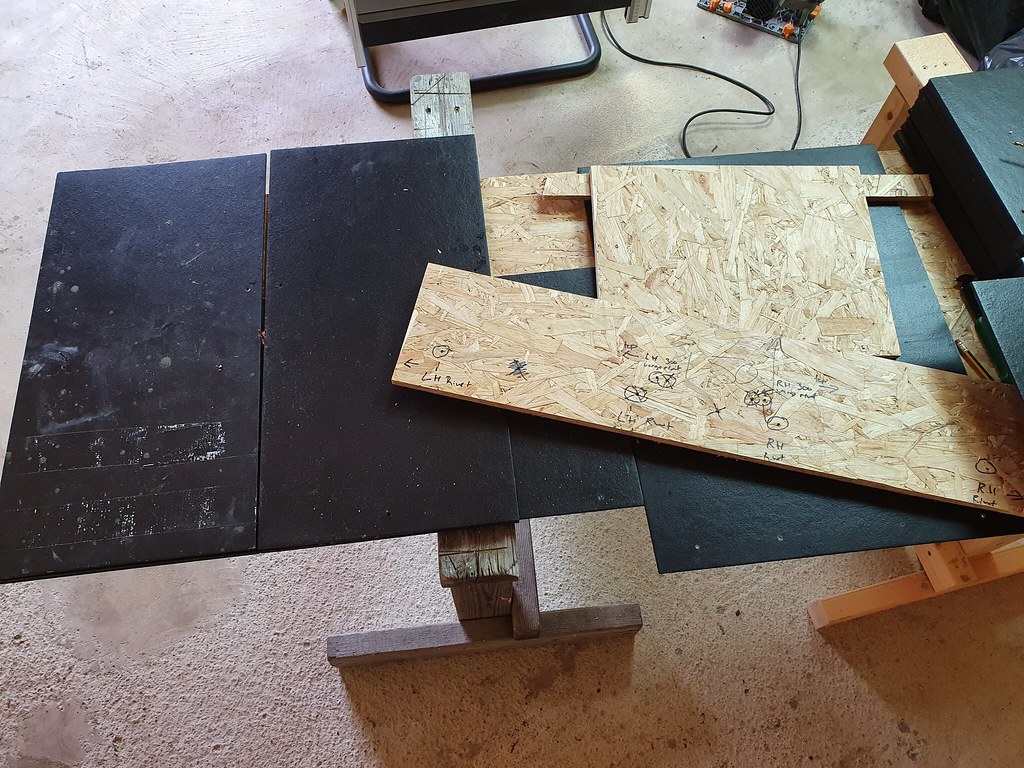
Just before finishing up I started on working out my wedge size and bottom featheredge detail. Since I have a table saw I took the corner off of one of my small test bits to see how it looked. Not as fancy as the routed finish Mike used but It'll still work and can't be seen anyway.

That was that for the day. I'm really looking forward to having my paint so I can start making the large satisfying strides that make you feel like you actually got somewhere each day.

Last but not least, I now have some modicum of a deadline. I shall once again be broadcasting sports to the Nordic regions as of the 23rd of July and Premier League to everywhere except the UK from the 30th. So yay money coming. Somehow does't FEEL like a happy thing though! Desire is to get the roof and walls clad and a door fitted before then. Anything else is a bonus.
 
I know where your coming from, a whole day of useful bits that had to be done for the next large jobs. and it looks as though you’d had another day off.

Looks the business.
 
Looking good man. When the emergency lighting comes on in my shed it's the windows and the sun has come out. :wink:
#proper job
 
Brewers account activated. Hurrah.

20l tin of Bedec reduced to £180 with the voucher a new trade account gets. Hurrah.

Possibly a week for it to be in stock. FML.

Given that I don't want to go back to work with the roof and walls not clad, I'm going to take the decision to not wait to paint the fascias before the tiles go up. It's not ideal but it'll just have to do. There's no way I can do the roof and the walls in a week.

The reason I don't want it left as once I'm back at work properly I'm away for 4 or 5 days at a time and when I'm back I try to get at least some time with my wife and kid, so Id rather not be tackling these big jobs that you just want to plough through all day.

With that in mind, a tower will be here at 9 tomorrow morning. I'd better work out what the hell I'm doing then really!
 
DBT85":2240fmgk said:
Brewers account activated. Hurrah.

With that in mind, a tower will be here at 9 tomorrow morning. I'd better work out what the hell I'm doing then really!
Get your slates close enough along the sides to start loading the roof when you get the scaffold.

keep them well back, 5-6 feet as they'll be in your way as you work up the roof. Ask me how I know!!
 
That big red tractor you had come over to move bricks will save you a lot of slate humping and time if you can get it back to levitate the slates to the roof,,,,,,,,,unless you've come to enjoy the work. :wink: (hammer)

Pete
 
The slates are close enough to the far side of the workshop already so once it's up I can start loading. I figured I'd do that side first to learn as nobody will ever see it!

Frankly today was another rubbish day although it has reinforced my plan to get the roof done ASAP.

A late start coupled with the trip to get the interior paint, other home duties and the torrential downpour limited my actual progress to... sealing the 8 cut ends of the fascia.

I spent a bit of the afternoon making up a couple of jigs for tile cutting so that I'm not trying to measure and then hold a straight edge in place on the 46 eaves slates or all the doubles that will go up the verge. Those templates also include the holes for rivets on those verge slates so hopefully some of the brain work is already done. It also meant I was making my mistakes on the ground in the dry rather than on a scaffold in the pouring rain. The one I did make is of no consequence as the tile can be used elsewhere.

While in the dry of the workshop (and the slightly warmer as it was cold AF in the rain) and with my emergency lights on (which dim when I turn my tracksaw on!) I noticed a couple of drips coming from the rafter ties. I know the membrane is good as it was pooling with water at the rafter feet behind the fascia, I guess nail and staple holes were letting a little in. The rain was constant for about 2 hours and the worst it got was a couple of tennis ball sized damp spots on the floor. With an actual roof over it it'll never be a problem.

I did also calculate my verge overhang so hopefully with the scaffold and the 70% chance of rain tomorrow I can get started.

50087887842_59b67f274e_b.jpg


I really need to make some progress.
 
DBT85":2itle1zm said:
The
I spent a bit of the afternoon making up a couple of jigs for tile cutting so that I'm not trying to measure and then hold a straight edge in place on the 46 eaves slates or all the doubles that will go up the verge.
You shouldn’t need a straight edge to measure the eaves slates. Your first one will be on the extreme left or right. Put a tile on the opposite end in the correct position. Run a string line half inch up from the finished edge (on the edge line if you wish, but I found half inch up easier) and work to the string line, same as you would for brickwork.
 
Sheptonphil":2mmusgdt said:
DBT85":2mmusgdt said:
The
I spent a bit of the afternoon making up a couple of jigs for tile cutting so that I'm not trying to measure and then hold a straight edge in place on the 46 eaves slates or all the doubles that will go up the verge.
You shouldn’t need a straight edge to measure the eaves slates. Your first one will be on the extreme left or right. Put a tile on the opposite end in the correct position. Run a string line half inch up from the finished edge (on the edge line if you wish, but I found half inch up easier) and work to the string line, same as you would for brickwork.
I'm only talking about cutting them Phil. No point marking and trying to hold a straight edge in one place while I score the tiles every time when a bit of osb screwed to another bit of osb eliminates it all.
 
The heavens have opened once more and while I am stupid I'm not a fool. Time to stop for the day.

All in all happy enough with the progress, it feels quite slow but I've got the first verge finished now so I can just bang up the next 170 odd standard slates without too much fuss and then deal with the other verge.

The time spent thinking yesterday was well worth it, if nothing else it helped me wrap my head around it a bit more. As with everything it all clicks together once you've been at it all day. I've even stopped forgetting to put rivets in under the eaves tiles where needed. One thing that did come up was that my sums were out. Somehow I'd calculated that my tiles would overhang the end of the fascia board by 70mm. Fortunately I checked by nailing both ends up and measuring the distance and spotted the error. It should be 35mm.

Slate cutting was easy enough with the scribe tool from Hardy though I only cut one on the ridge. Since its rinse and repeat I batched a bunch out inside as well as drilling the appropriate holes for nails and rivets.

I got to the ridge and my brain did a little melt. I'd ended the penultimate tile on the batten just like all the others and cut the final tile to length. I kept looking at it thinking it must be wrong, that there wasn't enough lap from the ridge down to the penultimate course. A trip down to check the Marley documentation (because the Cembrit stuff is rubbish) and sure enough mine looks the same as the picture so happy days. To be sure I hopped up with a ridge tile and sure enough the edge of it comes down far enough that I'm happy. I'll cut the rest of the pemultimate row a little longer anyway.

50090193663_0a64e1bc51_b.jpg


My to do list includes cutting a bunch more first and second course tiles as well as 23 top course and 21 penultimate course tiles to size. With those done I can just hoof them onto the roof and get them up without stopping to cut tiles on the roof all the time.

I'll have to make sure I give myself an escape route on the other side of the roof!

So there we have it. Some progress at last.

50090193348_d32ea98954_b.jpg
 
Another one of those days. A haircut (finally), a meeting and the wettest July in memory have helped contribute to about 14 tiles going up compared to yesterday.

I started off by getting to the ridge with some batten. I was going to need to put some on the ridge itself to help screw the ridge to anyway, but I had a cunning plan. While my penultimate and top slates were apparently ok, it still left me feeling irked. A solution presented itself easily enough. Take the penultimate tile right up to the batten on the ridge, and nail the top tiles to the ridge batten itself. A much larger lap is achieved below the ridge tile. I'll get a pic tomorrow.

So batten up, new 1.5 tile cut, drilled, part nailed, nails removed because I forgot the farkin rivet, rivet in place, secured again, top tile cut and secured in place.

Next up I wanted some string lines to make sure things were running right. Just pinned under the ends of the eaves slates and taught around a nail at the opposite end. I now have 3 handy trip wires on the working side of the roof because it's not hazardous enough up there.

I sat and tiled in some rain before it really started belting down. Time to get off the roof before I slide off it.
50094412282_48484575f1_b.jpg


It looks pitiful compared to yesterday but I've sorted some bits out and worked out how best to place the rivets for the next tiles so I'll take it for now. Tomorrow I have a whole day to myself and only 10% chance of rain with good weather for the next 4 or 5 days, at last. The ground around the workshop is like a bog.

I already had 50 odd tiles in the workshop ready for cutting to size so I took the chance in the pouring rain to get those done. I now have enough cut to do all the 1st, 2nd and penultimate tiles without cutting on this side of the roof. The penultimate ones are a bit of a pain as I need to cut 20mm off the end. They score easily enough but with not much material to grab hold of snapping the waste off isn't easy, so a little grabby jig later and I could do them in short order.

Tiles cut and ready and a few template tiles used to cut and drill others
50093596798_51f3a3fbce_b.jpg


Maybe, just maybe, I can make better progress tomorrow.
 
Plodding progress, but progress none the less. You’ll have it wrapped at the weekend.

What are you going to screw the ridge tiles to? There’s no central batten, unless there’s one under the membrane.
 
DBT85":1wpzknvm said:
There's a central batten now, it was part of my revised ridge arrangement.
Ah, excellent. Didn’t want you tiling up to the top before thinking about it. :eek:
 
Sheptonphil":l95f5p0i said:
DBT85":l95f5p0i said:
There's a central batten now, it was part of my revised ridge arrangement.
Ah, excellent. Didn’t want you tiling up to the top before thinking about it. :eek:
I could have just screwed into the ridge if I'd needed to. When I get the photo tomorrow you'll see this is a better arrangement of tiles at the ridge and will give me a better lap with the top 2 courses and ridge tiles.
 
Couple of tips for your ridge: if you're bedding and pointing the tiles with mortar, be careful with those tiles as they show every stain. Mask up and use stout cover sheets below the ridge when pointing, and along any route up and across the roof where you're carrying mortar.
Second tip- not sure where you're based but be careful about the sand in your mortar. Coastal and other locations often supply unwashed sand with high salts content. Result : you get staining after completion which shows particularly on matt dark tiles. Solution; ask your supplier about the sand origin and double wash it yourself to be sure.
Apologies if you know all this or its not relevant but in my job, I see so many newly tiled roofs wrecked by staining from high level mortar, which often doesn't show up till well after the roofer has gone and been fully paid. :shock:
 
Back
Top