


This project has been on the go for a few months now, thanks to getting distracted by a busy period at work, another non-woodworking project, making an MDF dog-head silhouette (...) and so on. It's nearing completion, though, hopefully if I post about it it'll shame me into finishing it! As I mentioned in another thread, I'm well aware I'm pretty rubbish at woodwork compared to some of the guys on here, so I've been a little reluctant to post projects for that reason... but hopefully I'll learn a thing or two!
The goal is to make a triangular corner table that can sit in our front 'porch hall', as the estate agent put it. It's this corridor-width room between the front door and the main downstairs hall (with an S-shaped path between them) that seems to have been added onto the house after it was completed (not least because the downstairs loo window opens onto it!), and despite hanging a picture at one end it looks a bit bleak, so we thought it'd be nice to have some plants sat in the corner... unfortunately the only suitable table I already have is rectangular and profiled, so the corner sticks out ready to take the skin off of unwary knees or shins. When we first moved in I thought the space would be good for the little shoe-stool I did as the first project in the new house, but that idea got vetoed... but the photo I took of the not-yet-painted piece in situ shows the space the table's going in (also note the awesome work on the skirting board there which I've carefully avoided telling my belovèd girlfriend about lest she ask me to fix it):

I'm quite proud of this project 'cause it's the first time I've used hand tools quite so extensively - most of the pieces were cleaned up from rough-sawn timber by hand (after some sage advice on here about plane purchase), tenons cut without use of a router or bandsaw for a change and only a few cuts were done with machines where I didn't quite trust myself to get it right by hand. Of course, it's easier 'cause it's a three-legged table, so it's always going to be stable no matter how dissimilar the legs are! ;-)
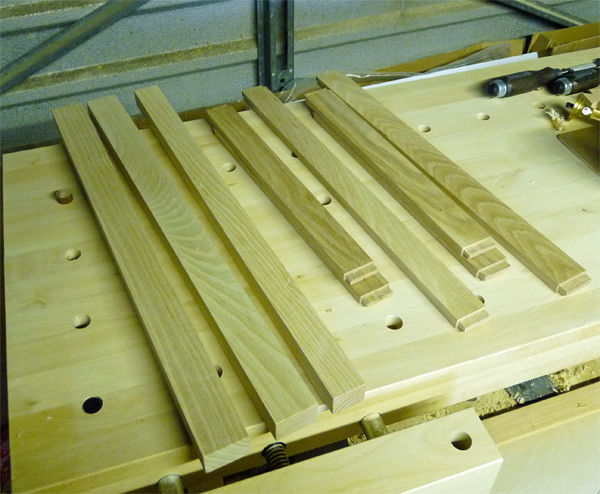
I know it looks like that middle piece on the left is bent, but I think it's a trick of the lens, 'cause it's straight right now. The legs are ash, the rails and stretchers oak; the original plan was to paint it, and I had bits of ash and oak in roughly the right sizes already, so it seemed OK. Naturally, she's now changed her mind and wants it oiled or varnished or something instead (I was going to try out this Osmo Polyx that certain forumites go on about all the time) so the slight difference in wood tone will have to be a feature!
I did try and transfer mortice sizes as best as possible from the tenons themselves (and you can see some flaws in my planing here as well - this particular pit is going to be cunningly hidden under the apron where only I know it's there). I think this was my first mistake on this project, though - I would have been better off cutting the mortices first and sizing the tenons to fit rather than the other way around - it turns out that I only have chisels so small, so it was touch-and-go in a couple of cases as to whether I'd be able to cut the mortices narrow enough.
I clamped a couple of bits of scrap to the sides of the legs while chopping the mortices for the apron rails and stretchers, since there's only about 3mm between the mortice and the front face. It seemed to work, there was only one slight split and that was entirely down to me being careless (and thankfully, fixable).
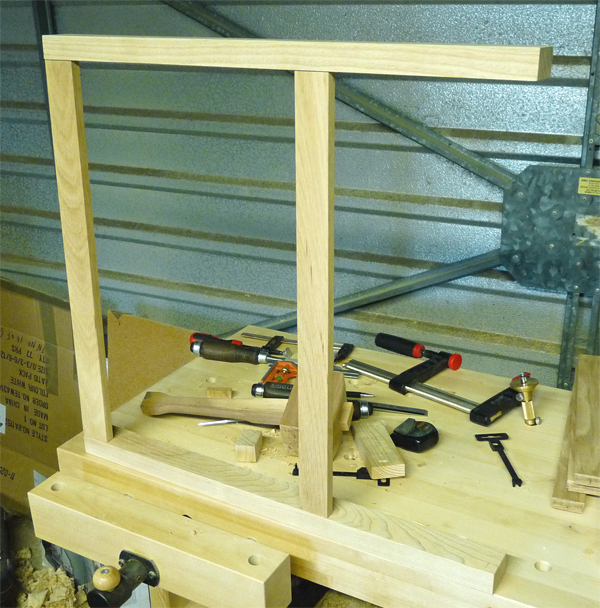
It was pretty satisfying to get this far and have it all fit together reasonably well (and square!). Of course, now I had to attach the back rails and stretchers at 45 degrees.
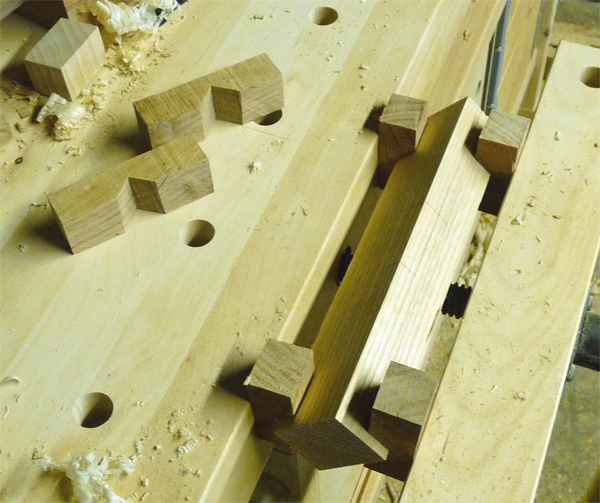
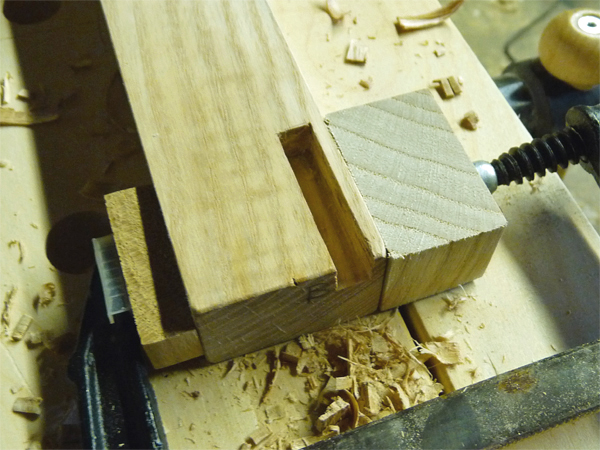
I did a test of my plan for 45-degree mortices recessed into the back corner of the legs on a bit of scrap (I think it may have come from the end of one of the legs, in fact). First fixing it securely in the vice in some hastily-cut holding blocks - in retrospect I should have used non-slip matting or something between the blocks and the workpiece, I had a couple of minor marks to steam out afterwards, but thankfully it all came clean. I'd been lulled into a false sense of security by all the times I'd successfully used flat scrap bits of wood to clamp things up without marring.
The recess was marked out, cutting the bottom lines one both sides with the marking gauge, and just chopped and pared out with chisels.
On the up side, the mortice wasn't incredibly difficult to chop within the recess, and fit nice and snugly. On the down side, I dented both apex corners while doing so. Thanks to the helpful chaps on this forum who suggested steaming the dents out - it worked perfectly. As suggested by I think AndyT, I cut the recess a millimetre or two short on the actual legs and widened it out after I'd finished the mortice, so most of the dent got removed anyway.
After a while I could dry-fit it all together, and it stood up and everything. Fortunately at this point I decided that the pine furnitureboard top that I'd cut for it was rubbish before it was too late, and I'd do a proper one in Ash.

Many thanks to Andersonec, who pointed out that there was a friendly timber merchant right under my nose in the middle of Grantham who could sell me some ash - I nipped in and pretended I knew what I was talking about and came home with enough ash planks to joint into a table top.
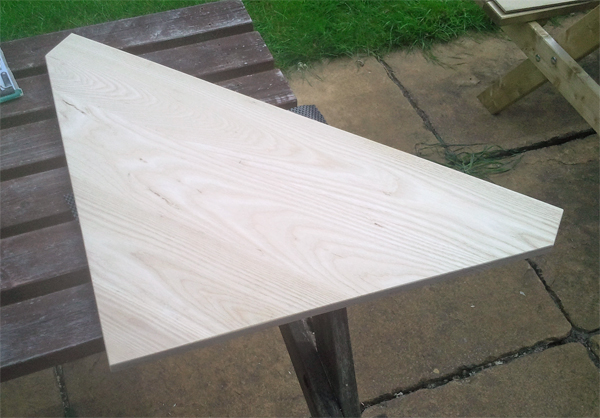
This is one of the points that I chickened out and used a circular saw to cut the sides of the tabletop to form the correct triangle shape - I had cut the pine one to shape using a japanese handsaw, but I didn't fancy either the risk of cocking it up or the risk of breaking teeth off my favourite saws of all time while cocking it up, and the previous occupants of the house had conveniently left us a great outdoor cutting table. I didn't think he was a woodworker, though, so I don't know what they used it for...
I did use the handsaws to trim the two square corners on the front edge, though, and used a block plane and one of those great Lidl sanding handles (oh, when will they sell those again?) to bevel the arises.
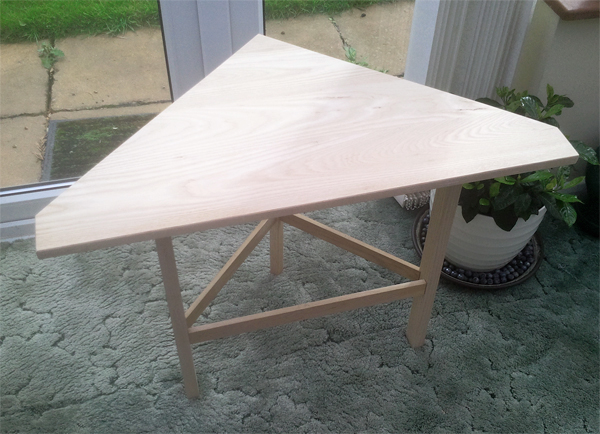
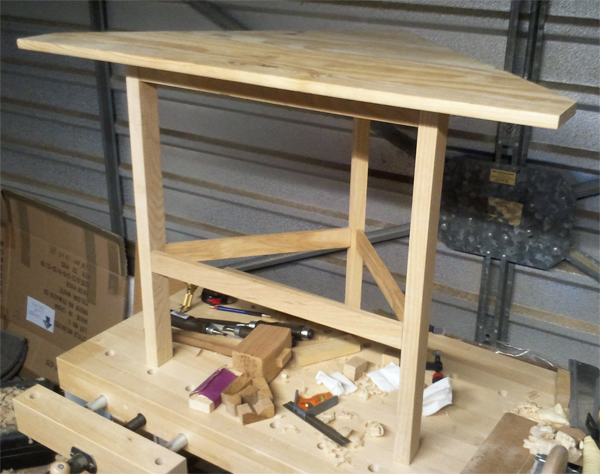
Here's the last dry-fit before final assembly - I just need to cut some grooves in the back side of the aprons for tabletop-attaching buttons and I'm ready to go.
(On that note: I've heard of people using a biscuit jointer to cut the button holes, but I think it would probably cut too deep for the width of these rails. I could cheat and use a router, of course, or chisel a short recess, or I could use my second-favourite plane - a Record 044 plough plane - to cut a slot down the entire length of the apron. The latter would be the most fun, and I had a go on a bit of scrap already in anticipation, but I'm worrying that it may weaken the apron too much. Anyone have any advice?)
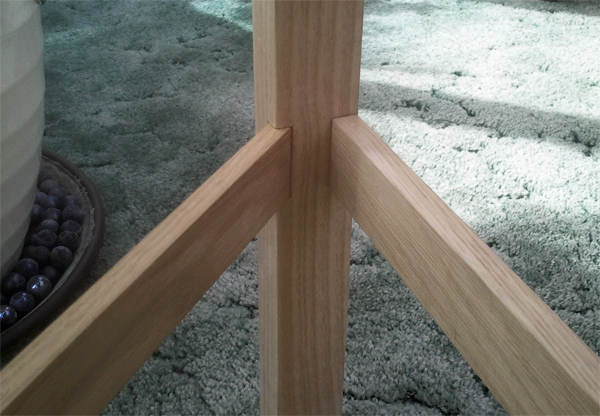
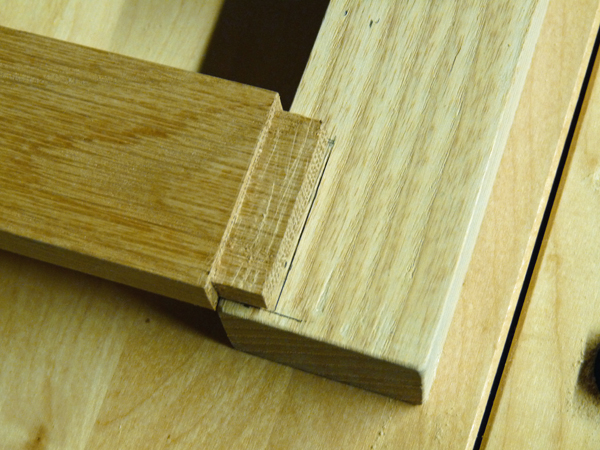
Here's the inside of one of those 45-degree joints - I think it turned out pretty well, but I'm a little apprehensive about whether or not the apron would expand enough to be problematic inside that recess. My instinctive reaction is that if it does move it wouldn't be enough to damage anything, but my experience with wood expansion is limited...
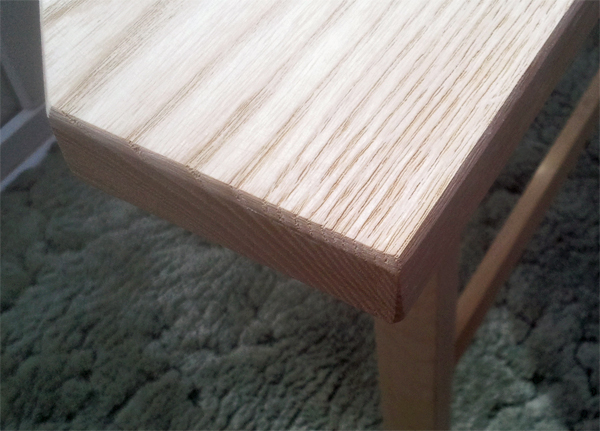
The other question I have is about corners such as this one - what would people do here? I bevelled the front and side edges on top and bottom, which left this edge looking a bit sharp. So I tried taking the block plane to it, but it's not straightforward to keep the angle. I ended up sanding it to about where I thought it should be (and a bit more after this photo, as well) but I'm not sure there isn't a better way that I didn't think of.
Another future step, of course, will be deciding on a finish. It was originally scheduled to be painted, but the committee has since changed their mind and it'll be receiving a finish that leaves the grain visible. I'll be trying the Osmo Polyx stuff - I bought a small tin and I'll try it on some scrap first - but if anyone has any other suggestions about oils or varnishes to use on ash that don't make it look silly, I'm all ears!
The goal is to make a triangular corner table that can sit in our front 'porch hall', as the estate agent put it. It's this corridor-width room between the front door and the main downstairs hall (with an S-shaped path between them) that seems to have been added onto the house after it was completed (not least because the downstairs loo window opens onto it!), and despite hanging a picture at one end it looks a bit bleak, so we thought it'd be nice to have some plants sat in the corner... unfortunately the only suitable table I already have is rectangular and profiled, so the corner sticks out ready to take the skin off of unwary knees or shins. When we first moved in I thought the space would be good for the little shoe-stool I did as the first project in the new house, but that idea got vetoed... but the photo I took of the not-yet-painted piece in situ shows the space the table's going in (also note the awesome work on the skirting board there which I've carefully avoided telling my belovèd girlfriend about lest she ask me to fix it):
I'm quite proud of this project 'cause it's the first time I've used hand tools quite so extensively - most of the pieces were cleaned up from rough-sawn timber by hand (after some sage advice on here about plane purchase), tenons cut without use of a router or bandsaw for a change and only a few cuts were done with machines where I didn't quite trust myself to get it right by hand. Of course, it's easier 'cause it's a three-legged table, so it's always going to be stable no matter how dissimilar the legs are! ;-)
I know it looks like that middle piece on the left is bent, but I think it's a trick of the lens, 'cause it's straight right now. The legs are ash, the rails and stretchers oak; the original plan was to paint it, and I had bits of ash and oak in roughly the right sizes already, so it seemed OK. Naturally, she's now changed her mind and wants it oiled or varnished or something instead (I was going to try out this Osmo Polyx that certain forumites go on about all the time) so the slight difference in wood tone will have to be a feature!
I did try and transfer mortice sizes as best as possible from the tenons themselves (and you can see some flaws in my planing here as well - this particular pit is going to be cunningly hidden under the apron where only I know it's there). I think this was my first mistake on this project, though - I would have been better off cutting the mortices first and sizing the tenons to fit rather than the other way around - it turns out that I only have chisels so small, so it was touch-and-go in a couple of cases as to whether I'd be able to cut the mortices narrow enough.
I clamped a couple of bits of scrap to the sides of the legs while chopping the mortices for the apron rails and stretchers, since there's only about 3mm between the mortice and the front face. It seemed to work, there was only one slight split and that was entirely down to me being careless (and thankfully, fixable).
It was pretty satisfying to get this far and have it all fit together reasonably well (and square!). Of course, now I had to attach the back rails and stretchers at 45 degrees.
I did a test of my plan for 45-degree mortices recessed into the back corner of the legs on a bit of scrap (I think it may have come from the end of one of the legs, in fact). First fixing it securely in the vice in some hastily-cut holding blocks - in retrospect I should have used non-slip matting or something between the blocks and the workpiece, I had a couple of minor marks to steam out afterwards, but thankfully it all came clean. I'd been lulled into a false sense of security by all the times I'd successfully used flat scrap bits of wood to clamp things up without marring.
The recess was marked out, cutting the bottom lines one both sides with the marking gauge, and just chopped and pared out with chisels.
On the up side, the mortice wasn't incredibly difficult to chop within the recess, and fit nice and snugly. On the down side, I dented both apex corners while doing so. Thanks to the helpful chaps on this forum who suggested steaming the dents out - it worked perfectly. As suggested by I think AndyT, I cut the recess a millimetre or two short on the actual legs and widened it out after I'd finished the mortice, so most of the dent got removed anyway.
After a while I could dry-fit it all together, and it stood up and everything. Fortunately at this point I decided that the pine furnitureboard top that I'd cut for it was rubbish before it was too late, and I'd do a proper one in Ash.
Many thanks to Andersonec, who pointed out that there was a friendly timber merchant right under my nose in the middle of Grantham who could sell me some ash - I nipped in and pretended I knew what I was talking about and came home with enough ash planks to joint into a table top.
This is one of the points that I chickened out and used a circular saw to cut the sides of the tabletop to form the correct triangle shape - I had cut the pine one to shape using a japanese handsaw, but I didn't fancy either the risk of cocking it up or the risk of breaking teeth off my favourite saws of all time while cocking it up, and the previous occupants of the house had conveniently left us a great outdoor cutting table. I didn't think he was a woodworker, though, so I don't know what they used it for...
I did use the handsaws to trim the two square corners on the front edge, though, and used a block plane and one of those great Lidl sanding handles (oh, when will they sell those again?) to bevel the arises.
Here's the last dry-fit before final assembly - I just need to cut some grooves in the back side of the aprons for tabletop-attaching buttons and I'm ready to go.
(On that note: I've heard of people using a biscuit jointer to cut the button holes, but I think it would probably cut too deep for the width of these rails. I could cheat and use a router, of course, or chisel a short recess, or I could use my second-favourite plane - a Record 044 plough plane - to cut a slot down the entire length of the apron. The latter would be the most fun, and I had a go on a bit of scrap already in anticipation, but I'm worrying that it may weaken the apron too much. Anyone have any advice?)
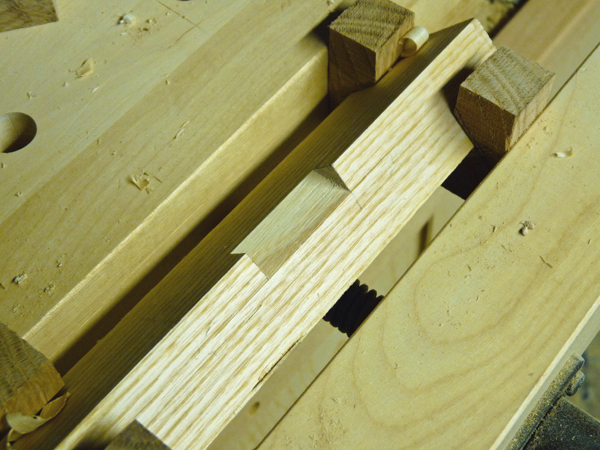
Here's the inside of one of those 45-degree joints - I think it turned out pretty well, but I'm a little apprehensive about whether or not the apron would expand enough to be problematic inside that recess. My instinctive reaction is that if it does move it wouldn't be enough to damage anything, but my experience with wood expansion is limited...
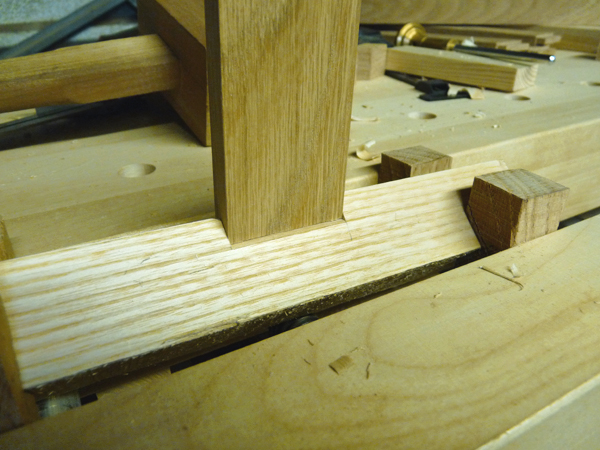
The other question I have is about corners such as this one - what would people do here? I bevelled the front and side edges on top and bottom, which left this edge looking a bit sharp. So I tried taking the block plane to it, but it's not straightforward to keep the angle. I ended up sanding it to about where I thought it should be (and a bit more after this photo, as well) but I'm not sure there isn't a better way that I didn't think of.
Another future step, of course, will be deciding on a finish. It was originally scheduled to be painted, but the committee has since changed their mind and it'll be receiving a finish that leaves the grain visible. I'll be trying the Osmo Polyx stuff - I bought a small tin and I'll try it on some scrap first - but if anyone has any other suggestions about oils or varnishes to use on ash that don't make it look silly, I'm all ears!

