COMPETITION ENTRIES

UKworkshop.co.uk

Help Support UKworkshop.co.uk:

This site may earn a commission from merchant affiliate links, including eBay, Amazon, and others.
Status
Not open for further replies.

woodbloke

Established Member
Joined
13 Apr 2006
Messages
11,770
Reaction score
1
Location
Salisbury, UK
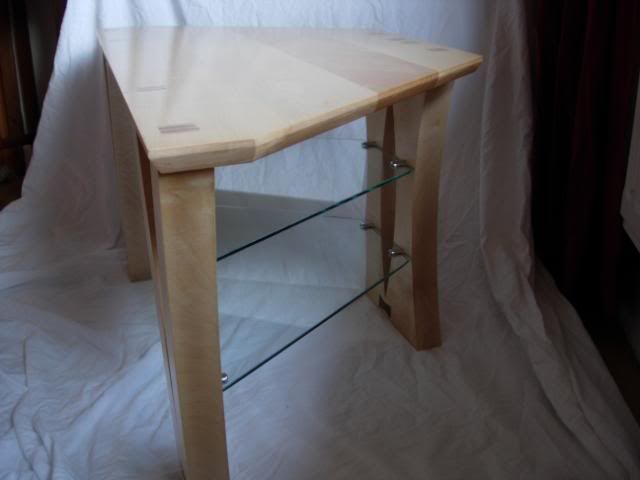
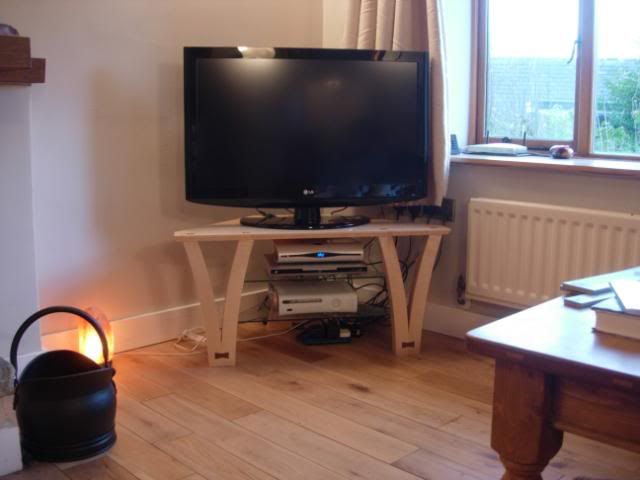
Would all competitors in the Competition post their completed entries into this thread. Just to recap, the entry should consist of six pictures, two of which should be the completed project shot from different angles and preferably against a plain, clutter free background. The pics should be accompanied by a maximum of 350 words of text.

Please state in capitals the level of entry: Advanced, Intermediate or Beginner with the title of the piece and then re-state the Design Brief, which will NOT be included in the 350 words of text.

The entries in this thread will be the ones’ that the judges will deliberate over, so please, no comments of any sort on the entries, any comments will be deleted by the mods.

Each judge should independently produce a short critique on his choices for each category (winner and second place, so six in total) and forward them to me via a PM. I will then collate the judgements and a majority decision in each category will win. Should there be an even split amongst the judges in any particular category, I’ll re-evaluate the judge’s choices and cast a deciding vote to form a majority, thus acting as adjudicator.

This thread will close at around midnight on the 31 Oct so if you miss the deadline…you miss the deadline!

Once the judging has taken place and the winners have been chosen, I’ll start another thread with a brief resume of the judges deliberations on the winning pieces.

My prize for the WIP thread will be sorted out after the main judging has been finished. Please remember though, that my prize will be awarded for the clarity of communication and comments to and from other forum members in the thread will be ignored - Rob
 
I don't know whether this is the appropriate place for this, so please feel free to move the post.

I will not be competing in this years competition.

I have been overtaken by events, I'm afraid. My workshop is full of bits for an invention of mine which I am trying to develop into something commercial, so I doubt whether I will even start my whacky conservatory furniture before the deadline. I do intend, however, to make it sometime this winter and will of course post on here as and when.

Best of luck to all those remaining in the the game!

Mike
 
Same for me, actually. Mainly because I have been busy with more important stuff but also because I lost interest in the design.

Good Luck all.
 
Entry Level: Advanced.
Title: Chess Table.


Design Brief: A chess table with drawer for the chess pieces made from American Black Walnut, with sycamore or maple for the lighter squares of the chessboard top. It may also have sycamore or maple inlay work.
_________________


The legs are tapered on the insides from the lower rails; all the joints in the legs are mortise and tenons. The upper rails have radiuses so to match the heights of the shoulders of the lower rails.
3852221684_0f17798cd1_o.jpg


The drawer housing is mitred on each corner reinforced with biscuits and was pinned and glued to a 3/8” thick veneered mdf board, the joint of the ABW and mdf was covered in 1/2” half moon mouldings. On the inside upper corners of the mitres gussets were added for strength and allow me to attach the chess board top. The drawer section is screwed to the upper rails of the legs through the mdf base.
3864359511_a9c761ef82_o.jpg


The drawer goes right through the table and can be opened from either side of the table. All the joints are hand cut dovetails and the two fronts were cut from the drawer housing to match the grain. The base is fitted to the drawer all around using blind housing joints on all four sides. The drawer fronts were then lipped with cock beading of sycamore to enhance the drawer fronts.

The top has mouldings of ABW mitred at the corners and glued to a sub base of 1/2” veneered mdf using 1/2” rebates within the mouldings.

The 2” square chequers made up from ABW and Sycamore were cut from strips 2” wide, then glued together in alternating woods, then sawn at 90* on the table saw again into 2” strips, then arranged and glued into the familiar eight by eight squares of a chess board. It was then edged with ebony and sycamore stringing mitred at the corners before being finally sanded on my belt sander to a thickness of less than 1/4” it was then glued totally to the mdf sub base to eliminate any movement from a cross grain situation, .
3905864929_81bf3d1444_o.jpg


Finish was one coat of cellulose sanding sealer and two coats of Danish oil each coat was cut back with 0000 wire wool before a coat of Black Bison wax paste was applied using wire wool, then buffed up with a soft cloth.

3950773610_550a7dd1f7_o.jpg


3950772684_d6b2f77586_o.jpg
 
Entry Level: Intermediate

Title: Extending Table


Design Brief: To make an extending table in a style similar to 3 existing items I have made previously for the conservatory. Needs to be reasonably compact to keep doorways clear where it will be located but capable of extending as much as possible when moved out for use with guests.

...........................

I've never made an extending table before so the first thing I did was go and look at what was available to buy. I did not like any of the expansion methods as they all left gaping holes in the table frame when extended. Most did not expand by very much either.

Rather than take the safe option of copying the least open style I spent some time designing my own way of doing it here. My working life has been spent solving design problems (in metal) so there was an element of seeing if I can still do it involved :)

Having decided on a design I then had to tackle processes I had not attempted previously. I have never veneered anything before and I have certainly never made veneers before.

Table004.jpg


The veneer making and fixing process was an extraordinary amount of work and it was a great relief to have that part done and move on to working with 'normal' wood.
Table024.jpg


There was a pause while I reconsidered how the table top will be lifted. My original idea had one lifting slope but having pieces in front of me it became obvious it would be too unstable. The result was a design with 4 slopes for stability and levelling adjustment.
Table056.jpg


Home modified very short drawer slides steer the table top into vertical motion only.
Table057.jpg


Using a tripod and cable release this is a series of pictures animated to show how it is extended and returned to compact size.
Table.gif


And finally another view showing the lack of gaping holes in the frame when extended.

Table079.jpg


Final thoughts. The Beech I bought for this has all turned out to be darker and more highly figured than the existing furniture. Starting again I would have selected lighter stock. That said it is not dark enough to be a problem and the reaction to it is 'isn't that grain lovely' rather than how much darker it is. Oh and it will be some time before I veneer again!
 
Level Intermediate

Title
Oak Framed porch using air dried oak with curved bracing
and plain hand made tiling

This is first one of these I have made it uses air dried oak
which I obtained from a local sawmill three boards 5 mtr x .600mm x 65mm thick they weighed a ton.

This proved to a bit of a task to reduce the three
boards to a size which could be planed thicknessed morticed and tenoned.

Then came the assembly which took two days the
curved braces that butt to the wall are morticed and tenoned into the brickwork a new one for me.

I cheated a bit and bought some oak flooring for the
roof boarding and then turned it into V T G for the effect.

The finish is three coats of sickens filter 7 as we did not want the
bare oak look which most oak porches are.

I really enjoyed making this am looking for another challenge

P1010320.jpg


P1010321.jpg


P1010316.jpg


P1010317.jpg


P1010101.jpg


P1010103.jpg
 
Entry Level Beginner
Design brief was from my daughter who wanted a chest of draws and a bedside cabinet. Originally it was to be in pine until she changed her mind and wanted wood without knots, so we settled on sycamore.
Both the chest and cabinet are built the same way with a front and back frame which is doweled together and doweled onto the end frames which have the top and bottom rails tongue & grooved into the side pieces.

frame.jpg


The ends are filled with the sycamore which was left over after cutting down boards. It’s planed and sanded down to be a tight push fit into the rebates and the mullets. Clearance is left around the panels to allow for movement and care taken not to glue them in position.
The draw runners are screwed to the sides through slots again to allow movement.

Draws are made from soft wood and the draw fronts from sycamore which are cut to allow the front to sit inside the frame.

draws2.jpg


small%20draw%20front.jpg


back%20draw.jpg


The design is most definitely make it up as you go along, the sides gave the theme which became clean straight lines, no curves or rounded edges.

Bedside Cabinet
small1.jpg


Chest of Draws
chest3.jpg


The finish is one coat of sanding sealer one coat of blonde shellac and some clear wax polish.
 
Entry Level: Intermediate
Title : Console/Dining Table


The concept arose from the client wanting a dining table which could seat eight in a refectory table formation but which would, when not in use, occupy less space and be less prominent in a relatively narrow room.
Working back from dimensions for that form of table, 205cms by 90 cms, I opted for a gate-leg arrangement but with the leaves folding longitudinally. The four polished brass counter-top hinges which join the leaves have a butterfly form which I then echoed with 4 decorative dovetail keys, in yew, which correspond with the 8 seating places and which “possibly” contribute to keeping the walnut boards together although there is also a loose tenon in there.
When the table is in folded console table arrangement, 2 layers of table edge are visible together and so as a decorative element I have put in banding. When folded, the twin legs display the wedged through tenons which then resemble, a little, column capitals.
African walnut for the table top –I really wanted to experiment with elm for the top but couldn’t find any here and when I machined the boards the colour differences between them became more apparent (although they are all the same species) and so I had to arrange them to make a feature of it – making a virtue out of necessity.
The base is in ash and when the legs, hinged by soss hinges, are folded they are held close together by earth magnets recessed into the uprights.
The finish is two coats of Osmo poly wax followed by another coat of regular wax on top which was then buffed to a sheen.


4018896679_b762896c81_b.jpg

The initial sketch led to working drawings in CAD

4009643932_c642dbb7f4.jpg

I generally make a small model of a proposed piece of furniture better to understand both the proportions and how the assembly might work.

4009644108_30b22dee03.jpg


4008879025_141cf48b00_b.jpg


4009645624_d546d14c1b_b.jpg


4009645836_8acd1c3991.jpg
 
ENTRY LEVEL: BEGINNER
TITLE: BEDSIDE TABLE


Design Brief: A bedside table with a single draw to fit into a bedside alcove 16"x11". The finished table must be suitable for a small child and hold a bedside light and a water cup.

Submission:

The proportions of the piece were based on the size of the space that the piece was to go into, these requirements led to the tall thin nature of the design.

The carcase and top originated from a single plank of wood to ensure that the grain and colour were consistent throughout. The drawer frame and drawer sides were made from a second piece of wood.

The mortices and tenons for the carcase were initally cut by hand, each piece fitted well, however when a trial fit for the whole piece was done, the joints were not at 90 degrees to each other. The mortices were then redone with a router and the tenons padded out with a slip of veneer.

3831519456_5c77bc5dfc.jpg


The legs were initially cut and planed square and then tapered after the mortices were cut to make the piece less chunky.

To ensure that the top could be added after the carcase is glued together, the drawer shelf was created in cherry as a frame which sits in a groove in the side panels rather than a solid shelf. This reduced stability slightly, but was required to put the piece together.

3831523140_0544bf79bc.jpg


The drawer body was made from a second plank of cherry, the joints were hand cut dovetails. The base of the drawer was a solid cherry panel fielded to float in a groove in the drawer sides. The drawer pull was turned from a branch of cherry. The drawer pull was given an 8mm diameter tenon which was glued into the drawer to attach the pull.

4021028685_d6186b08aa.jpg


The top was bookmatched solid cherry jointed with a rubbed glue joint. A half round feature was routed around the top of the table. The top was attached with metal brackets altered with oval screw holes to allow for wood movement.

4023831916_6c3bec105a.jpg


The whole piece was then finished with two coats of Chestnut Shellac Sanding sealer cut back with 600 grit abranet and three coats of clear Briwax applied and buffed with a soft cloth.

4023539510_735875db0c.jpg


4023524130_7d12590953.jpg
 
Entry Level: Intermediate
Title: Jewelry box

Design Brief:
Jewelry box about 400x250x180 from maple and walnut with 2 drawers and a tray with dividers. The drawers and top will be veneered.
_________________

Legs and drawer slides glued. The carcass ready to be glued up using dowels and mortice and tenon joints. Bottom is 4mm MDF.
dscf2348-0.jpg


Jig to rout recess for quadrant hinges.
dscf2356-2.jpg


Veneered panel ready for pressing between bits if MDF and curved cauls. Birdseye maple with cross banded macassar ebony, maple stringing and walnut.
dscf2356-6.jpg


Drawer was dovetailed at the front, veneered with birdseye maple and ebony with rosewood pull.
dscf23small-4-1.jpg


Finish is 3 coats of danish oil.
dscfsmall-7.jpg


Insides finished off with red felt wrapped around stiff card.
dscfsmall-12.jpg
 
ENTRY LEVEL : INTERMEDIATE
TITLE : PEARWOOD MANTLE CLOCK


Design brief

A small mantle clock, with arts and crafts influences, based on a design found in a reference book called “In the Craftsman Style.”

Here is a picture of the clock from the reference material.

4053480943_b4dffb6202.jpg


The design called for the use of a timber with a mild, uncomplicated grain to allow the design to dominate.


The submission

This project began when I located a suitable piece of English Pearwood and an offcut of Bog Oak for the inlay.

I set to work by planing the timber and using my bandsaw I divided the timber into pieces which were cut approximately to size.

I allowed the timber a month in doors to account for any movement before commencing work on the two sides.

I dimensioned these by hand before using my Woodrat to cut grooves to hold the front and back panels and the middle shelf by way of small tenon joinery.

I cut veneers of Pearwood which were bookmatched and pearl glued to oak faced mdf for the panels.

Attention then turned to the eye-catching checkerboard band across the middle of the clock.

I made up two sandwiches of material and cut slices from these. The slices were glued together one at a time to form a block. Once I had sufficient length I cut two slices length ways to fill the front rail. The front rail was glued to the middle shelf and a groove cut to hold the bottom of the front panel. The inlay pieces are 6mm square.

WIP picture of this aspect;

3985636060_41fe714cb0.jpg


The next move was to make the door which included loose tenon joinery using the Domino , and a rebate for the glass. I made muntins from a few off cuts.

3964267572_606e88a98e.jpg


The door is held in place with dowels set into the sides. Location of the dowels was important to avoid the door fowling the middle shelf.

The bottom shelf made as the middle included a stop to prevent the door from swinging inside the clock. Turning to the top I used the woodrat to cut a cove on the underside and grooves to accept the front and back panels.

I planed a taper on the side pieces to provide a visual lift.

I finished the clock with three coats of white polish diluted with meths to retain the natural colour of the Pearwood. A final clear wax was applied after assembly.

Clock dimensions H430mm W210mm D85mm

4053473023_46d846413f.jpg


4054215944_af504e3ed7.jpg


4043190167_bf90e94092.jpg


Tony.
 
Entry Level: Intermediate

Title: Keepsake Box

Design Brief:
A keepsake box made from Oak and Spalted Beech and dimensioned at 335mm xi 235mm x 190mm large enough to accommodate A4 size papers and other important items.


When I entered this competition I wanted to do something that I'd never done before and there are Three things that I chose to do.

1. Double box joints, these were done using the same wood but the with the end grain showing on the narrow strip

DSC00029.jpg


2. Curved top/lid, a lot of work involved in this using the table saw, Hand Plane and sandpaper

DSC00023.jpg


3. Wooden stop hinges, these were quite a challenge and took about 4 attempts to get right, they were made so the lid opened to just over 90 degrees, any more and the box would have toppled over

DSC00030.jpg

DSC00025.jpg


I had designed a lock made completely out of wood but it proved to difficult and unsafe to manufacture so I opted for a mechanical lock set into Spalted Beech

DSC00024.jpg


Finally, finished with three coats of Danish oil, the Spalted Beech top showing the configuration

DSC00028.jpg


Afterthoughts: I am not sure whether the hinges will be strong enough, maybe they should be made from half inch thick stock instead of three eighths.
I also should have given myself more time instead of rushing around in the last few hours.
 
WRITING DESK - INTERMEDIATE

Design Brief:
i will design and make a smallish writing desk which will be (hopefully) pleasing to the eye, and be able to hold laptop and cable modem, plus keep a shed load of cables and supplies out of sight. And a pen. The design will have to be airy and light so that it doesnt clutter/invade the room but still get noticed for its subtelty. it will be used as a ocasional desk for the laptop, nothing heavy duty. a cross between a desk and a hall table.
level will be intermediate, i think.


The idea for this writing desk came while admiring Senior and Carmichael's work.
I was particularly looking at one of their desks which featured arched feet and a flap.

Putting down a few ideas for a desk inspired by this one led me to the design presented here.
The desk I imagined had to be subtle and sit almost unnoticed in the corner of the room.
I wanted something heavy at the base of the feet, but very light at the top. I wanted some kind of trompe l'oeil effect, where the casual observer would not imagine it possible to have anything stored in this desk, as the top appears so thin.
In fact, it isn't. It is over 1.5" thick where the legs are tenoned through. I added discrete braces between each pair of legs and extra rigidity is brought in from the back support, which is dovetailed through the desk top. This prevents the U shaped top from opening up.
These braces also support the base of the storage compartment. The legs are made of three laminated pieces. The solid reclaimed oak piece is fairly heavy and surprisingly sturdy.

I wanted the desk to be practical and a useful piece of furniture for the occasional computer work. To this end, the desk had to house a laptop, and the cable modem. I am also using a channel routed in one of the back legs to hide the unsightly power cable.

01.jpg


02.jpg


It is stained using walnut extract. A pore sealer was then applied, flattened using steel wool, and waxed. The resulting closed pore finish is smooth and slightly glossy. The pull ring and hinges are solid brass. The overall look of the desk is as I wanted it. Subtle, discreet, noticed...almost ! The keen eyed observer will comment on the shapely legs, and will almost inevitably peer on the underside of the desk, just to reassure himself that there is indeed some trickery underneath the flap ! The dark finish thins the design an helps it to blend in its surrounding. The finish also combines with shape of the legs to give the overall look a hint of Japanese character.


03.jpg


04.jpg


05.jpg


06.jpg
 
Intermediate Level - TV Stand in sycamore and maple

Design Brief - I will be making a stand that will support the TV and fit into its allocated corner, hold the TV at the correct height, haves shelves capable of holding SKY box, DVD player, WII and XBOX. It must be also be an elegant design and demonstrate a suitable compromise between function/strength and elegance


I wanted a piece in a light coloured wood, but also strong, so chose maple and sycamore - with strong figure and grain being important. I spent a long time planning and designing to work out the issues, once done I then made full size templates for marking the legs with.

stand007-1.jpg


Before cutting the curves in the timber I ensured I cut the legs to exact length and square with the edge, this was essential if I was to have a datum point for marking and cutting the tenons. These were cut using the bandsaw and finished with a chisel and shoulder plane.

The legs were bandsaw cut to the marking lines and taken just to the edge of the line using a bobbin sander. It's difficult to achieve a smooth finish on hard wood this way, so the final shaping was done using a flat bottomed spokeshave. The areas where the legs meet was marked and planed flat with a jack plane.

The legs were joined using walnut dovetail keys (for contrast) and went through the full thickness of the legs. Each was custom fit in halves for ease before bringing together for the final fit.

tv64.jpg


The tenons were wedged, again with walnut, and a good tight fit was essential as they are to be on show. The slots were bandsaw cut and the wedges custom fit by sawing and sanding to each slot.

tv84.jpg


The tenons had been deliberately made 1mm too long so that they would be planed back flush with the top once the wedges were fitted. This was done with a block plane. The block plane was also used to plane the chamfer around the underside of the top as I wanted to avoid using the router with it's risk of tearout and burning.

The shelves were to be 6mm glass and held using chromed supports screwed into the legs.

I sanded down to 320 grit and used a satin lacquer finish with spray cans, de-nibbing with 400 grit before the third and final coat. Light applications was the key to a successful finish here.

tv98.jpg


tv100.jpg


Finally, in situ.

tv103.jpg
 
Status
Not open for further replies.
Back
Top