Brown oak coffee table.

UKworkshop.co.uk

Help Support UKworkshop.co.uk:

This site may earn a commission from merchant affiliate links, including eBay, Amazon, and others.
I like the table, I would have preferred the resin to be stained black to link the butterflies, which I absolutely love.

I agree with Rob about the round-over being a bit excessive but it is each to their own. I liked the shape of the edge in one of the top pictures where it is sharper.

Can I ask, how thick are the butterflies?

Mick
 
Well, in the interest of balance, I really like the rounded edges to the table top. It should make it very tactile and of course be kind on the shins for those bumping in to it. I also like the resin infill in preference to leaving the cracks open to get filled in with biscuit crumbs and peanuts! :lol: Not sure whether i would prefer the resin to be left clear or to be stained black - but I would reserve judgement until seeing the actual piece. Overall, I love it.
 
Thanks for the positive, and the not so thoughts on this table.

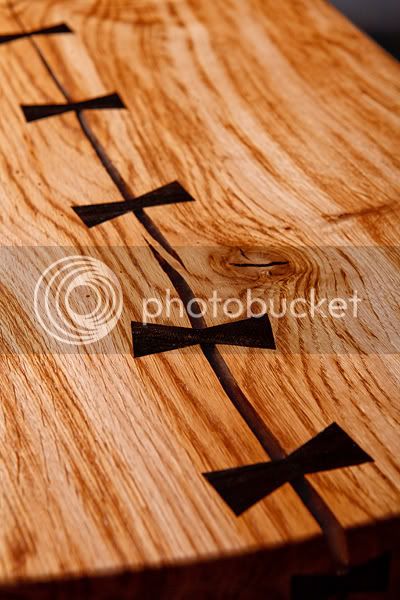
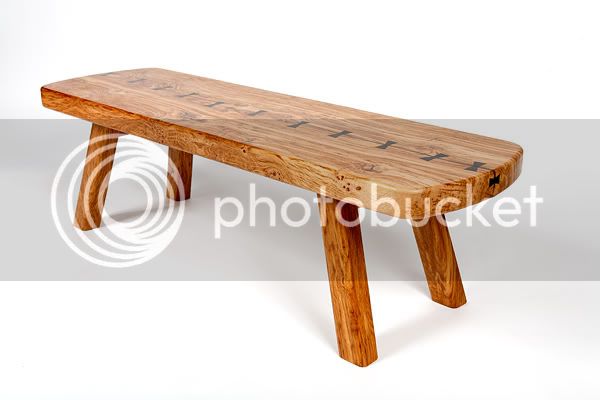
A couple of points I would like to make, firstly I have used this method for more than ten years and have a very practical knowledge of it. So with that in mind, I think it will be OK. The resin I have used is epoxy and not polyester, and anyone who has used epoxy knows it sticks like .... rather than poly which is used as a casting resin so will release after time. I cleaned the cracks out first before pouring, though they were very clean anyway with just a few loose splinters that were blown out with the aid of a airline with a needle attached.

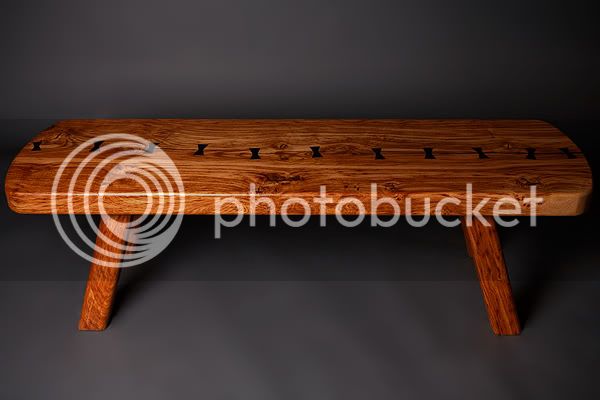
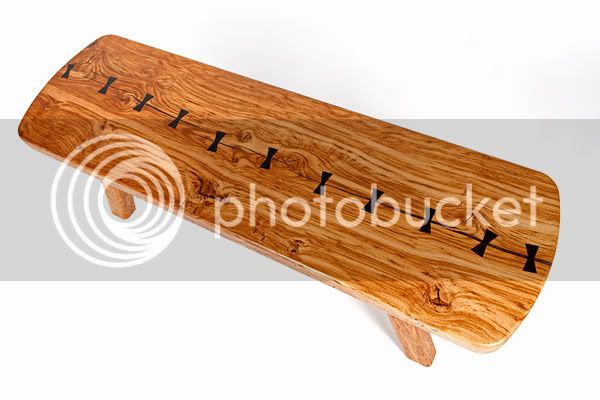
The method of using butterflies is not new, and has been used by restorers for a long time, which is where I directly copied it from, again from having practical knowledge of this method and having seen it used on a 17th century oak sideboard when I was a lad. As for the point about using black stained resin, its rather moot, because it looks black until you get 6" from it anyway because no light can penetrate from the bottom.

Now onto filling larger areas, this is possible and I have done it here though my work isn't displayed, unless you care to explore Johns site and look for the victory range of tables..... I made the first four. It was a long time ago when John first came up with this method, and as far as I know these items are still OK. I will say that what I have shown here is a very easy pour, however they haven't always been so. A lot of time and Johns money was used in getting the method down for large pours, and I wouldn't recommend it for a novice.

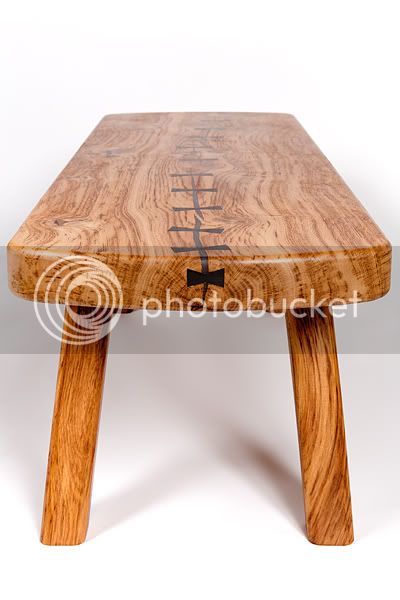
I made this table with my children in mind, hence the more rounded feel, but would have done it this way because I don't like sharp edges anyway. The proportions are right in mine and my wife's eyes as we look at the piece right here and now, and thats what important. Thanks for everyones interest.
 
Thanks for the additional comments about the resin technique, Mark. I've seen it used a few times and think it looks great in the right situation. I might give it a go some time.

Cheers :wink:

Paul
 
I have to say that I think the table looks great. The top is done in a way I would never of though of. I'd have probably not used that piece which, when you look at it now, would be a shame. Excellent piece.

Bob
 
Mark, thanks for the photo's, I've not seen the West epoxy used like that before.
I really like the finished table too.

=D> =D> =D>
 
Very nice indeed. Can I also question if it's brown oak. I have a board of 'brown' in the workshop and it is darker and more brown than yours. The guy at the mill I got it from told me the brown was caused by some form of fungal infection - beefsteak fungus growing on the tree when live (I just read). Maybe the colour varies anyway??
 
I guess the top is tiger oak, but a couple of legs are fairly brown......so with that in mind its a very rare brotiger table.
 
I really like that piece. Right up my street and a great way to show of the character of the wood.

It's something I will bear in mind next time I find a split in some wood.

I knew about dovetail keys before but I hadn't considered the idea of putting them centre-stage like that.

Really good job.
 
Just got some nicer images done for the website...


tigeroaktabledarkfrontview.jpg


coffeetabletopveiwwhitebackground.jpg


coffeetablecloseup2.jpg


coffeetablesideveiwdarkbackground.jpg


coffeetableendveiwwhitebackground.jpg


coffeetablesideveiwwhitebackground.jpg


Bit nicer than my crappy efforts anyway.
 
Love it. Nice use of a well figured and interesting board. Made me wonder if in discarding similar boards in the past I've missed some opportunities.

Thanks for sharing.
 
Wow

The better photo's make it look like a different piece. Sorry not trying to knock your photography but that makes the table look so much better.

I see it in a different light and like it so much more, well done.

Mick
 
Really do like this Piece its got me itching to get back in the workshop! I'm thinking the concept might work for a long really slim console table for my hall. The timber yards will sell some if their split boards because of this post Mark! Love the pictures they're Amazing! I think they really do show the subtle refined beauty of this table to its fullest.
To quote Hancock "Good job".
 
As I said earlier, it looks good, but even with the studio pics, the design doesn't do a great deal for me...sorry :( - Rob
 
I love it!!! as others have said, I wouldn't have touched a bit of wood like that... opened up my eyes, that's for sure!!!
=D> =D>
 
Thanks guys, it makes a change being able to keep something I've made. It was made to mine and my wife's wishes, we are very happy with it, my two year old has wasted no time claiming it for assembling puzzles, and has put a nice patina on it already. Now back to furniture making for clients, where I have less control on what I make :(
 
Back
Top