Bronze casting infill plane WIP

UKworkshop.co.uk

Help Support UKworkshop.co.uk:

This site may earn a commission from merchant affiliate links, including eBay, Amazon, and others.
I would epoxy the infills in, if you want to get them out a little heat will soften the epoxy.

If you do them well first time then you shouldn't need to remove them, it you damage one you should be able to patch any small fault, and if its a big problem then you might as well make a complete new one and hack the old one out.

Pete
 
Mark
I think Jimi's and Pete's comments are right. In regard to the "Richard" plane, what Jimi has done is obviously reversible. If you are slightly inaccurate with drilling out the old screws, you can always make the new countersink slightly larger and use a larger screw.
As Pete has said, I think you need perhaps to quantify your potential problem, in that if there is slight damage to the infill, it will be repairable, and doesn't need removal. If it is more serious, then you will have to make a new infill anyway, and the niceties of delicate removal don't apply. You need to remove the damaged part as swiftly and easily as possible, commensurate with not damaging the rest of the plane. If that dictates a robust approach, so be it.
Best wishes Mike
 
Mark, just wanted to through in my two cents, I have repaired a few Spiers, and made a few infills from castings. In my opinion, the best approach is to drill from sidewall to sidewall with the infill in place . If you start with a smaller diameter drill and increase the drill bit size step by step, you can get a pretty round hole. Then use a reamer in a brace and turn it once or twice to get the smallest chamfer, then insert the pin, and very little hammering will set the pin without mucking up the side. As Mike and Jimi and Peter have said, you usually want to think of a way to get the infill out. You hope you don't have to , but better safe than sorry. Personally, I don't like the look of the screw in the front bun of the post war Norris, but it is a matter of style that some may appreciate.
 
Saturday was metalworking day.
Some 5mm gauge plate arrived at the end of last week so I cut a piece 220 x 65 (using a hacksaw - about 30 minutes), filed the cut edges parallel and then mounted it in the mill to cut a 25 degree bevel
IMG_2418.jpg

IMG_2419.jpg

Then cut the corners off
IMG_2420.jpg

Drilled a 3/4 inch hole for the cap iron screw
IMG_2421.jpg

I milled out the rest of the slot, and then, in a rash moment, thought it would be fine for me to do 'my' engraving rather than the fat of sending it to ian Chalcott as after all how hard can it be??
Errr well quite hard it turns out... I am not sure whether I am going to be happy with this but anyway this is what I ended up with. It is not crisp enough but I might have another go. Worst case scenario I have to cut another blade.
IMG_2444.jpg

I had also ordered some 3mm gauge plate so cut a smaller piece for the cap iron
IMG_2436.jpg

Again mounted it in the mill to make the angled bevels
IMG_2437.jpg

IMG_2438.jpg
 

Attachments

  • IMG_2418.jpg
    IMG_2418.jpg
    175 KB · Views: 1,143
  • IMG_2419.jpg
    IMG_2419.jpg
    166.7 KB · Views: 1,143
  • IMG_2420.jpg
    IMG_2420.jpg
    148.8 KB · Views: 1,144
  • IMG_2421.jpg
    IMG_2421.jpg
    131 KB · Views: 1,144
  • IMG_2444.jpg
    IMG_2444.jpg
    76.7 KB · Views: 1,122
  • IMG_2444 (1).jpg
    IMG_2444 (1).jpg
    168.6 KB · Views: 1,123
  • IMG_2444.jpg
    IMG_2444.jpg
    76.7 KB · Views: 1,144
  • IMG_2436.jpg
    IMG_2436.jpg
    191.3 KB · Views: 1,144
  • IMG_2437.jpg
    IMG_2437.jpg
    220.2 KB · Views: 1,144
  • IMG_2438.jpg
    IMG_2438.jpg
    181.4 KB · Views: 1,143
I finished off the bevels and then bevelled the other end of the cap iron to 20 degrees All that remained was to drill the hole. I mounted an 8.5mm drill bit which was very close to the 3/8 tap I wanted to use - and the bit wandered - no idea why as it was all apparently going well - but the hole I have ended up with was 2mm off the midline which I will definitely have to redo
IMG_2439.jpg

So all in all a bit disappointing - but it has taught me a lot about metalworking so all good.
Sunday morning I worked on the infill. I started with the front bun
IMG_2425.jpg

Then using a mixture of rasps it was quite straightforward to shape this
IMG_2426.jpg

IMG_2427.jpg

The rear infill was also fairly straightforward to shape using rasps
IMG_2433.jpg

I copied Jimi's idea of milling out the slot for the rear infill handle on the mill rather than a router - this was very straightforward
IMG_2429.jpg

I went through the grits sanding it all down and then glued up the rear infill
IMG_2442.jpg

Finally I put a coat of the TruOil sanding sealer on the front bun
IMG_2442.jpg

I need to have another look at the blade tonight before I send it off for hardening to decide whether it is acceptable
Cheers Mark
 

Attachments

  • IMG_2439.jpg
    IMG_2439.jpg
    251 KB · Views: 1,138
  • IMG_2425.jpg
    IMG_2425.jpg
    100.6 KB · Views: 1,139
  • IMG_2426.jpg
    IMG_2426.jpg
    152.2 KB · Views: 1,139
  • IMG_2427.jpg
    IMG_2427.jpg
    131.4 KB · Views: 1,139
  • IMG_2433.jpg
    IMG_2433.jpg
    168.2 KB · Views: 1,139
  • IMG_2429.jpg
    IMG_2429.jpg
    123.2 KB · Views: 1,139
  • IMG_2442.jpg
    IMG_2442.jpg
    114.4 KB · Views: 1,139
  • IMG_2443.jpg
    IMG_2443.jpg
    152.7 KB · Views: 1,118
WOW! You can't BELIEVE how deja vu this all is...and mate..the first IRON I cut the centre slot by hand 2mm out too!!!

That is one hell of a lot worse than only having to redo the cap iron mate! So I feel your pain...but not as much as I could...you came out lightly! I have no idea how it happened...there must be a 2mm nudge gremlin out there in metal land!

The infills are looking superb. I see you are going for the bolder "Norris" shapes...and looking good my friend.

Cellulose sanding sealer?

Looking forward to the next episodes...who's hardening your iron?

Jimi
 
Hi Mark,
This is very interesting - I look forward to every installment. Great work!
I assume that you are using a centre drill first to prevent the drill bit wandering? (Grandmother, eggs, coat)
If I may ask - How are you going to deal with the business end of the cap iron (i.e. bending/milling) to provide pressure at the blade tip?
Liam
 
Very much as a non-engineer, I have found it better to scribe 2 lines parallel to the long axis of the blade to be, one from each edge, then 2 at right angles, so forming a very small square. For some reason, I find this easier to accurately centre punch, rather that hit the optimum point on a simple scribed cross. Check for accuracy with say a ground point, then use the smallest centre drill, very carefully with light pressure, to form a starter.
The number of times I have broken the point of small centre drills... I now save the stubs and regrind for marking gauges.
Then start drilling with a short small diameter drill, say 2mm., and open up with larger increments until somewhere near what you need as a finished size.
It's a fiddle and necessitates the cross slide absolutely not moving.
I don't know what the level of inaccuracy is like from new twist drills, but it is not unusual to see the tip of an apparently new drill bit bend off line. Once it moves, it's impossible to correct, and I usually turn the blade piece over and start again.
Hopefully someone out there can help with a more reliable method.

Mike
 
Liam brings up a good point about the pressure of the cap iron and I did a lot of research on this.

I adopted a fixed (not two part) Clifton style milling the rear of the face of the cap iron and then bevelling the leading edge ridge.

You can see this in my article on the build but if you need further information give me a shout.

The full article can be found HERE

Cheers

Jimi
 
Thanks Jimi Mike and Liam
Philly is hardening the iron - I sent it off today
The sealer is the one you recommended TruOil stuff
I have done more tonight - photos tomorrow
Haven't decided how to bend the cap iron yet. There is a light engineering works a couple of doors along from us - I might take it round to them
I will post photos tomorrow - but made good progress
Cheers for now
Mark
 
I milled a channel to the rear of the edge and then put a bevel on the front wall...then I bent the 3mm steel in a Record vise...

DSCN5281.jpg


It closes up flat when tight...

20140814_234621.jpg


Check out a video I just posted on here...using the GoPro Hero 4 camera mounted on the side...

It will give you confidence in the quality of Philly's hardening!

Cheers

Jimi
 
Great video Jimi - love the artistry
The Mark 2 cap iron was cut out of 3mm steel. I decided to cut the hole BEFORE I did any of the hard work on the bevels etc!
IMG_2447.jpg

I liked the idea of marking with a square (thanks Mike) but I just did it with a permanent marker pen with a fine nib - seemed to work fine. I started with a 3mm hole then went up 1mm at a time which seemed to work fine I don't have any of those centring bits - always wondered why they would be needed - now I know!
IMG_2448.jpg

I tapped the 8.5mm hole with a 3/8" x 26 tap
IMG_2449.jpg

To make the screw I took an old M10 bolt the head of which would be big enough
IMG_2450.jpg

Cut the head off
IMG_2452.jpg

and mounted it in the lathe
IMG_2453.jpg

The head was turned down to 15.2mm - it will be captive inside the adjuster - the ring of which will be a cut off from a 3/4 inch pipe which has ID = 15mm - I will take it down another .2mm when it is otherwise finished
I cut the thread with the corresponding die and it all looked good
IMG_2457.jpg

Another coat of TruOil on the infills and they are starting to shine.
IMG_2459.jpg

Thanks guys
Mark
 

Attachments

  • IMG_2447.jpg
    IMG_2447.jpg
    134 KB · Views: 1,140
  • IMG_2448.jpg
    IMG_2448.jpg
    142.3 KB · Views: 1,139
  • IMG_2449.jpg
    IMG_2449.jpg
    122.7 KB · Views: 1,140
  • IMG_2450.jpg
    IMG_2450.jpg
    151.8 KB · Views: 1,140
  • IMG_2452.jpg
    IMG_2452.jpg
    89.1 KB · Views: 1,140
  • IMG_2453.jpg
    IMG_2453.jpg
    133.7 KB · Views: 1,140
  • IMG_2455.jpg
    IMG_2455.jpg
    163.8 KB · Views: 1,118
  • IMG_2457.jpg
    IMG_2457.jpg
    117 KB · Views: 1,140
  • IMG_2459.jpg
    IMG_2459.jpg
    119.7 KB · Views: 1,140
Mark
Your rate of progress is very impressive.
Centre drills are fine, usually available in HSS, and fragile in the smaller sizes. With any sideways, or too much downward, pressure, the tip will snap off and remain embedded in the workpiece, from whence it can be a real sod to remove.
There are cobalt varieties available, but I have never tried them - must do so. I don't know whether they are less fragile.
Jimi - your cap iron looks a very elegant solution. Another reason why I need a milling machine.
Regards Mike
 
Thanks for the references, Jimi. It was good to revisit the full article - and to see just ho innovatie some of your technques are. Bravo - You've solved one of my problems - thanks!.
Mark - Ths is turning out to be a really beautiful plane.I look forward to every installment. I think that you owe it to yourself to invest in some centre drills - they are inexpensive and a revelation when it comes to accuracy! (RDG etc. do cheap sets).
Liam
 
You're probably right Liam - but if I add up the cost of this plane so far in terms of: the casting £44, gauge plate £50, 9/16" 40TPI tap & dies £20, mild steel rods £10, phosphor bronze 'lump' for the lever cap £50. Wood for the infills I already had so not counting that. Even so I am at around £200! Having said that, this plane is definitely been my second crash course in metalworking and it has been so enjoyable. Jimi remind me the weight of yours - I am up to about 4kg already without the lever cap or steel sole!
Might be quiet this week busy week at work
Cheers Mark
 
I spent lots of time working on this plane over the long weekend with variable success:
Firstly, the iron arrived back from Phil and I sharpened it and it is a very pointy piece of metal indeed so my heartfelt thanks to Philly for a superb job. Must learn that skill next time
IMG_2484.jpg

Second, I decided the edges of front bun were too sharp so I relieved the corners with a rasp and then went through the grades again and recoated it
IMG_2491.jpg

IMG_2492.jpg

Third, I epoxied the 2mm steel base onto the sole of the plane - this involved first keying the surfaces, then cleaning with meths
IMG_2499.jpg

After mixing both tubes, I used an old blade to spread the stuff on both surfaces then clamped up to my bench using all my holdfasts and a big clamp
IMG_2501.jpg

Next I turned to the cap iron
I think I have lost some photos but I filed the edges off etc as before and bevelled the leading edge and copied Jimi (sorry Jimi) by milling a rebate (wrong word I am sure when describing steel) into the lower surface of the cap iron
I also cleaned up the screw I had cut which is going to be the cap iron screw
IMG_2487.jpg
 

Attachments

  • IMG_2484.jpg
    IMG_2484.jpg
    118.6 KB · Views: 1,027
  • IMG_2491.jpg
    IMG_2491.jpg
    109 KB · Views: 1,028
  • IMG_2492.jpg
    IMG_2492.jpg
    136.5 KB · Views: 1,026
  • IMG_2499.jpg
    IMG_2499.jpg
    136.6 KB · Views: 1,027
  • IMG_2501.jpg
    IMG_2501.jpg
    136.3 KB · Views: 1,027
  • IMG_2487.jpg
    IMG_2487.jpg
    126.3 KB · Views: 1,026
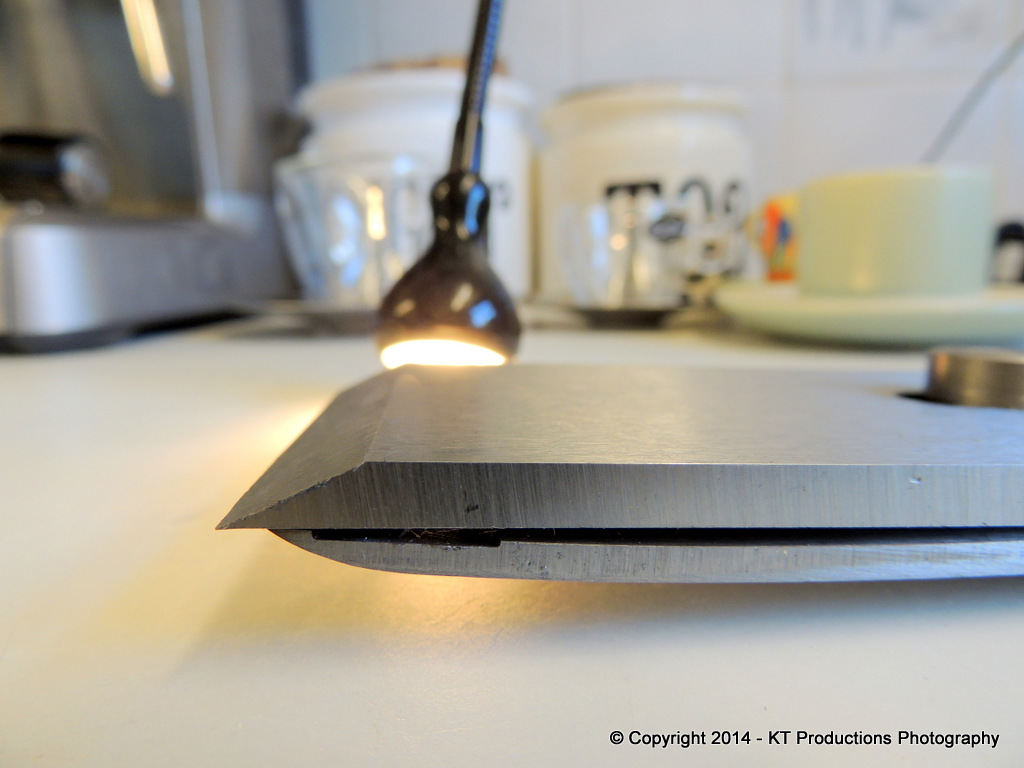
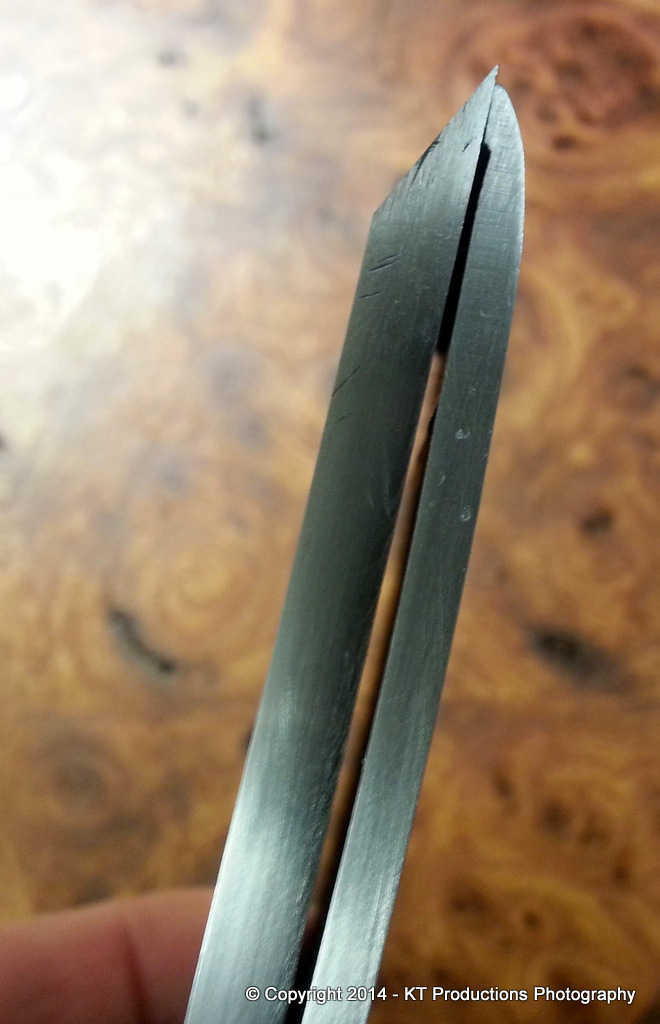
Finally I turned my attentions to the adjuster...
I had used the head of a 265 mm M10 bolt to make the cap iron screw - so I used the rest of the bolt for the adjuster screw. First I turned it down on the lathe and then cut a 5/16" 40 TPI thread in one end (I was using a Norris adjuster here to guide me on the proportions etc
I drilled and tapped an offset of a 3/4" mild steel rod to make the corresponding anchor for the adjuster
IMG_2481.jpg
.
Then, with apologies cos my phone was not charged on sunday am, so I have missed out a few steps, I cut a similar length offset of 3/4" steel pipe for the retainer, and then used the lever cap screw from my St James Bay infill kit which I had not used originally to provide a brass head for the adjuster
IMG_2486.jpg

The retainer (i.e. the thing which holds the cap iron screw captive) I drilled 2x 4mm holes through the walls opposite each other on the mill
IMG_2488.jpg

I drilled a 3.5 hole into the screwed end of the adjuster shaft on the lathe then tapped this by hand with a M4 tap
IMG_2495.jpg

The inside of the retainer piece I enlarged with a series of diamond and HSS burrs using a Dremel to countersink it - I do not have a countersink small enough to get in there
IMG_2493.jpg

Then it was just a question of patience and an M4 countersunk bolt to get it all to fit together
IMG_2496.jpg

I used a small washer between the retainer and the shaft which meant I could tighten up the screw until the retainer would rotate but there was no play. I can take a more detailed photo of this sometime to demonstrate
So by the end of yesterday I had got to this stage with the whole blade / cap iron / adjuster mechanism arranged on the bench to show how it would work. I am using Richard's brilliant alternate suggestion as to how to mount the adjuster using a 1/4" steel rod in a short brass tube sunk in the infill
Sorry if some of that is not clear but as I say the lack of a camera meant I missed some crucial shots
Cheers Mark
 

Attachments

  • IMG_2481.jpg
    IMG_2481.jpg
    124.1 KB · Views: 1,023
  • IMG_2486.jpg
    IMG_2486.jpg
    122.6 KB · Views: 1,023
  • IMG_2488.jpg
    IMG_2488.jpg
    125.5 KB · Views: 1,025
  • IMG_2495.jpg
    IMG_2495.jpg
    143.4 KB · Views: 1,024
  • IMG_2493.jpg
    IMG_2493.jpg
    116.8 KB · Views: 1,024
  • IMG_2496.jpg
    IMG_2496.jpg
    102.6 KB · Views: 1,024
  • IMG_2498.jpg
    IMG_2498.jpg
    109.7 KB · Views: 1,002
Fabulous!
I thought of following you but all of the brass castings seem to have disappeared off the market (sold!) - unless anyone knows otherwise, of course.
I think the adjuster looks really well executed - can't wait for the shavings
Liam
(ps centre drills really are only pennies in comparison and save so much grief!)
 
Great progress - I'm enjoying following this WIP.

When drilling the hole in the infill for the pivot tube it is very important to get it central. As drills tend to wander in wood owing to the grain and variable hardness I use a steel guide to prevent this from happening, as in the photo below.
 

Attachments

  • 2013-05-23 20.42.14C.jpg
    2013-05-23 20.42.14C.jpg
    239.7 KB · Views: 944
Got out into the workshop for an hour before work today and had a look at the steel sole
It all looked good and did not take too much filing to get the sides flat again
IMG_2502.jpg

IMG_2504.jpg

The mouth was obviously closed up and filled with hardened epoxy which I had to chip out
IMG_2504.jpg

I drilled the mouth out carefully with a 4.5mm drill bit, then filed it down
IMG_2505.jpg

It needs a lot more work but I think will be fine
Thanks gents for the comments - Liam I quite often see one of those castings - every few weeks or so
Richard point taken about the brass tubing being central
I have day off this friday so will make progress then hopefully
Kind regards
Mark
 

Attachments

  • IMG_2502.jpg
    IMG_2502.jpg
    138.9 KB · Views: 935
  • IMG_2504.jpg
    IMG_2504.jpg
    145.8 KB · Views: 935
  • IMG_2503.jpg
    IMG_2503.jpg
    152.8 KB · Views: 913
  • IMG_2505.jpg
    IMG_2505.jpg
    118.3 KB · Views: 935
Back
Top