You are using an out of date browser. It may not display this or other websites correctly.
You should upgrade or use an alternative browser.
You should upgrade or use an alternative browser.
Bronze casting infill plane WIP
- Thread starter gasman
- Start date


Help Support UKworkshop.co.uk:
This site may earn a commission from merchant affiliate
links, including eBay, Amazon, and others.
gasman
Established Member
Sorry I meant less stressful than I thought - and the angles are clearly not exact but I don't think that matters if it looks alright
gasman
Established Member
Another very long pause in proceedings...
However, the lever cap arrived back from Chalco yesterday and looks great

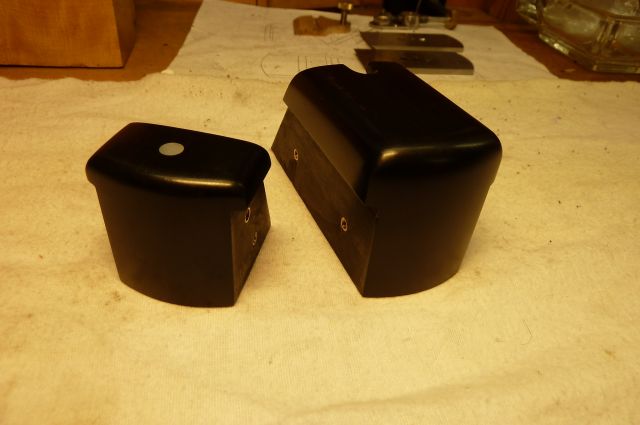
Even though the infills are not epoxied in place yet I could not resist taking a shaving of a scrap of oak - and they fit well enough to give enough friction to enable it all to work fine. The mouth is abut 1 to 2mm - I will take photos when it is all glued up.
I had polished the sides earlier in the week so it is now a very shiny thing.


This weekend I will make the final decisions on the gap on either side of the lever cap which I have discussed before and whether to do anything about them before epoxying the infills in place
The whole thing weighs in at 5300g - that's 11 lbs 10 ounces!!
So nearly there now
Cheers
Mark
However, the lever cap arrived back from Chalco yesterday and looks great
Even though the infills are not epoxied in place yet I could not resist taking a shaving of a scrap of oak - and they fit well enough to give enough friction to enable it all to work fine. The mouth is abut 1 to 2mm - I will take photos when it is all glued up.
I had polished the sides earlier in the week so it is now a very shiny thing.
This weekend I will make the final decisions on the gap on either side of the lever cap which I have discussed before and whether to do anything about them before epoxying the infills in place
The whole thing weighs in at 5300g - that's 11 lbs 10 ounces!!
So nearly there now
Cheers
Mark
Attachments
Really a great looking plane, I like the segmented knurl on the screw, the nice hand finishing and the very tasteful stamp on the lever cap.
At almost 12 pounds, it won't speed bump on any knots, that's for sure.
At almost 12 pounds, it won't speed bump on any knots, that's for sure.
Klaus Kretschmar
Established Member
Terrificly looking plane! Honestly, regarding your way of making, I've expected this result. It's a heavy beast but a panel plane is allowed to be heavy. One annotation: you fix the infills by glueing in them with epoxy. As far as I know the most infill makers are using mechanical jointings like pins or screws to fix the infills at the plane sides. I guess that this allows some seasonal movement of the wood. Aren't you afraid to get some cracks on the long run?
Klaus
Klaus
gasman
Established Member
Thanks everyone
Klaus I also am concerned about this way of fixing the infills but on the previous plane I made I riveted the infills and the hammering distorted the plane ever so slightly. This infill wood is completely dry now at 8% or so and I think it will be OK. Others have said that, worst case scenario, you can still get the infills out and replace them. Good point though I will think some more before the weekend
Cheers
Mark
Klaus Kretschmar
Established Member
Hello Mark,
don't want to give any advice. How could I regarding your fantastic work on this plane...
Just a thought to the subject. Not my thought however but the one of Gerd Fritsche, the infill maker. A few weeks ago I've made a plane out of a kit from Gerd. His approach to fix the infills seems to be rather smart. The infills get some threaded inserts.
The corresponding holes in the sides of the blade get a slight bevel.
The screws will be fastened by adding a little epoxy.
After having filed the screw heads flush to the sides, tha sides will be ground or just sanded.
Now the sides can be finished to any degree of glance.
This methodology allows the infills some seasonal movement without getting cracks since the wood is able to slide slightly on the threaded inserts.
Klaus
gasman
Established Member
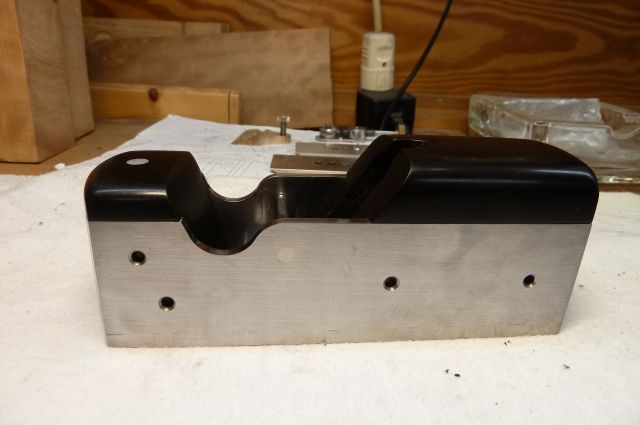
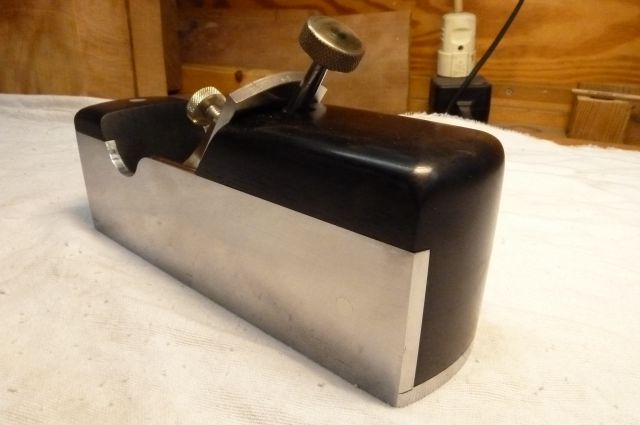
After weeks of faffing around getting interrupted and getting other jobs done I finally got the time to finish off the bronze casting plane this weekend
I epoxied in the infills which was very straightforward. Then there was a little bit of paring away the dried epoxy from the surfaces of the bronze and the infill. These came away very easily because I think of the smoothness and hardness of all the layers of TruOil.
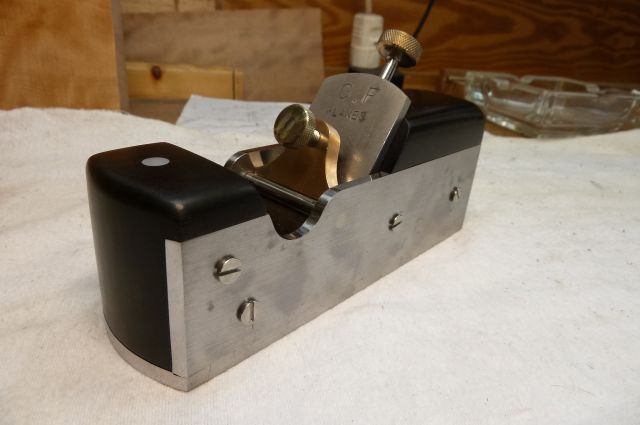
I did however decide one final coat of TruOil was called for so I carefully taped up the bronze sides etc with insulating tape and put one more coat on.
Then it was just a case of assembling the plane, sharpening the iron once again and taking some shavings. It works beautifully and I am thrilled to have (finally) reached the end of a very long and frustrating journey. Time will tell how much I use this - I can certainly see me reaching for it when flattening wide boards but the biggest benefit for me bar none was the metalworking etc skills I have acquired along the way. For example the second version of the adjuster I made was so much smoother than the first. It was all fun but I am kind-of glad it's over!


Here with my other infill

And finally here those two with the 2 Norris planes there are kind-of based upon

Thanks for all your kind words and support
Regards from Oxford
Mark
I epoxied in the infills which was very straightforward. Then there was a little bit of paring away the dried epoxy from the surfaces of the bronze and the infill. These came away very easily because I think of the smoothness and hardness of all the layers of TruOil.
I did however decide one final coat of TruOil was called for so I carefully taped up the bronze sides etc with insulating tape and put one more coat on.
Then it was just a case of assembling the plane, sharpening the iron once again and taking some shavings. It works beautifully and I am thrilled to have (finally) reached the end of a very long and frustrating journey. Time will tell how much I use this - I can certainly see me reaching for it when flattening wide boards but the biggest benefit for me bar none was the metalworking etc skills I have acquired along the way. For example the second version of the adjuster I made was so much smoother than the first. It was all fun but I am kind-of glad it's over!
Here with my other infill
And finally here those two with the 2 Norris planes there are kind-of based upon
Thanks for all your kind words and support
Regards from Oxford
Mark
Attachments
-
 2015-11-22 10.28.02.jpg192.6 KB · Views: 809
 -
 2015-11-22 10.27.42.jpg190.4 KB · Views: 809
 -
 2015-11-22 10.27.47.jpg182.9 KB · Views: 809
 -
 2015-11-22 10.29.12.jpg206.1 KB · Views: 809
 -
 2015-11-22 10.28.53.jpg180.2 KB · Views: 809
 -
 2015-11-22 10.27.59.jpg203.7 KB · Views: 809
 -
 2015-11-22 10.32.39.jpg214.9 KB · Views: 809
 -
 2015-11-22 10.34.03.jpg164.7 KB · Views: 809
gasman
Established Member
well spotted. I was gong to mention that. It is one of the ultra-low ones - I think only 4W and it stays on for the whole winter (turned it on yesterday). I have not had any condensation of any sort but then again my workshop is so well insulated and only a year old. I thought it was a very cheap 'investment policy' which sits there all winter warm to the touch
Thanks for kind words
Mark
Thanks for kind words
Mark
Klaus Kretschmar
Established Member
My hat is off to you, Sir!
Wonderful plane and quite a pleasure to follow this journey.
Klaus
Wonderful plane and quite a pleasure to follow this journey.
Klaus
Similar threads
- Replies
- 12
- Views
- 555