Bootfair Spiers? Infill

UKworkshop.co.uk

Help Support UKworkshop.co.uk:

This site may earn a commission from merchant affiliate links, including eBay, Amazon, and others.

jimi43

Established Member
Joined
12 Mar 2009
Messages
6,921
Reaction score
13
Location
Kent - the Garden of England
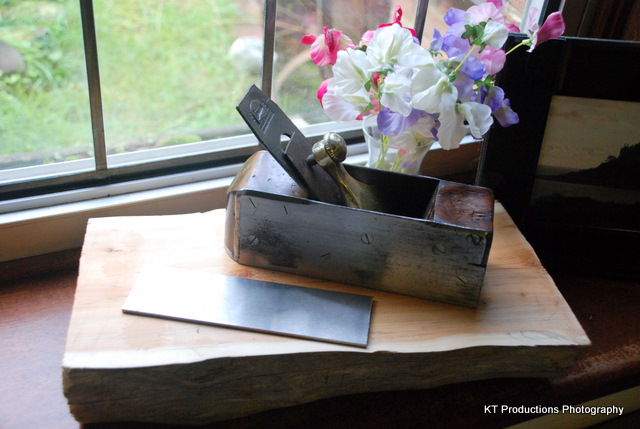
Another hidden gem found nestling in a pile of junk this weekend....

DSC_0001.JPG


I nearly missed it but the Bristol lever just poked out from the pile of rust and caught my eye...

DSC_0002.JPG


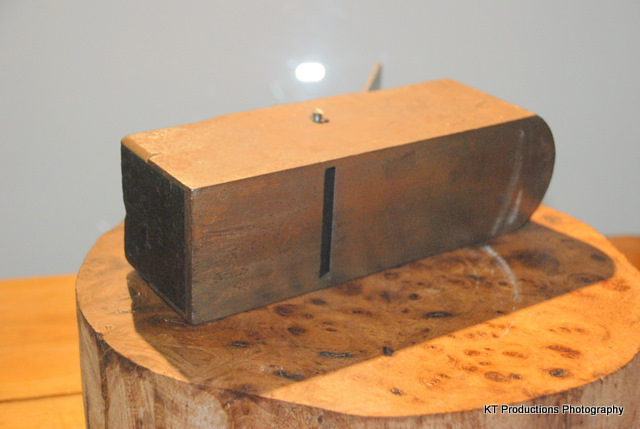
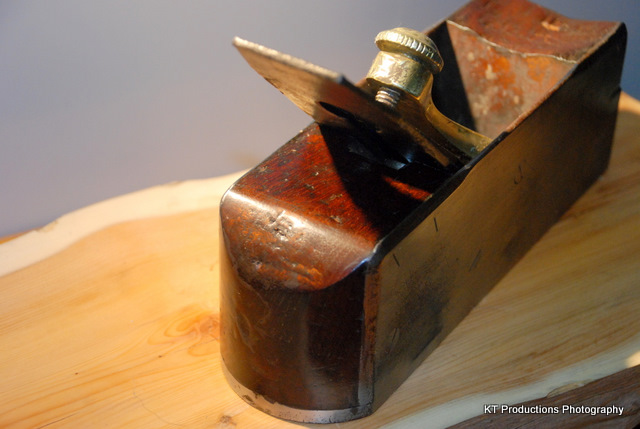
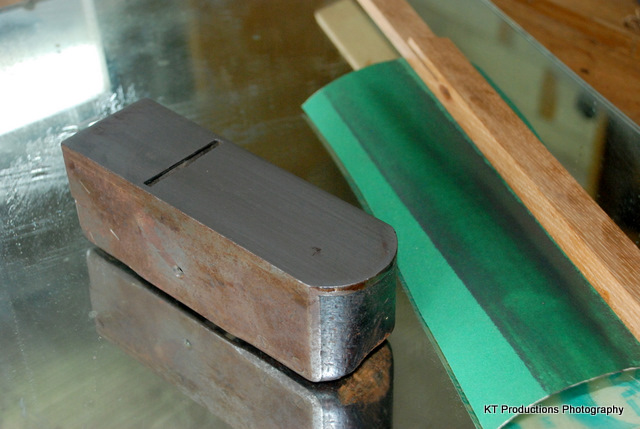
The important bit...the sole...is as flat as a pancake...indeed it reflects a perfect image so I have no worries there!

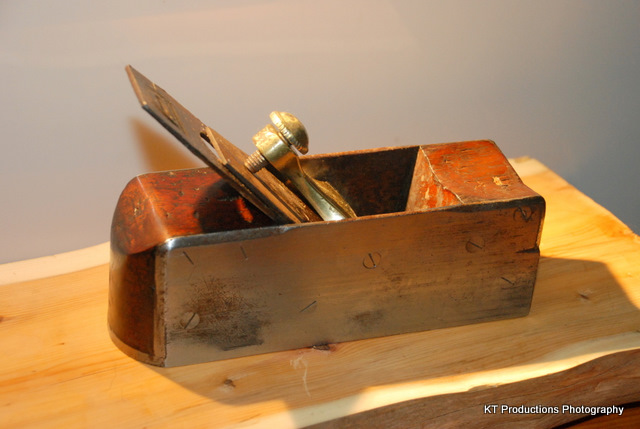
I need to remove the rust from the sides and generally restore the metalwork but this is such an abused beauty that I think a full restoration is necessary....

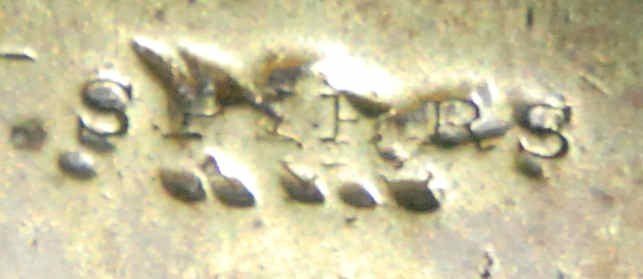
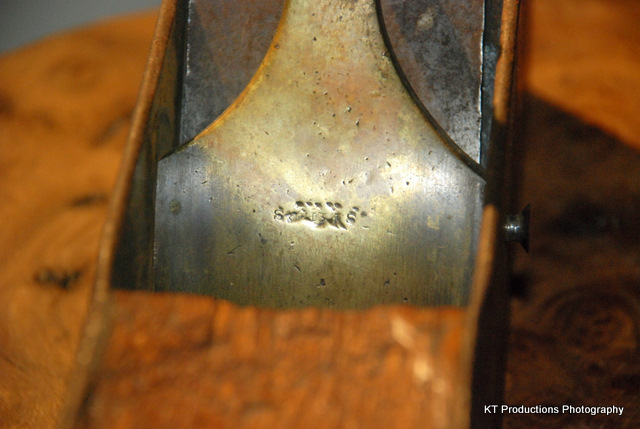
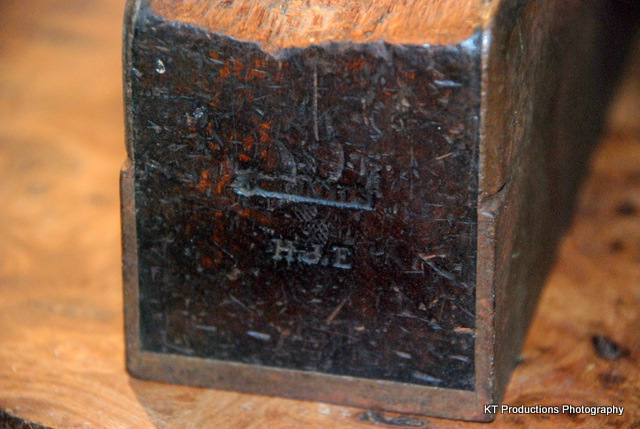
The previous owner did his utmost to obscure the maker's name for some unfathomable reason...but you can just read "SPIERS" under his bashing about with letter stamps!

DSC_0003.JPG


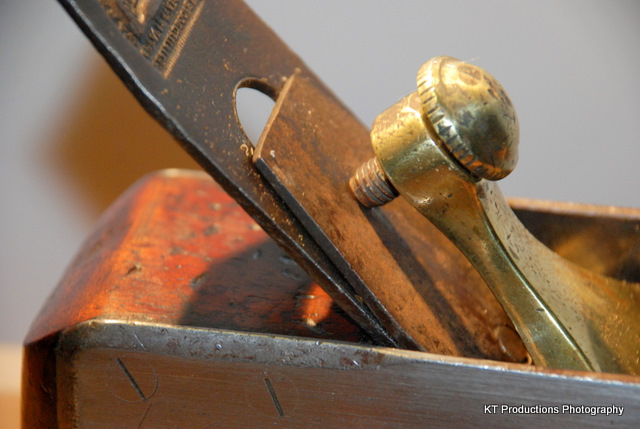
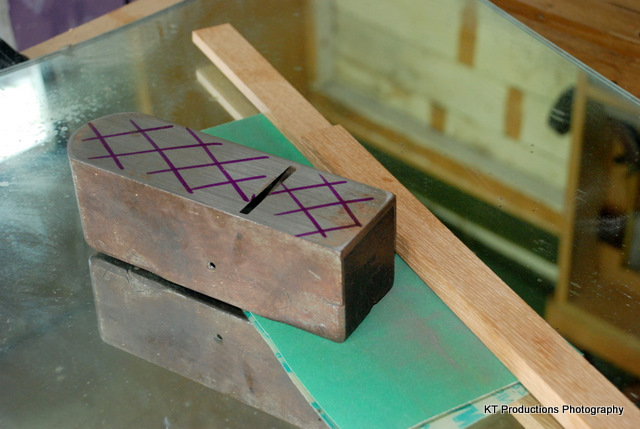
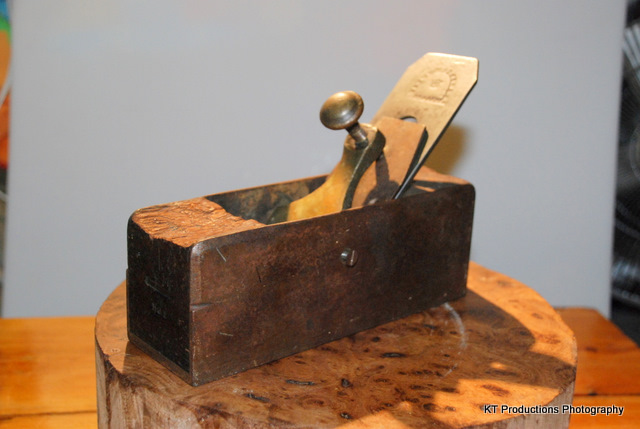
That was not all that was bashed...totally amazing since all you have to do is unlock the lever to get the iron and cap out but the back has suffered from a few thwacks....

DSC_0005.JPG


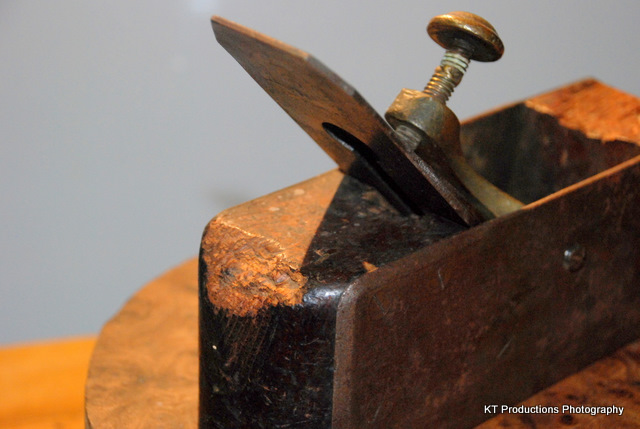
Mr Jenkins or Mr HJE....obviously used this plane with gusto...the front infill is badly worn and chipped out...sadly these infills are history...

DSC_0004.JPG


....and what happened to the lever cap screw is anybody's guess...

DSC_0006.JPG


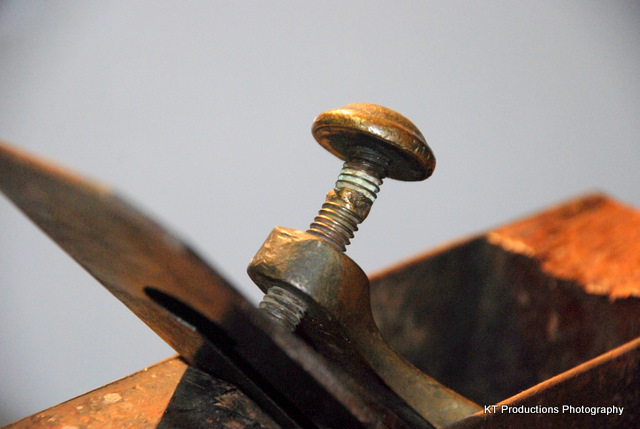
....snapped and brazed by a blind man is my guess!!!

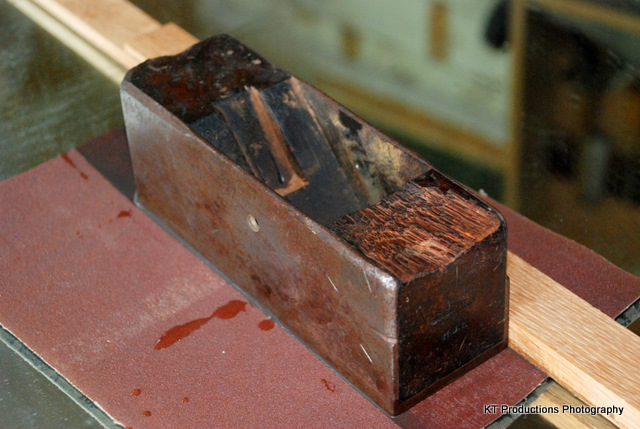
So...what to do with this baby....

Well....firstly...when I get a moment to myself the infills are out of there...and the lever cap to restore that....

Then to derust and flatten the sides and gently clean off the sole...

Make some new infills....(here we go again!) and make a new iron for her....(fun) and last but not least....source a new screw for the lever cap...

Any ideas where I can get just a screw guys and gals?

I particularly love this shape of plane....and can't afford a Holtey....so I guess for £2.50 it is worth doing something with....

More to come and in my blog.....

Watch this space!

Jim
 
Nice find! :wink:

I'd source some bronze/brass dowel and cut a matching thread into it before brazing the original cap screw head in place, OR - if there's plenty of leaway for adjustment - simply shorten the existing screw and have the screw head re-brazed into place on the longer section.

It may prove possible to polish the cap back to an even surface before having some kind engraver re-engrave Spiers name/logo onto it.
 
Hi, Jim

Nice plane! I guess the user was a little to heavy handed with the adjustment hammer.

Pete
 
Thanks guys.

Yes GP....my plan if I can't find a period replacement is to do exactly that...there being enough thread to cut square and rebraze the top.

I am not entirely sure if the top of the original screw...the "knob" is original. I have a feeling it is another piece of hardware which would "do" as I have not been able to find a similar pattern in my quick Google search.

In fact...I can't find a similar shaped infill at all (so far) so any pics or links anyone has to help me restore this would be most gratefully received.

I am also not sure if I want to leave the war wounds on the lever cap or restore it with an engraved "Spiers" mark. I guess someone somewhere may be able to re-engrave or stamp...needs more research.

More to come....

Jim
 
Jimi

Sorry for the delay in replying to you, but thanks all the same for getting in touch.

That's a real gem of a plane, and one that I've never seen before. My Murlands tool value guide has a very similar dovetailed plane, but with a wedge as opposed to a lever cap. The version in the book is noted as being quite rare, and worth £200-400, yours might even be rarer and thus worth a little more.

If you still intend to restore this plane, I'd firstly try to remove the infills, by gently tapping the rivets with a parallel pin punch over a block of wood with a hole in. Be carefull however, as early planes were sometimes screwed together, and the heads of the screws lapped flush.

Let me know how you get on.

Cheers
Aled
 
Hi Aled

Nice to see you back in the neighbourhood again my friend and thanks for the information on the plane.

I didn't realise that it would be worth that much...indeed that worries me a tad now as I am in more of a quandry as to whether to restore completely or not.

The infills are actually held in my screws on either side as you can just see from the top picture. The slots are still visible but gently trying to release them is proving fruitless as I anticipated it would after so many years.

On one side the edge of the screw thread is just visible below the damaged front infill....

I would appreciate your further consideration on this baby...it is such a shame that the infills are so damaged...and I want to get this working again as - although I perfectly understand the need for originality especially in rare examples....I also believe a tools should be used and not just collected.

I think I am very much on the fence on this one and would appreciate any views from folk more clued up than me.

I just love them for what they are and my leaning is to make this one beautiful again and at the same time, functional.

I was trying to source some box....I think I may have found some big enough...

What do you think?

I am a little lost!

Jim
 
Jimi,

Veering off topic a bit you say you are trying to source some box.

I can't be certain, as it was one of those things I meant to go back and look at but got distracted, but at the Westonbirt Festival of the Tree I'm fairly sure I saw a pile of box logs in the Friends of Westonbirt tent. They were logs, 2-3" diameter, maybe 6-10" long.

It could be worth getting in touch with them - see http://www.fowa.org.uk/ for contact details; you'd need to persuade someone to do you a favour as they are normally only geared up for cash sales in person at their monthly wood sales.

As for the bootfair plane, is there a case for compromise here? Sharpen the existing blade to working condition but keep it as a thoroughly well-worn tool? After all, if you need to use something for hours of work, you do have some other examples to choose from, and planes don't have to be pretty to work properly!
 
Hi, Jim

How about leaving most of the infill in and just replacing the damaged sections? that way it would remain mostly orignal and you wouldnt have to do so much work on it. Its what I would do to it.


Pete
 
Hi Andy

Thanks for the link to some box....I will try that today and let you know how I get on.

I am leaning towards the historical value being paramount...both of you are confirming my leaning...

If one infill were missing like on my last one...then it wouldn't be an issue to decide but this is entirely different....I am on the cusp.

As for sharpening the existing iron...sadly there isn't one. That one in the picture is out of my coffin...to test it. It did have a cap iron and a bit of plastic wedge from a door!!!!!

Pete....that is interesting...I was thinking about this option too the other day and sort of discounted it on the basis of blending. I wanted to put a cap on the front one using matching stock but I am not sure I am capable of hiding the splice....maybe I am selling myself short but I didn't want to end up turning a swan with a broken leg into a duckling! Advice here might encourage this avenue of thought.

In waiting to decide I shall get a suitable iron...the sole is now so flat it lifts plate glass with a touch of oil and suction pressure...and I will get her singing and in the meantime....mull over the infill options.

Many thanks guys...this feedback is very valuable to me.


Jim
 
jimi43":148d2baa said:
I am not entirely sure if the top of the original screw...the "knob" is original. I have a feeling it is another piece of hardware which would "do" as I have not been able to find a similar pattern in my quick Google search.

Something about this doesn't ring true. I think it's the original, badly repaired. If you were going to braze a new top onto a broken screw, you wouldn't include lots of (non-functional because of the braze) thread from the replacement top - you'd shorten the screw as GazPal proposed.

And if you had a screw that happened to be the same pitch/diameter as the original, you wouldn't take the top off that to attach it to the original bottom. You'd just use the whole thing as a replacement.

In fact, the way the repair has been done, you could braze any suitable bit of metal to the top to form a knob - the fact that isn't what's happened suggests that someone's wanted to keep the original screw.

Good luck with the restoration!
 
Jimi - for a replacement blade, and maybe a cap screw if you want to replace it, you could try giving Charles Stirling a ring - I know he's got a lot of new old stock of blades, and has a lot of relevant experience of details from sourcing parts for his own infill kits - as discussed on here before.

https://www.ukworkshop.co.uk/forums/post502778.html?highlight=#502778

I'm not on commission - it just feels like an obvious option to me with it being so local!
 
Hi Andy...

Forgot about that thread...will call him to see what he has tomorrow....

Well we are getting on with the Spiers infill plane....and one thing I was trying to figure out was - is this REALLY a Spiers of Ayr Scottish plane.

Clearly, there are planes out there that are a bit of a mix of other parts...Norris caps abound and I often think that many a "Norris" has been sold on FleaBay which isn't quite all what it seems.

Spiers of Ayr are a little less well known and this plane strikes me as an honest plane but I was struggling to see the magic words on the lever cap....remember this picture....

DSC_0003.JPG


Then just today...I was looking down at the front infill and all the letters came into immediate focus...

spiersayrlogo.jpg


The bloody logo is upside down....and even though bashed about is very clear now! How strange...but very pleasing at the same time!

Next came the cap screw. Remember the bastardised welding job?

DSC_0006.JPG


I am still looking for another cap screw...but in the meantime I took the top off with a hacksaw....then sawed the poorly brazed section out and putting the cap in my lathe, drilled out a hole to suit the remaining threaded rod...

I tried to braze the cap back on but I am not good at this...more practice necessary I think...so for now...a quick clean up...some Original Araldite Epoxy and voila!

DSC_0046.JPG


I made the knob a little more original and practical by filing some knurling on manually...buffed it up a bit to look original and I am pleased with the results. It's about 1/2" short for this iron and cap but with the correct iron and a shield cap iron, I think it will be perfect..

Next...the back infill...for now I want to keep everything original to see how I can tart it up a bit...so first off...getting rid of those horriible rough dents...and just bevelling it a little bit...

Before....

DSC_0005.JPG


.....and after.....

DSC_0047.JPG


I think this looks the part..

The front infill is the worst part of this plane...but smoothing that down a bit too...it really was quite smooth and to be honest, I kind of like the planing position...

DSC_0045.JPG


The sides squared up fine but for the back on both sides...lots of scratching and a hollow that would be difficult to flatten...but I like that feature...it is the result of thousands of hours of use...the metal is actually worn by thumb and finger of some old codger over his and perhaps his son's lifetime. I really love that thought so that little blemish is staying!

So...still seaching for an iron...I will get a parallel one..

See ya later!

Jim
 
Hi, Jim

That looks loads better.

How about making a blade? its just a lump of O1 steel, I nave made some my self its not to hard to do.

Pete
 
Racers":2xk129rv said:
Hi, Jim

That looks loads better.

How about making a blade? its just a lump of O1 steel, I nave made some my self its not to hard to do.

Pete

Hi Pete

I was thinking about breaking out the oven again...I have just the piece of steel left from my last iron....ALF's keen eye will note another subject of interest on the right....eh ALF?

DSC_0050.JPG


I will put my hand up here and say I was after a quick fix with a vintage iron...keen as I am to try her out! Then I was going to make my own iron to actually use her!

I just wasn't keen on getting kitted out again

DSC_0234.JPG


The bootfair on Saturday is the last one until next year..(what SHALL I do then!) so I will try to find a replacement....then if not will whittle up a new iron on Saturday....

The sole is as flat as a pancake...

DSC_0007.JPG


Lapping on course oxide first...

DSC_0012.JPG


Going down the grits...

DSC_0011.JPG


and ending up on 3M lapping film gave such a flat sole...when I tried to pick it up...the surface tension stuck it to the plate glass and lifted it off the bench!!! I had to slide it off!

So I am happy it will shave rather nicely...we shall see!

Watch this space!

Cheers!

Jim
 
Ah, sweet peas....

No? St Michael's Mount? *she guessed* :-s

I was wondering about this, and with the proviso that I know diddly squat about infills, but what if the "Spiers" name had been defaced because it wasn't actually a Spiers plane? Did they flog off lever caps and such for DIY infill plane makers? Was just a thought that wouldn't go away.
 
Alf":30e16zqq said:
Ah, sweet peas....

No? St Michael's Mount? *she guessed* :-s

I was wondering about this, and with the proviso that I know diddly squat about infills, but what if the "Spiers" name had been defaced because it wasn't actually a Spiers plane? Did they flog off lever caps and such for DIY infill plane makers? Was just a thought that wouldn't go away.

Indeed...St Michael's Mount it is...where I was wed some 30 years ago to a lass from Marazion! Well spotted! 8)

I am not sure it is defaced...rather abused as the rest of the plane. The amount of wear is astounding but the sole is perfectly flat. This leads me to believe this was a workhorse for a trade carpenter for many many decades...I mean...how many push forwards does it take to actually wear an indentation with your thumb? :shock:

It was when I tried to lap the sides I noticed these were at the back exactly where it would be held...amazing! The front infill depression is even more amazing...

Like every tool of this vintage they hold a wealth of history...from their birth as you say...which may have been slightly non-pedigree...to the use and finally to the rusty pile from whence it was reborn!

This is why I love tools...old tools...

I think I should have been an archeologist! :D

Cheers

Jim
 
I couldn't agree more in terms of the tales many old hand tools could tell if capable of speech. Seeing old tools resurrected and once again put to their intended use can be very satisfying.

On the point of wear to areas you'd grip, it's pretty traditional to carve, scallop, sand and otherwise match grips and holding points to suit your hand. Quite often to a point where nobody else could comfortably use the same tool without re-modifying or even replacing the grip. My grandfather's planes, saws and chisels were all adapted to suit his grip and even more so as he aged. I've also found my grip has changed by quite a degree over the years. Especially when comparing the handles on old tools from my apprentice years to those I tend to use most often now.
 
GazPal":nc0wigve said:
I couldn't agree more in terms of the tales many old hand tools could tell if capable of speech. Seeing old tools resurrected and once again put to their intended use can be very satisfying.

On the point of wear to areas you'd grip, it's pretty traditional to carve, scallop, sand and otherwise match grips and holding points to suit your hand. Quite often to a point where nobody else could comfortably use the same tool without re-modifying or even replacing the grip. My grandfather's planes, saws and chisels were all adapted to suit his grip and even more so as he aged. I've also found my grip has changed by quite a degree over the years. Especially when comparing the handles on old tools from my apprentice years to those I tend to use most often now.

Wow GP...I never knew that! You learn something new every day!

Well I am now very happy to leave the "scallops" especially created...another leaf in the history of this fascinating tool.

If I grip this right handed....the depressions do "feel" right....trouble is I'm a lefty! What shall I do now! :cry: :wink:

Thanks for that little gem in my knowledge....wonderful!

Jim
 
jimi43":ctsjqlte said:
Wow GP...I never knew that! You learn something new every day!

Well I am now very happy to leave the "scallops" especially created...another leaf in the history of this fascinating tool.

If I grip this right handed....the depressions do "feel" right....trouble is I'm a lefty! What shall I do now! :cry: :wink:

Thanks for that little gem in my knowledge....wonderful!

Jim

Aye, it's not unknown for me to be found whittling away at a newly bought plane handle so it fits my grip and I treat my chisel and hammer shafts in the same way.

If I found it comfortable to use I'd leave as is and enjoy putting it to good use, but would always consider adding the odd judiscious "antiqued" scallop or two if need be. It is your plane afterall is said and done and needs fine tuning for your own use. :) Liberon have a nice selection of stains and coloured shellac sticks for such purposes. :wink:
 
Back
Top