Ash Coffee Table - Finished

UKworkshop.co.uk

Help Support UKworkshop.co.uk:

This site may earn a commission from merchant affiliate links, including eBay, Amazon, and others.
I don't know, these people who come on here posting about stuff they've actually done... What is the world coming too! :roll: :wink:

Looking good mate. I found that very light passes on the p/t over come most of the tearout on Ash.
 
Thanks WiZeR. I'm sure you'll be back in the workshop before you know it! :wink:

To be certain I couldn't make use of either of the other two lengths of Walnut I have left over, I decided to run them both straight through the thicknesser in order to get a good look at the grain. Needless to say, I'm not very happy with the boards I picked up...

One side looks okay, although there's plenty of sapwood down the edges. The grain's not too bad and, from this face, it looks quite usable...

2569585409_bac1bbb5cf.jpg


Oh dear! Turn the boards over and that lovely dark purple colour almost completely disappears! :shock: Not very good at all. I don't know what I'm going to do with most of this timber as I can barely use any length of it for anything else besides small boxes! :x

2569585359_8bd2cc35e5.jpg


I'll send an e-mail with these photo's to David Simmonds and see what he has to say. What would you guys do in this situation? I don't think this timber's going to be much use to me but have any of you had any success in using walnut like this?
 
I have thought about that... But won't the stain affect the glue from working properly? I'll also have to scrape it flush once the glue's gone off anyway, which would mean exposing the lighter timber again. :(
 
Olly
I had the same problem when making my "fluted table" - I ended up cutting 4mm "veneers" from a clear plank and gluing them onto my thicker stock.
Real depressing how sappy the ABW we get in the UK is....... :(
Philly :D
 
Thanks Philly, I've had a look a your Fluted Table (nicely done, by the way! :wink:) and I can see what you mean. If I don't find anything at college tomorrow then I might try gluing in double-thickness stuff or something... I can always rout it out again if it goes wrong. :)
 
Olly

The table's looking good! I do like the look of breadboard ends but have always been put off by the movement issue. Contrasting dowels really set it off.

I am not adverse to using sapwood in my projects so the walnut looks fine to me, although I appreciate it is not what you need.

Bob
 
I got home from college to find I have an e-mail waiting for me from Interesting Timbers. David seems very understanding with regards to the problem of sapwood in walnut and he's happy for me to take the boards back and exchange them, provided they have similar sized stuff available in stock! :D

Another big thumbs up to Interesting Timbers from me then! :wink: How many other companies would be prepared to do this, eight-months after buying the table??? Actually, I recall Devonwoody having a similar experience of outstanding after sales service from Yandles once. :)

This still means I'll have to let the timber acclimatise, etc. but I do have future plans for the rest of that walnut anyway...! :wink:


Bob, thank you for your comments. :) I agree with what you are saying and, in a different situation (eg. table top), I could probably use the one good face that contains minimum sapwood. With the breadboard ends, I did consider leaving them intentionally proud (too late now!) and even thought about using walnut instead of ash. :shock: :)
 
About time for an update, I think! :D 
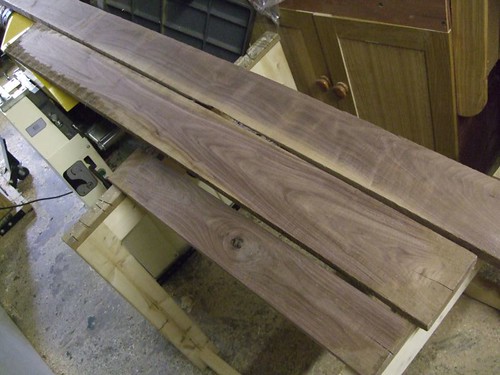
Went back to Interesting Timbers yesterday and exchanged the walnut for some 1 1/2" stuff as they didn't have any 1". David Simmonds was again more than helpful and he even allowed me to scrape away at the surface with my block plane. :wink:

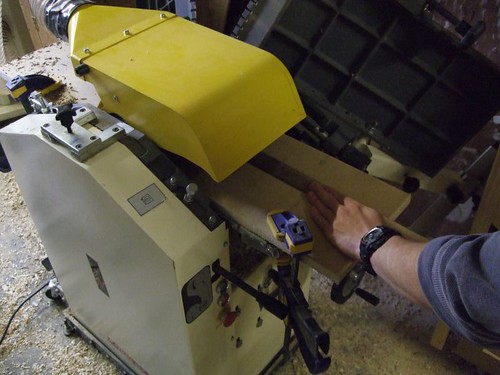
With some decent walnut amongst my stock, I began working on the inlay material. I started by ripping off a 2" width, which would incidentally remove a slight waney-edge at the same time. After preparing a face and edge on the planer, I ripped off about 8mm on the bandsaw and then repeated the process so I had some spare. When it came to thicknessing, I used the MDF "false bed" trick, held in place with a couple of cramps (I couldn't be bothered to try and find my drill and all that...!)

2610031701_552abe0b48.jpg


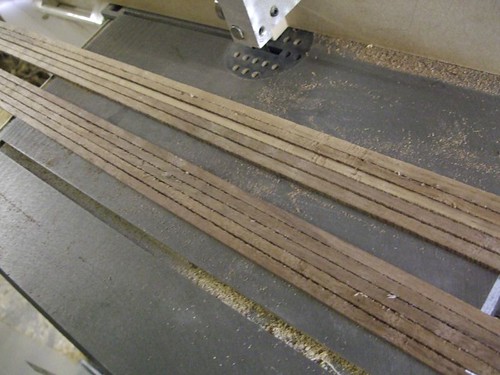
With a bit of care then, I was able to plane this stuff down to a size that would fit snuggly in the pre-cut grooves. Then I took the 1 1/2" wide strips and ran them through the bandsaw to give me plenty of 6mm wide strips (5mm would've been plenty but the guides on my bandsaw were interfering with the fence :roll:).

You can see in this photo's how there is still quite a variation in this new lump of walnut. Then again, I did choose to rip off a section from outer edge of the board, where the sapwood was going to be... :oops: :wink: Forutunately, I cut plenty of spare. I still ran both lengths of walnut through the thicknesser just to be sure - and they both look fine for future use. :D

2610032039_1d2d1495aa.jpg


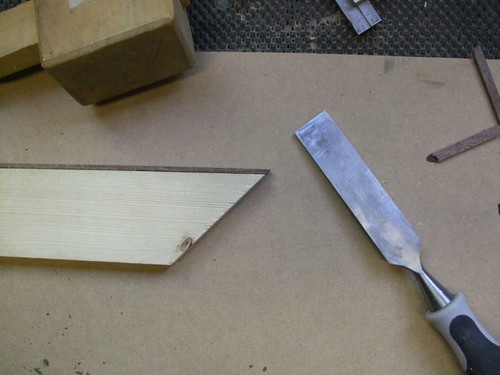
If I attempt something like this again, I'll look for a different approach to mitring the ends of the inlay stringing. I honestly thought any saw I have would be too coarse to cut through this, but that didn't mean that doing it with a chisel was necessarily a better solution... Anyway, what's done is done now, I'll have a look at it again tomorrow! :? :)

2610866238_1e1193e9a3.jpg


2610032575_88c844c393.jpg


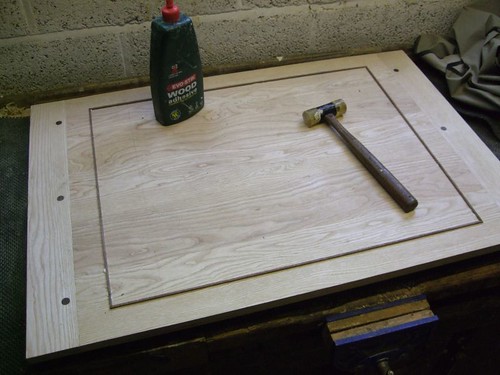
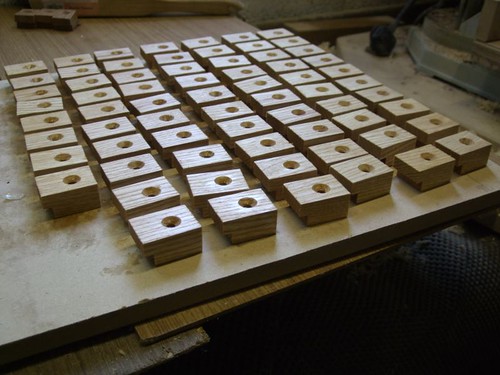
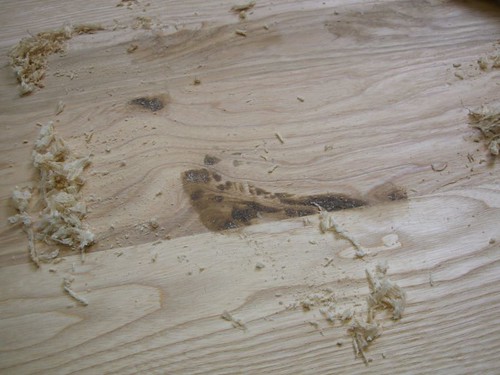
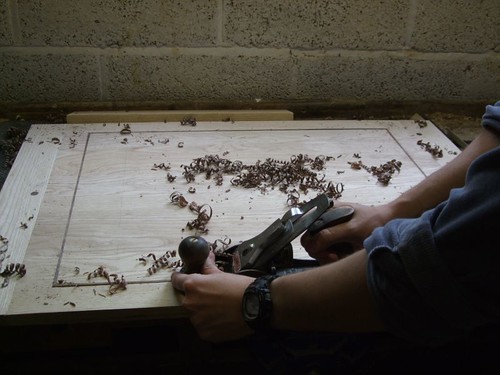
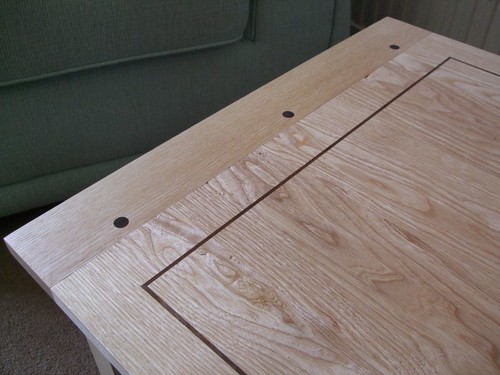
Until I got my hands on some more walnut, I wasn't really able to do much else on this except to keep working on removing the tearout from the top and, it is going quite well with the scraper. I did give my army of buttons a coat of Danish Oil so I could at least fix the shelf...

2610865788_d3d27a6044.jpg


2610032479_068d555825.jpg


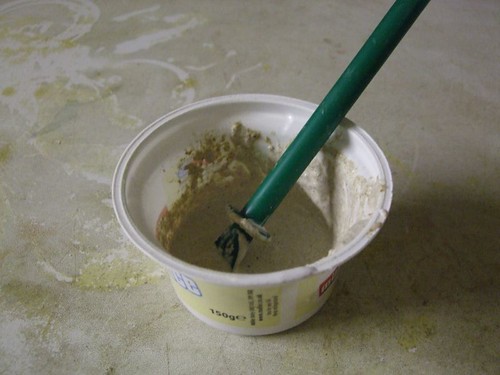
And I even had a go at mixing up some filler (sawdust and PVA) to see how it might fill any outstanding 'scars' left by the tearout.

2610031803_8f726f18c0.jpg


I'm glad I only tried this on the underside, where it won't be seen, as some of it went horribly dark once the glue had dried. Even after scraping, this is how it looks. At least I didn't touch the top surface, eh! :wink:

2610032695_6ea6c03fb2.jpg


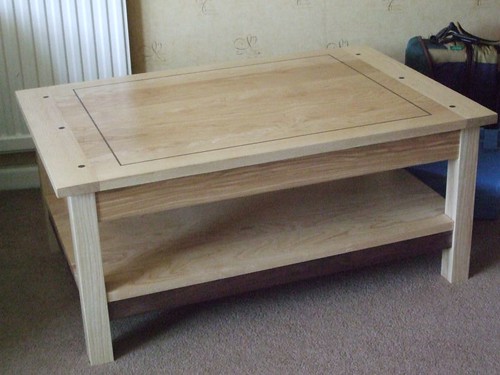
I also noticed the main panel has shrunk already, leaving the breadboards exposed by about 1mm. I'll try and leave it for a few days longer while the sun's out like this, in hope of minimising any further issues of shrinkage once it's indoors.

Nearly there then! But I think this is one project I'll be sorry to see completed, if you know what I mean. :D
 
looking good olly the ash and walnut looks like a good mix

whats the 'false bed' trick on the p/t ? I want to create some fairly thin stock so am wondering how it helps
 
Thanks Paul.

If you try and wind up the thicknessing bed as high as it will go (for minimum depth of cut) you'll probably find, as I did, that the table comes in to contact with the anti-kickback fingers and stops at 4mm, meaning you cannot thickness anything less than 4mm.

Even if you could raise the table higher, there becomes an increased chance that the rotating cutter block and its knives will come in to contact with the cast iron surface of your bed - not a good thing on any account!! :oops:

If the knives were to come in to contact with the MDF then, no damage would be done and you can easily and safely thickness very thin stuff. David Charlesworth, in a recent article for F&C, stated that it's better to use a piece of timber that's been through the thicknesser already, rather than a sheet of MDF or ply, since it should perfectly match the positioning of the knives horizontally (and, therefore, give a perfectly parallel cut).

Whatever you choose to use, you can clamp it in place to the front extension or, even better, fix a timber 'stop' to the front end on the underside, so that this rests against the edge of the bed and stops the false bed from being pulled through the machine with the rollers.

Don't forget to add 19mm (measure it!) when setting the depth of cut. And don't even think about running thin stuff like this over the surfacing tables - very dangerous indeed!

:)
 
Once the glue had dried on the inlay strips it was simply a case of planing them close to being flush with the surface and finishing it all off with a card scraper. You don't want to risk sanding something like this as you'll run the risk of 'contaminating' the lovely light ash with big, dark splodges of walnut dust. :? Lovely curly shavings...! :)

2625733150_ff7fdd7a8c.jpg


After two coats of Osmo Satin Polyx Oil the top was ready to be fixed in place, again using buttons. I knew I "panic bought" that tiny Metabo driver at Christmas for a good reason! :wink:

2624887575_4a9dd4937a.jpg


Now then. Before I show you some shots of the finished piece, I want to show you what our existing coffee table looks like. It's made of cheap pine with some kind of "ugly brown" laminate on all outside faces - no, I can assure you, I didn't make this one!! :roll: :lol:

2624887861_09135f2d64.jpg


Here she is!

2625708480_ebe17ccba3.jpg


I don't think the first photo' does it justice, so here's a slightly better shot of one of the breadboards. 8)

2625708786_14e03e735c.jpg


Mum seems really happy with it - as am I, considering some of the struggles I initially had when machining the boards for the top. I don't it's clear in the photo's but there's still a small amount of tearout in places, which will bother me subconsciously... :roll: But I like how I've managed to get a good contrast between the legs and rails, and top and breadboards, even though all boards are of the same species! :) So, I've learned a bit more about timber selection and sorting through what you've got.

Maybe it would have been better to find some more ash with contrasting grain and use that for the lower rails as well? My other thoughts were that I set the shelf a little too high off the floor but, looking at it now, it looks good to me. :)

I'm very happy with how this has turned out and, at the same time, I'm open to all forms of feedback. :wink:

Thank you for following this thread. :)
 
Excellent Result Olly. I really like the inlay, not sure I'd have the bottle to do that. Enjoyed following this along, gave me some good ideas too. Don't get down about the tearout, blame it on the species. ;)
 
Olly - nice job, well proportioned. Not sure for me, that the inlay on the top works, but I like the breadboard detailing. The lower rail I think as well would have looked better in ash rather than ABW...certainly a vast improvement on the existing table. The bay or wait to 05 Nov? :lol: - Rob
 
Thanks for your comments guys. :)

Rob, the inlaying was something I was very keen to try as I don't have any up-and-coming projects where I'd be able to add a feature like that. I think it's one of those situations where I should perhaps step back a bit and ask myself 'where do I want the focal point to be on the top?'. Maybe it is a little OTT with the breadboards and figuring in the ash, but I'm pleased it went well. :wink:

As for the old one, it's actually going to our neighbour! :shock: She's already got one coffee table and I regularly supply her with firewood, so I don't know what she intends to do with that old thing... :roll: Perhaps, in time, she'll see the light and I'll be designing a new table for her as well! :D
 
OPJ":3rvim1r3 said:
Rob, the inlaying was something I was very keen to try as I don't have any up-and-coming projects where I'd be able to add a feature like that. I think it's one of those situations where I should perhaps step back a bit and ask myself 'where do I want the focal point to be on the top?'. Maybe it is a little OTT with the breadboards and figuring in the ash, but I'm pleased it went well. :wink:

I can understand you wanting to have a go at that technique and it's quite rewarding to do, but I think on this project it clashes with the round breadboard detailing...too much happening on one surface maybe? I might have been inclined to do a rectangular inlay on each of the main rails underneath the top. For me though, and this is a personal view, inlay doesn't work on well proportioned furniture of this type with clean, un-fussy lines, I think I would have just left it with the round breadboard detailing to give a little bit of visual contrast to the strong grain configuration of the ash.
I think it's right that you should feel well chuffed with this one, it is a good piece, but as I always maintain, it's the detailing ('specially handles and pulls) that make or mar a project and 'more' generally is not as good as 'less'
It's quite possible to sand a dark and light wood together. I use a very strong shop vac nozzle immediately in front of the sanding block so that as soon as dust is created it gets sucked away, in other words you use the sanding block in one hand and the nozzle in the other and move both together over the wood...try it, it does work - Rob
 
Hi Olly, its turned quite a good looking little coffee table, shame about the tearout, have you not thought about trying to fill it with something.
 
motownmartin":39fe59lw said:
shame about the tearout, have you not thought about trying to fill it with something.

I think the problem with trying to fill it is that, as Ash is a fairly open grained wood, you would either need to fill the whole top or leave it as it is. If you tried to fill just the tear-out, you would end up with those patches super-smooth and the rest of the top open grained, which would probably look worse than leaving it as it is.

I don't think the tear-out looks too bad and would be inclined to leave it as it is.

Cheers :wink:

Paul
 
I like the table a lot - if I ignore the breadboard ends*.

(*I'd ignore the caveat to my opinion, though, as I really don't like breadboards in general, and that's just a personal thing).

Neat work, I like the inlay (which I normally don't go for much).
 
Back
Top