You are using an out of date browser. It may not display this or other websites correctly.
You should upgrade or use an alternative browser.
You should upgrade or use an alternative browser.
Are Grippers much safer than push sticks?
- Thread starter tony359
- Start date


Help Support UKworkshop.co.uk:
This site may earn a commission from merchant affiliate
links, including eBay, Amazon, and others.

Droogs
Not the Sharpest Moderator in the box
no no") The fence itself, the position of the featherboard is fine.
The fence itself, the position of the featherboard is fine.
When you push the board through the saw and the push stick is in the nearer to the sawblade half of the board, it not only gives forward motion but also a small amount of sideways movement as well. In this case the motion is a vector that moves forward but also at the same time away to the right of the blade and this causes the board to try and rotate in a clockwise direction and is stopped by the fence. This therefore ensures the cut is accurate but also prevents the forces that can induce a kickback up to the point where it is inline with the very center of the blade spindle. Once you go past this the blade is moving in a different (up) direction to the front (down) and so that the forces are then in reverse and this is why we have a riving knife. There is also pressure from the fence to push the wood that is between it and the blade into the blade causing anti clockwise rotation. this is prevented by making sure the fence is not there to do that and so the furthest you want the fence to be is in line with the centre of the blade.
You normally fit a sub fence to the fence that follows the principles above if the main fence can not be repositioned.
hope that makes it clearer
The fence itself, the position of the featherboard is fine.When you push the board through the saw and the push stick is in the nearer to the sawblade half of the board, it not only gives forward motion but also a small amount of sideways movement as well. In this case the motion is a vector that moves forward but also at the same time away to the right of the blade and this causes the board to try and rotate in a clockwise direction and is stopped by the fence. This therefore ensures the cut is accurate but also prevents the forces that can induce a kickback up to the point where it is inline with the very center of the blade spindle. Once you go past this the blade is moving in a different (up) direction to the front (down) and so that the forces are then in reverse and this is why we have a riving knife. There is also pressure from the fence to push the wood that is between it and the blade into the blade causing anti clockwise rotation. this is prevented by making sure the fence is not there to do that and so the furthest you want the fence to be is in line with the centre of the blade.
You normally fit a sub fence to the fence that follows the principles above if the main fence can not be repositioned.
hope that makes it clearer

Lonsdale73
Established Member
I have a Gripper-clone which I've used with a DW745. I have found there are times, eg when cutting strips thinner than 18mm, when the blade guard impedes the fence so - shock, horror - I've removed to permit those cuts. The Gripper is a great asset in this instance. It's possible to use one without having to have your hand all the way over the blade at all. They're about 7" long and a 'heel' can be hooked over the tailend of the workpiece to complete the cut without fingers being at risk.


Last edited:
You normally fit a sub fence to the fence that follows the principles above if the main fence can not be repositioned.
That was the part I was missing! It makes sense but I never seen anything like this on any online video to be honest...
What Droogs explained is what is in the operator's manual for the SCM slider saws, and possibly the other slider saws as well, which have adjustable rip fences. With my slider, the end of the rip fence should follow a 45-degree line away from the arbor as the width of the rip increases. Most times, I follow a 60-dgree path for the end of the rip fence and have not seen any problems with ripping. My rip fence has a slight toe out, which I think is about 0.006 inch.
As soon as I setup the Incra positioner on the auxiliary table of the sliding sled, I might not use the rip fence again. Most, if not all, of my ripping can be done from the left side of the blade, as the crosscuts are now.
As soon as I setup the Incra positioner on the auxiliary table of the sliding sled, I might not use the rip fence again. Most, if not all, of my ripping can be done from the left side of the blade, as the crosscuts are now.
I have the SC2 Classic, which dominates my small shop. I'll post an image of the positioner as soon as I have it set up.bang on MickeK, I use a SCM
Here are two quick teaser images showing the SCM SC2 Classic and the Incra LS25 Positioner used as a second point in space on the slider. I hope this helps.I may be a bit confused now - if you could post a picture @MikeK I'd appreciate it a lot, thanks!
This is still a work in progress, as I have to make a better fence and stop block for the positioner. I used a spare Woodpeckers T-track to put on the end of the positioner to show how it would look. I have two of these auxiliary tables. One is for the positioner and the other is plain and used as a support for large sheet goods. The table fits into a T-track on the side of the slider sled and has grub screws to set it coplanar to the sled. Once adjusted, the tables can be removed for storage and when attached when needed without additional adjustment.
Not shown in these images is the vertical clamp that rides in the slot on the top of the sled. The clamp secures the piece to be cut securely to the sled. High-end shops use pneumatic plungers attached to the fences to secure the piece, but these usually cost about $2K for a basic system and exceed my hobbyist desire.
This image shows the positioner attached to the auxiliary table. The table can be set at any position along the length of the sliding sled to accommodate different lengths of board or sheet stock to rip.

This image shows how a board would be ripped using the crosscut fence as one point and the Incra positioner as the other point.

This is not my idea, as I borrowed it from this video by Sam Blasco:
Tony359 yes your wood should be wider in your sketch so that it is cut!
But note that (a) the fence should be straight and (b) so should the fence-side edge of the work. If the latter is bowed (either concave or convex) then there is indeed a danger that the work will rotate as the wood progresses. This is not often noted.
If your work does not have a straight edge, then you can use a straight piece bonded to it by hot glue or double-sided sticky tape to run along the fence. This is a way of getting a straight edge from sawn planks with a live (want) edge.
And yes, unless cutting ply, MDF etc, the fence should definitely end after the start and before the centre of the blade. In fact, my fence is curved to follow the curve of the blade so that the pressure point keeps roughly the same relation to the blade all the way up. This wooden fence attaches to the main stainless steel tubular fence, which clamps automatically front and back (Wadkin AGS design). The blade is for smooth crosscuts.

Oh and the riving knife is disassembled in this pic to show someone the design. I have never once used it without the riving knife and guard.
But note that (a) the fence should be straight and (b) so should the fence-side edge of the work. If the latter is bowed (either concave or convex) then there is indeed a danger that the work will rotate as the wood progresses. This is not often noted.
If your work does not have a straight edge, then you can use a straight piece bonded to it by hot glue or double-sided sticky tape to run along the fence. This is a way of getting a straight edge from sawn planks with a live (want) edge.
And yes, unless cutting ply, MDF etc, the fence should definitely end after the start and before the centre of the blade. In fact, my fence is curved to follow the curve of the blade so that the pressure point keeps roughly the same relation to the blade all the way up. This wooden fence attaches to the main stainless steel tubular fence, which clamps automatically front and back (Wadkin AGS design). The blade is for smooth crosscuts.
Oh and the riving knife is disassembled in this pic to show someone the design. I have never once used it without the riving knife and guard.
MikeG.
Established Member
.......I have never once used it without the riving knife and guard.
Just curious......
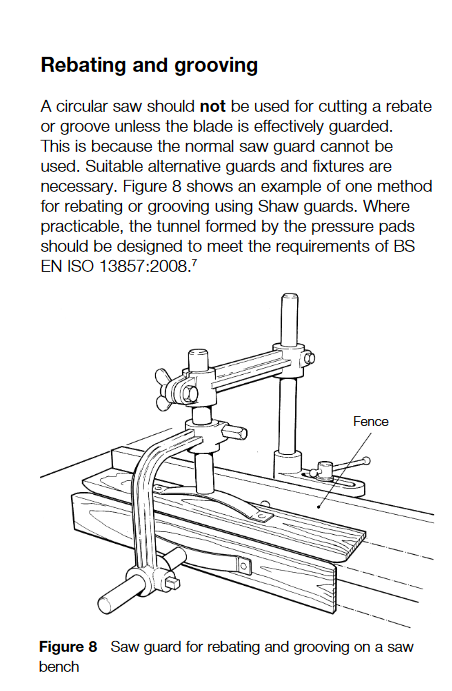
The only thing I would ever find a table saw useful for would be cutting larger rebates. This would be perfectly easy with a riving knife, but not with a crown guard if that attached to the riving knife. How do properly set up machines manage this sort of cut?
Trevanion
Greatest Of All Time
How do properly set up machines manage this sort of cut?
This is how the HSE states it should be done.
TheTiddles
Established Member
Just curious......
The only thing I would ever find a table saw useful for would be cutting larger rebates. This would be perfectly easy with a riving knife, but not with a crown guard if that attached to the riving knife. How do properly set up machines manage this sort of cut?
with a guard on a cantilever arm off the side table? I rigged one up on my (admittedly small) TS200 them found a router with a dedicated jig was way better as the small saw didn’t have the huge sliding table to take advantage of
aidan
MikeG.
Established Member
I'm talking about rebates way bigger than a router can cut.
TheTiddles
Established Member
Just a general observation, it’s interesting how much opinion and concern we all have for safety here despite our low accident rate, does anyone remember the guy years ago who sawed off his kids thumb end with a table saw and the forum in a different country was full of people saying how brave his kid was at the hospital, nobody mentioned the parent’s extreme negligence.
I think we have this right
Aidan
I think we have this right
Aidan
TheTiddles
Established Member
I'm talking about rebates way bigger than a router can cut.
would you not build up the cut, like you would with a router? And what would you be making, a large lap?
MikeG.
Established Member
A window, for instance, can have rebates in excess of 35mm deep. A door frame has rebates over 45mm deep.
TheTiddles
Established Member
Ah, depth not width, with you now, yes, cantilever crown guard with the dust extraction attached I think it the normal route, plenty of people here who actually do that I think?
Aidan
Aidan
Droogs
Not the Sharpest Moderator in the box
The crownguard on the the SCM I use is on a side mounted post and can be raised/lowered to accommodate the height of the material to about 800mm if you wanted to.
https://www.scmgroup.com/en/scmwood...884/sliding-table-saws.896/class-si-550ep.587
https://www.scmgroup.com/en/scmwood...884/sliding-table-saws.896/class-si-550ep.587
Similar threads
- Replies
- 14
- Views
- 1K
- Replies
- 15
- Views
- 2K