An infill project with a modern twist

UKworkshop.co.uk

Help Support UKworkshop.co.uk:

This site may earn a commission from merchant affiliate links, including eBay, Amazon, and others.
Inspiring work here - I particularly like the resourceful turning of the lower bun. And when you see a book called 'The Backyard Foundry', it gets interesting!
It's very impressive to see what gets made in back yards and sheds all over the land. Amazing =D>
 
rafezetter":9c6hb0h8 said:
I also really like that adjuster, but do you think it would be possible to make one that works the same way as a spokeshave? I had an issue with one of my planes where I had sharpened it to an angle instead of 90deg to the side of the blade and even putting it diagonally on the frog and full adjust it wasn't quite straight in the mouth (I didn't realize this until I couldn't do anything about it.). The spokeshave adjuster gives so much more control and forgiveness.

I missed this in my previous reply. The spokeshave adjuster is easy to make, but the problem is that it is very coarse. If the pitch of a M6 thread is 1 mm, then 0,1 mm shaving means 1/10 turns on the screw, which isn't that much to do accurately. And finish shavings are much thinner than that, 0,01 mm is still on the thick side. I thought that if I want the plane to be able to take very thin finish shavings I would need a possibility for at least a bit finer adjustment.

Technically it would have been possible to make the adjuste rjust the same way as a spokeshave adjuster worhs: those collars that are now moving levers could have been bigger and matching groove could have been cut behind the iron.

Pekka
 
Surprisingly most of my bench chisels have been I. Sorby. So when I received an I. Sorby parallel iron from Ray Iles among with a load of other plane irons I got from him, I decided that I had to use it for the plane, although it looks a little too long. The plane iron came without a chipbreaker, so I had to make one.

3 mm steel sheet, brass gas fitting, a tiny bit of turning with a drill.
P1020805_800.jpg


add some filing and the result is a cap iron.

P1020810_800.jpg


The back has to be riveted on, so I had to to re-thread the insert after riveting.

Next prolem is that usually the cap iron screw is a lot bigger than M8. Therefore I had to turn a cap iron screw from a M10 bolt so that the head would have been big enough.

P1020816_800.jpg

P1020818_800.jpg


And finally, the plane got ready.

P1020820_800.jpg


I got fed up with the version with the adjuster box, so I made a simple smoother without bells and whistles. Hopefully I'll get the adjuster version ready soon.

Pekka
 
Pekka Huhta":390t6pej said:
P1020274_450.jpg


The shape of the knob is very comfortable, it gives a wider rest to the palm than just a round Stanley knob. I am pretty happy with the shape, although the whole knob could have been a tiny bit bigger in every respect.

Pekka

That's commonly called a mushroom knob. These are used in the current era by some Veritas tools, were recommended by the late Robert Wearing. They encourage a palm down grip, more like that used on infills and wooden bench planes, as opposed to a "close fist" grip which is more natural on the commoner Bailey knob.

IIRC one of the older Bailey makers (union, sarjeant, millers falls etc) also fitted a knob like this, but I can't find a reference right now.

Edit; I was thinking of Auburn, but other early metal plane makers also used them.

BugBear
 
To be honest Pekka....I find the Norris or any other adjuster poking out the top an unnecessary frill and prefer my infills without an adjuster so although the mechanisms to allow adjustment are very clever indeed (particularly your idea), I prefer the bare bones approach.

The one you've ended up with is smashing!

=D> =D> =D>

Jim
 
bugbear":2c8znh4z said:
Pekka Huhta":2c8znh4z said:
The shape of the knob is very comfortable, it gives a wider rest to the palm than just a round Stanley knob. I am pretty happy with the shape, although the whole knob could have been a tiny bit bigger in every respect.

That's commonly called a mushroom knob. These are used in the current era by some Veritas tools, were recommended by the late Robert Wearing. They encourage a palm down grip, more like that used on infills and wooden bench planes, as opposed to a "close fist" grip which is more natural on the commoner Bailey knob.

I remember seeing something like that on eBay. If remember correctly there has been a slightly similar knob in the 60's in brown plastic (?!) and in fact the earlier, low "balloon type" Stanley knobs had the same idea of a wide top. There is hardly anything new in hand plane business :D 
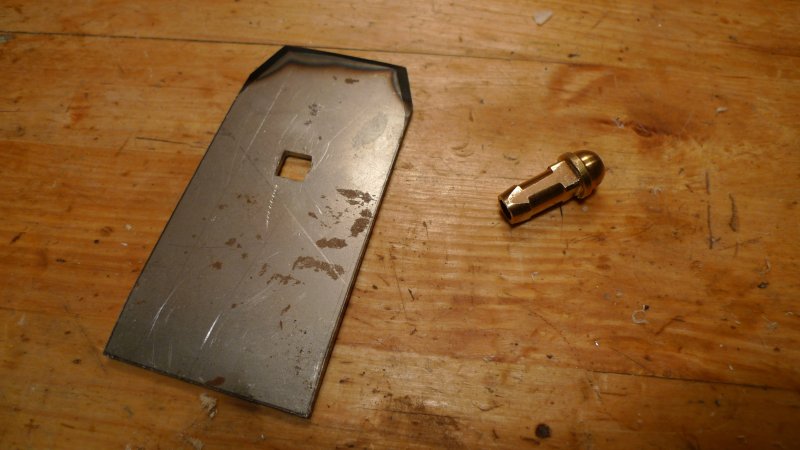
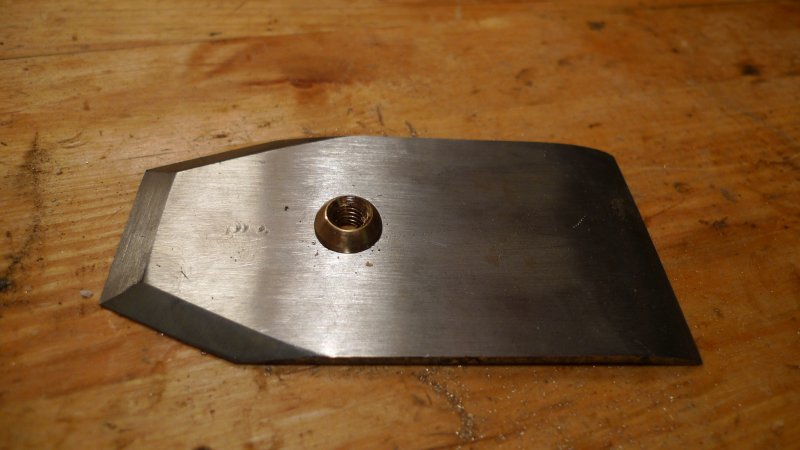
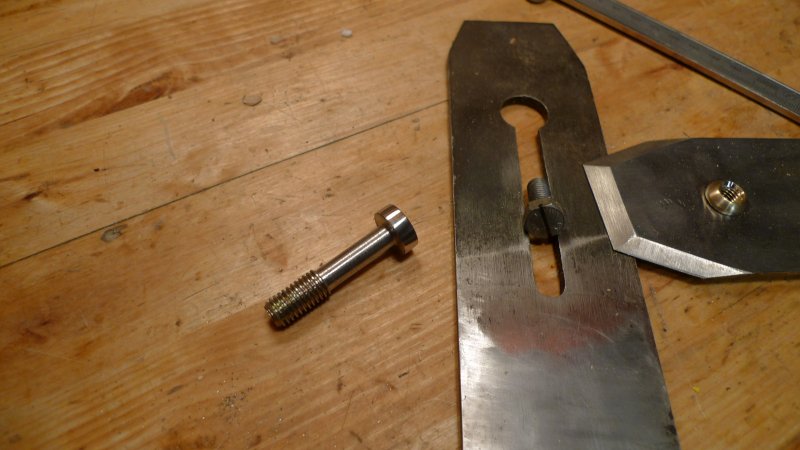
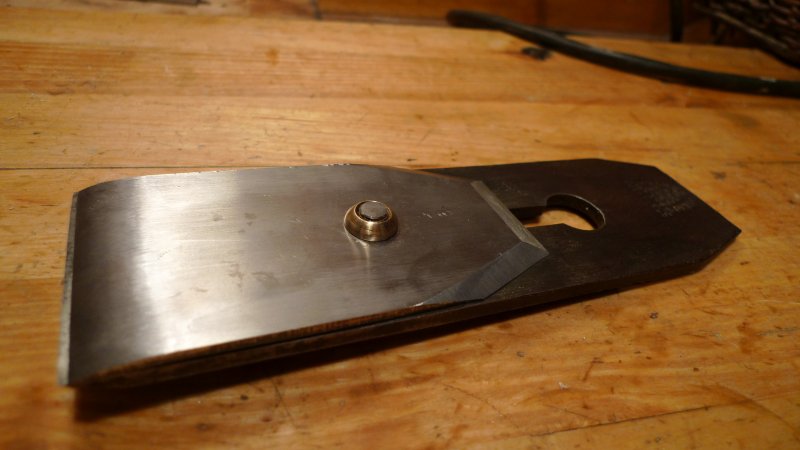
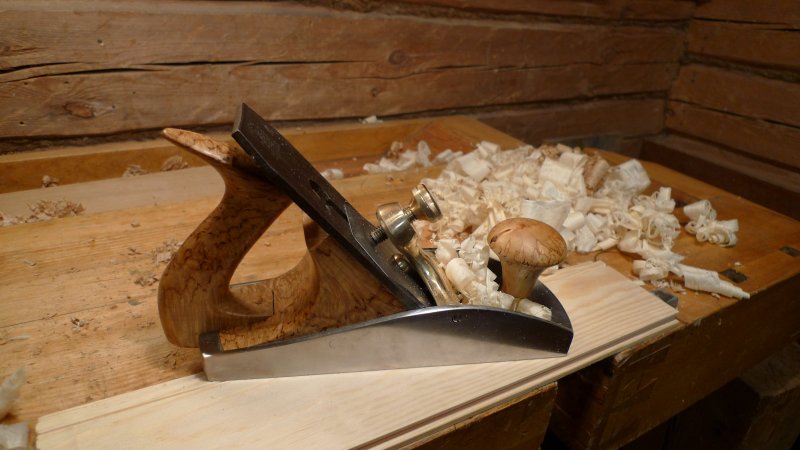
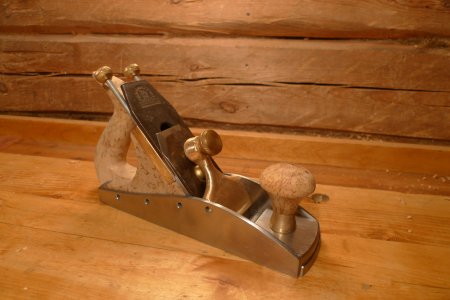
That's why I had to build that adjuster, just for proving that all hasn't been invented yet.

jimi43":2c8znh4z said:
To be honest Pekka....I find the Norris or any other adjuster poking out the top an unnecessary frill and prefer my infills without an adjuster so although the mechanisms to allow adjustment are very clever indeed (particularly your idea), I prefer the bare bones approach.

The one you've ended up with is smashing!

The plane works perfectly without an adjuster. The only problem is that there isn't a very good place for hitting the plane to back the iron. And I used endless hours to make the fine-tuning adjuster for adjusting the mouth opening of the other plane and this one works perfectly without one. For this particular plane there is no need for the mouth adjustment either, but I'm planning to use the other plane with all adjusters as my "workhorse plane" (general purpose #4 replacement) and this one can be saved just as a smoother.

The first thing you notice about the plane is the weight. It weighs 2950 g, which is half a kilo more than a #5 Clifton and 150 g more than a sweetheart era #6 Stanley. So if there is a benefit in having a heavy plane, at least I should be able to find it out :wink:. It glides over knots like they don't exist, but I have to admit that it lacks the maneuverability and dexterity that my small Spiers infill has.

Pekka
 
I like that front bun a lot, and I can see it would change the way you hold it (c.f. a Bailey style) fundamentally. I noticed Richard T had done one similar on his new smoother (his is canted forward a small amount too I think).
Jim's point re adjusters is also interesting. I recently acquired a Norris A5 (I believe the A denotes with adjuster) and I mostly agree with Jim. I was always intruiged by the Norris adjuster - obviously clever, and it is well done (tight tolerances etc). But Custard made the point it is still hard to adjust depth without upsetting lateral (if only slightly). So for a dedicated smoother I would probably prefer no adjustment device, and on my Norris the presence of adjuster makes traditional adjustment at best awkward. I've been using woodies almost exclusively recently - I've become far quicker at adjusting after some regular practice.
Mighty fine plane Pekka - to get the weight into perspective, that is just a little shy of a Lie Nielsen No7 1/2 'jointer' (22" long, they are) :shock:
 
FWIW back when my woodturning was done with a power drill in a vertical stand, clamped horizontally, I managed to turn brass parts initially with a file, but later with a scraper type woodturning tool. The results were quite good off the tool, provided that the tool was kept sharp and applied to the workpiece with negative rake. You can play around with the angle up and down, and when you hit the sweet spot, the brass swarf flies off in a very satisfying way. Even now with the benefit of a metal turning lathe I still turn by hand if I want a curve.

On the woodturning lathe, I fit a brass ferrule onto a turned chisel handle, on the lathe between centres, then hand turn to ensure a clean line between the wood and the ferrule, introducing a concave radius, if I get carried away. Final finish with abrasives, but as Pekka has said, spindle speed is critical to avoid chatter.
Mike
 
Back
Top