


OK, OK, I know I had a workshop thread already, but I thought it would be useful to consolidate it into a single thread, into which all the photos etc could be in a single series, and in addition, I could incorporate a few pictures I didn't use originally. To reduce download times, I've also reduced the pictures sizes, but you can click on them to see a larger image
So... the original "mini" workshop. Started out at 8' x 12', and even after extending it was only 8' x 16'. (Yes, that is an observatory next door).

Requirements for the new workshop were:
#1 Larger!
#2 Larger!
#3 Larger!......
The things I got right on the previous workshop which I wanted to replicate were:
Good number of electric sockets
Double Glazing
Insulation in the walls / Roof
Secure
Wooden Floor
Plenty of lights, as I work mostly in the evening, so the whole natural light thing is a bit of an irrelevance.
Things I got wrong were the (internal) roof was too low, and it got too hot in the sun - adding overhangs seemed a good way to shade the walls and reduce the effect of the sun.
So after buying a new large garden with sufficient space for a workshop (and fortunately had a house attached) I was able to see what was available. (20th Jul 2006)

The original boundary was a hedge, and behind it was a large area of rubbish/compost heap etc.
First job was to clear it out, and remove the dodgy looking branches on the big ash tree. Both times I've built a workshop I've been quite surprised how much you can gain by clearing out a bit of hedge, or waste area. Removing a 2 foot wide hedge and expanding a workshop by a corresponing amount might not seem much but 2 foot extra inside a workshop can make a vast difference. (6th August 2006)

Second job was to get some cables layed. A mistake I made last time was not to set up some 'semi-permanent electrics' so that I could wander down each day, plug in the power tools and get cracking rather than winding extension cables up and down. I also wanted the cables to go under the planned concrete plinth so they had to go in first.
A bad back rules out digging it and as the pictures show, it would have taken an age, and there was clay in the lower half. You can see clearly the switch from sand to clay by the colour of the spoil - the lower half would have takes ages to dig by hand I think! (7th Sep 2006)
The Ditch-Witch was hired from HSS.

You can't use it for awkward trenches so Dad came in handy with the spade!


A days work. A very very long trench, fully to depth (450mm), including the lower half through thick clay. What a wonderful machine! Total price for the day was £220 inc VAT, delivery and damage waiver. Still, worth every penny to me. It weighs about 550kg, and my trailer has a weight limit of 500Kg. The towing limit for the car is only 600Kg, and the trailer weighs over 100Kg. No doubt it probably would have taken it, but I decided to pay the delivery fee. Having seen how unmanvoerable it was, this was the right decision!
I bought 60m of 6mm 3-Core Armoured cable which cost 109+VAT. Again, this could be reduced by using only 2-core and using the armour as earth, but I feel its safer to have the additional core in parallel on the earth. The network cables, again I bought more than needed (100meters) in each case, but its quite ecomonic to buy it "standard" lengths.
Total price, £177 inc VAT
A quick sprinkle of grass seed and its all covered over. If you spot the difference between the picture above and below its that I've built a summerhouse in the meantime. Its wired up, and got the tablesaw and workbench in it. (17th Nov 2006)

The plot needing levelling, and I need a trench cutting further up the garden to add a path so it made sense to get someone in to churn around in a mini-digger. I did consider doing this myself but the speed which the lad cracked through it meant it was a simple decision.

I opted for a concrete base. By using one of these "mix-on-the-spot" concrete services with a motorised dumper, I knew I wouldn't have to shift it by hand, or hire assistants in to help. I've staked several planks around and made various "tampers" to level it and to get the bubbles out. (18th Dec 2006)

The motorised barrow was great - carrying 0.5m3 per run - so just 10 trips to bring the total 5.2 cubic meters needed. The total base is 7m x 4m and I added a small section on the back which I plan to use for storing bee hives etc. Concrete certainly isn't the cheapest method, and also probably not the best environmental option but it provides a secure base, didn't involve any digging trenches for foundations and helped my back to stay OK.
Picture Missing

Mum and Dad helping today.

You can see the "temporary electrics". Two sockets, RCD protected. I use one for power tools, and another to power a floodlight mounted on the tree. Initially I carted the compressor up and down each night but just chained it to the tree in the end and covered it over at the end of each session.

Having a workshop to build a workshop is definately a boon if you are working in the winter. It's not by chance that the summerhouse was built, wired up, and the workbench and tablesaw installed before I got cracking on the main workshop build. Here I am starting to cut the 3"x2"s that form the basic structure. (28th Jan 2007)


The windows will be double glazed both for warmth, and security. They are 4-20-4 clear glass. £9.80 each. Quotes ranged up to £25 each. The price is for a basic window - no frame. I intend to permanently mount them in a recess, high in each frame to make it more difficult to break them and climb in. (4th Feb 2007)

Its going to be covered in shiplap - I need to rip a small amount of the bottom piece - otherwise the overhang will be too much.

First though, I need to trim them to length - the sliding table with a stop is ideal for repeatable cuts...

Preparing the shiplap during the evenings, ready for use at a later date.

With the good weather inthe early part of 2007 I was able to setup outside. I've built a couple of tresles, and the nailgun is getting some serious usage. It will have paid for itself 10 times over by the time I finish.

I'm using 100mm screws to make a series of frames, which can be assembled later.


Each frame will contain a window

I'm using Tyvek underneath - its breathable, but lets the moisture away. I hope it will keep the draughts out too.

A lick of paint.

Making a frame....


Uurrgghh snow. Not very conducive to work! You can hardly remember just how good the weather was at the start of 2007. I do, it sent the bees a little out-of-kilter at the start of the season. (8th Feb 2007)

Why does every project create so many TUITs? Anyway, I wanted a bit more security, and privacy for what I'm upto so firstly get the back fence sorted. Its allotments behind, so one day I may get a gardening urge, and in the meantime, a padlocked gate will do!

And finished (Not the best effort but OK) (17th Feb 07)


All the frames are done now. They still need painting but that will be done later. I have in my mind using one of these "spray" systems.

Even the door frame is done. I've screwed a couple of braces across for the time being. It will hold a sheet of plywood wide, and I just need to trim the end off a sheet. So it should look nice and square, and plenty wide enough to get all my kit in and out.

The plywood floor sits on 2 x 3" joists. These in turn sit on roofing felt. This stops moisture from the concrete getting up into the floor. It worked really well in my last workshop, so I thought I'd do it again. The plan is to fill the gap with 50mm polystyrene, leaving a small gap that air can move through, helping to keep everything dry underneath. (12th March 07)

And I've carried all my timber down. Phew.. 50 lengths of 4.5m, and lots of OSB and plywood. The back is holding up (just)

Got to cut a few sheets of ply. God only knows what I'm doing with that saw. Its just a mock-up- honest....

My little LN put to good use once again cleaning splinters.

Making the floor. It'll be 3.25metes wide, which requires a small additional piece to add to the standard length of 244cm. I choose to add an additional 81cm, which is exactly 1/3 of a sheet after saw kerfs. Again, it minimises the number of cuts I have to make.

And remembering to draw lines so I know where to screw into once the walls are placed on... DAMHIKT. Lets just say I've built a workshop very similar before...

The main sheets.

Deciding on cross piece for the roofing "A" frames. They are 27 degrees, which was carefully calculated to ensure each 4.5m length of timber had one cut, giving one floor joist, and 1 roof beam. 1 is 2.5m, and 1 is 2m. (14th Mar 07)

All angles cut, and you can see the floor stacked up underneath. Its really feeling like I'm making progress now.

Heebee jeebies I made a jig. I am not using a single piece to form the apex, so need to attach each half across to its opposite number. I'm using 4 screws, 2 x 100mm and 2 x 150mm.

Heres it after

Drill the cross piece

Its bolted with coach bolts and penny washers.

Having a check. I've decided the cross piece isn't low enough. (about 14th March 07 I think)

Beth has chickenpox so I'm on annual leave. Fortunately, the baby monitor works to the bottom of the garden and she slept for 2 hours after lunch. Not a bad stretch to get some more work done!

This is more like it though. Evenings working in the dark. Thankfully I setup those floodlights at the start.


OK, spurred on by Byrons accurate pricing, I thought I'd do a quick divvy up on costs.
Next up, the concrete base. This was a bit of a luxury, as its major overkill. However, their is some logic behind it. I've got a bad back, so it was not possible to spend a long time smashing up hardcore to form the base, as swinging a sledge hammer puts such a strain on you. In addition, I didn't want to be carrying loads of lumps of concrete which I find are easy to acquire from skips etc. Most householders are only to happy to let you take hardcore, and if you search around, you can get very clean stuff, often bricks from old house extensions being knocked down. I went for a 6 inch thick base - which uses large amounts of concrete. You could get away with much thinner, but it may be better to include some metal reinforcing. I simply poured concrete into the hole. The extra cost was offset by the ease. Miximate turned up. I didn't care how much, or little I'd miss estimated by as thats their selling point. I guess what I'm trying to say is sometimes when you have family helpers, their time is valuble and extra cost which saves you time and accelerates the project along can make a real difference. I paid £20 to have the powered wheelbarrow.
£622 inc VAT for concrete.
Also some shuttering timber, + tamping timber £33
So that's the base done. Running total £220 + £177 + £622 + £33 = £ 1052 = Base + Feed Electrics
Now, onto actual timber for making the workshop itself.
I did quite well on this, as I made an initial order of 250m of shiplap, and they delivered 320 meters by mistake!
27 Pieces @ 4.8m of 2" x 3" is £205
5 x Sheets of 12mm OSB = £46
4 x Sheets of 18mm WBP Plywood. = £92
Initial Costs to start Frame Making
£205 + £46 + £92 = £343+ VAT =£403
Running Total £403 + £1052 = £1455
General Construction.
Next up, Staples for attaching roofing felt + Tyvek Housewrap = £6
4 More sheets of 18mm WBP Plywood £92+VAT
15 Sheets of 12mm OSB £138+VAT
50 Piexes of 4.8m £204+VAT
£510 Total.
Running Total £1965
Coachbolts, tarpaulin, penny washers £35
Forgot... alarm cable was £30
Telephone + Cat5 £48
Screws 500x No6 x 100mm = £26
Screws 500 x No6 x 150mm = £42
Double Glazed Windoes £9.80 x 10 = £98
Hinges + Door Security = £55
Polystyrene Insulation for Floor £50
Tyvek Housewrap = £150
Anticipated further costs = Felt £300
Anticipated Kingspan Insulation (Seconds) £367
Total Expected Cost = £3166.
Not bad given my expectation in a post recently was that'd it'd cost £3K!
Not cheap, but as I can dismantle this workshop, it should be fairly east to remove in the future should that ever happen.
Working at night helps to push everything along, as I've got some friends coming over to help with the actual "construction" Not much to see as I'm using taurpalins to keep everything dry.

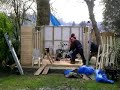
Right, ready for action. You may need to click on the larger image but the floor is down (thanks to mum for helping). It fitted together perfectly. All the panels are piled in the far corner ready to be lifted off in the expected order of use.

Click here to see the actual construction in all its YouTube glory! (31st Mar 2007)
See the action on YouTube!!!!!!
click on image for larger view
Or click the link below!
http://www.youtube.com/watch?v=D8R1Kd6XGoI
All the panels are attached. It took less than 2 hours to get to this stage from the previous picture. Its all in the preperation!


We screwed a couple of vertical battons to hold the A frame at each end.

You can see them without the noggins in yet.

And from the inside out. Gives a good idea of the contstruction


Most of the noggins in now. Its starting to feel quite rigid. (April 1st today 8~0)

Made the overhang, and got some covering of OSB on.

Rain covers on, and finished for the W/E

The overhang should be about 60cm - enough to keep the rain and sun off.

Inside.

So... thats the basic construction finished. It feels huge inside (given the tiny workshop before thats not surprising!). I'm rather pleased.
What luck, a whole week without rain. That meant everything was nice and dry and ready for felting.

Heres the inside, ready for insulation. (6th Apr 07)

Heres the insulation. Stacked up in the garden.

Its seconds, so has some damage particularly to the corners.

Dads helping today - the back is better - but not perfect. (8th Apr 07)

I'm using "easy-seal" from Wickes. Its a two layer system - sticky back felt basically. Its rated for habitable rooms, and it probably overkill for a workshop - but now isn't the time to start skimping. Its also easy to apply. If the roof is porous you can use a sealer - but we've used this before direct onto MDF and it seems fine.

The undercoat is complete.

Next stop is the capsheet - again its sticky back, with a narrow strip on the upper edge of each sheet, which sticks the next sheet down. The benefit of this system is their is no need to have any battons to hold it down. This in turn means no nails or screws need to penetrate the layers.

Next day, the bargeboards are on (front) (9th April 07)

and back.

Basically, the rain held off for the entire assembly + felting. Since then I've managed to get 5 windows in (albeit temporarily) and the overhang should stop any rain coming in front and back. Unfortunately I ordered my double glazed units a little too big, so have to chisel about 3mm out of one short edge of the window. It's a pain, but not actually that difficult. (20th Apr 07)

I'm starting to add the insulation. I cut it outside and it stinks.

You can see the windows are now in, along with metal bars (5th May 07)

More helpers, paid for this time. A lad at work is saving to buy a house and a bit of saturday work proves ideal. We are adding plastic sheeting on the inside.(6th May)

I'm planning a stable type door (eventually) At least its basically waterproof.

You can see I have boarded the inside walls, and am now starting on the roof. A small airgap allows air to circulate up into the roof void.

To stop critters getting up there I have added meshes.

More progress (11th May)

More plastic and boarding. Its not at all easy to do on your own.

I am "secure" now. So can move some items in.

I'm adding sealent around all the gaps, and battons to tidy up any messy joins. You can see I have a floodlight setup to allow work in the evenings.

First coats of paint on! Yippee it starting to look like a workshop now! (14th July)

I'm starting to think about electrics now. You can see the temporary ones, and the planned new unit.

I'm getting bored of writing this now..... about this time I needed something out of the old shed that had the extractor in it. What did I find? A wasps nest!

Starting on some large shelves at the far end of the workshop. Partially for security in case someone ever tries to base the back wall in. (7th Aug 07)

Three shelves in, and the supply up in the top of the picture may feed the extractor which I plan to move outside eventually into the little "extractor house" (10th Aug)
Got home to find some 'irish' chaps parked outside in a transit pickup today, and their "mate" wandering about in the garden. "Looking for scrap mate, as we saw you had some rubble".
I hopefully found him before he got in the workshop but couldn't be sure. Spent the rest of the day building gates down the side of the house, and all of sunday moving equipment into the workshop from the summerhouse, garage and various other less "secure" places.
So... after a few days more.... I'm in...but it doesn't finish there. I've got stuff everywhere, and needless to say after three moves, everything needs cleaning, setting and generally checked over.

Still not finished outside. Some extra "finishing pieces being added on. (3rd Sep)

Finished spraying at the back, and added some supports for holding rough construction grade timbers.

Gutters next!

Here it is in context... with sister & hubbie wandering about

Inside, looking more settled (18th Oct 07)

Pull out trolley for the chop saw, woodrat behind

General Shots inside


Knocked up a clamp stand finally

Wow thats it. I constantly felt I was never making any progress when I was building it, but looking back, I made very good, regular updates and it actually didn't take as long as I thought.
Adam
So... the original "mini" workshop. Started out at 8' x 12', and even after extending it was only 8' x 16'. (Yes, that is an observatory next door).

Requirements for the new workshop were:
#1 Larger!
#2 Larger!
#3 Larger!......
The things I got right on the previous workshop which I wanted to replicate were:
Good number of electric sockets
Double Glazing
Insulation in the walls / Roof
Secure
Wooden Floor
Plenty of lights, as I work mostly in the evening, so the whole natural light thing is a bit of an irrelevance.
Things I got wrong were the (internal) roof was too low, and it got too hot in the sun - adding overhangs seemed a good way to shade the walls and reduce the effect of the sun.
So after buying a new large garden with sufficient space for a workshop (and fortunately had a house attached) I was able to see what was available. (20th Jul 2006)

The original boundary was a hedge, and behind it was a large area of rubbish/compost heap etc.
First job was to clear it out, and remove the dodgy looking branches on the big ash tree. Both times I've built a workshop I've been quite surprised how much you can gain by clearing out a bit of hedge, or waste area. Removing a 2 foot wide hedge and expanding a workshop by a corresponing amount might not seem much but 2 foot extra inside a workshop can make a vast difference. (6th August 2006)

Second job was to get some cables layed. A mistake I made last time was not to set up some 'semi-permanent electrics' so that I could wander down each day, plug in the power tools and get cracking rather than winding extension cables up and down. I also wanted the cables to go under the planned concrete plinth so they had to go in first.
A bad back rules out digging it and as the pictures show, it would have taken an age, and there was clay in the lower half. You can see clearly the switch from sand to clay by the colour of the spoil - the lower half would have takes ages to dig by hand I think! (7th Sep 2006)
The Ditch-Witch was hired from HSS.

You can't use it for awkward trenches so Dad came in handy with the spade!


A days work. A very very long trench, fully to depth (450mm), including the lower half through thick clay. What a wonderful machine! Total price for the day was £220 inc VAT, delivery and damage waiver. Still, worth every penny to me. It weighs about 550kg, and my trailer has a weight limit of 500Kg. The towing limit for the car is only 600Kg, and the trailer weighs over 100Kg. No doubt it probably would have taken it, but I decided to pay the delivery fee. Having seen how unmanvoerable it was, this was the right decision!
I bought 60m of 6mm 3-Core Armoured cable which cost 109+VAT. Again, this could be reduced by using only 2-core and using the armour as earth, but I feel its safer to have the additional core in parallel on the earth. The network cables, again I bought more than needed (100meters) in each case, but its quite ecomonic to buy it "standard" lengths.
Total price, £177 inc VAT
A quick sprinkle of grass seed and its all covered over. If you spot the difference between the picture above and below its that I've built a summerhouse in the meantime. Its wired up, and got the tablesaw and workbench in it. (17th Nov 2006)

The plot needing levelling, and I need a trench cutting further up the garden to add a path so it made sense to get someone in to churn around in a mini-digger. I did consider doing this myself but the speed which the lad cracked through it meant it was a simple decision.

I opted for a concrete base. By using one of these "mix-on-the-spot" concrete services with a motorised dumper, I knew I wouldn't have to shift it by hand, or hire assistants in to help. I've staked several planks around and made various "tampers" to level it and to get the bubbles out. (18th Dec 2006)

The motorised barrow was great - carrying 0.5m3 per run - so just 10 trips to bring the total 5.2 cubic meters needed. The total base is 7m x 4m and I added a small section on the back which I plan to use for storing bee hives etc. Concrete certainly isn't the cheapest method, and also probably not the best environmental option but it provides a secure base, didn't involve any digging trenches for foundations and helped my back to stay OK.
Picture Missing

Mum and Dad helping today.

You can see the "temporary electrics". Two sockets, RCD protected. I use one for power tools, and another to power a floodlight mounted on the tree. Initially I carted the compressor up and down each night but just chained it to the tree in the end and covered it over at the end of each session.

Having a workshop to build a workshop is definately a boon if you are working in the winter. It's not by chance that the summerhouse was built, wired up, and the workbench and tablesaw installed before I got cracking on the main workshop build. Here I am starting to cut the 3"x2"s that form the basic structure. (28th Jan 2007)


The windows will be double glazed both for warmth, and security. They are 4-20-4 clear glass. £9.80 each. Quotes ranged up to £25 each. The price is for a basic window - no frame. I intend to permanently mount them in a recess, high in each frame to make it more difficult to break them and climb in. (4th Feb 2007)

Its going to be covered in shiplap - I need to rip a small amount of the bottom piece - otherwise the overhang will be too much.

First though, I need to trim them to length - the sliding table with a stop is ideal for repeatable cuts...

Preparing the shiplap during the evenings, ready for use at a later date.

With the good weather inthe early part of 2007 I was able to setup outside. I've built a couple of tresles, and the nailgun is getting some serious usage. It will have paid for itself 10 times over by the time I finish.

I'm using 100mm screws to make a series of frames, which can be assembled later.


Each frame will contain a window

I'm using Tyvek underneath - its breathable, but lets the moisture away. I hope it will keep the draughts out too.

A lick of paint.

Making a frame....


Uurrgghh snow. Not very conducive to work! You can hardly remember just how good the weather was at the start of 2007. I do, it sent the bees a little out-of-kilter at the start of the season. (8th Feb 2007)

Why does every project create so many TUITs? Anyway, I wanted a bit more security, and privacy for what I'm upto so firstly get the back fence sorted. Its allotments behind, so one day I may get a gardening urge, and in the meantime, a padlocked gate will do!

And finished (Not the best effort but OK) (17th Feb 07)


All the frames are done now. They still need painting but that will be done later. I have in my mind using one of these "spray" systems.

Even the door frame is done. I've screwed a couple of braces across for the time being. It will hold a sheet of plywood wide, and I just need to trim the end off a sheet. So it should look nice and square, and plenty wide enough to get all my kit in and out.

The plywood floor sits on 2 x 3" joists. These in turn sit on roofing felt. This stops moisture from the concrete getting up into the floor. It worked really well in my last workshop, so I thought I'd do it again. The plan is to fill the gap with 50mm polystyrene, leaving a small gap that air can move through, helping to keep everything dry underneath. (12th March 07)

And I've carried all my timber down. Phew.. 50 lengths of 4.5m, and lots of OSB and plywood. The back is holding up (just)

Got to cut a few sheets of ply. God only knows what I'm doing with that saw. Its just a mock-up- honest....

My little LN put to good use once again cleaning splinters.

Making the floor. It'll be 3.25metes wide, which requires a small additional piece to add to the standard length of 244cm. I choose to add an additional 81cm, which is exactly 1/3 of a sheet after saw kerfs. Again, it minimises the number of cuts I have to make.

And remembering to draw lines so I know where to screw into once the walls are placed on... DAMHIKT. Lets just say I've built a workshop very similar before...

The main sheets.

Deciding on cross piece for the roofing "A" frames. They are 27 degrees, which was carefully calculated to ensure each 4.5m length of timber had one cut, giving one floor joist, and 1 roof beam. 1 is 2.5m, and 1 is 2m. (14th Mar 07)

All angles cut, and you can see the floor stacked up underneath. Its really feeling like I'm making progress now.

Heebee jeebies I made a jig. I am not using a single piece to form the apex, so need to attach each half across to its opposite number. I'm using 4 screws, 2 x 100mm and 2 x 150mm.

Heres it after

Drill the cross piece

Its bolted with coach bolts and penny washers.

Having a check. I've decided the cross piece isn't low enough. (about 14th March 07 I think)

Beth has chickenpox so I'm on annual leave. Fortunately, the baby monitor works to the bottom of the garden and she slept for 2 hours after lunch. Not a bad stretch to get some more work done!

This is more like it though. Evenings working in the dark. Thankfully I setup those floodlights at the start.


OK, spurred on by Byrons accurate pricing, I thought I'd do a quick divvy up on costs.
Next up, the concrete base. This was a bit of a luxury, as its major overkill. However, their is some logic behind it. I've got a bad back, so it was not possible to spend a long time smashing up hardcore to form the base, as swinging a sledge hammer puts such a strain on you. In addition, I didn't want to be carrying loads of lumps of concrete which I find are easy to acquire from skips etc. Most householders are only to happy to let you take hardcore, and if you search around, you can get very clean stuff, often bricks from old house extensions being knocked down. I went for a 6 inch thick base - which uses large amounts of concrete. You could get away with much thinner, but it may be better to include some metal reinforcing. I simply poured concrete into the hole. The extra cost was offset by the ease. Miximate turned up. I didn't care how much, or little I'd miss estimated by as thats their selling point. I guess what I'm trying to say is sometimes when you have family helpers, their time is valuble and extra cost which saves you time and accelerates the project along can make a real difference. I paid £20 to have the powered wheelbarrow.
£622 inc VAT for concrete.
Also some shuttering timber, + tamping timber £33
So that's the base done. Running total £220 + £177 + £622 + £33 = £ 1052 = Base + Feed Electrics
Now, onto actual timber for making the workshop itself.
I did quite well on this, as I made an initial order of 250m of shiplap, and they delivered 320 meters by mistake!
27 Pieces @ 4.8m of 2" x 3" is £205
5 x Sheets of 12mm OSB = £46
4 x Sheets of 18mm WBP Plywood. = £92
Initial Costs to start Frame Making
£205 + £46 + £92 = £343+ VAT =£403
Running Total £403 + £1052 = £1455
General Construction.
Next up, Staples for attaching roofing felt + Tyvek Housewrap = £6
4 More sheets of 18mm WBP Plywood £92+VAT
15 Sheets of 12mm OSB £138+VAT
50 Piexes of 4.8m £204+VAT
£510 Total.
Running Total £1965
Coachbolts, tarpaulin, penny washers £35
Forgot... alarm cable was £30
Telephone + Cat5 £48
Screws 500x No6 x 100mm = £26
Screws 500 x No6 x 150mm = £42
Double Glazed Windoes £9.80 x 10 = £98
Hinges + Door Security = £55
Polystyrene Insulation for Floor £50
Tyvek Housewrap = £150
Anticipated further costs = Felt £300
Anticipated Kingspan Insulation (Seconds) £367
Total Expected Cost = £3166.
Not bad given my expectation in a post recently was that'd it'd cost £3K!
Not cheap, but as I can dismantle this workshop, it should be fairly east to remove in the future should that ever happen.
Working at night helps to push everything along, as I've got some friends coming over to help with the actual "construction" Not much to see as I'm using taurpalins to keep everything dry.

Right, ready for action. You may need to click on the larger image but the floor is down (thanks to mum for helping). It fitted together perfectly. All the panels are piled in the far corner ready to be lifted off in the expected order of use.

Click here to see the actual construction in all its YouTube glory! (31st Mar 2007)
See the action on YouTube!!!!!!
click on image for larger view
Or click the link below!
http://www.youtube.com/watch?v=D8R1Kd6XGoI
All the panels are attached. It took less than 2 hours to get to this stage from the previous picture. Its all in the preperation!


We screwed a couple of vertical battons to hold the A frame at each end.

You can see them without the noggins in yet.

And from the inside out. Gives a good idea of the contstruction


Most of the noggins in now. Its starting to feel quite rigid. (April 1st today 8~0)

Made the overhang, and got some covering of OSB on.

Rain covers on, and finished for the W/E

The overhang should be about 60cm - enough to keep the rain and sun off.

Inside.

So... thats the basic construction finished. It feels huge inside (given the tiny workshop before thats not surprising!). I'm rather pleased.
What luck, a whole week without rain. That meant everything was nice and dry and ready for felting.

Heres the inside, ready for insulation. (6th Apr 07)

Heres the insulation. Stacked up in the garden.

Its seconds, so has some damage particularly to the corners.

Dads helping today - the back is better - but not perfect. (8th Apr 07)

I'm using "easy-seal" from Wickes. Its a two layer system - sticky back felt basically. Its rated for habitable rooms, and it probably overkill for a workshop - but now isn't the time to start skimping. Its also easy to apply. If the roof is porous you can use a sealer - but we've used this before direct onto MDF and it seems fine.

The undercoat is complete.

Next stop is the capsheet - again its sticky back, with a narrow strip on the upper edge of each sheet, which sticks the next sheet down. The benefit of this system is their is no need to have any battons to hold it down. This in turn means no nails or screws need to penetrate the layers.

Next day, the bargeboards are on (front) (9th April 07)

and back.

Basically, the rain held off for the entire assembly + felting. Since then I've managed to get 5 windows in (albeit temporarily) and the overhang should stop any rain coming in front and back. Unfortunately I ordered my double glazed units a little too big, so have to chisel about 3mm out of one short edge of the window. It's a pain, but not actually that difficult. (20th Apr 07)

I'm starting to add the insulation. I cut it outside and it stinks.

You can see the windows are now in, along with metal bars (5th May 07)

More helpers, paid for this time. A lad at work is saving to buy a house and a bit of saturday work proves ideal. We are adding plastic sheeting on the inside.(6th May)

I'm planning a stable type door (eventually) At least its basically waterproof.

You can see I have boarded the inside walls, and am now starting on the roof. A small airgap allows air to circulate up into the roof void.

To stop critters getting up there I have added meshes.

More progress (11th May)

More plastic and boarding. Its not at all easy to do on your own.

I am "secure" now. So can move some items in.

I'm adding sealent around all the gaps, and battons to tidy up any messy joins. You can see I have a floodlight setup to allow work in the evenings.

First coats of paint on! Yippee it starting to look like a workshop now! (14th July)

I'm starting to think about electrics now. You can see the temporary ones, and the planned new unit.

I'm getting bored of writing this now..... about this time I needed something out of the old shed that had the extractor in it. What did I find? A wasps nest!

Starting on some large shelves at the far end of the workshop. Partially for security in case someone ever tries to base the back wall in. (7th Aug 07)

Three shelves in, and the supply up in the top of the picture may feed the extractor which I plan to move outside eventually into the little "extractor house" (10th Aug)
Got home to find some 'irish' chaps parked outside in a transit pickup today, and their "mate" wandering about in the garden. "Looking for scrap mate, as we saw you had some rubble".
I hopefully found him before he got in the workshop but couldn't be sure. Spent the rest of the day building gates down the side of the house, and all of sunday moving equipment into the workshop from the summerhouse, garage and various other less "secure" places.
So... after a few days more.... I'm in...but it doesn't finish there. I've got stuff everywhere, and needless to say after three moves, everything needs cleaning, setting and generally checked over.

Still not finished outside. Some extra "finishing pieces being added on. (3rd Sep)

Finished spraying at the back, and added some supports for holding rough construction grade timbers.

Gutters next!

Here it is in context... with sister & hubbie wandering about

Inside, looking more settled (18th Oct 07)

Pull out trolley for the chop saw, woodrat behind

General Shots inside


Knocked up a clamp stand finally

Wow thats it. I constantly felt I was never making any progress when I was building it, but looking back, I made very good, regular updates and it actually didn't take as long as I thought.
Adam
