Hi Graham
Even two years ago, if asked "what role does the chipbreaker play?", I would have answered, "To stiffen and support the blade". Since then I, along with many others, have learned that it can do much more than this - that is can control the shaving in the same way as a high angle plane does. This is not new information, but seems to have become downplayed and minimised in recent decades to the point that it is new for many.
The thing is that Lie-Nielsen continue to take the stance that the chipbreaker is a cap iron, that is, it supports the iron only. When they brought out their chipbreaker (about 10 years ago - it was the first review I wrote), the rationale was that it did a better job of supporting the iron than the thin Stanley type, which was previously used.
The fact is, the angle to the leading edge of the LN chipbreaker (like the LV) is 25 degrees. This would not be sufficient to deflect shavings from a Type I into a Type II chip formation no matter how close you get it to the edge of the blade. So your experience of the LN chipbreaker under performing is very reasonable. Unless you honed the chipbreaker to 45 degrees (or more - the Kato video suggested up to 80 degrees), all it will do is support the iron.
Now I am not sure - and I would like to hear - how many here deliberately set up the chipbreaker as close to the edge of the blade to minimise tearout in interlocked grain. How many actually work with interlocked grain - unless one does, you will not see the gain.
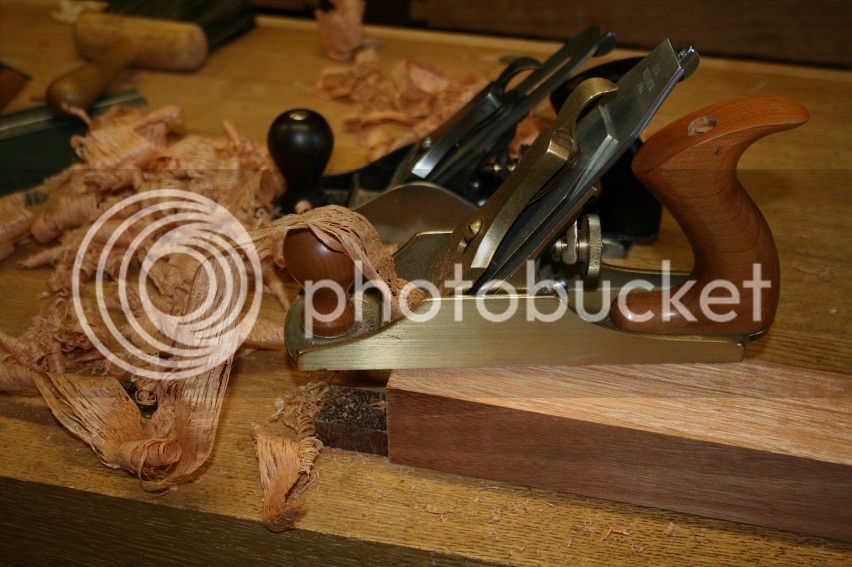
How to tell if you have set the chipbreaker close enough? the simplest way is to look at the resulting shaving - the "chipbreaker effect" causes the shaving to straighten up. A curly shaving is more likely to reflect a Type 1 chip (where the shaving is breaking ahead of the blade. This is vulnerable to tearout). A straight shaving reflects a Type II chip (where the shaving has undergone a significant and dramatic change of direction, breaking at the blade, and does not tearout).
Here is a straight shaving (in the background are curly shavings):
So, who uses the Clifton chipbreaker with interlocked grain and sets it close enough to the blade to produce straight shavings?
Regards from Perth
Derek


")