shed workshop advice?

UKworkshop.co.uk

Help Support UKworkshop.co.uk:

This site may earn a commission from merchant affiliate links, including eBay, Amazon, and others.

Eifers

Member
Joined
28 Apr 2017
Messages
17
Reaction score
0
Location
Swansea
Hello, first post here as just joined up.

I'm just about to start building a workshop shed in the garden and wondered if anyone could give some advice or pointers, before I make some fundamental dumbass mistakes which you guys might see coming but i have no idea about (yet!).

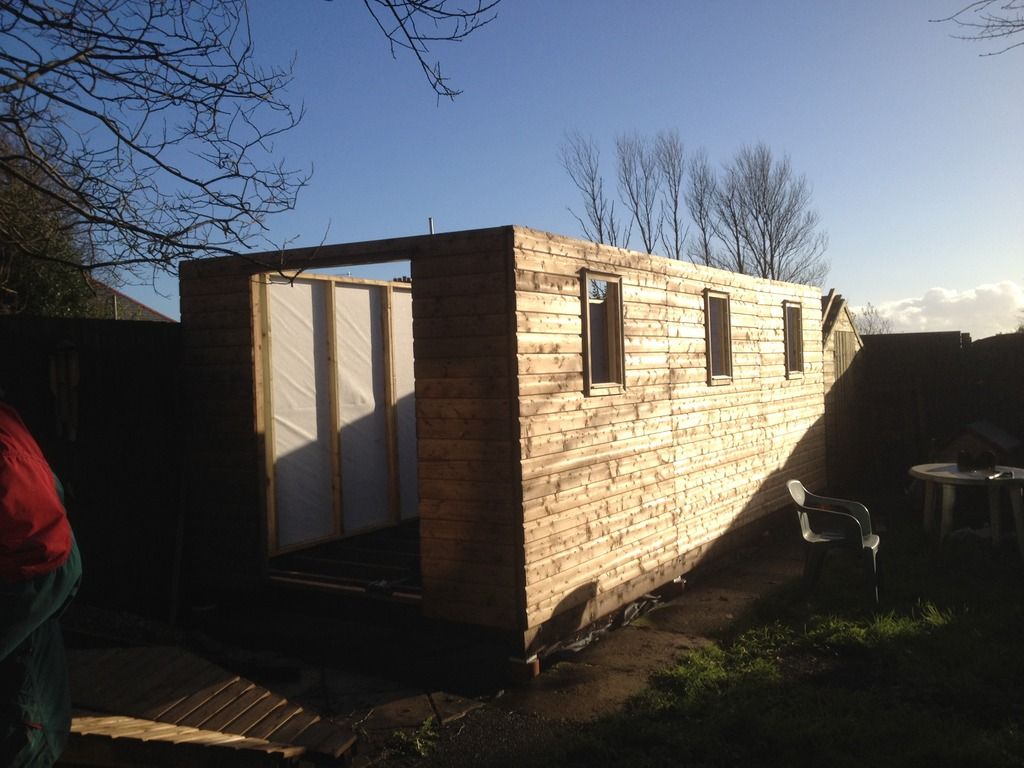
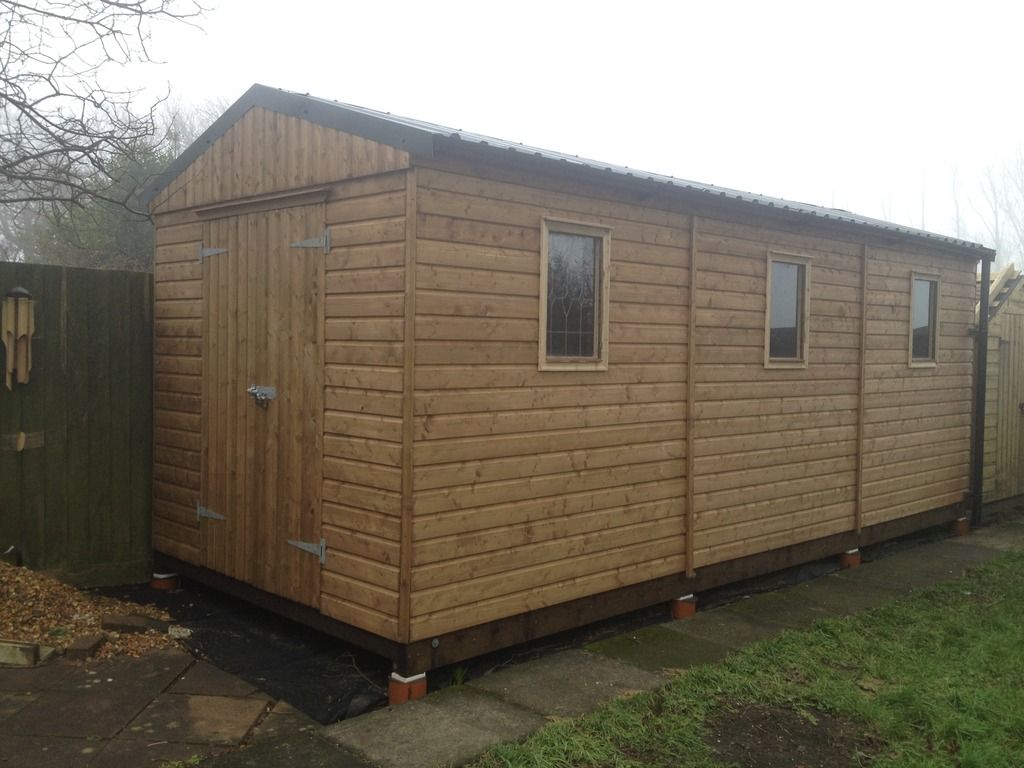
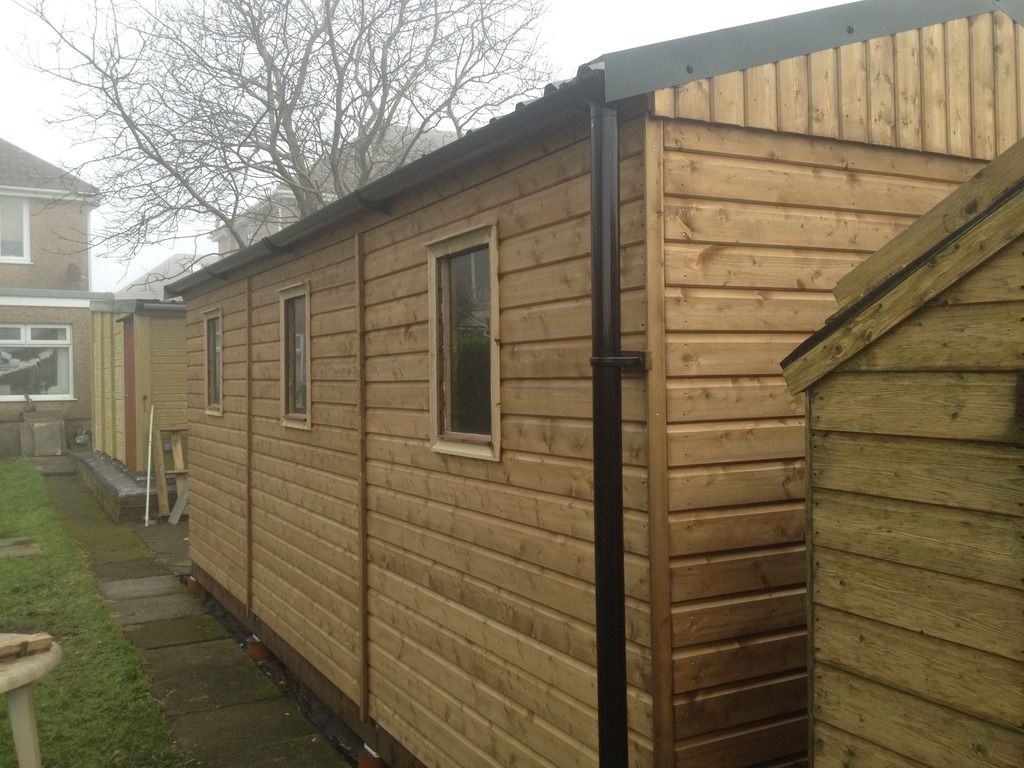
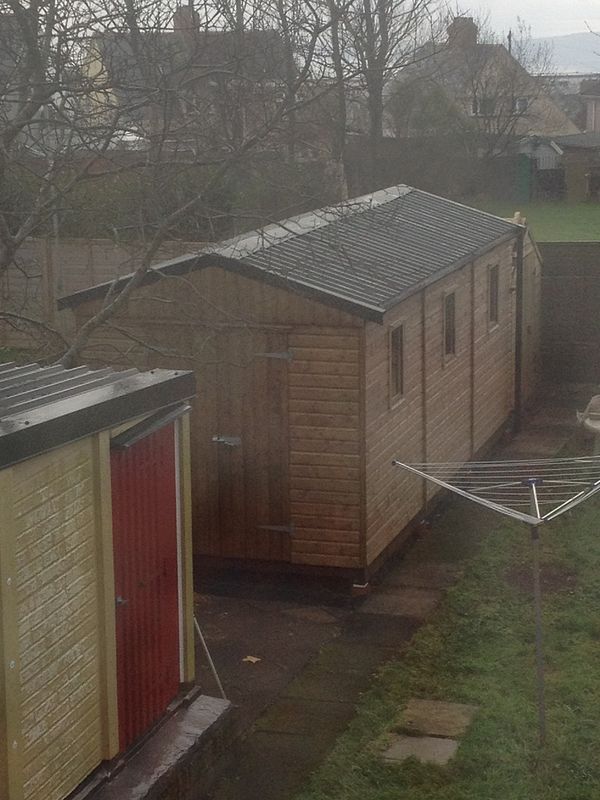
I've managed to negotiate a plot about 8ft wide by 20ft long, which seems narrow but will have to do. the site is fairly flat but the shed will have to be put up close to the boundary fence.

I'm planning on sorting out a base myself and then ordering a shed to put on it ....had planned to build from scratch but it'll save time and stress as I work full time.

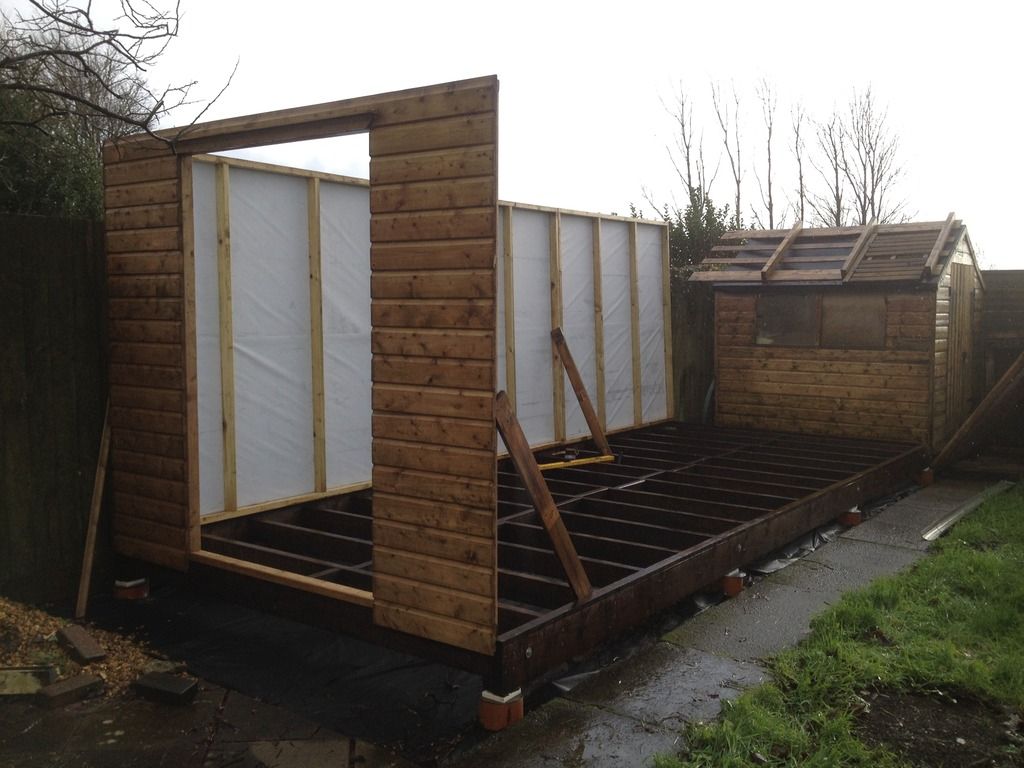
Having looked at a few options for the base, and wanting to keep costs and sweat down, I'm thinking of making concrete piers, and building a frame on top of 4' x 2' or 6' x 2' timbers with ply or osb board as flooring. This should save the labour of perfectly levelling the ground, shifting tons of hardcore, cement and sand etc, and a lot of work. I've also been told it's a good idea to have air flow under the shed to help prevent the timber rotting (most sheds ive had in the past, sitting on concrete, haven't lasted well).

any potential pitfalls so far? I'd like to have a woodburner in there but not sure if this kind of floor would be solid enough to take the weight?

Also can anyone recommend a company to build a fairly sturdy workshop shed (not the sort from B&Q!) who will deliver to south wales?

thanks everyone for any input
 
If closer than 1 metre to boundary fence and bigger than 15 sq m it will need to be made of non combustable material -at least the part within 1 metre will be. Its part of the building regs -for England. I think intumescent paints can be allowed. Thats assuming you have a neighbour the otherside.

Concrete piers work well, it would be worth setting out with a laser level if you have one. If you cant see the line wait till its dark.
 
ok, thanks chaps! sorry for the slightly slow reply since April, I have been mostly working on the shed, I shall bung a few progress pics up if anyone is interested....being a newbie to building sheds (apart from a 6x6 from b&Q), maybe it'll be entertaining

here is the spot where it is being built, replacing the current doghouse which is a bit cramped.. first job, remove doghouse...dig up 500 bluebells, clear and level the site...
 

Attachments

  • IMG_2415.jpg
    IMG_2415.jpg
    62.3 KB · Views: 289
  • IMG_2417.jpg
    IMG_2417.jpg
    63.9 KB · Views: 288
  • IMG_2418.jpg
    IMG_2418.jpg
    74.6 KB · Views: 288
and here are the cunning plans for my shed....as dimensions were dictated by space, it is 6m x 2.4m ... As I wanted to keep costs and labour to a minimum, rather than making a concrete slab and all that entails, I opted for building the structural timber base, set on 8 concrete piers, four along each side (every 2 meters).
 

Attachments

  • IMG_2608.jpg
    IMG_2608.jpg
    56.3 KB · Views: 302
  • IMG_2610.jpg
    IMG_2610.jpg
    36.7 KB · Views: 302
  • shed plan.jpg
    shed plan.jpg
    26.4 KB · Views: 300
for the pilings, i wanted to use cardboard 'sonotube' which is apparently common practice in the states....but unheard of here. So after a bit of headscratching decided on the biggest waste pipe i could find in Selco's (160mm x 3m) not ideal but needs must. luckily when I dug down to the subsoil i found I could cut the 3 meter pipe into equal sections for the pilings without needing more pipe.

I spent an enjoyable afternoon smashing up old paving slabs for rubble to compact at the bottom of the holes, and managed to scrounge up some reinforcing grid to cut up to reinforce the piles.
 

Attachments

  • IMG_2575.jpg
    IMG_2575.jpg
    68.8 KB · Views: 275
  • IMG_2573.jpg
    IMG_2573.jpg
    26.3 KB · Views: 275
  • IMG_2576.jpg
    IMG_2576.jpg
    59.1 KB · Views: 274
  • IMG_2574.jpg
    IMG_2574.jpg
    98 KB · Views: 277
  • IMG_2572.jpg
    IMG_2572.jpg
    71.5 KB · Views: 277
  • IMG_2571.jpg
    IMG_2571.jpg
    63.1 KB · Views: 277
here are the pilings being laid out and measured up, I did borrow a laser level as suggested by RobinBHM above, worked a treat thanks!... you may notice the path to the right of the picture attached, which I had to dig up and relay before starting the pilings, it looked like it must have been hit by a stray bomb when they blitzed Swansea in WW2! at least with it straightened up i had a good baseline to follow and something to kneel on instead of the muck. At this point my gf suggested replacing the fence at the bottom of the garden as I had nothing much to do and so much time on my hands.... :shock:
 

Attachments

  • IMG_2570.jpg
    IMG_2570.jpg
    43.3 KB · Views: 272
Looking good Eifers. keep the updates coming!

I plan to use a similar piling techniques for a deck next spring. I was thinking of using 225mm dia twin wall carrier drain for my forms, this should give plenty of room for error.
 
A bit late in the day, but for future reference:

http://www.supremeconcrete.co.uk/genera ... d-dekpost/

Anyway, I would suggest that when the shed is constructed, insulate it. I don't know if you plan to work in it in the winter, but if you do you'll be glad you did, well I am.

The mistake I made was not insulating the floor. I guess I'm a bit focussed at the moment with the current weather, but I've just come in and my feet are bl**dy frozen!
 
will1983":35e0oux5 said:
Looking good Eifers. keep the updates coming!

I plan to use a similar piling techniques for a deck next spring. I was thinking of using 225mm dia twin wall carrier drain for my forms, this should give plenty of room for error.

Cheers buddy!...I will try and get more pics up tonight...the 225mm twin wall drain would be better, I would go with the perforated one as had some issues with the concrete being slow to set in mine which i put down to either adding too much water to the mix (used postcrete so hard to judge) or water saturation as the pipes are solid plastic. I drilled mine to attach anchor points a few months after setting them up and found some were still a bit soft....hopefully it will go off with more time, and it can't go anywhere so not too concerned
 
Geoff_S":2wq3pxee said:
A bit late in the day, but for future reference:

http://www.supremeconcrete.co.uk/genera ... d-dekpost/

Anyway, I would suggest that when the shed is constructed, insulate it. I don't know if you plan to work in it in the winter, but if you do you'll be glad you did, well I am.

The mistake I made was not insulating the floor. I guess I'm a bit focussed at the moment with the current weather, but I've just come in and my feet are bl**dy frozen!

Hadn't seen the dekposts before, they look ideal! and would have saved some bother... but looking at prices it would have cost me about £115 plus delivery.... as I'll do anything to save a few quid, i think the pipe and concrete for the piles cost about £40

Strangely enough I'm just now looking for insulation! I am planning on lining the whole thing...I want to put Celotex down between the joists before putting flooring sheets in, but it's pricey stuff :roll: waiting for some to come up on the local classifieds. thinking about getting 50mm but not sure if it'll be thick enough?
 
so here's the frame for the floor, sitting on the pilings, I used 7x2 for the long rails, with 2x2 lengths fixed to the inside bottom edge to give a ledge for the 5x2 joists and end rails to sit on... I nailed it all together with some big 4 1/2 inch (I think) galvanised nails. Apparently it's a bad idea to use screws to fix weight bearing timbers as they are brittle and can snap/sheer off.

I put some rubber pads (cut from old engine intake duct) under the frame as I found water was ponding on top of the DPM (ironically!) I later added in some pieces of thick plastic fascia board to spread the load better on top of the piles
 

Attachments

  • IMG_2629.jpg
    IMG_2629.jpg
    87.2 KB · Views: 176
  • IMG_2628.jpg
    IMG_2628.jpg
    81.6 KB · Views: 177
  • IMG_2631.jpg
    IMG_2631.jpg
    64.1 KB · Views: 176
  • IMG_2802.jpg
    IMG_2802.jpg
    53.4 KB · Views: 176
I braced the frame up with some steel brackets in the corners and at the piles to help prevent any movement/spread in the timbers these were bolted in / coach screwed.
 

Attachments

  • IMG_2801.jpg
    IMG_2801.jpg
    81.2 KB · Views: 168
  • IMG_2798.jpg
    IMG_2798.jpg
    47.3 KB · Views: 168
here it is with the joists fixed in, and noggins between down the centre to stop any twisting. these I screwed in as they arent weight bearing as such, and pull the joists together.. all the timber was tanalised, and pre treated to two coats of Creocote (other preservatives are available)...great stuff, lovely smell, gets all over the shop if your not careful

and that was the floor framing all done.... there now followed an intermission for a couple of months while I waited for the shed to be made..
 

Attachments

  • IMG_2822.jpg
    IMG_2822.jpg
    51.6 KB · Views: 166
  • IMG_2812.jpg
    IMG_2812.jpg
    95 KB · Views: 166
Eifers":edq9dvfe said:
for the pilings, i wanted to use cardboard 'sonotube' which is apparently common practice in the states....but unheard of here. So after a bit of headscratching decided on the biggest waste pipe i could find in Selco's (160mm x 3m) not ideal but needs must. luckily when I dug down to the subsoil i found I could cut the 3 meter pipe into equal sections for the pilings without needing more pipe.

I spent an enjoyable afternoon smashing up old paving slabs for rubble to compact at the bottom of the holes, and managed to scrounge up some reinforcing grid to cut up to reinforce the piles.

How deep are your pilings? I built similar foundations for three free standing sheds in the States. The code where I lived required all piles (footers) to be a minimum of 24 inches below grade and the bottom of the footer must be below the frost line. This prevents (or minimizes) frost heave in the winter. The water table where I lived was high, so water content in the soil was an issue during winter.
 
MikeK":3m0n30zc said:
How deep are your pilings? I built similar foundations for three free standing sheds in the States. The code where I lived required all piles (footers) to be a minimum of 24 inches below grade and the bottom of the footer must be below the frost line. This prevents (or minimizes) frost heave in the winter. The water table where I lived was high, so water content in the soil was an issue during winter.


They are about 14 inches / 40cm lengths of pipe.....I looked into that but a builder I talked to said not to worry about it as we don't get such extreme low temperatures here, especially by the coast, and I'm building on top of a hill, so groundwater isn't an issue. I just dug down to the subsoil which was pretty solid, it has a lot of rock in it, then put in 3 or 4 inches of mixed size rubble and compacted it in with a heavy sledge (hammer)

If it falls over I'll post a pic :lol:

(thats a slightly nervous laugh)
 
Eifers":298trw8i said:
Geoff_S":298trw8i said:
A bit late in the day, but for future reference:

http://www.supremeconcrete.co.uk/genera ... d-dekpost/

Anyway, I would suggest that when the shed is constructed, insulate it. I don't know if you plan to work in it in the winter, but if you do you'll be glad you did, well I am.

The mistake I made was not insulating the floor. I guess I'm a bit focussed at the moment with the current weather, but I've just come in and my feet are bl**dy frozen!

Hadn't seen the dekposts before, they look ideal! and would have saved some bother... but looking at prices it would have cost me about £115 plus delivery.... as I'll do anything to save a few quid, i think the pipe and concrete for the piles cost about £40

Strangely enough I'm just now looking for insulation! I am planning on lining the whole thing...I want to put Celotex down between the joists before putting flooring sheets in, but it's pricey stuff :roll: waiting for some to come up on the local classifieds. thinking about getting 50mm but not sure if it'll be thick enough?

My frame is 2"x2" and has been there some 15 years or more. So I used pink Rockwool in the walls, works a treat. The Celotex is like fingernails down a blackboard, but is going to be much easier between the joists.
 
A couple of contacts you might find useful:

I bought a fair quantity of Kingspan seconds from these people to use in a 30 sq m studio I built a few years ago. Keep looking at their special offers for new stuff. https://www.secondsandco.co.uk/

If you decide to install a stove and are worried about weight then get a lightweight steel workshop stove. I fitted a Greenheart stove from these folks in my workshop a few years ago and have been very happy with it.
https://www.workshopstoves.co.uk/

My only connection with these businesses is as a satisfied customer.
Dave
 
Thanks for the info Decas! the stove site looks like it will come in very handy..I have a woodburner I want to put in at a later stage :)

Sorry for the break in updates...I have been sourcing the insulation board. After a long wait and scouring ebay and gumtree I eventually found a guy selling celotex off fairly cheap - £14 for an 8x4 by 70mm sheet which usually retails for around £50! it was advertised as 'some are half boards' which turned out to mean offcuts, which will need more fitting work but thats fine. I got ten 8x4 70mm sheets and 10 8x4 40mm sheets for a grand total of £260. Hopefully enough to do the whole shed.

Anyway....here are a few pics of the shed build :)

IMG_3068_zpsdgdzq2ea.jpg


IMG_3070_zpsjvm0v2xl.jpg


IMG_3071_zpsdhzntrun.jpg
 
Back
Top