I blame Roy Underhill!

UKworkshop.co.uk

Help Support UKworkshop.co.uk:

This site may earn a commission from merchant affiliate links, including eBay, Amazon, and others.

AndyT

Established Member
Joined
24 Jul 2007
Messages
12,028
Reaction score
538
Location
Bristol
Well, I say blame, it's more of a polite thankyou. And also 'Toolsntat' Andy, who sent me a tip-off that a rather interesting item was on ebay, collection only, in Bristol.

So I've done the deed and bought it. I've also brought it home in semi-portable bits. Good grief but it's solid!

I'm talking about a Barnes 4 1/2 treadle driven metalworking lathe.
It's the model Roy Underhill featured in this programme - http://video.unctv.org/video/2296983856 which is little more than a half hour advert for the thing!

This is the ebay listing photo showing it assembled:

Barnes412_zps887593cb.jpg


And here are some close-ups of it in bits in my workshop:

IMG_2522_zpsd768e191.jpg


IMG_2529_zps12c69f64.jpg


IMG_2528_zps3844dace.jpg


IMG_2527_zps57cf85a0.jpg


IMG_2525_zps8188e4c3.jpg


As far as I can see there are no important bits missing and there is just one handle broken. Most of the bits move and it looks as if it was well greased before being left unloved in a shed for a while. It comes with a three jaw chuck, a four jaw and a faceplate. It has a set of change gears to power the toolrest along to do thread cutting. Yahoo!! :D :D

It will be "some time" before I post any video of it whirring away happily and I expect I'll be back with lots of questions, especially to the serial restorers of lumps of old cast iron.

For starters, what's the best sort of degreaser to use these days?
And what bits turn against what other bits to get the chuck open and removed?
 
Eeeek! :shock: =D> =D>

And it's a treadle one so you don't have to remember to peddle backwards.

I wonder what the likelihood of finding a manual is ... the back gear ratios frinstance can't be guessed at.

Screw cutting should be a good deal less frought than when using a powered lathe - if you mess up with the disengagement you can just stop treddling before the carriage collides with the chuck. :) (Looks like that's the lever that is broken?)

Btw have you seen this site? http://www.lathes.co.uk/barnes/index.html

and http://www.lathes.co.uk/index.html

Seems like a useful sort of place.
 
Not the machine I fantasize about but it should be fun to play with. I'm not coordinated enough to work my hands and feet at the same time. :roll:

As for degreasing I would use a solvent like Varsol or mineral spirits. What you have in your neck of the woods and are allowed to play with could be different than what we can get here in Canada.

For the rust look into http://shieldtechnology.co.uk/rustremoval.htmln
Should be just the thing to shine up your machine.

Pete
 
Richard T":10cg9hd1 said:
I wonder what the likelihood of finding a manual is ... the back gear ratios frinstance can't be guessed at.

But can be calculated easily after counting the teeth on the gears?

BugBear
 
Thanks for the encouragement guys!

The gear ratio problem has been sorted by the very clever Barnes designers who seem to have anticipated that a paper manual would not last as long as their indestructible machines. There is a metal plate on one of the legs which shows the model number and the gears to choose for a range of different pitches:

985EAA1A-7C6D-4296-8D33-BABDB7B2B68F-1058-0000022BF62B0A16_zps16262b39.jpg


And here's a general view of the whole top bit that I didn't post last night

E4C00271-6B78-4C9B-8529-C78D8E6A0E1A-1058-0000022D86511B19_zpsa049d89e.jpg


Thanks for the links Richard - I had already found that site and it helped encourage me to take the plunge!

On the degreaser front what I was wondering was how good the various cans of stuff in bike and car shops really are - I suspect I'll use quite a lot of white spirit as I already have it and it's cheap.
 
What a beauty indeed, slightly envious. What with the foot powered scroll saw and this, it must be quite peaceful over there.
I hope you restore it quicker than I have managed with the hand morticer. Re degreasing, I think Jim knows a few tricks.... where's Jim?
 
Ooooo - that's NICE! ***turns faintly green with envy***

On degreasing, white spirit will do, but even better if you can get hold of some is diesel oil. You can either leave smaller bits to soak in a bucket, or slather it onto bigger bits and leave it to steep for a week or so. It'll loosen some pretty heavy duty crud.

For further information, there's a specialist bookseller called Camden Miniature Steam Services. If they have a copy of 'Using the Small Lathe' by L.C.Mason, snaffle a copy. There are lots of other books on lathe work, but that's among the best. (It explains, among many other things, screwcutting and the selection of gear trains for, so you'll be able to check whether Barnes' draughtsmen got their sums right when they set out that brass plate!)

I think that three-jaw chuck that's on the spindle is a 'scroll chuck', operated by two bars of round metal in the holes on it's periphery. It looks from the bits like you've got a set of 'outside jaws' as well. They're handy.

The chuch is probably fitted to the spindle by being screwed on and off - you can easily check by examining the 4-jaw and faceplate. It'll be tight to remove in all probability, having been attached for so long. Soak well in Plus Gas, diesel or similar penetrating oil, and try not to damage the spindle nose.

I shall follow this one with interest!
 
condeesteso":2p594f4r said:
What a beauty indeed, slightly envious. What with the foot powered scroll saw and this, it must be quite peaceful over there.
I hope you restore it quicker than I have managed with the hand morticer. Re degreasing, I think Jim knows a few tricks.... where's Jim?

Busy buying telescopes!!

BugBear
 
I have the slightly larger Barnes No.5 (5 1/2" centre height and 33" between centres). It has the date 1890 on the back of the bed. Sadly mine lost its treadle before I bought it so it is motor driven but it is in regular use. Yours looks like it will be readily brought into useable condition - please let us know how you get on.
 

Attachments

  • IMG_1113C.jpg
    IMG_1113C.jpg
    243.1 KB · Views: 2,654
  • IMG_1110C.jpg
    IMG_1110C.jpg
    243.3 KB · Views: 2,654
rxh":38syv1oo said:
I have the slightly larger Barnes No.5 (5 1/2" centre height and 33" between centres). It has the date 1890 on the back of the bed. Sadly mine lost its treadle before I bought it so it is motor driven but it is in regular use. Yours looks like it will be readily brought into useable condition - please let us know how you get on.

Wow very nice!

I expect I shall be coming back with some detailed questions as I get on with the restoration. I'll also be looking for a date on mine.
 
Here's a quick update of some progress on dismantling and cleaning. I won't post every picture though I'm trying to take plenty to show me how to put it back together. One nice aspect of machinery of this age is that it's really easy to look at it and understand what the function of each part is. (It's at the opposite end of the spectrum from a modern car, for instance!)

This is how the cross slide swivels. A circular part has a dovetailed rim which fits into a matching slot. A bolt tightens a collar to hold it in place:

IMG_2544_zpsc00cc5d2.jpg


On sub-assemblies like this, each part has a number stamped on it - mine are number 17. I think the method of manufacture must have been to cast and machine to standard sizes, then number a set of parts before fitting them together as a unit. Just like making wooden moulding planes where you can find a pencilled number on body and wedge matching a filed number on the iron. (The number on the iron being in Roman numerals as they are much easier to file.)

For cleaning I'm trying some of this Autoglym cleaner (which seems quite good) as well as WD40 or equivalent, white spirit and plenty of old toothbrushes, sticks and rags. The outer layer of filthy old grease can be scraped off with an old credit card and then brushed with the cleaner and washed.

Before:

IMG_2558_zps1bf9281d.jpg


During:

IMG_2560_zps7547e21a.jpg


After:

IMG_2566_zpsaa3b7767.jpg


I've not decided what to put as a final finish. I don't want to repaint. I'll probably go for thinned linseed oil on the big bits (legs, flywheel, bed) with renaissance wax on the smaller, handled parts.

One challenge was getting the old chuck off. This is how it was at first. In this shot you can see that the front part is fixed to the back with three screws. These are very mashed up and two of the heads are broken - fortunately they were loose and came off with pliers.

IMG_2522_zpsd768e191.jpg


That left the outer part locked solid and the inner part very firmly screwed on to the mandrel. I tried a strap wrench but that was too gentle.

IMG_2561_zps35680c7e.jpg


After leaving it overnight and coming back to it the next day I saw at once what to do. These pictures are a reconstruction for your benefit!

Step 1 was to trace over the positions of the screw holes with a piece of paper.

IMG_2562_zps69dc0280.jpg


Step 2 was to use that as a template to knock three nails into a bit of scrap wood:

IMG_2563_zps901a53e6.jpg


Step 3 was to wedge the pulleys against the casting, hold the new bespoke wrench in place and give it a little knock with a hammer:

IMG_2564_zps68bc7b3f.jpg


This worked!

The outer part was locked up solid with a twist bit in place. After some fruitless attempts to undo it, I realised that I could just drift the drill bit out by putting it over a handy dog hole in the bench and hitting the back of it. With the drill out, the other bits moved enough to open it up and clean it.

I now see it is by Cushman Industries - who are still going - but according to the archive copy of the 1912 catalogue were a supplier of accessory chucks to Barnes, so it may well be contemporary with the lathe.

IMG_2565_zps4056d147.jpg


IMG_2570_zps03260aa7.jpg


IMG_2571_zpsbe2c43a2.jpg


There's still plenty more to do; I'll post updates when there's anything fresh to report.
 
I made my first steam engine (a Reeves 'Trojan') on a treadle lathe of similar vintage. One thing about treadle lathes is that you soon learn just how important it is to keep your tools sharp...
 
Very reminiscent of the Drummond flat bed that I once acquired as consolation prize while buying a car for SWMBO :D . It had been treadle powered, but at some stage in its life, had a motor added. Fortunately it had been kept dry, so everything worked immediately. Amazingly good machine, still very precise after at least 70 years of (presumably quite gentle) work. Wonder where it is now???
 
WOW...love it. I'll follow this with great interest Andy :)

I think you'll have as much fun doing it up as you will using it.

Bob
 
I'm sure you will all be thrilled to know that I have spent several happy hours in the workshop patiently scrubbing the decades of accumulated grime off my new old lathe. Here are some more wip photos as evidence.

Headstock with filth:

IMG_2522_zpsd768e191.jpg


going...

IMG_2577_zps29a23bdd.jpg


going...

IMG_2579_zps5f09875f.jpg


and the current state - can you see that there is no compacted grease inside the root of every one of those gear teeth? And that you can touch most of the surfaces without getting a black hand?

IMG_2597_zps4685ea22.jpg


Here are the change gears before:

IMG_2582_zps5c64366b.jpg


and after:

IMG_2598_zps34cb0dea.jpg


The four jaw chuck had been as black and greasy as everything else but here it is clean - so the numbers on the jaws are visible -

IMG_2583_zpsb1c22bf3.jpg


I can now see that this too is by Cushman and could well have been supplied with the lathe:

IMG_2584_zps75dc2775.jpg


It's all going nice and smoothly - old screws have all come undone when I needed them to. The headstock won't move on the bed but there's no need for it to do so - it has to sit in the right place for the leather belt to run.

There are two little challenges. The biggest of the change wheels has a break in it:

IMG_2601_zps734c17d1.jpg


IMG_2600_zpscd4d1aed.jpg


These gears are machined steel, not cast iron, so it may be feasible to get this welded - if it's necessary. The gear chart only shows it as being needed for very fine threads.

However, I suspect the last owner might have used the automatic feed on it slowest settings as the default way of advancing the carriage, as the manual advance handle is broken:

IMG_2602_zps660f0616.jpg


This ought to have a bar both sides with a balancing ball on one side and a forwards facing handle on the other.

I hope I could make one, when the lathe is working - my plan is to make a substitute in hardwood to get me started and then have a go at a steel or brass one. Tell me if that's a silly idea.

More later, but the action shots will be a while yet.
 
AndyT":3k1ae2xs said:
However, I suspect the last owner might have used the automatic feed on it slowest settings as the default way of advancing the carriage, as the manual advance handle is broken:


This ought to have a bar both sides with a balancing ball on one side and a forwards facing handle on the other.

I hope I could make one, when the lathe is working - my plan is to make a substitute in hardwood to get me started and then have a go at a steel or brass one. Tell me if that's a silly idea.

Boot strapping a lathe into a better lathe is almost a hobby in itself for some model engineers.

BugBear
 
Is the piece with the broken handle one solid piece or can any of it be taken apart?

I was wondering about attaching a new handle of that type to the existing thread and gear.

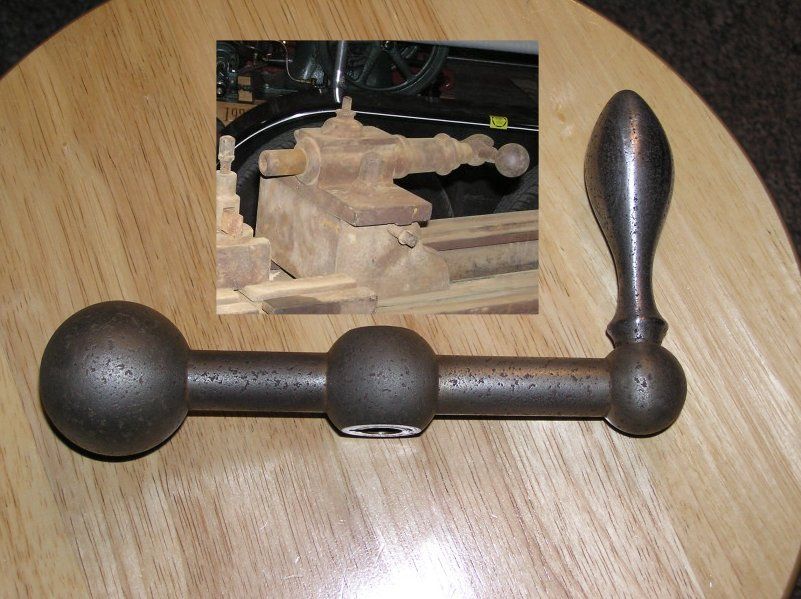
Just a photo I found of vaguely the right type of handle. If the handle was made like this: (turned)


Then it would be attached at its middle ball; which is still there. Is it detachable at that point?
 
AndyT":yi39x579 said:
I hope I could make one, when the lathe is working - my plan is to make a substitute in hardwood to get me started and then have a go at a steel or brass one. Tell me if that's a silly idea.

If you had one made of hardwood, you could cast a new one from aluminium! You'd just need... ;-)


I'm sure I recall seeing some machinists recommending not cutting wood on a metal lathe because if the chips are left laying around and/or dust gets under the slides or whatever they can promote rust... but I'd tend to think of that as a cleaning problem more than anything!
 
Back
Top