DBT85s Workshop - Moved in and now time to fit it out

UKworkshop.co.uk

Help Support UKworkshop.co.uk:

This site may earn a commission from merchant affiliate links, including eBay, Amazon, and others.
That's not going to be easy with that mesh. If you do manage it then I would suggest a 6x1 tamper for one person, with the other person working alongside with a trowel, scooping off excess, or filling in holes. Wear gloves.

If there are two of you I'd be tempted to construct a big tamper which is a couple of feet longer than the width of the pour, and do the work from the outside. Raised handles out of battens are a good idea.
 
Ok, I'm going to have to get on the mesh to poke it anyway though right?

I'd planned on ordering a 6m 2x4 as the outside of the formwork is going to sit at about 4.8m and add handles either for use on the outside or inside.

Maybe I'll swap that up to a 1x6 and we can see how it goes.
 
No. You can wander around the outside with the poker. The poker vibrates the mesh, and the mesh vibrates the concrete all over.

For tamping, you'll want a 6x2 with handles if working from the outside, but a short 6x1 if you are working alone standing in the concrete.
 
Ahh ok.

Well, orders have started being placed. All the wood/mesh/aggregate/cladding is just waiting to be paid for.

Shall sort the roof a bit later.
 
Hi.
It’s getting exciting.......
Just my tuppence worth ( and benefit of hindsight)
Keep thinking about overall design, I thought I had it nailed down fairly well but made some school boy errors, and would do things differently (I guess we all would) Of course it depends on your use, location, projects undertaken, machinery etc.
My errors, just things I didn’t consider. More windows needed, do not underestimate the beauty of natural light. As Mike said, it’s easier to make the opening fit so find a couple (or more) secondhand double glazed window frames. I left a wider opening than was required until I lucked out on a set of french patio doors.
You could always block or screen off the interior, if you’re worried about security. At the very least consider making a couple of openings between studs to fit a standard ready made window size from a supplier that you like so they can be added in the future. I thought it was nice and bright once I finished the inside, and clad with ply. Now it’s full of stuff it’s quite dark in places, paint the walls white.

Do not underestimate the need for storage. The downside of windows/doors is they take up wall space! I have nowhere to store an 8x4 sheet flat against the wall because of the stupid piers I put in(I know that’s not an issue here) and if I stand it upright it hits the ceiling! Consider if you put ties between rafters have you enough room to swing a board or sheet. I seem to be constantly reorganising to gain a bit of floor or wall space, it should be big enough but........ (particularly if you have to store timber, bikes, diy stuff, random rubbish) Of course it’s entirely possible that I have too much stuff :wink: :wink:

If I was you I’d buy a nail gun rather than hire do you have a compressor? I just sold mine after the house extension was complete. You WILL need more fixings and timber than you thought. As you’ve just put in a nice sized order with some one locally you’ll get a decent relationship going with them, so it’s no hassle to put some extra 4x2 onto that next order when you realise ‘oops forgot something’

I’m all up for doing things correctly (says someone who regularly over-engineers or spends far too long on the silliest task) but as far as things like tying rebar, amount of overlap etc, Don’t stress, if you want to spend £20 on a hooked stick then go for it. A pair of pliers works just as well, I used to have a hook that I made that fitted in a Yankee screwdriver (never did find it when I needed it) a hook shape wire in a bit of broom handle if you don’t want to use pliers. Google ‘manual rebar tying tool’
use your time and attention to: the rebar not being too close to edge, top or bottom of concrete, getting it level and getting a decent finish, is the concrete going to be the floor finish, If so are you insulating the slab? (You’ve considered insulation in walls and ceiling, what about the floor)
You’ve got enough concrete (and using a poker is good practice, some builders never even seen one!) and rather than the usual bits of brick to support the rebar you seem to be using chairs. Once the mesh is in, and assuming you can work from the sides then avoid walking or standing in it.
One person on rake/ poker and two on the tamper works well.
Avoid putting too much water in the concrete. (Builders like to do this cos it makes pour easier)
Hope this helps, keep asking questions, oh and one more thing. Take pictures. We like pictures.
 
mindthatwhatouch":26lgbgxw said:
.......I used to have a hook that I made that fitted in a Yankee screwdriver (never did find it when I needed it) a hook shape wire in a bit of broom handle if you don’t want to use pliers. Google ‘manual rebar tying tool’......

I bought a commercial one of those......a potato sack tier from an agricultural merchant(like this).......and a sack full of little soft wire ties with loops on the end. It makes the job very quick and easy. A couple of quick pulls of the handle and the wire was tied.
 
mindthatwhatouch":ed8tl7mm said:
Hi.
It’s getting exciting.......
Just my tuppence worth ( and benefit of hindsight)
Keep thinking about overall design, I thought I had it nailed down fairly well but made some school boy errors, and would do things differently (I guess we all would) Of course it depends on your use, location, projects undertaken, machinery etc.
My errors, just things I didn’t consider. More windows needed, do not underestimate the beauty of natural light. As Mike said, it’s easier to make the opening fit so find a couple (or more) secondhand double glazed window frames. I left a wider opening than was required until I lucked out on a set of french patio doors.
You could always block or screen off the interior, if you’re worried about security. At the very least consider making a couple of openings between studs to fit a standard ready made window size from a supplier that you like so they can be added in the future. I thought it was nice and bright once I finished the inside, and clad with ply. Now it’s full of stuff it’s quite dark in places, paint the walls white.

Do not underestimate the need for storage. The downside of windows/doors is they take up wall space! I have nowhere to store an 8x4 sheet flat against the wall because of the stupid piers I put in(I know that’s not an issue here) and if I stand it upright it hits the ceiling! Consider if you put ties between rafters have you enough room to swing a board or sheet. I seem to be constantly reorganising to gain a bit of floor or wall space, it should be big enough but........ (particularly if you have to store timber, bikes, diy stuff, random rubbish) Of course it’s entirely possible that I have too much stuff :wink: :wink:

If I was you I’d buy a nail gun rather than hire do you have a compressor? I just sold mine after the house extension was complete. You WILL need more fixings and timber than you thought. As you’ve just put in a nice sized order with some one locally you’ll get a decent relationship going with them, so it’s no hassle to put some extra 4x2 onto that next order when you realise ‘oops forgot something’

I’m all up for doing things correctly (says someone who regularly over-engineers or spends far too long on the silliest task) but as far as things like tying rebar, amount of overlap etc, Don’t stress, if you want to spend £20 on a hooked stick then go for it. A pair of pliers works just as well, I used to have a hook that I made that fitted in a Yankee screwdriver (never did find it when I needed it) a hook shape wire in a bit of broom handle if you don’t want to use pliers. Google ‘manual rebar tying tool’
use your time and attention to: the rebar not being too close to edge, top or bottom of concrete, getting it level and getting a decent finish, is the concrete going to be the floor finish, If so are you insulating the slab? (You’ve considered insulation in walls and ceiling, what about the floor)
You’ve got enough concrete (and using a poker is good practice, some builders never even seen one!) and rather than the usual bits of brick to support the rebar you seem to be using chairs. Once the mesh is in, and assuming you can work from the sides then avoid walking or standing in it.
One person on rake/ poker and two on the tamper works well.
Avoid putting too much water in the concrete. (Builders like to do this cos it makes pour easier)
Hope this helps, keep asking questions, oh and one more thing. Take pictures. We like pictures.

Thanks for the post!

With regard windows, I will draw some bits up today and see what I can find on the second hand market. With some price reductions and some other bits being funded by my father in law, there is actually a bit of wiggle room for some windows. I know I could just buy panels and make a frame, it csnt be THAT hard. At least that ay they'd match.

The concrete won't be insulated under. I won't be using the workshop all day every day to take advantage of its thermal mass, so I might possibly maybe insulate over the top of it and have a floating floor. It's not 100% certain yet but it's likely. Insulaton I have as much as I could want of here.

I've got meshmen (concrete castles) in the boot of my car that I picked up today from Travis Perkins of all places, those will support the bottom mesh. A bunch of 90mm circle mesh spacers will keep the top mesh away from the bottom one but still 50mm off the surface. I did also buy a bunch of the ties and the spinney hook jobbie.

It'll all be white inside with lots of led lights, so not too many dingy corners hopefully, and the floor to ceiling height will at minimum allow me to have a sheet standing up.

I'm fortunate that this won't be a combined workshop and shed, so things like pressure washers and lawn mowers won't ever go inside unless I have to fix them! There will be at least one 7m and one 5m wall with no windows, as they are on the boundary so will just be staring at bushed or trees in close proximity. So I'm hoping storage space with that, storage on the rafter ties and maybe some other solutions will see me OK.

I don't have a compressor here, but also hire isn't a cost I have to bear. I'm sure I'll use more fixings and timber than I've planned, but I did at least start with a design that has literally every brick, slate, stud etc in it that I need. So hopefully I won't be too far out.

The slab will be 7m x 5m give or take so I'm not sure how much we can avoid getting in the middle. It'll be fine with the big float but to rake it around I'll probably have to get in there a little.

We've just got to keep up with a 1 or 2 ton dumper with a 60m minimum round trip, so I think we should be OK. A mate who is hopefully helping has done some slabs before and even has his own rake haha.

Fear not, there are going to be many pics, questions and if I don't cock it up entirely maybe even a time lapse or 12.

There's even a detailed log of what's been bought so anyone following along can see how much its hurt. It's not too bad at the moment. I knocked the better part of 500 off with the merchant from price I was expecting to pay so that was a good start.
 
As the thread title so beautifully indicates, spending has started. So it's finally happening :shock: I think my first post in a workshop thread was in about 2016, that's how long I've been thinking about it!

£2336 dropped today on a lot of the build, bar the ridge, feather edge, dpm, membrane and tiles. That includes some extras here and there in case of bent or damaged looking boards. There is also some overlap with some parts so if I'm short one I can nick it from elsewhere.

I wanted to get the ridge and FE ordered too but Davies never got back to me and by the time I called them they were shut and of course they are closed on weekends.

For anyone that might care or want to know prices and what I'm using for what, below is everything and its individual Inc vat price, I'll not include rubbish like tools as even less people will care.

Online or collected today - £85.18
60x Concrete Meshmen 40/50mm - £14.40 - To hold the bottom mesh 50mm up - Travis Perkins of all places
1x 30mx300mm DPC - £9.99 - DPC - Screwfix
1x 9.6mx20mm galv band - 7.99 - To stop the workshop being blown away :lol: - Screwfix
12x 90mm Circle Wire spacers - £28.80 - to hold the top mesh away from the bottom mesh
1x bundle of 150mm double loop ties - £24 - to wire it all together


Arriving Friday 29th - £1003.77 - Slab and plinth all from Kellaway Worcester

10x bags Type 1 - £355.20 - Subbase
3x bags sharp sand - £154.80 - blinding
12x 3.6x2m A142 mesh - £201.45 - reinforcement
5x 50x200 6m - £106.20 - formwork and later rafter ties
5x 50x50 4.8m - £24.04 - formwork support and vampire patrol
1x 50x150 6m £18.61 - tamp and later anywhere its needed
28x 100mm lightweight block - £38.64 - inner plinth
20x 25kg builders sand - £59.28 - mortar (I know mike will think I'm mad for not buying a huge bag)
5x 25kg cement - £23.94 -Mortar
1x plasticiser - £3.58 - Mortar


Arriving Wednesday 3rd - £1247.53 - 95% of framework all from Kellaway Worcester
15x 50x100 4.8m - £128.73 - Sole/Top plates and leveling plate on top of bricks.
45x 50x100 3m - £241.38 - Studs and noggins
4x 50x150 4.8m - £47.23 - Rafter ties (the other 3 to come from the formwork)
2x 50x50 4.8m - £12.50- infills for OSB support
4x 25x100 4.8m - £18.60 - fascias, corner details, barge boards etc
1x 25x150 4.8m - £6.99 - Asked for 25x75 for corner details but I can cut this down.
54x 25x50 4.8m blue batten - £163.94 - all the battening
35x OSB3 11mm - £417.90 - internal cladding
28x 50x150 3m - £206.64 - rafters

Tomorrow is sorting tiles, DPM, roof/wall membrane and doing my drawings for the framework and something window shaped for the one 7m wall. As I said before, I'd like to start by knowing exactly what I'm supposed to be aiming for.

As things stand I'm hoping for a hole to appear in my garden on Wednesday, fill it up once everything arrives Friday and hopefully be in a position to order the pour on Monday, probably for the Wednesday or Friday AM as the kid will be at nursery.

The photos and fun shall start soon!
 
Additional

Do I just want some Ronseal end grain preserver to dip my cut bits in or are there any other suggestions
 
I use Protim, but there are lots. Put some in a shallow bowl like a washing up bowl, and stand your cuts in there for a few seconds whilst you cut the next lot.
 
Back to the end-cut preservative........It's a good idea to get one with a colour in it, so you can see at a glance if you've treated the ends. It's easy in the confusion of bits of wood all over the place to lose track of which have been done and which haven't.
 
Goodo :D
I fully intended to record costs as well but just ended up throwing the receipts in a folder, I admire your organisation.

What are you using as a plinth for the stud work?
 
mindthatwhatouch":3j01w29l said:
Goodo :D
I fully intended to record costs as well but just ended up throwing the receipts in a folder, I admire your organisation.

What are you using as a plinth for the stud work?
Haha yeah it's a challenge! Most of it I can do before I have any toys to play with so I have the time.

Plinth will be 3 course brick for the outer and 50mm block for the inner. Mike's method 2.0.

I just have to decide on the bricks. We have loads down in the farmyard. Enough in one type that look good but there are no frogs.
Figure my first time laying might be best with ones with frogs!
 
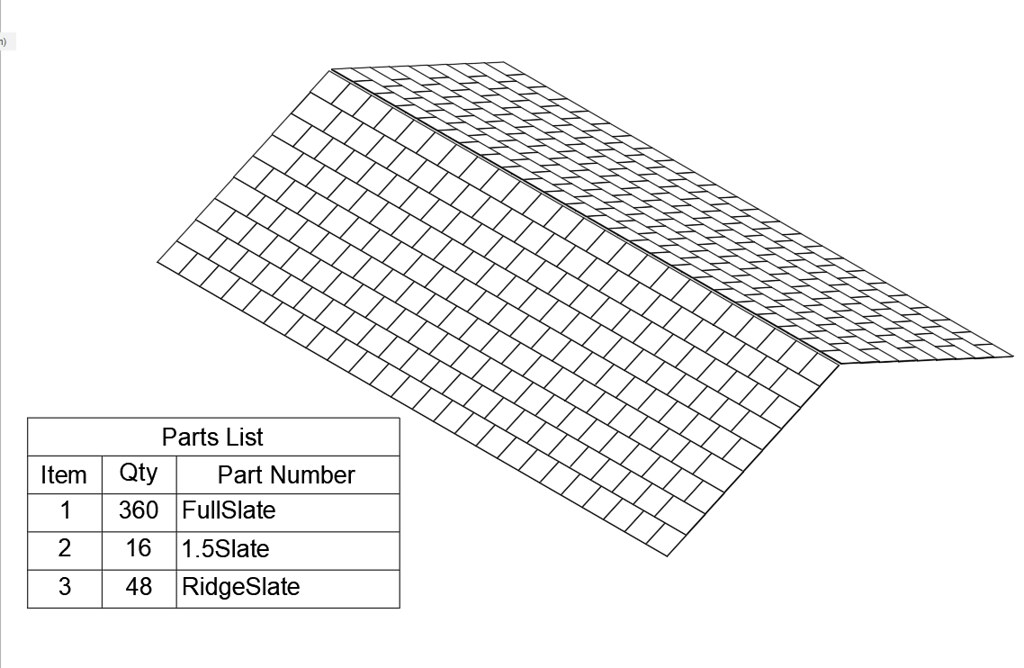
I'll leave this here so you can play the game "why would he have been mega annoyed with the amount of tiles he ordered"

Ignore the chart, its missing some things anyway. Just look at the diagram. The slates are 300x600.
49926277576_266fa1428b_b.jpg
 
For a start, Based on a 7.2 x 4.5 building, the rafter length will be 2.5 metres at 25 degree pitch. You’ll need another row of 24 to cover the 2.5 metres each side, you will need an extra 24 Tiles for each double bottom starter courses, and 24 more each side for a top row. So total for both sides, Extra row +48, starters +48 top row +48 at least four of these will be tile and a half. So 144-6= 138 standard and 4 doubles.

Your 316 full plus 16 x1.5 comes to 340, you had 18 rows at 24 which is 432 so your figure on the chart by diagram is way out anyways.

I make it more like 12 rows a side = 24 Rows, 24 tiles per row = 576. One tile per row will be tile and a half, so 24x1.5= 36 equivalent.

I recon you will need
576-36=540 singles Plus 24 doubles (they have to be cut to tile and a half)

Not surprisingly, that’s the same area as I used, and my workshop is 29.98 sqm.
 
Ahh you're cheating and working it out with sums :lol:

When I drew it up I completely omitted any headlap. I'd have been very upset.

The numbers are wrong on that chart for a multitude of reasons, I did say ignore it (hammer). There's no first row. Though in that diagram the top row are there. They just happen to end at the same point as the full tile underneath because I'd used no headlap.

In Roof 2.0, I do come to exactly 540 tiles and 24 double tiles (before adding spares) 8) . I have adjusted that headlap though for the sake of the drawing.

Did you use a set headlap based on minimum spec or did you pick one that meant less bits of tile cut off at the ridge?

Question now is do I spring the extra £200 for teh Moorland slates and have the dressed edge or just stick to the Jutland that are like yours and just square.
 
Back
Top