Underneath the stairs

UKworkshop.co.uk

Help Support UKworkshop.co.uk:

This site may earn a commission from merchant affiliate links, including eBay, Amazon, and others.

Steve Maskery

Established Member
Joined
26 Apr 2004
Messages
11,795
Reaction score
156
Location
Kirkby-in-Ashfield
I live in a house. One with a staircase, and as with all houses with staircases, I have the knotty problem of what to do with that awkward space underneath.

The floor in that area is nowhere near level (3/4” difference over 5ft or so) and it's just rough concrete. So it's been a bit of a dumping ground ever since I moved in. I decided to do something about it. (Sorry about the phone photos, it's a bit cramped for a tripod).

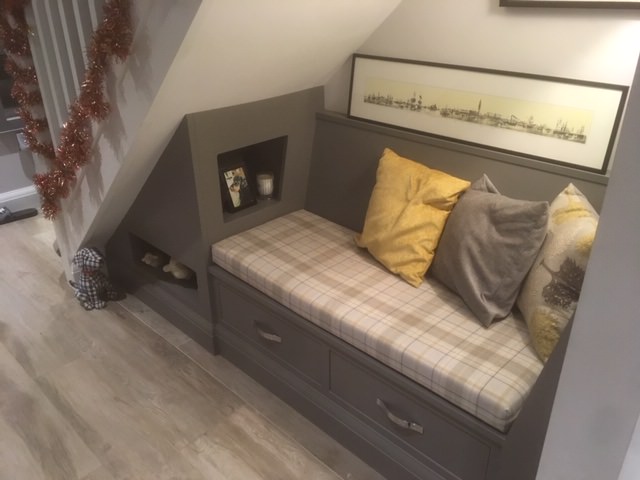
It currently looks like this:

P01.jpg


The floor is a wooden frame raised on adjustable kitchen cabinet legs, with MDF panel infills. There is a shelf half way up

P02.jpg


I've made a face-frame with an off-centre mid-stile and made a pair of Shaker F&P doors. So far, so good.

I've been mulling over how to make the triangular door above (OK, trapezoidal, if you want to out-pedant me). This is how I've gone about it.

I don't want to be measuring anything. The challenge is that it must be exactly the same width as the pair below it and at exactly the same angle as the stairs themselves.

Rather than take measurements, I made a rod (or story-stick, as you may see it referred to as) and then used that to make a full-sized template. It almost went according to plan...

First of all I marked the width and height on a story stick

P03.jpg


P04.jpg


and measured the internal angle of the face-frame. 41.7deg.

P05.jpg


Back in the workshop, I cut a piece of 4mm MDF, using the marks on the rod for setup.

P06.JPG


P07.JPG


Having cut the width, I used the angle-finder, still set from the staircase, to lay the track. A piece of wood held against the edge of the MDF ensured that the angle-finder lay exactly on the edge.

P08.JPG


I made the cut and took it up to the house.

It wasn't right. The slope ran out noticeably along its length. What had gone wrong? I assumed I'd allowed the angle-finder to slip, so I did the job again, being very careful to ensure that it didn't move. But that piece was wrong as well. By exactly the same amount in exactly the same way.

So I put the template into the corner of the frame. Perfect! But when it sits on the existing doors, it's miles out. Ah, perhaps I had not hung the doors level. But no, a spirit level over the two doors reads 0.0 deg. Any closer and it would be off. What on earth is going on?

And then the penny dropped, if the doors are level, what about the stud wall?

That was the problem.

When I made the face-frame, I just fixed it to the existing stud wall. I didn't check that that wall was properly vertical. It's not, it's out. Not by much, but enough to mess me up here.

So once I knew where the problem was, I was able to cut the template to fit, ignoring the fact that the left-hand edge of the frame is not actually vertical, and, like Cinderella's slipper, it fits.

P09.jpg
 

Attachments

  • P01.jpg
    P01.jpg
    96.5 KB · Views: 591
  • P02.jpg
    P02.jpg
    99.8 KB · Views: 591
  • P03.jpg
    P03.jpg
    84.4 KB · Views: 591
  • P04.jpg
    P04.jpg
    86.5 KB · Views: 592
  • P05.jpg
    P05.jpg
    73.9 KB · Views: 590
  • P06.JPG
    P06.JPG
    241.6 KB · Views: 592
  • P07.JPG
    P07.JPG
    231.9 KB · Views: 592
  • P08.JPG
    P08.JPG
    216.3 KB · Views: 592
  • P09.jpg
    P09.jpg
    77.4 KB · Views: 590
The next job is to draw some key positions on the template. I've already milled up the material for the rails and stiles. The lower rails are 65mm, everything else is 50mm wide. But rather than measuring, I set my pencil gauge directly from the stock.

P10.JPG


There are two sets of lines, the innermost one is the overall widths of the frame sections, the outermost one is the bottom of the grooves, which I need to cut the panel.

P11.JPG


I rubbed out any pencil lines that were extended too far, so I don't confuse myself.

P12.JPG


Using the template, I set the fence on my SCMS. I'm using the casting of the table as a proxy for the actual travel of the blade. A test cut confirmed that I had it set correctly.

P13.JPG


I could then mark out the length of the sloping rail from the template and make the cut. The length is marked out from the bottom of the groove in the left stile to the bottom of the groove in the right stile.

P14.JPG


The bottom rail is marked out and cut, but as these ends are square, it's an easy step.

Next the panel. I marked it out directly from the template, and used the template to position the track, as before.

P15.JPG


All that remains is the joinery. Ha!

I'm using a pair of Shaker router cutters. One does all the sticking (the groove and the little bevel) and the other cuts the complementary bevel and stub tenon. This step involves the latter.

I'm cutting end-grain, so there is always the risk of spelching, so I use a push-block to support the back edge.

P16.JPG


The trouble is, that is fine when cutting with the outer edge of the rail against the push block, but when the inner edge is in contact with it, there is a very small gap, because of that bevel, and it's just where it shows. The worst bit is at the top end of the sloping rail and I got some serious spelching there, as I'm routing very much against the grain and the push-block is no good to me anyway. Fortunately I didn't lose any actual wood fibres and I stopped as soon as I realised what was happening, so a bit of glue should fix it. I'll know better tomorrow. I can cut a filler on the end of a piece of scrap that will support the groove properly. I'm annoyed that I didn't think of that in the first place.

P17.JPG


So I can't finish this until tomorrow, the suspense is killing me!
 

Attachments

  • P10.JPG
    P10.JPG
    207.2 KB · Views: 584
  • P11.JPG
    P11.JPG
    162 KB · Views: 584
  • P12.JPG
    P12.JPG
    190.9 KB · Views: 584
  • P13.JPG
    P13.JPG
    232 KB · Views: 584
  • P14.JPG
    P14.JPG
    199.9 KB · Views: 584
  • P15.JPG
    P15.JPG
    206.2 KB · Views: 584
  • P16.JPG
    P16.JPG
    233.6 KB · Views: 584
  • P17.JPG
    P17.JPG
    213.6 KB · Views: 584
Great to see a proper WIP Steve.
Warts and all is even better.
Much as I'd like to spend all my time working in my shed on some daft but joyful side project, reality is DIY. Will be for a while. And no spare time. Ever.
How do people have eight kids and then be on Grand Designs and your Smug McCloud Fella is all 'This Is George and Tabitha. George is a Professional Bubble Blower at kids parties and Tabitha trains Pure Bred Arabian Race Hamsters and they have £3.5 million to spend doing up this castle and plan to all the project management themselves.'
And you're sitting there thinking WTF am I missing here?! :|

Currently on the backburner, two front room chimney reveal units, 3 doors to hang (bathroom door before Christmas or I am a Dead Man Walking) new stairs under cupboard... 'We could have a pull out unit...' A 'secret' storage room that needs access above the now old stairs. 'I need a door that's not a door. Can you make a door that no one can see?' *bit doubtfully* Like an Indiana Jones type door Love? Where you pull a book out and there's a whole Inca Tomb behind it? 'That's the ticket' *Ermmm oooo k. I can have a go..... Maaaaaybe put a mirror over it so you lift the door out using the mirror????
A full length mirror in the bathroom? Are you insane?
I won't bore you with the architraves, skirts, etc.... #-o

Look forward to updates Steve.
 
Either you have drunk too much or not yet quite enough... Sounds like you definitely need it!
One of the great advantages of living alone is that THERE IS NO NAGGING.
Good luck!
Edit: I did that last one on my phone. There was supposed to be a smiley in there somewhere, it obviously fell off along the way.
So :D , thank you for the giggle.
 
Ah tbf Steve, the Mrs is good as gold. Its not nagging it's just different perspectives.
And 'not enough yet'. :D
I also forgot to include in the previous comment I'd already picked up a tip or two. So cheers. Real life WIP is what I meant... much as I like to see fine furniture it doesn't really figure in my life personally. Maybe one day. :wink:
 
Thanks to all for your contributions!
Steve - very useful
BM101 - very funny [you should be writing for a magazine!]
doctor Bob - very impressive.
 
This morning I looked at my glued rail and was pleased to find it in one piece. I cut a piece of scrap to the correct angle, ran it over the router cutter and used it to fill the groove of the rail.

P18.JPG


I then completed the cut I started yesterday and, of course, it was a perfectly clean result.

P19.JPG


Clamping up poses a challenge. I need to get pressure square across an angled joint, avoiding slippage. So I clamped a triangular block in place with a sash cramp in one direction and a trigger clamp in the other.

P20.JPG


This is a more general view of the glue-up. I've got glue squeeze-out on all four joints. Whooppee!

P21.JPG


Then it was just a matter of cutting off the horns, cleaning up and installing the hinges. And Robert, ladies and gentlemen, is your father's brother.

P22.jpg


If it looks a bit out of alignment it is because there are no door bumper stops yet, so the lower doors close a bit too far in. They will be right when I've done that.

Now all I have to do is the same job all over again to make the fixed bottom right panel. I can re-use the template, it just needs cutting down a bit, and I know that the angle will be right.

I'm rather pleased with myself.
 

Attachments

  • P18.JPG
    P18.JPG
    185.3 KB · Views: 358
  • P19.JPG
    P19.JPG
    183.8 KB · Views: 358
  • P20.JPG
    P20.JPG
    215.9 KB · Views: 358
  • P21.JPG
    P21.JPG
    237 KB · Views: 358
  • P22.jpg
    P22.jpg
    105.3 KB · Views: 358
Good to see your build Steve. This is right up my street as my interest is home built ins. Been looking forward to you appearing 'back on the stage' as it were. I know you had/have plans for more videos so hope that is still on track as I like your style of presentation.
For my stuff I try to make everything square as a self contained unit and scribe in with a face frames or similar as it appears nothing in houses old or new is ever square/ perpendicular or straight.
 
That’s an excellent WIP thanks Steve, I’d never have thought of making the door template fill the full space first to check sizing and then cutting for the rails. You learn a new thing every day !


Sent from my iPhone using Tapatalk Pro
 
AES":3jl308yb said:
What (finally) gets stored therein?
Ooh, you know, a box of maps of areas I'm never going to walk round again, a bag of pieces of string too short to keep, an almost empty tin of paint, that sort of stuff.
Every house needs a Glory Hole.
:)
 
Back
Top