First Chair Related Hurdle... A Split

UKworkshop.co.uk

Help Support UKworkshop.co.uk:

This site may earn a commission from merchant affiliate links, including eBay, Amazon, and others.

El Barto

👍
Joined
20 Nov 2016
Messages
1,107
Reaction score
49
Location
North Hampshire
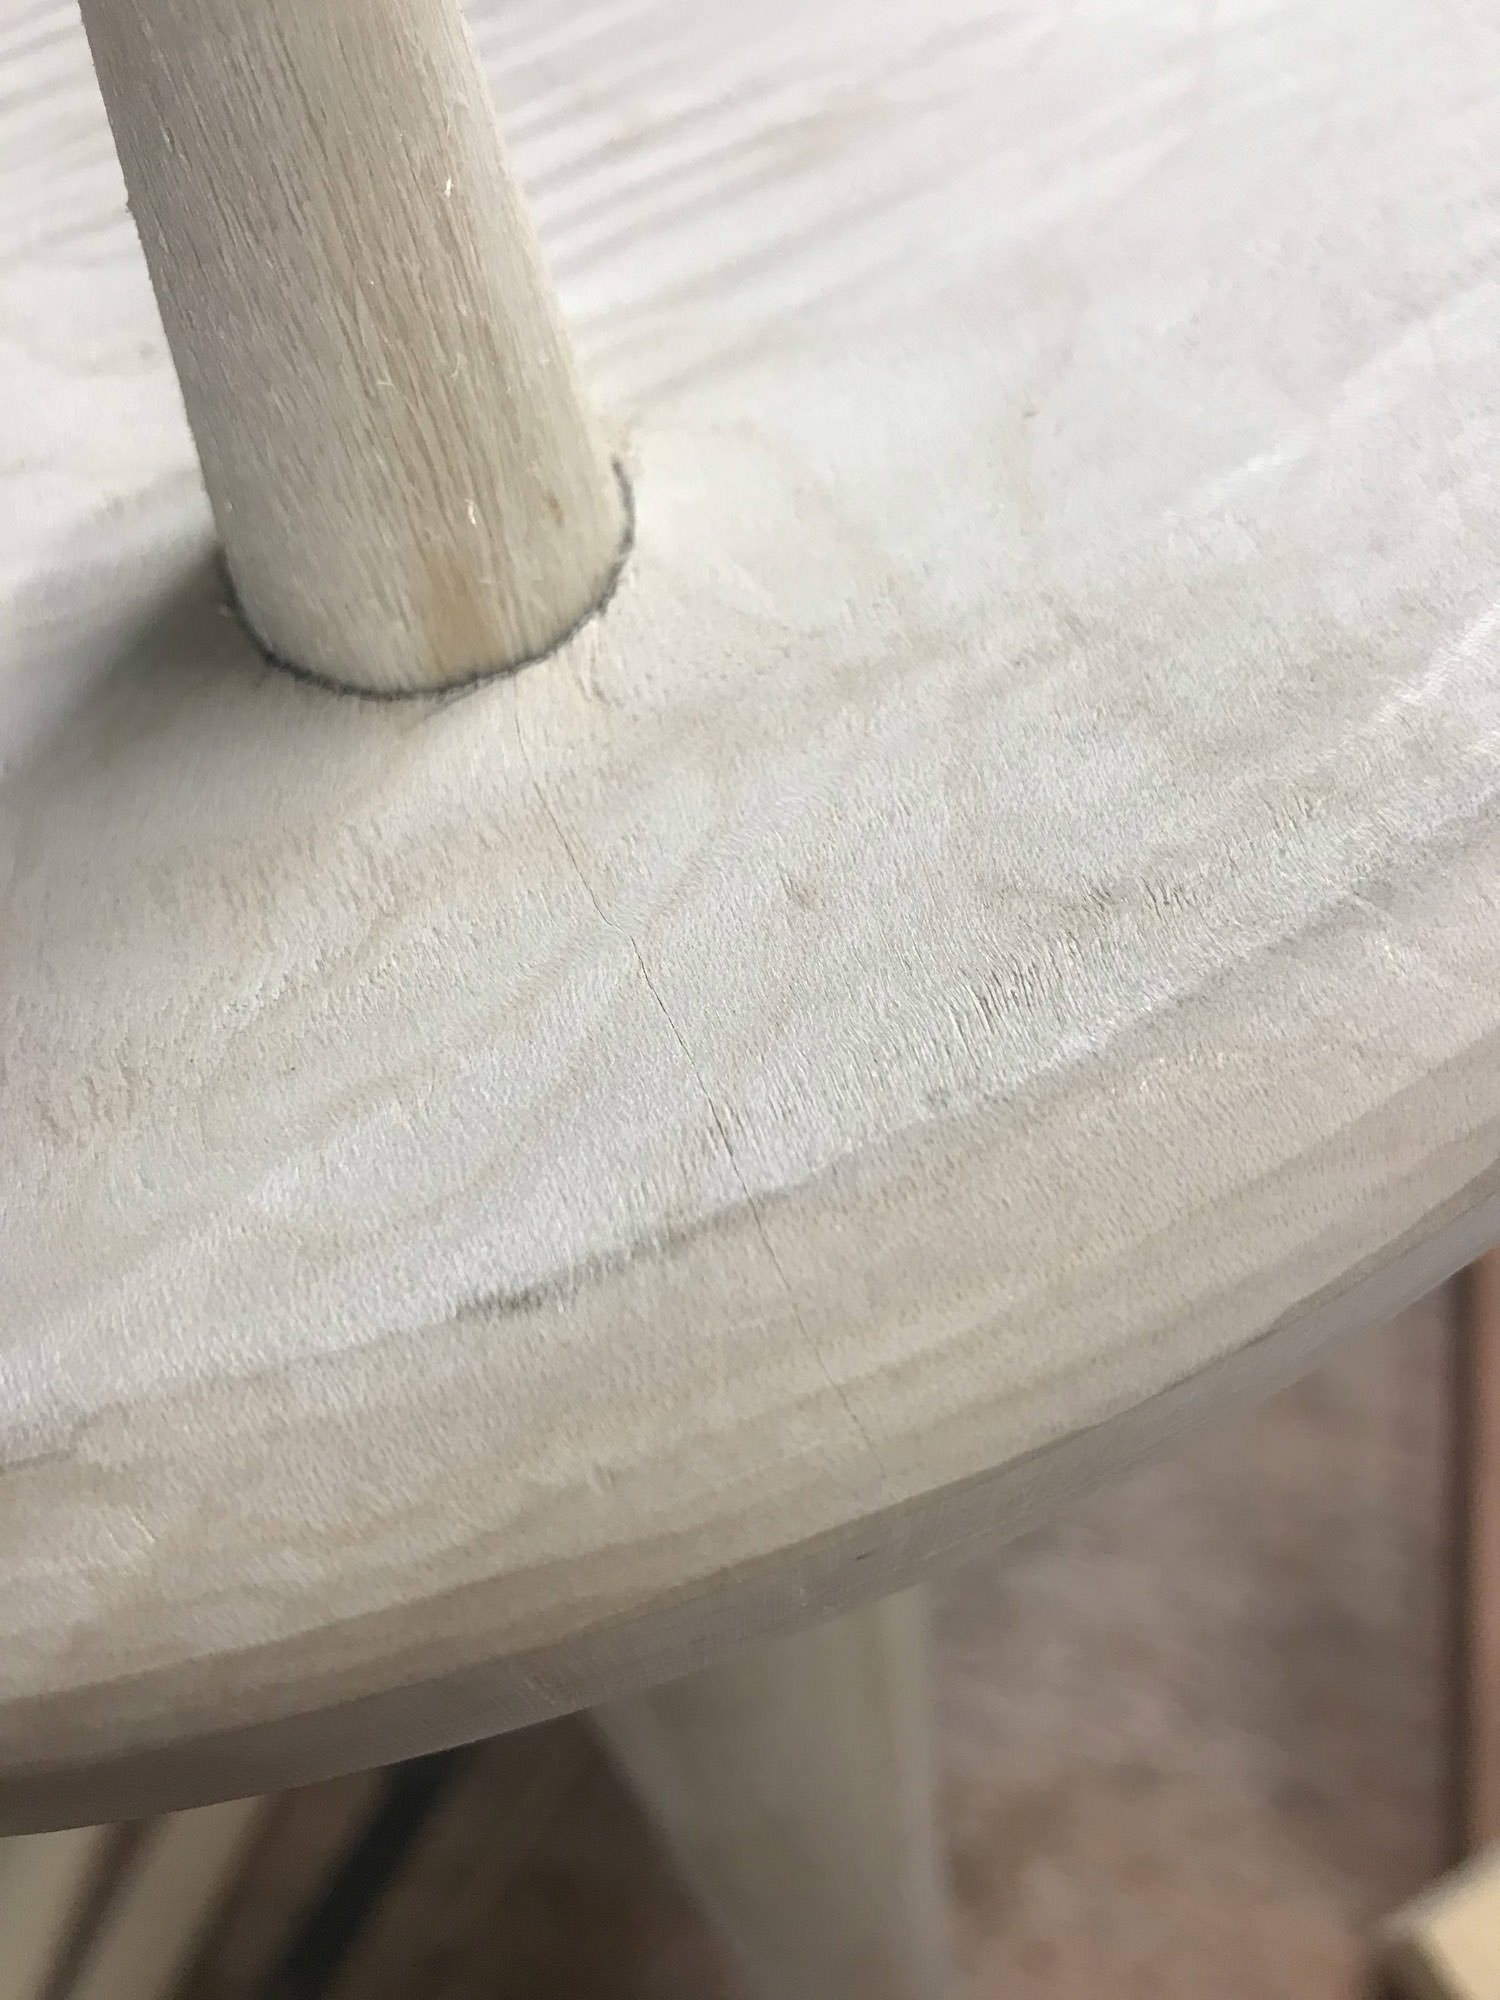
Test fitting some legs into a seat yesterday I noticed a tiny hairline split appear. It doesn't go all the way through the seat but does give me some concern, especially because the leg was only lightly tapped into the socket - it makes me wonder what will happen when the tenon is eventually wedged.

CbfeqdA.jpg


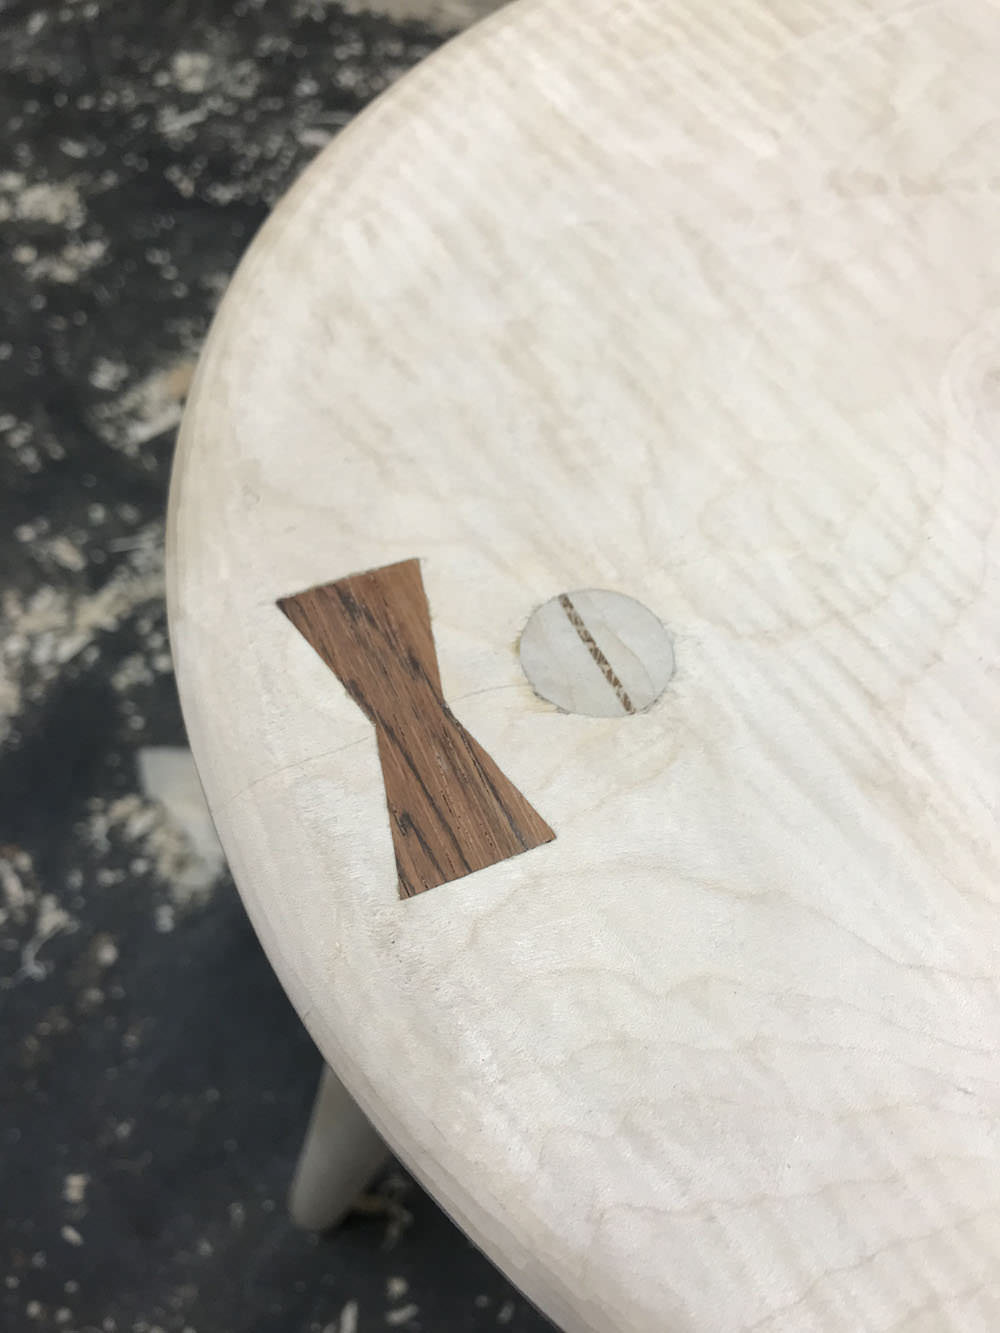
The seat is rippled sycamore, not an ideal material for a seat in the first place but it also seems quite brittle. It looks nice though!

Any thoughts on how to proceed? As it stands the split is too small to get any glue into.

Live and learn (hammer)
 
Ouch! But don't worry, that shouldn't be fatal.

If the wedge in the top of leg is orientated correctly the main force shouldn't be forcing that split open. Before you wedge I'd gently tap that leg home to open the crack a little, wick some ultra thin superglue into the crack (superglue comes in different grades of viscosity), remove the leg to allow the crack to spring back and also apply some cramp pressure if possible.

For a belt and braces job, after the glue has dried sink in a butterfly cleat at least 12mm, straddling the crack on the underside like this,

Butterfly-Cleats.jpg


Good luck!
 

Attachments

  • Butterfly-Cleats.jpg
    Butterfly-Cleats.jpg
    109.4 KB · Views: 1,064
Thanks Custard! There's no sign of a crack on the underside, only the small line you see in the picture. Could I still use a butterfly cleat on the top? It's only a stool for the home so doesn't need to be pretty but I still want it to be strong.

Would a router be the most efficient way to cut out the housing for the cleat? I guess as it'll only be small using handtools will be fairly painless...
 
You can have butterfly cleats top and bottom if you wish.

Here's how I do them for waney edged, slab top tables.

-Make up paper templates and decide the shape and positioning of the cleats. I often involve the clients as it give them some involvement in the job.

-Cut the cleats accordingly, usually from an ultra hard, contrasting timber like Ebony or Rosewood. On two sides of the cleat form a minute bevel, only a fraction of a degree. This will wedge in the cleat and ensure it's gap free.

-Cramp the cleat to the surface and knife around it with a fine blade, ensuring you're really tight against the cleat.

-Get a steel ruler and knife in a second set of lines , inset by about 0.5-1.0mm from these first layout lines.

-Hog out the waste with a palm router (if you're confident), work in a clockwise direction from the centre out, but stay a whisker inside the second, inner set of lines. Make sure the depth of the cleat mortice is about 1mm less than the cleat thickness.

-Using a chisel and a router plane work up to the inner knife lines.

-Re-sharpen your chisel and then finish to the outer knife lines. This may sound a faff but if you want tight glue lines then it's worth it.

-Bang in the cleat, wait for the glue to dry, then flush off the excess 1.0mm depth that you left on the cleat.

I read an article by Chris Schwarz where he was demonstrating butterfly cleats. He ended up with a gappy mess, but cheerfully assured his readers that a bit of black wax would fix it. If I'd have cocked up like that I'd have done the decent thing with a loaded revolver in the library, but hey ho, each to their own.
 
Great thank you! Possibly a stupid question but as the seat has already been shaped and is therefore not flat will it be best to work from a level surface, eg. straddling two boards over the seat or something? So the router has a flat reference face...

Ps. lol at Chris Schwarz's take on it :D
 
the seat has already been shaped and is therefore not flat

Interesting challenge.

If the seat base is reasonably flat you could use that as the reference surface. Rest it on a pillar drill and hog out the waste with a forstner bit. If you don't have a suitable drill you're welcome to use mine next time you're passing. I'm sure we could find some suitable Ebony or Blackwood or Rosewood for the actual cleat at the same time.
 
This project wasn't a huge priority so I kind of just moseyed along with it but finished it today.

I took Custard's advice with the split; wicking superglue into the crack and then fitting a butterfly cleat, this being the first time I'd used one. A cleat so small was certainly a bit fiddly but it came out ok with only a couple of very small gaps. Had this not been a crude workshop stool I might have taken a bit more time over it...

HRNkb4M.jpg


A small detail I enjoyed adding was the wedged through tenon of one of the stretchers (what do you call this stretcher, out of interest?).

thJFkFD.jpg


Overall this was a fun build, one where I tried new things or practiced techniques and where mistakes didn't matter. The stool is surprisingly comfortable and will make a welcome addition to the workshop.

HNmcLVZ.jpg
 
custard":36n77p6w said:
You can have butterfly cleats top and bottom if you wish.

Here's how I do them for waney edged, slab top tables.

-Make up paper templates and …………………………

..............................................wait for the glue to dry, then flush off the excess 1.0mm depth that you left on the cleat.

Custard, for a novice like me, that's a really useful explanation. Will store that in the little grey cells for the future.

Obi Wan :eek:ccasion5:
 
custard":34jwexs7 said:
You can have butterfly cleats top and bottom if you wish.

Here's how I do them for waney edged, slab top tables.

-Make up paper templates and decide the shape and positioning of the cleats. I often involve the clients as it give them some involvement in the job.

-Cut the cleats accordingly, usually from an ultra hard, contrasting timber like Ebony or Rosewood. On two sides of the cleat form a minute bevel, only a fraction of a degree. This will wedge in the cleat and ensure it's gap free.

-Cramp the cleat to the surface and knife around it with a fine blade, ensuring you're really tight against the cleat.

-Get a steel ruler and knife in a second set of lines , inset by about 0.5-1.0mm from these first layout lines.

-Hog out the waste with a palm router (if you're confident), work in a clockwise direction from the centre out, but stay a whisker inside the second, inner set of lines. Make sure the depth of the cleat mortice is about 1mm less than the cleat thickness.

-Using a chisel and a router plane work up to the inner knife lines.

-Re-sharpen your chisel and then finish to the outer knife lines. This may sound a faff but if you want tight glue lines then it's worth it.

-Bang in the cleat, wait for the glue to dry, then flush off the excess 1.0mm depth that you left on the cleat.

I read an article by Chris Schwarz where he was demonstrating butterfly cleats. He ended up with a gappy mess, but cheerfully assured his readers that a bit of black wax would fix it. If I'd have cocked up like that I'd have done the decent thing with a loaded revolver in the library, but hey ho, each to their own.
Hi Custard,

Thanks for the description above - very informative! Could you elaborate a little on the bit in bold please? A butterfly cleat might have six sides (or four sides and two ends depending on how you view it) why would you only bevel two? Is there an optimal two to pick?
 
Hello Memzey, I wasn't very clear there so my apologies.

By "two sides" I meant, when looking at the butterfly cleat, taper the entire north end and west side (or south end and east side!).

Why not taper all the sides? Because you risk splitting the workpiece. You want just enough of a taper to jam the butterfly cleat in with really tidy glue lines, but not so much that you'd have to sledge hammer it home and it behaves like a splitting wedge!
 
Gotcha. Thanks Custard. So that would be both sides which contain an angle then (the ones which give it the butterfly shape).
 
That's exactly right Memzey, and make that taper as slight as you possibly can. Ignore my previous explanation, I'm trying to do too many jobs at the same time and mucking them all up!
 
nice stool! the butterfly cleat makes it more unique, very good for a first go. =D>
 
Back
Top