How do you Actually Sharpen the ChipBreaker Effectively?

UKworkshop.co.uk

Help Support UKworkshop.co.uk:

This site may earn a commission from merchant affiliate links, including eBay, Amazon, and others.

MrDavidRoberts

Established Member
Joined
23 Dec 2016
Messages
388
Reaction score
2
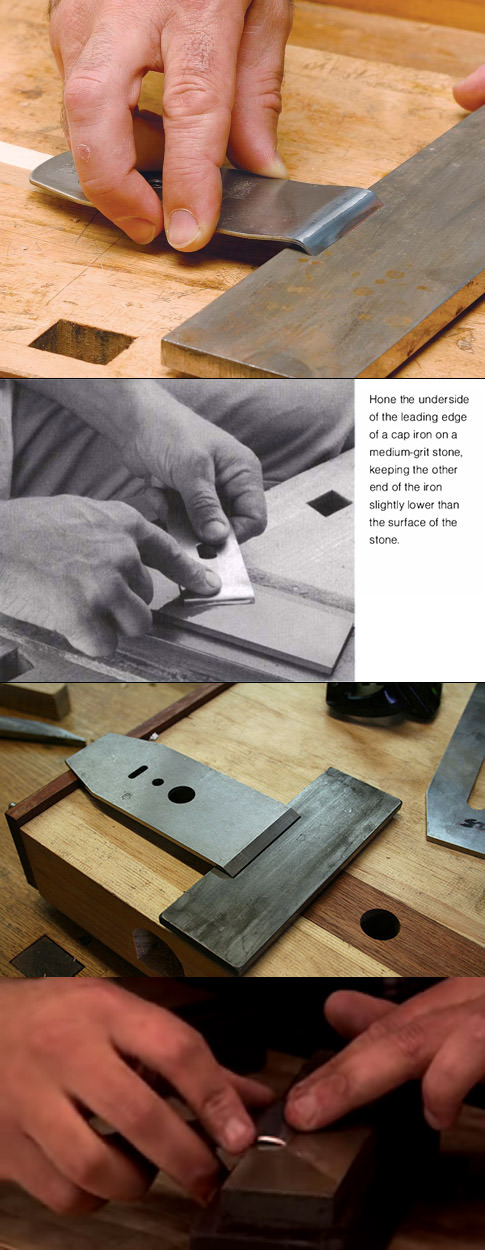
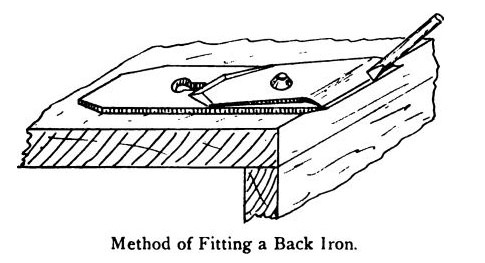
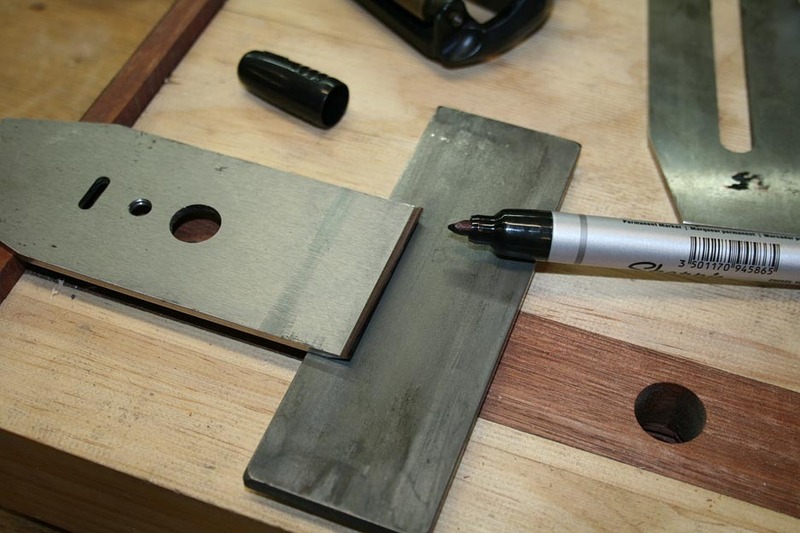
I'm still struggling with this.. I just have no idea how to actually sharpen the chipbreaker so it doesn't catches any shavings/dust under it..
There are Tons of videos about how to ''set'' the chipbreaker and telling what it should be like( straight/no light coming etc...) but there is not a single guide that I can find on how do you actually sharpen it to be like that?

At what angle do you even sharpen it? how do you do it exactly? How do you hold it when sharpening it etc? Do you need to remove any burr etc? There is no way you can do it by just holding it freehand and trying to match the original angle as you can't really see the exact angle, even the slightest fault in the angle will create a gap which will let the chips in.
 
Work the entire profile in an arc motion on something relatively coarse to establish the top side geometry, ending the motion with the cap iron being about 60 degrees angle from the abrasive surface. this is a freehand operation. Go slow if you're worried about it, and check the front of the cap to make sure you're abrading it evenly.

Once you have uniform coarse scratches all the way to the edge of the cap iron with a terminal angle of somewhere in the range of 50-60 degrees (you'll have a wire edge hanging off of the end of the cap at that point, and since it's mild steel, it will be substantial), then use a mid-range stone with the same motion.

then, undercut the leading edge on the underside as is often shown (5 degrees, 10 degrees, probably isn't that critical) so that you've got a fresh edge with some relief.

Go back then and then either a polish stone or strong metal polish (like autosol) on hard leather or wood - to clean up the top side (the curved area) of the cap iron and remove any remnant of a wire edge.

It should be perfect at this point. You don't need perfect mirror on a big part of the cap iron, you just want to have a reasonable finish on the first couple of millimeters, but if you work 5 mm of area or so in doing this, it's not a big deal. Take a look at the cap iron from the side. If you see yourself removing so much metal that the metal is getting too thin, you've gone too far.

If a cap isn't defective, this is a five minute process done once and then never again (ignore comments about the cap iron wearing and needing periodic refreshing, it doesn't occur functionally in use).

Proper (best) geometry for a cap iron is that 50-60 degree initial contact with the iron with a curved profile that gets shallower in angle as you get further from the edge. On some planes, that doesn't matter (metal planes) as much, and in others (wooden planes) it's critical for feeding so that the initial part does the straightening of the chip and the remainder of the cap iron stays out of the way of the feed gap between the cap iron and the wear on a wooden plane.
 
By the way, if there is a lot of heavy work to do because the lower part of a cap iron leading edge is full of defects and rough from poor manufacturing, you can also do the initial work with a mill file.

the final work should still be done with this rolling motion terminating at about 55 or 60 degrees (50, 55, 60, whatever you want - not terribly critical, but not 40 and not 80).

search "Making a Double Iron Jack Plane - Part 7a - Preparing the Iron and Bed" on youtube for a video of a wooden plane cap iron being prepared, but the rolling motion is somewhere around 10 minutes in.
 
David's description is good.

I would prefer less "undercut" or clearance angle.

Support the top end of the C/B on a wooden prop, while working the underside on the edge of a stone. A diamond stone is excellent for this work as it stays flat. If the height of the prop is 3 mm less than the height of the stone, a clearance angle of about 1 1/2 degrees will be created.

David Charlesworth
 
I've never measured, so I'll go with your estimate. It's probably less (on mine) than I guessed above - thinking about it, 10 was a bad number to suppose (it's almost physically impossible on the wooden caps).
 
MrDavidRoberts":353mkxpw said:
There are Tons of videos about how to ''set'' the chipbreaker and telling what it should be like( straight/no light coming etc...) but there is not a single guide that I can find on how do you actually sharpen it to be like that?

What, like this guy?
https://www.youtube.com/watch?v=fVfJxDFNinc

He also has a setting video after this one, and a how to use video just before. It's a good intro mini-series.
 
MrDavidRoberts":966wafs1 said:
...not a single guide that I can find on how do you actually sharpen it to be like that?
What search terms did you use?? I had no difficulty in finding numerous guides to preparing the cap iron by doing a search for that exact phrase, then substituting chipbreaker for cap iron found many others.

Doing the upper surface of the cap iron I think speaks for itself, once you know the angle to aim for. It's a basic sharpening operation after that. The underside is the bit that is more difficult but it's well covered online and the following images show the heart of the method, where you hang the cap iron over the side of the stone so that the edge is undercut slightly:

WrIsZpt.jpg

This is David Charlesworth, Garret Hack, Doug Cohen and Richard Maguire from top to bottom.

And in case it's of help to you or anyone else, here's an old tip (1902!) for getting the fit perfect if you're having trouble with the above method:
WaGQyf0.jpg

Having sharpened the back-iron to a fine edge on the oilstone, screw it fairly tight to the cutter, leaving about 1/16″ [1.5mm] of the latter exposed. Next holding the pair very firmly on the bench, draw a hard bradawl, or the broken off end of a sawfile, along the edge of the back-iron; this will strip off a fine shaving of metal, and the operation should be repeated until it is impossible to see the slightest trace of light between the irons when the edge is held in a strong light, and the joint at the side, which is looked through, is shaded by the hand.
From "Modern Practical Joinery" by George Ellis.
 
There is a pictorial on my website: http://www.inthewoodshop.com/WoodworkTe ... eaker.html

A few of the pictures ...

1. Flatten the underside. Mark before hand ..

SettingTheChipbreaker_html_m7bd5a292.jpg


2. Hone on a fine diamond stone. I am resting the rear of the chipbreaker on the planing rest of a small benchtop bench I have. Note that this is very slightly undercutting the front ledge (that is, towards the rear).

SettingTheChipbreaker_html_2b66941a.jpg


SettingTheChipbreaker_html_m67e55a6b.jpg


Regards from Perth

Derek
 
Before you start flattening the edge of your capiron first check if the face of the cutting blade is actually really flat. In the past I have managed to make a blade rather concave, while trying to flatten it. That caused some serious headscrathing to find out why my flat capiron was still wobbling on the blade.
 
MikeG.":2lxorp4f said:
MrDavidRoberts":2lxorp4f said:
I'm still struggling with this.......

So we'll all be interested to see if you return to the thread and take part in a meaningful discussion.

Apparently not after more than 3 weeks. :roll:
 
The OP got himself a little too invested in "you guys are a bunch of old fools" kind of talk, and got exposed.

I think we've all been there when we were beginners.

But we bounced back, too, and learned the value of taking advice and figuring out why the old way was the old way. We'll see if he does.
 
I had assumed he had been banned for a stupid outburst on another thread.
Maybe wishful thinking on my part.

Or his bridge has collapsed and crushed him :lol:
 
I looked at the wiki page on Dunning for about 3 whole minutes wondering about burning witches and how it related...then I realised I needed to google Dunning Kruger instead.
Luckily as a genius I won't suffer from it.
So that's nice. I don't hold out much hope for you lot though.
:D
 
Back
Top