Derek Cohen (Perth Oz)
Established Member
In the spirit of offering information to others who are also looking to take their first steps carving seats, I have a run down of the tools I have used so far. Not all of these tools are necessary, but as I am learning to carve a seat, I am interested in the tools that make this happen.
It is also hoped that others, especially those with experience, will comment on the tools - which they find useful and which not.
I shall return to discuss my experience of marking drilling and tapering the legs at a later time. That deserves a topic to itself.
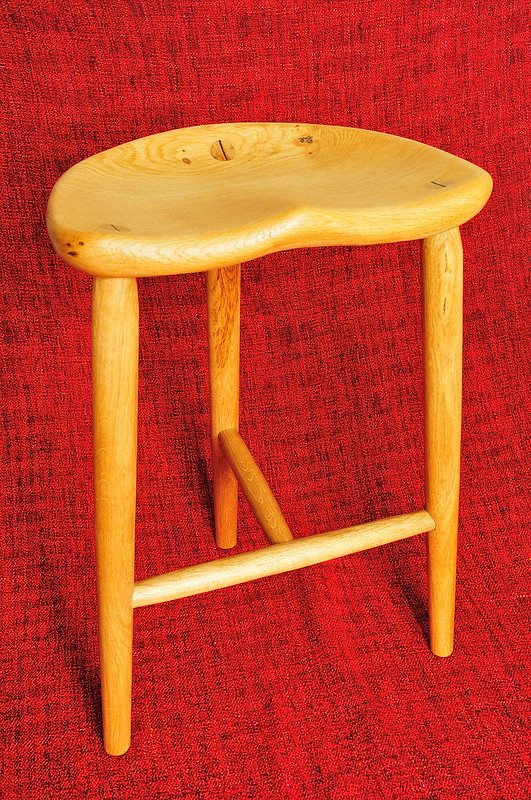
In the background I am making a prototype three-leg counter stool in Radiata Pine (construction timber - dry and a little brittle ... but the smell when cut is strong!). The seat is 12" deep and 15" wide. The blank is 1 3/4" thick.

Roughing out with the Ray Iles scorp: this is the only scorp I have used, so I cannot make comparisons with others. Apparently - I read somewhere - that Pete Galbert came across a vintage scorp which he loved, and sent it off to Ray Iles as a model. This is the result. To a newbie like myself, this was well-balanced and easy to sharpen - it came beautifully hollow ground and pretty sharp to start. It was easy to keep sharp with a strop. I liked the handles and the blades continuous curve (I've seen some, like Two Cherries, which are a curved square). It surprised me how it was possible to use this to make precise cuts, both thick and fine.
The Veritas Pull Shave is an alternative to the scorp, however I did not find it as aggressive. Instead it was more like a jack plane than a scrub - capable of removing waste but not cut as deeply as the scorp. I like using if after the scorp to refine the surface. It offered more control than the scorp. I am comfortable using drawknives, but someone who is not may prefer it to the scorp.

I managed to find two cobbler (shoemaker) shaves of differing radii. These came with blades that were nearly worn out. They were reground and sharpened up. The handles were cut off as they were limiting the angles they could be used at. These shaves really surprised me. Dark horses. They managed to get into tight angles ...

The LN round bottomed spokeshave was used later at the front of the seat. This is a reliable, old friend.
These are two travishers I built. One has a radius of 5 1/2", and the other a radius of 11". The latter is to remove the hollows left by the 5 1/2", or where a flatter surface is needed. To be blunt, the 11" is overkill. I have seen Pete Galbert used just the one (5 1/2") travisher (made by Claire Minihan), and do so immediately after the scorp. As mentioned earlier, I am feeling my way ... and anyway I made them. It was just a little more time.
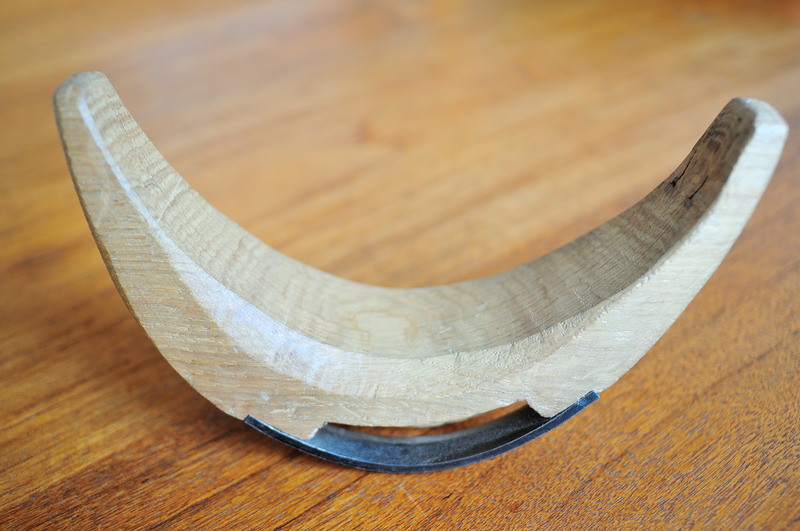
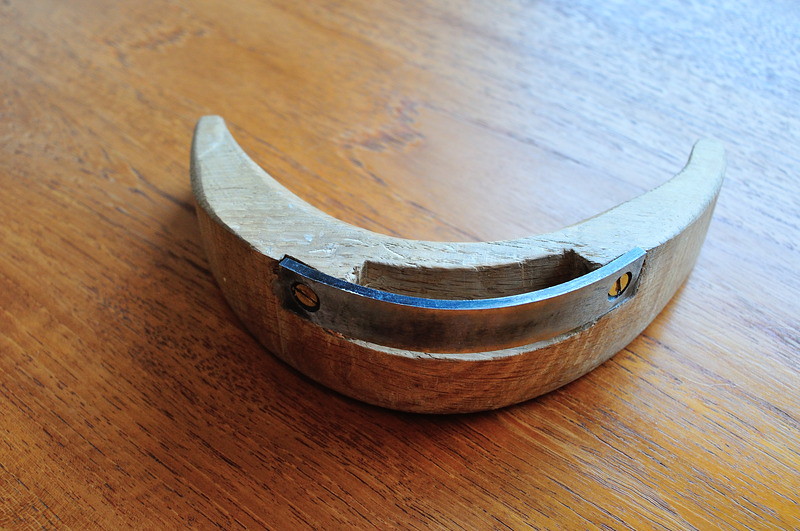
Jarrah and Rock Oak ...


It was very satisfying to find these two planes working well.

Lastly, the surface was finished with a scraper. This is one I made from the rear end of an O1 1/8" thick plane blade. It is prepared very simply, hollow grinding to create a fine wire at the edges.

That is sufficient to scrape and leave a surprisingly fine surface .... even in Pine.
The seat is still a work in process.
Comments?
Regards from Perth
Derek
It is also hoped that others, especially those with experience, will comment on the tools - which they find useful and which not.
I shall return to discuss my experience of marking drilling and tapering the legs at a later time. That deserves a topic to itself.
In the background I am making a prototype three-leg counter stool in Radiata Pine (construction timber - dry and a little brittle ... but the smell when cut is strong!). The seat is 12" deep and 15" wide. The blank is 1 3/4" thick.
Roughing out with the Ray Iles scorp: this is the only scorp I have used, so I cannot make comparisons with others. Apparently - I read somewhere - that Pete Galbert came across a vintage scorp which he loved, and sent it off to Ray Iles as a model. This is the result. To a newbie like myself, this was well-balanced and easy to sharpen - it came beautifully hollow ground and pretty sharp to start. It was easy to keep sharp with a strop. I liked the handles and the blades continuous curve (I've seen some, like Two Cherries, which are a curved square). It surprised me how it was possible to use this to make precise cuts, both thick and fine.
The Veritas Pull Shave is an alternative to the scorp, however I did not find it as aggressive. Instead it was more like a jack plane than a scrub - capable of removing waste but not cut as deeply as the scorp. I like using if after the scorp to refine the surface. It offered more control than the scorp. I am comfortable using drawknives, but someone who is not may prefer it to the scorp.
I managed to find two cobbler (shoemaker) shaves of differing radii. These came with blades that were nearly worn out. They were reground and sharpened up. The handles were cut off as they were limiting the angles they could be used at. These shaves really surprised me. Dark horses. They managed to get into tight angles ...
The LN round bottomed spokeshave was used later at the front of the seat. This is a reliable, old friend.
These are two travishers I built. One has a radius of 5 1/2", and the other a radius of 11". The latter is to remove the hollows left by the 5 1/2", or where a flatter surface is needed. To be blunt, the 11" is overkill. I have seen Pete Galbert used just the one (5 1/2") travisher (made by Claire Minihan), and do so immediately after the scorp. As mentioned earlier, I am feeling my way ... and anyway I made them. It was just a little more time.
Jarrah and Rock Oak ...
It was very satisfying to find these two planes working well.
Lastly, the surface was finished with a scraper. This is one I made from the rear end of an O1 1/8" thick plane blade. It is prepared very simply, hollow grinding to create a fine wire at the edges.
That is sufficient to scrape and leave a surprisingly fine surface .... even in Pine.
The seat is still a work in process.
Comments?
Regards from Perth
Derek