Router Thicknesser

UKworkshop.co.uk

Help Support UKworkshop.co.uk:

This site may earn a commission from merchant affiliate links, including eBay, Amazon, and others.

SteveF

Established Member
Joined
16 Sep 2013
Messages
2,230
Reaction score
1
Location
Maidstone
looking for the "ultimate" jig
I just don't have the room for a dedicated planer thicknesser and it would not do width I need
i have a cheap and nasty woodstar that to be honest is not a bad planer but a pineapple thicknesser
thicknessing per say is not priority, more about getting flat boards
however a few jobs i have planned require 2x4 foot boards up to 4" thick to be worked on
so I would rather spend my hard earnt on router jig that can adjust for most tasks
metalwork skills are not great to be honest, and hand tools are even worse

Steve
 
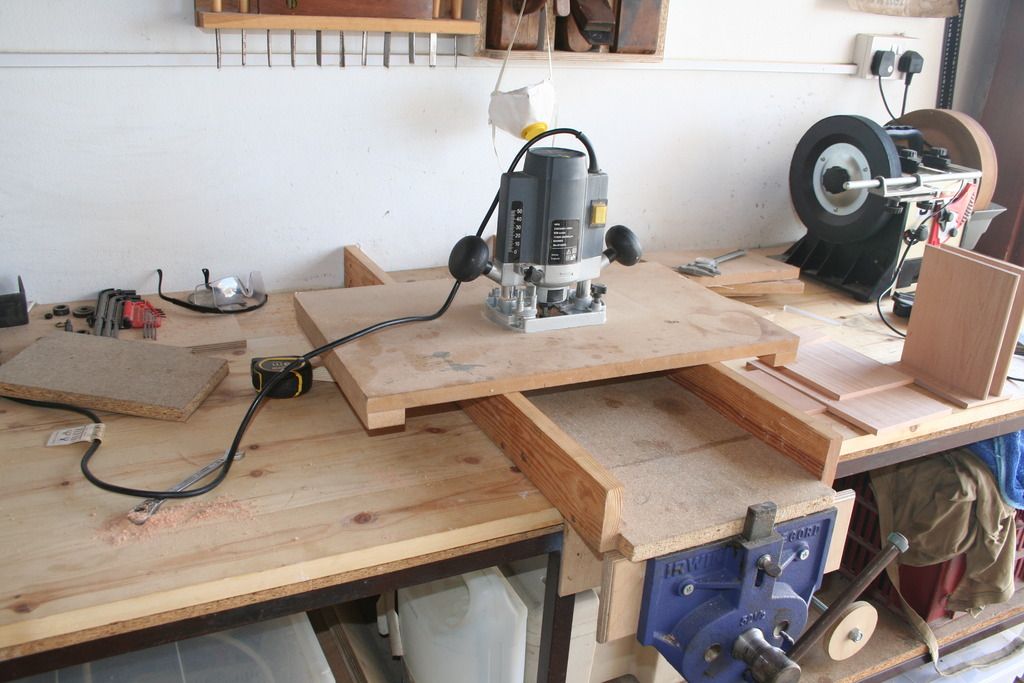
Heres my mark 1 version.
IMG_1435_zpsio496do5.jpg


The mark 2 has a kitchen tile base with adjustable feet to allow me to get dead quare, or even an angle if i want.
But this one worked well.
 
I can't post pics, as mine is dismantled, but it is similar to Bob's setup.

Bob's is probably better than mine. I have used trammel bars through the fittings in the baseplate (T11, 10mm bars), to support the router, but they are really too springy. I also have two "levels" as the trammel bars themselves can slide on a frame of square steel tube, which then slides on wooden rails along the stock. Whilst this does make using it easier with big bits of stock (you can get to the edges of the board without having loads of carriage hanging out over the sides of the thing - I have limited access to the back of my bench, and it's good if the bench is against a wall), my "Mk I" version isn't really rigid enough.

That said, it is probably also easier to clear shavings as access is better. This approach generally does make rather a mess!

It is a good way to deal with warped stock though, and the only way* with boards too big for the planer block. From experience, make sure you pack a twisted board very well, so that it can't move. I stick the packers on with d/s tape, then hold the whole lot still on the bench with a big router mat. If you have waste around the edges or ends of the board, you might screw the board down carefully (obviously sink the screwheads below the deepest cut you will take!).

HTH, E.

* Of course you can do the whole thing manually with planes - good exercise! The router may deal with difficult grain better though, as it has essentially a high cutting angle, and a cutting rather than riving action, because of the speed of rotation. There is some risk of burn marks if you don't keep the router moving or you let the cutter gum up. I did get a bit of tearout on a big awkward oak board, and we ended up paying a local firm to drum sand it to final finish (I don't own one).

PS: Choice of cutter matters too. I have the Wealden 6-wing one (sold for doing bowl-fitting etc. in worktops), but their 3-wing one is well thought of too. I'm sure you can use a simple rebate, but the rounded ends to the proper cutters minimise swirl marks and scuffing, which you would get with a squared-off rebater.

PPS: It occurs to me that the router mat probably allows too much vibration vertically. Screwing the board down as rigidly as possible would be a lot better, so it can't vibrate.
 
Even with that 22 mm mdf base, I found i was pressing down on the router hard enough to bend the base down a touch, giving me a hollowed centre. the mark two has a wooden brace across the whole width to strengthen it.
 
I made a sled and in principle it works well
I would like to develop this further
this will be a permanent feature in my hobby workshop
shortfalls so far is movement in x & y
moving router across the work I would like to not have to hold the sled down
I looked at linear bearings but got lost in all the options and costs
moving the sled side to side also has similar issues
I am looking for something about 4 x 2
I have a few sheets of 6mm ali that I can use to make a stiff platform for it
just looking for some inspiration \ ideas


I know a thicknesser planer would be useful but the clean cut I got from a 6 cutter router bit was so smooth i think this is the way forward for my purposes
Steve
 
4 x 2?
Are you talking FEET?
Surely not?
4 foot by 2 foot sled?
if so then no single sheet of anything will be rigid. You would need to build a cantilevered sled
 
first post says...

"however a few jobs i have planned require 2x4 foot boards up to 4" thick to be worked on."
 
Sunnybob is correct
I want to be able to move across a 4 x 2 feet board
which is why I was looking at linear bearings but it seems rails over 1200 are harder to find at the right price in UK
and the technical information of what diameter I would need is a bit mind blowing
was just hoping someone had already gone down this route
cnc seem to use small motor and cutting tools
I am talking I guess quite a bit more force with a 1\2 router and 2" cutter

Steve
 
Thats a very serious amount of investment money to make a sled that big.
youre into commercial cnc territory.
How many are you making? can you not assemble boards from smaller planks?
 
Steve

What are you trying to make with a board that size- is it a table top or similar?

Do you need the linear bearing level of accuracy? It would be much much much cheaper to do away with it, even if you had to do a final flatten with a handplane or sander (which you would need to anyway)
 
As I hinted before, consider two lots of sliders. I'll attempt a bit of ASCII art:
Code:
                                o               o
================================|===============|=======================
                                |               |
                                |               |
                                |               |
                                |               |
                        o-------+--+----+-------+----o
                                |  | RO |       |
                        o-------+--+----+-------+----o
                                |               |
                                |               |
                                |               |
                                |               |
                                |               |
                                |               |
                                |               |
================================|===============|=======================
                                o               o

The innermost pair of bars (horizontal, above) are the trammel/fence bars of the router. On my T11 these are 10mm, and easily obtainable in longer lengths. They are clamped in the router base in the usual way.

The vertical pair, in my setup, are square-section steel tube 3/4" approx. Mine came from a frame to hold suspended files (like an open filing cabinet drawer), which my wife was throwing out from her office, but again, that size is cheap from metal stockists and pretty rigid.

The outer pair (horizontal) are just flat, straight bits of 2x2. If I was working deeper stock they would be deeper too. They are parallel on the bench, either side of the workpiece.

It should be obvious that the extra complexity allows me to get to the outer edges of the work without a huge sled straddling the main rails - there's almost no overhang either side. The disadvantage is that it might be slightly more springy, but we've discussed that. Using box-section tube seems to work well (it's what I had handy) but you could just as well use copper plumbing tube or aerial pole (aluminium, or light gauge steel tube - as long as it's straight and rigid. Metal slides on metal without bearings, although if I used it a lot I'd do something more elaborate.

The disadvantages of rollers are cost, ease of gumming up, and the ability to trap crud underneath them, thus lifting the cutter slightly and spoiling the finish (other reasons why I've stuck with sliding metal on metal). When I used it, I had a friend moving the Hoover tube along with the router, which made it a lot easier to work.

HTH, at least a bit.

E.
 
Forgot to add, the vertical pair in the diagram are clamped as a pair at each end, so they slide left-right as one. The process is to start at one end of the work,do a rectangular area by sliding the trammel bars and router around, then move the vertical bars, do another section and so on.

"Horizontal" and "vertical" only apply to the diagram above, not real life. In the real world the router's trammel bars sit on the box section steel sled, which runs on the wooden rails either side (outside of) of the workpiece, which is a long rectangle underneath all of that lot. Two layers slide, the outer long rails are fixed down.
 
I flattened an old bench top with kerf slots from a circular saw, then chipping out followed by a router on a sliding sled [ride on style].
The carriage I used for the circular saw was the sort of thing I think that would suit this, I had two rigid fixed rails, then sitting on top of this were two pieces of stiff angle iron like two capital 'L's facing each other, clamped together at a distance. These only slid along the length of the long rails, the router [saw in my case] slides in the channel created by the angle iron and is not modified and has nothing attached.
So you have a rigid fixed height router channel that can move from side to side on top of a pair of fixed rails.
 
beech1948":2k9io8f7 said:
SteveF

Have a look at this. Its a bench top manual CNC style machine from Paoson Woodworking

https://www.youtube.com/watch?v=NG9IAndPcrw&t=34s

I have two Legacy ornamental Mills
One is a Woodchuck with steel bars and the other is more modern with alloy rails. The Woodchuck tends to lift from the work but The more modern Revo does not.
It runs in alloy rails and the Delrin type bearings slide inside that, It is quite good but an accuracy only for wood.
How it would work for a sled I do not know, also where to get the alloy Rail to suit is any bodies guess.
Just food for thought ! ! ? ?
Timber
 
I think I have a plan now
it involves ali plate, formica, ali extrusion, hdpe sheet
just going to try what I have in "stock" and see how it works
my mock up in mdf worked surprisingly well, it just felt uncomfortable in use
and with a 2" router bit that is not fun
I also need to explore clamping \ wedging options as well...some of work will be down to 10mm thick
If I ever come across some linear bearings \ rails going for a song I will think again
Steve
 
SteveF":3354cj51 said:
I think I have a plan now
it involves ali plate, formica, ali extrusion, hdpe sheet
just going to try what I have in "stock" and see how it works
my mock up in mdf worked surprisingly well, it just felt uncomfortable in use
and with a 2" router bit that is not fun
I also need to explore clamping \ wedging options as well...some of work will be down to 10mm thick
If I ever come across some linear bearings \ rails going for a song I will think again
Steve
Steve
I use hot melt glue (Glue Gun ) Have tried two sided tape -------not so good------- holds the test bit O.K. and lets go of the proper bit-------- That Is When I let Go///???
Timber
 
Back
Top