


Alf
Established Member
Gouge handles too. Files even, if you're feeling really posh... This one is By Demand - a list of the guilty parties is available on application. I had no good reason for doing this at all, except I'd seen it done by someone else, went "oooo" and rather fancied getting the same reaction when people looked at my tool cabinet. Once I've built one... It's also a good opportunity to play about with exotics that are a bit pricey in furniture-making sizes. Naturally this isn't the only way to do it, or the best way, or probably not even a good way, but it is "A" way.

Top, we have Ze Master Handle, Best London Octagon Box. Below, a Common Octagon Box, like wot we Londoners* look down our noses at wiv scorn. Probably. Little easier to make, mind you.

Now just in case you don't have A Master Handle handy about your person, I've made SketchUp suffer a bit in order to run up a quick, and not wholly accurate, measured drawing. That is the measurements are right, but the shape... I look on it as a rough guide - mainly 'cos I have no hope of getting my turning ability (which is rather like my ability with SU) to actually do exactly what I want. Anyway, it's a start.

The fun bit is selecting the wood. I wanted close grain, as resilient as possible, but also lots of colours. Yeah, yeah, so I could have picked something ideal, pale and cheap and had fun with a kaleidoscope of rainbow pigments courtesy of stains and such, but I didn't. Instead I had fun with, in the main, the Axminster catalogue's turning blanks. Might have to get some purpleheart from Yandles for the next run...

I made 'em into 1 1/8" squares, 'cos that works out to the size I like, but experiment. At this point it's worth mentioning that traditionally you have handle sizes corresponding to the chisel size, but unfortunately I have only one size of hand... I think one reason is probably to accommodate the different sizes of ferrule elegantly; I struggle a bit with any significant bulge above the ferrule on the largest size, and the smallest can look a little overwhelmed. Up to the individual, when all's said and done. That's rather the point of making your own chisel handles...

Being a lazy devil, and with quite a few to do, I bandsawed off the corners to make the octagonal blanks. You may wish to plane them octagonal, use a table saw, whatever.

Et voilà. Just the job for a colourful avatar.

But gotta think turning now, so the centres marked in the usual way and then I drilled the pilot hole for the screw chuck. That's about as fancy as my lathe work holding gets, and that's only 'cos I prefer to bore the tang holes on the lathe. If I was any good at all at boring them accurately off the lathe I could do the whole thing between ordinary centres. If I wasn't a skin flint when it comes to lathe tools I'd get a proper chuck and maybe speed things up a bit.

So here 'tis mounted on the screwchuck with the live centre in the tail stock to keep it well behaved. Oh, and we're in the dark in t'other place now, so my photography skills take a hopeless plummet. Good light makes David Baileys of us all...

First thing I do is fit the ferrule - measuring inside diameter of same. Craft Supplies ferrules are pretty good and available in a smaller size to the Axminster ones. The latter vary in height/length between sizes to an irritating degree, at least to me.

I use a parting tool to make a shoulder of the right size, but narrow in case I go too far - I'll still have enough blank length to make the handle. About one in four ferrules is either too loose or too tight a fit 'cos I'm hopeless.

Once the diameter is correct, it's taken down the blank far enough to accommodate the ferrule and the latter is fitted on, often with a little friction to heat it up to expand a little and a mallet. On the other hand epoxy can hide a multitude of sins of the other variety too...

Now with my reference point of the ferrule set I can mark up the important features of the handle in pencil on the blank. Overall length, the shoulder transition from knob-on-the-end to flats, where the flat sweeps down, and sometimes the narrowest point too.

The length and knob-on-the-end parts are obvious, but the band at the narrowest point I turn to roundabout the size of the knob-on-the-end simply as a visual reference - partially for diameter and partially for the location of the narrowest part. Works for me. The parting tool's still doing all the work.

Here I've used a spindle gouge to make a hash of the transition down to the ferrule and the roughing gouge for the sweep down from the flat area towards the narrowest bit.

Spindle gouge again to start the curve on the knob-on-the-end and rouging gouge to do the sweeping shape at the front (apart from the bit right by the ferrule where it won't go). I can wreak untold disaster with a spindle gouge, but the roughing gouge and parting tool I rather like. No scrapers of abrasives used; I prefer to sand with the grain off the lathe. You might notice the flat at the bottom isn't quite symmetrical with the top? Fear not, that's why I leave the final finishing of the octagonal section until after the turning, to allow for any little problems like that.

This is a fun bit, making the decorative dark lines. I think you're supposed to use a sort of cheese wire, but I just reverse the blade in a junior hacksaw frame i.e. teeth in, and use that. Friction is what you want; just for once burning smells are a Good Thing.

Getting technical now. This bootiful piece of artwork (prints available from the gallery shop) is s'posed to illustrate that you take the diagonal measurement of the tang at a few points (at least three) to work out what size drill bits you need, and how deep you need to drill them.

If you have a few to do it's worth making a note of bits and how deep on each blade to avoid mistakes.

An example of drill bits taped up to the required depths. Always start with the largest of course, but you knew that. One of these days I need to try one of those smaller Miller Dowel bits and do it all in one go.

Drill chuck in the tailstock, advance same and... well it's all just boring.

Okay, all done, knob-on-the-end almost fully formed and ready to go back to the bench.

You could finish off the knob-on-the-end first, but I chose to plane the octagon smooth. 'Course you could leave it roughly bandsawn for that tactile Krenovian look if you fancied, but I'd sooner justify a gratuitous plane picture myself.

Then the excess end is sawn off, trimmed down with a good sharp chisel (if you've got one with a handle still on it) and blended in all 'andsome like with some abrasives. At the same time I go all over the handle with 240 grit with the grain to clean up the evidence of my turning deficiencies and soften all the edges. For the latter, touch tells you much more than eyesight. For the former, maybe coarser than 240 in some places... Put a bit of tape round the ferrule to protect the brass form the abrasives and, later, the finishing stage.

Then the moment of truth and whacking the handle on the blade - don't forget to take advantage of that octagonal shape and line up the flat of the blade with a flat on the handle. Some folks, largely of a 'Murrican persuasion, say burning in the tang is the way to go. It's one way, I s'pose. I've never done that after dozens of handles and I've never seen a handle that shows evidence of that being done, so don't feel obliged to set fire to your workshop unless you want to. If it doesn't go all the way home, do your best to knock it off and adjust your stepped holes a bit. If it won't come off, a strip of leather wrapped round to create a faux leather washer can do wonders, but I'll deny I ever said that...

I like to finish off with a couple of coats of blonde de-waxed shellac knocked back with wax applied with fine non-woven abrasive; seems to make for the nicest feel (for me) and lets the wood do the talking and not the finish.
Some time later...

Clockwise from "noon"; Rosewood (dlabergia latifolia); Satinwood (chloroxlon swietenia); Pau Amarello (euxlophora parensis); Imbuya (phoebe porosa); Muhuhu (brachyaena hutchinsii); Padauk (pterocarpus soyauxii); Imbuya; Rosewood; Bubinga (guibourtia demeusei); Pau Amarello; Satinwood; Muhuhu; Bubinga and Padauk.
And that's how it's done. One way anyway. Be warned though, it is a bit addictive.
Cheers, Alf
*Formative years, so as good as.

Top, we have Ze Master Handle, Best London Octagon Box. Below, a Common Octagon Box, like wot we Londoners* look down our noses at wiv scorn. Probably. Little easier to make, mind you.

Now just in case you don't have A Master Handle handy about your person, I've made SketchUp suffer a bit in order to run up a quick, and not wholly accurate, measured drawing. That is the measurements are right, but the shape... I look on it as a rough guide - mainly 'cos I have no hope of getting my turning ability (which is rather like my ability with SU) to actually do exactly what I want. Anyway, it's a start.

The fun bit is selecting the wood. I wanted close grain, as resilient as possible, but also lots of colours. Yeah, yeah, so I could have picked something ideal, pale and cheap and had fun with a kaleidoscope of rainbow pigments courtesy of stains and such, but I didn't. Instead I had fun with, in the main, the Axminster catalogue's turning blanks. Might have to get some purpleheart from Yandles for the next run...

I made 'em into 1 1/8" squares, 'cos that works out to the size I like, but experiment. At this point it's worth mentioning that traditionally you have handle sizes corresponding to the chisel size, but unfortunately I have only one size of hand... I think one reason is probably to accommodate the different sizes of ferrule elegantly; I struggle a bit with any significant bulge above the ferrule on the largest size, and the smallest can look a little overwhelmed. Up to the individual, when all's said and done. That's rather the point of making your own chisel handles...

Being a lazy devil, and with quite a few to do, I bandsawed off the corners to make the octagonal blanks. You may wish to plane them octagonal, use a table saw, whatever.

Et voilà. Just the job for a colourful avatar.

But gotta think turning now, so the centres marked in the usual way and then I drilled the pilot hole for the screw chuck. That's about as fancy as my lathe work holding gets, and that's only 'cos I prefer to bore the tang holes on the lathe. If I was any good at all at boring them accurately off the lathe I could do the whole thing between ordinary centres. If I wasn't a skin flint when it comes to lathe tools I'd get a proper chuck and maybe speed things up a bit.

So here 'tis mounted on the screwchuck with the live centre in the tail stock to keep it well behaved. Oh, and we're in the dark in t'other place now, so my photography skills take a hopeless plummet. Good light makes David Baileys of us all...

First thing I do is fit the ferrule - measuring inside diameter of same. Craft Supplies ferrules are pretty good and available in a smaller size to the Axminster ones. The latter vary in height/length between sizes to an irritating degree, at least to me.

I use a parting tool to make a shoulder of the right size, but narrow in case I go too far - I'll still have enough blank length to make the handle. About one in four ferrules is either too loose or too tight a fit 'cos I'm hopeless.

Once the diameter is correct, it's taken down the blank far enough to accommodate the ferrule and the latter is fitted on, often with a little friction to heat it up to expand a little and a mallet. On the other hand epoxy can hide a multitude of sins of the other variety too...

Now with my reference point of the ferrule set I can mark up the important features of the handle in pencil on the blank. Overall length, the shoulder transition from knob-on-the-end to flats, where the flat sweeps down, and sometimes the narrowest point too.

The length and knob-on-the-end parts are obvious, but the band at the narrowest point I turn to roundabout the size of the knob-on-the-end simply as a visual reference - partially for diameter and partially for the location of the narrowest part. Works for me. The parting tool's still doing all the work.

Here I've used a spindle gouge to make a hash of the transition down to the ferrule and the roughing gouge for the sweep down from the flat area towards the narrowest bit.

Spindle gouge again to start the curve on the knob-on-the-end and rouging gouge to do the sweeping shape at the front (apart from the bit right by the ferrule where it won't go). I can wreak untold disaster with a spindle gouge, but the roughing gouge and parting tool I rather like. No scrapers of abrasives used; I prefer to sand with the grain off the lathe. You might notice the flat at the bottom isn't quite symmetrical with the top? Fear not, that's why I leave the final finishing of the octagonal section until after the turning, to allow for any little problems like that.

This is a fun bit, making the decorative dark lines. I think you're supposed to use a sort of cheese wire, but I just reverse the blade in a junior hacksaw frame i.e. teeth in, and use that. Friction is what you want; just for once burning smells are a Good Thing.

Getting technical now. This bootiful piece of artwork (prints available from the gallery shop) is s'posed to illustrate that you take the diagonal measurement of the tang at a few points (at least three) to work out what size drill bits you need, and how deep you need to drill them.

If you have a few to do it's worth making a note of bits and how deep on each blade to avoid mistakes.

An example of drill bits taped up to the required depths. Always start with the largest of course, but you knew that. One of these days I need to try one of those smaller Miller Dowel bits and do it all in one go.

Drill chuck in the tailstock, advance same and... well it's all just boring.
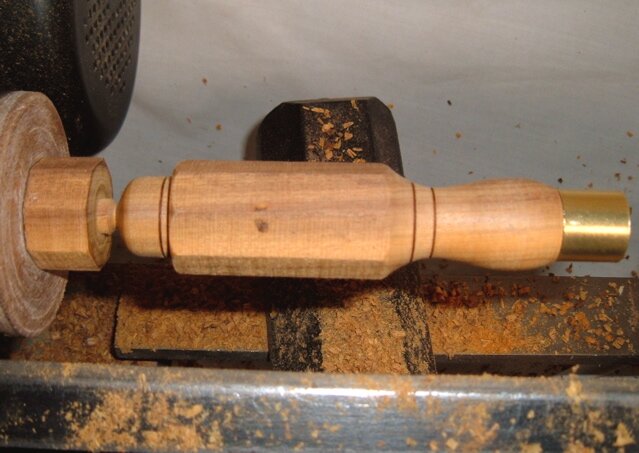
Okay, all done, knob-on-the-end almost fully formed and ready to go back to the bench.

You could finish off the knob-on-the-end first, but I chose to plane the octagon smooth. 'Course you could leave it roughly bandsawn for that tactile Krenovian look if you fancied, but I'd sooner justify a gratuitous plane picture myself.

Then the excess end is sawn off, trimmed down with a good sharp chisel (if you've got one with a handle still on it) and blended in all 'andsome like with some abrasives. At the same time I go all over the handle with 240 grit with the grain to clean up the evidence of my turning deficiencies and soften all the edges. For the latter, touch tells you much more than eyesight. For the former, maybe coarser than 240 in some places... Put a bit of tape round the ferrule to protect the brass form the abrasives and, later, the finishing stage.

Then the moment of truth and whacking the handle on the blade - don't forget to take advantage of that octagonal shape and line up the flat of the blade with a flat on the handle. Some folks, largely of a 'Murrican persuasion, say burning in the tang is the way to go. It's one way, I s'pose. I've never done that after dozens of handles and I've never seen a handle that shows evidence of that being done, so don't feel obliged to set fire to your workshop unless you want to. If it doesn't go all the way home, do your best to knock it off and adjust your stepped holes a bit. If it won't come off, a strip of leather wrapped round to create a faux leather washer can do wonders, but I'll deny I ever said that...

I like to finish off with a couple of coats of blonde de-waxed shellac knocked back with wax applied with fine non-woven abrasive; seems to make for the nicest feel (for me) and lets the wood do the talking and not the finish.
Some time later...
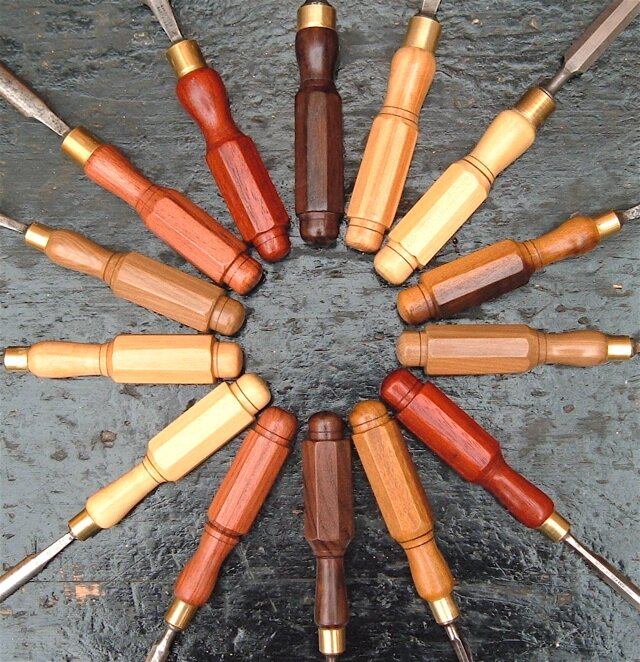
Clockwise from "noon"; Rosewood (dlabergia latifolia); Satinwood (chloroxlon swietenia); Pau Amarello (euxlophora parensis); Imbuya (phoebe porosa); Muhuhu (brachyaena hutchinsii); Padauk (pterocarpus soyauxii); Imbuya; Rosewood; Bubinga (guibourtia demeusei); Pau Amarello; Satinwood; Muhuhu; Bubinga and Padauk.
And that's how it's done. One way anyway. Be warned though, it is a bit addictive.
Cheers, Alf
*Formative years, so as good as.
