Finished! Making a ukulele

UKworkshop.co.uk

Help Support UKworkshop.co.uk:

This site may earn a commission from merchant affiliate links, including eBay, Amazon, and others.

profchris

Established Member
Joined
14 Jun 2015
Messages
1,090
Reaction score
257
Location
Suffolk
A friend's daughter Jenna (aged 10) won a set of Tasmanian Blackwood in the raffle at a ukulele festival, and very generously offered it to me as a present! Heavy negotiation ensued, and eventually I beat her up to me building the set as a uke for her. I also promised progress reports, and as I'm posting them on a uke board I thought they might be of interest to other woodworkers if I reproduced them here. Uke making is a strange combination of precision luthiery and improvised bodging.

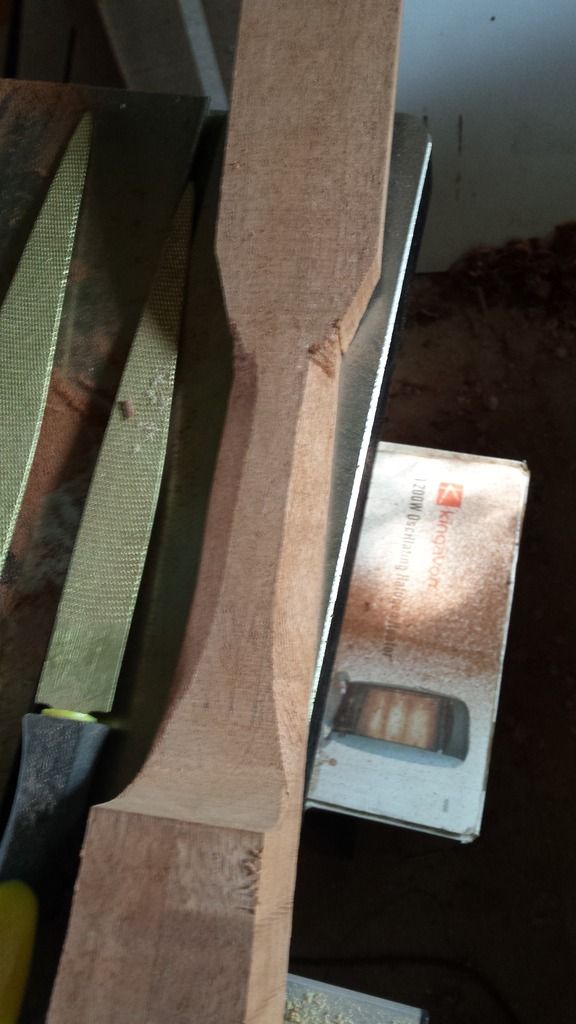
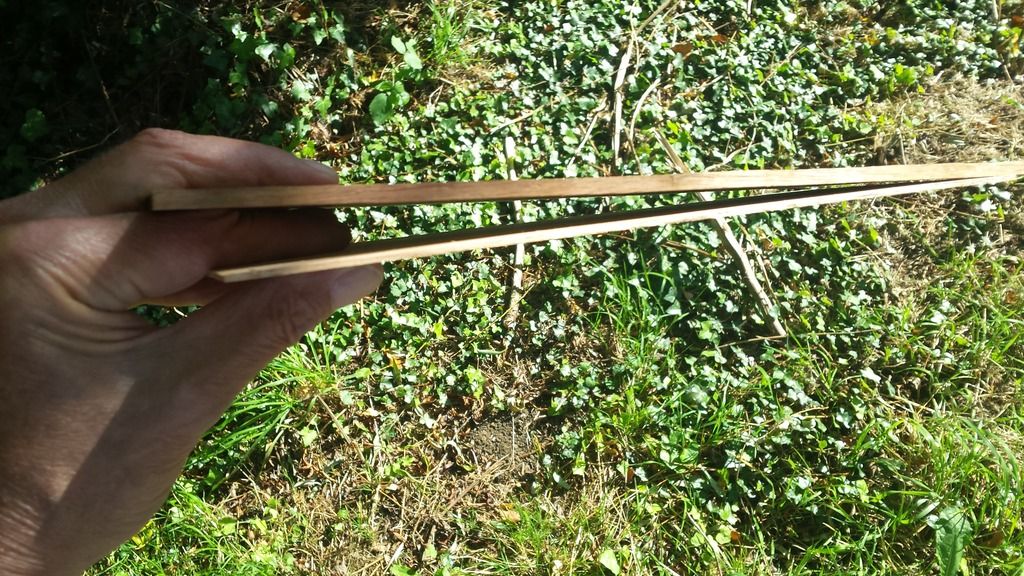
So, Jenna, I've made a start on the top and back. The wood is far too thick to make a ukulele, so I have to make it thinner. This picture shows your blackwood, and the thin bit is roughly how thick it needs to be.

20160812_165822_zpschbgve0u.jpg


Also top and back are each made of two pieces, so I need to glue them together before I start to make them thinner (which for some reason is called thicknessing!).

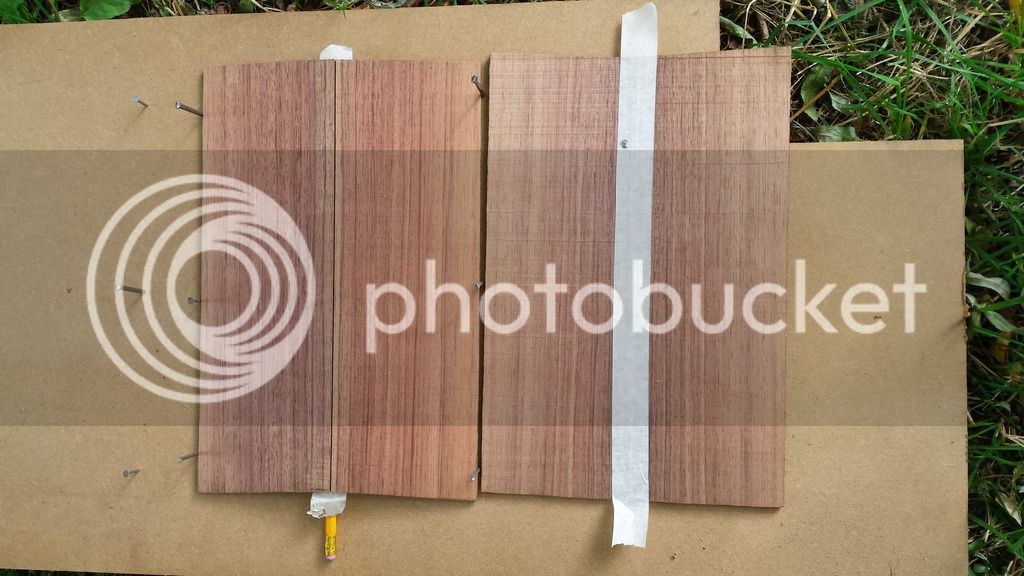
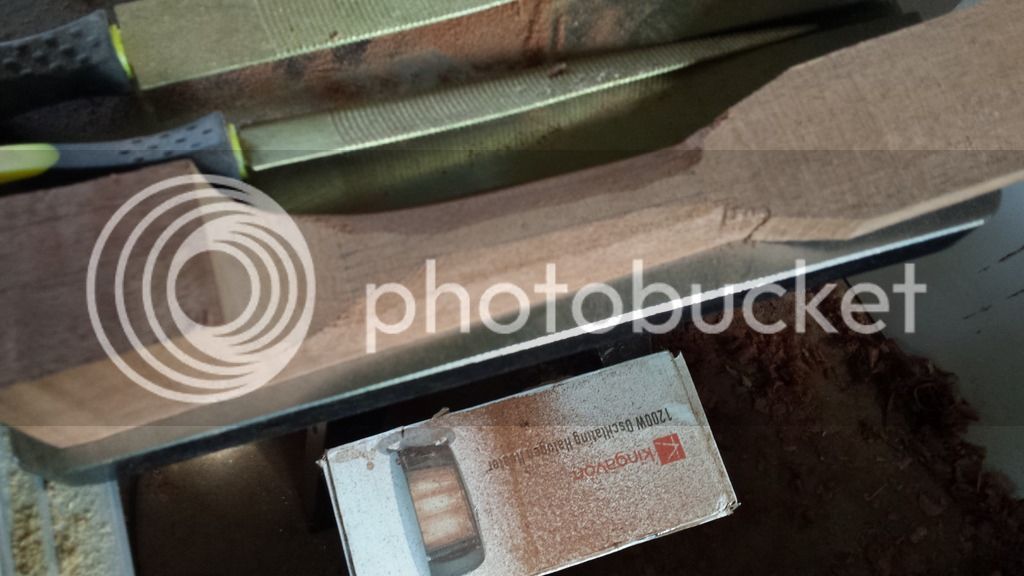
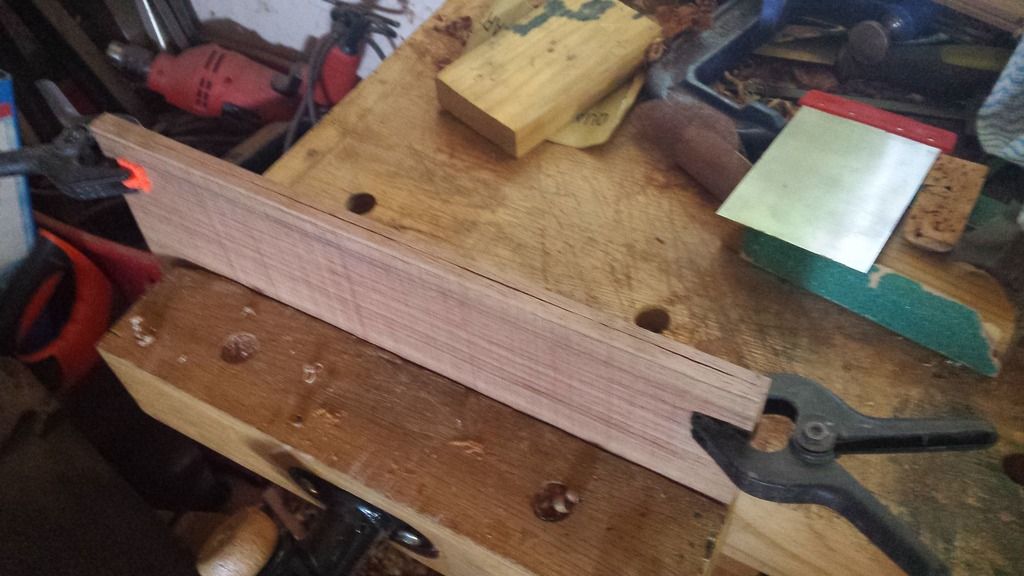
I need to get straight edges on both pieces to be glued, so I put them in a vice and get the edge to be joined roughly straight.

20160812_165715_zpsty2jkans.jpg


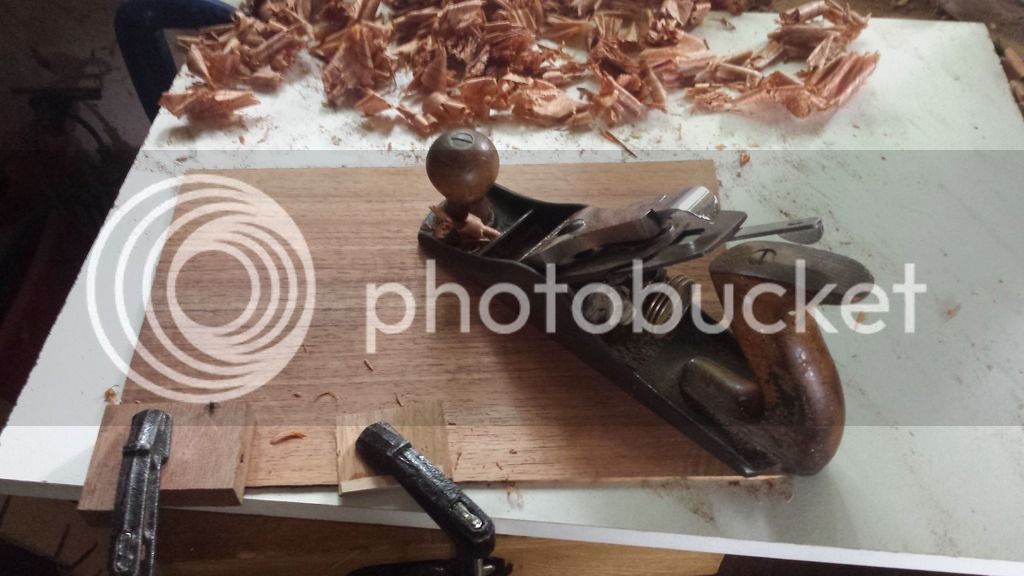
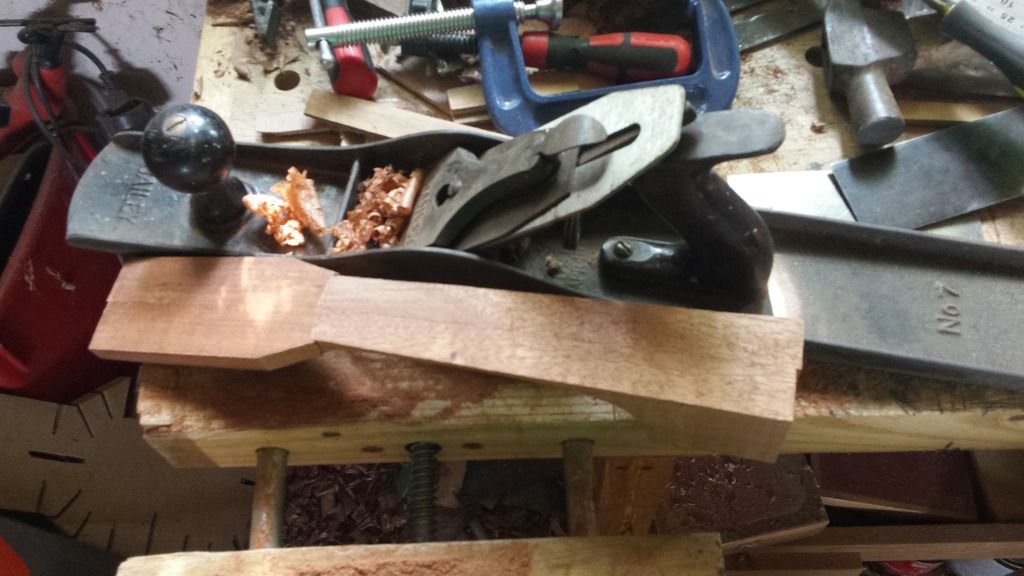
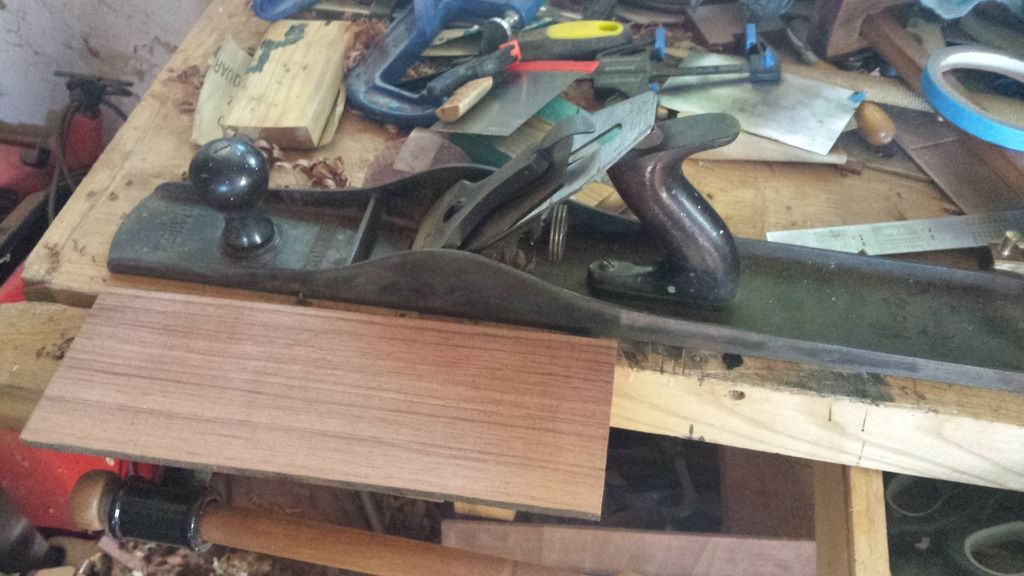
Then I take my very long plane:

20160812_170246_zps1quiuxuz.jpg


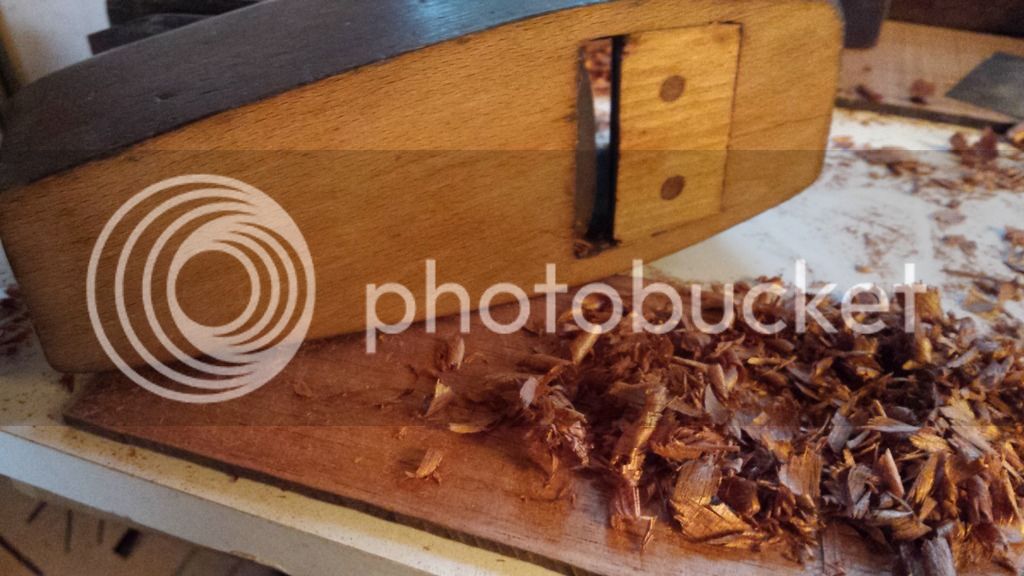
And I use a cunning trick learnt from a friend (who learnt it from someone else) and clamp the plane upside down in the vice. Now I slide the two pieces across the plane to produce a perfect (I hope) joint.

20160812_171156_zpsq4wxodur.jpg


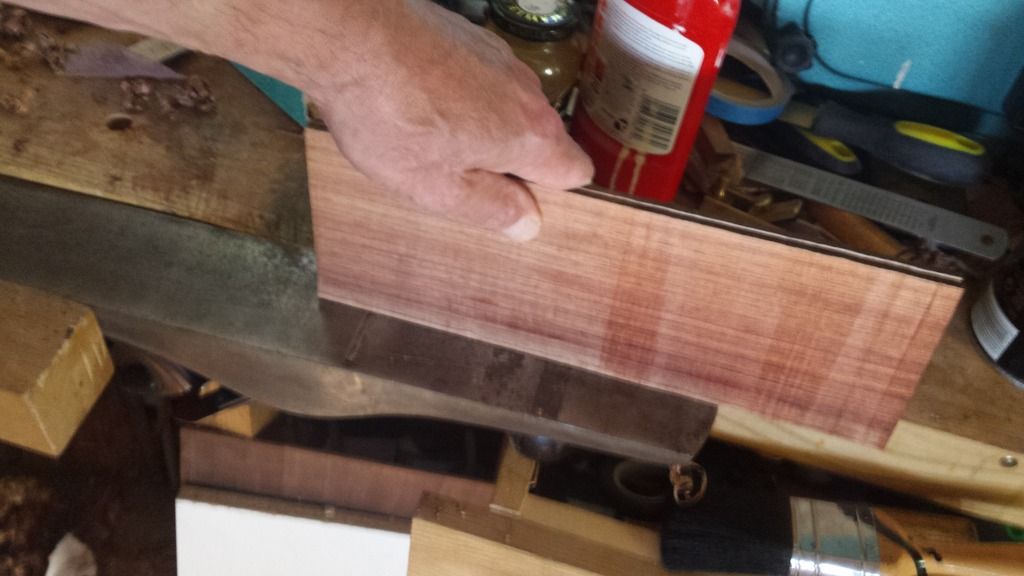
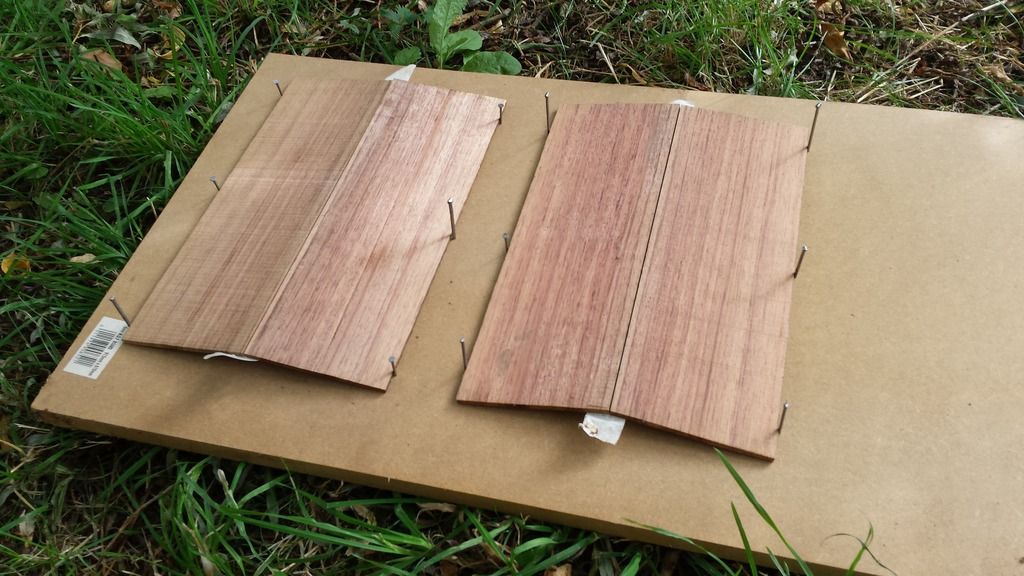
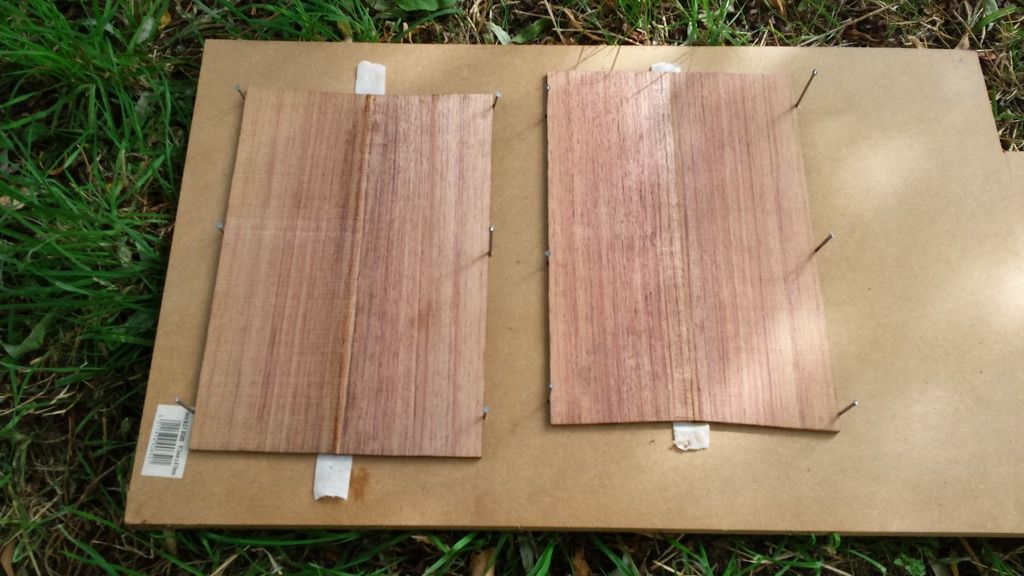
The reason for doing both at the same time is that, even if I don't hold the wood absolutely upright, this will give me matching angles so that there are no gaps. We will find out once I start thicknessing!
 
Now I have to glue the pieces together. This is the way I do it.

First, I use masking tape to stick them together, as on the right. Then I turn the joined pieces over on a flat board and put a pencil under the join to make a kind of tent. Bang nails in along both sides.

20160813_160119_zpso4cznqtt.jpg


If I apply glue along the join and press down, you can see that the nails push the two pieces together all along the joint.

20160813_160154_zpsubehr6qc.jpg


So I did that ...

20160813_160959_zpslqyvvqqc.jpg


and once the glue has dried I will have turned four pieces of wood into two pieces, each big enough for a top or a back. I won't decide which is which until I've thicknessed them, when I'll decide which looks best for which role.

You might be thinking that your ukulele is going to look a bit boring, because unfinished wood is very dull. So, this should give you an idea of what to expect:

20160812_165947_zpsxx8pktfz.jpg


Much prettier!
 
A note on edge joining thin plates (these were around 4mm):

1. I've used hot hide glue to join these plates for two reasons. First, it's the best candidate to give me an invisible glue line even if my joint is not absolutely perfect. Second, if I discover that I've made a mistake in jointing I can simply apply heat and moisture and the glue will release, and I can reglue without cleaning off the old glue because fresh glue reactivates the old.

2. Like most plates, these were vertical grain at one side and a little less vertical at the other (that's how trees grow). I've chosen to joint the most vertical grain, because that will give me a stiffer plate. Stiffer means I can make it thinner, and thus get more volume because a thin plate is easier for the string's vibration to move as it has less mass. But if the figure in the wood had looked markedly better the other way I would have gone with that, and built accordingly.
 
Thicknessing plates is always the hardest part of the job, and is really daunting for first time builders. Glueing together was comparatively easy! So I thought I'd explain how I do it, in case it helps others.

The problem is that this Blackwood is about 4mm thick (which is a good thing, because thinner would give me less room to make mistakes when glueing up). I need them to be less than 2mm.

I begin by planing, using my Stanley no 3 (£20 or so from eBay, less from a car boot sale). The first problem with planing is runout.

Runout is where the grain, looked at from the side edge of the plate, is at a slight angle. There is always some runout, and woods with figure like this Blackwood have quasi-random runout because the figure is caused by wavy grain. No problem you cry - don't plane into the runout like this > \\\\\\\\ (exaggerated, but you get the idea), because the blade will dig into the slanted ends of the grain and tear lumps out (called, yes, tearout). Plane the other way: >///////

Yes, but ... Most tops and backs are bookmatched. Two consecutive slices are taken from the wood, and then opened out like a book and joined where the spine would be. This looks excellent because the two halves are mirror images and so you can't see a disconnect where they join (if you get a good joint, see previous post).

But bookmatching means the runout in each half goes in the opposite direction. I cope with this by planing one half, then turning the plate and planing the other half. If the wood is well-behaved (and this wood was very cooperative) then I can get a nice, flat surface on one side. Good start.

Even so tearout is a risk. To reduce this when planing with the grain I get my blade as sharp as possible, and I set the cap iron as close to the edge as I can manage without covering the edge. Setting the cap iron this close means you can't take shavings any thicker than the sliver of blade, but it does make it far less likely that you'll get tearout.
 
But the plate is hardly any thinner after this work. I need to start work on the other side, but planing off thin shavings will take forever. And trying to take thick shavings will cause tearout. Dilemma!

The solution is to set my cap iron for thicker shavings, and then plane at 45 degrees to the grain direction, like this:

20160814_141916_zpsjyhjmvm3.jpg


On figured wood you'll get a little tearout (I did), but not so deep that you ruin the plate. So do this, turning the wood regularly, until you reckon you'll be a little above final thickness once any tearout has been smoothed away.

Now things get more delicate, because the plate os around 2mm thick and is flexible and fragile. I might try planing with the grain as above, resetting my cap iron, but this is risky. I'm putting quite a bit of leverage on the wood as I plane, because of where the clamps have to be to hold it down, and could split it. Or I might cause more tearout.

The simple solution is to switch to a cabinet scraper (plenty of instructions for use and sharpening online, try all the sharpening methods until you find one that works for you). You bend this tool slightly (fingers on edge, thumbs in centre) and then push it across the wood. If it's sharp you get really fine shavings (compare the fluffy scraper shavings here with the much more solid plane shavings).

20160814_161634_zpse7cbrohu.jpg


This is slow work, and more effortful than you'd expect, but is highly controllable.
 
But I have a better device:

20160814_164331_zpsvrjhkeke.jpg


I took a punt on a £15 box of wooden planes because I saw this in it and got lucky. It has a toothed blade:

20160814_164420_zpsuh0r6khk.jpg


(this is a veneering blade with lots of grooves, for large work fewer but deeper grooves makes it work faster)

In effect, I'm scraping twenty tiny chisels across the wood, and if I work at 45 degrees to the grain it produces what looks like ultra coarse sanding dust. Five minutes work reduced the plate to very nearly final thickness. Quick but very controllable, and ensures I don't accidentally thin some places more than others.

Of course this toothed blade leaves grooves in the wood, but a minute or two with cabinet scraper removes them. Or they could be sanded out. In some old instruments you can still see the grooves inside, because there is no structural reason to remove them except where you want to glue.

The plate is now just under 2mm and still a bit too thick, but I'll leave final thicknessing until I start making the body - if I ding or scratch this, I have some leeway to scrape away the damage.

Now to repeat this for the other top/bottom plate and for the two sides plates. So no more until that is done.
 
Super thread. I have never made a uke, just guitars. Do ukes ever have a belly in the back or are they dead flat?
 
AJB Temple":2e6z4ka7 said:
Super thread. I have never made a uke, just guitars. Do ukes ever have a belly in the back or are they dead flat?

Many are dead flat, but I like an aggressive belly - in due course!
 
I started this a couple of weeks ago, so there is more to come before I revert to real-time building.

Next was thicknessing the sides but they are trickier. With top and back I could plane one half, clamping at the other, and then flip the plate and plane the other half. This works because they are wide enough to clamp one side and plane the other half. Sides are too narrow for that.

So I decided to pause and convert one of my woodie smoother planes into a scrub plane. This needs a wide mouth, which the plane already had, and the cutting edge of the blade is ground into a very aggressive arc. So I did that (takes a lot of grinding on a thick blade) and tried it out on scrap first. Success!

So here is the blade (in the plane), on top of a side in progress, with a pile of shavings next to it. You will see that they are not really shavings, but instead large, long chips. In effect, the plane scoops gouges in the wood, taking it down very fast. I got this side down to near final thickness in about 5 minutes, most of which was spent moving the clamps to reach each part.

20160819_175153_zps3rfrz5rw.jpg


Tips on use, learnt the hard way (destroyed scrap wood bears witness to this).

1. Set the depth of cut very carefully. Once the blade starts to scuff the surface it only needs to be advanced a little further to produce suitably deep gouges. Too far and it digs in enough to split thin wood.

2. Plane at 45 degrees, NOT in the direction of the grain. Planing with the grain tears out large lumps. But 45 degree planing is remarkably controllable, and although the final surface is rough it will work down smooth very quickly (I'll use my toothed plane and a scraper for that).

3. Work sides in three sections - clamp at middle and one end, plane other end; reverse; clamp both ends and plane middle.

I'm quite pleased with myself! Final thicknessing is enjoyable, as I feel out the wood to decide whether I'm at the right point yet. Getting it to that point is just grunt work, and my scrub plane removes 90% of the grunt.

Then I made my life a bit easier when I remembered I had a non-toothed iron which would fit my toothed veneer plane. Swapping the irons turns it into a scraper plane, which does most of the scraping work and leaves me to finish off with the hand cabinet scraper.

Using this lot, it took about 20 mins a side to get them down to near-final thickness.

So at this point I have all the plates (top, back and sides) close to what I want. I'll do the final thicknessing, using only a cabinet scraper, immediately before I start to build them into the body. Why? Knocks/bumps/gouges. I can take any of these out during final thicknessing.

Readers (if any are left) will have noted my obsession with tearout. This is because these plates are scary thin - the top and back will end up around 1.5 mm, and the sides only about 1.2 mm. Usually I'd go thicker (say 1.8 and 1.5) but this wood is particularly stiff longitudinally. You can see that even 0.2 mm of tearout on the last pass of the plane would be a problem for me!
 
Next I need a neck.

The neck blank in the kit is very nice, but it's not cut for using a Spanish Heel, and that's what I want to do (explained later). So I'll use that for some other project and substitute a similar neck from my own stock.

I glued up two pieces of mahogany (recycled shelf) to make a blank about 2 1/4 inches square and about 13 inches long. I did this to get favourable grain orientation for stability and ease of carving, and also because it makes a nice stiff neck if you do it right (fingers crossed there!). Plane it square on all four sides.

[Digression on grain orientation: Ideally every piece of wood in a uke or guitar will have vertical grain. The reasons will be explained later.

For necks, horizontal grain can be good too. But diagonal grain is not ideal - OK for ukes because they are small, but for a guitar there is the risk the neck will twist.

One way to deal with this which enables you to use wood with grain on the diagonal is to laminate two pieces with the grain running in opposite directions: \\\\//// or ////\\\\. This produces a very stable neck.]

Then I marked out the underside and top of the peghead on one of the sides and cut it out on my birthday bandsaw. I've cut less close to the lines than I might because I'm still learning how to use this bandsaw, but it's so much better than my old one!

20160824_170826_zpstjh3xoev.jpg


I could do this with hand tools but it's hard work because the blank is so thick, and I can be more accurate with the bandsaw (unless I go really slow with hand tools).

Then I mark out the vertical shape of the neck:

20160824_170752_zpsctvjiv5j.jpg


If you look at the horizontal line just above the heel, that's where the neck will join the body. I've left quite a lot of blank to the right of that. This is because Spanish Heel construction doesn't have a separate neck block - slots are cut in the neck into which the sides fit. So I needed a longer blank to allow this.

Once cut out, we have something which is clearly on its way to being a neck. So the next instalment will be neck carving.

20160824_172444_zpsn0niurmw.jpg
 
To rough carve the neck I start by dividing the back into thirds, and marking a line on the side 1/3 up from the surface of the neck:

20160825_103906_zpspbc4qkf9.jpg


Then I got out my new rasps - less than £15 for all three direct from China, and they're really sharp. [Checked up pricing recently and they're over £20 a set now on Aliexpress, but still worth it I think]

20160825_104019_zpsrhvhrclk.jpg


Five minutes later the neck looks like this:

20160825_105138_zpsfeflwrbn.jpg


Now I just flatten off the ridges between the facets I've created to get this, which has NINE (I originally wrote seven, fool!) facets:

20160825_111113_zpsnlxmkhor.jpg


A rasp isn't essential - I used to do this with chisel and cabinet scraper. Some use spokeshaves, but this soprano neck only has about 5 inches of shaft to carve.

At this stage it's remarkably close to the final shape, so I can hold a fingerboard on the neck surface and feel how the neck would work. It's currently too deep front to back, particularly as Jenna has small hands, so I'll make it thinner when I come to the final shaping.
 
Up to now I haven't really flattened the top surface of the neck, just got it close. The reason for this is that as I carve the neck there will be some internal stresses in the wood which are likely to make it move about a little. Any flat surface I make won't be flat enough any more.

But now that I've removed the bulk of the wood, I can flatten the top surface. I use a really big plane for this, almost twice as long as the neck (I could use a shorter one, but as I have the big one and it is easier to use for this, why not?).

20160825_111101_zpsaosraaif.jpg


I also flatten the surface of the peghead and bring it in line with the neck surface. This means I can measure from the new surface to get the back of the peghead to the right thickness (that happens later).

Now I need to mark out and cut slots at the heel end, into which the sides will fit (this is the Spanish Heel part). I leave this until now because, as I plane the neck surface it gets longer (at the peghead end), and as I plane the peghead it gets shorter again. I want the body to join at the 12th fret, but I can't measure that until now because of those changes.

20160825_160941_zpstoskn2nj.jpg


I cut the slots with another of my birthday presents, a Pax 1776 Dovetail Saw from Thomas Flynn. This is a serious piece of kit, made by artisans in Sheffield's last traditional saw works and not stamped out on a production line but hand worked. It's like being a top flight surgeon when I use it! And at ukulele making workload it has at least 200 years of life in it, so aspiring legatees should start being nice to me right now.

The final process for today was to cut the heel sides roughly to shape on the bandsaw and then fair them into the sides with a block plane.

20160825_162455_zpsketmoirt.jpg


The end of the neck beyond the slots is far bigger than I need, but I won't cut the excess off until final shaping is complete. This gives me somewhere to clamp the neck while working on it, without worrying about dents and dings.

Next, final neck shaping.
 
My next process is to shape the heel. With my new rasps this is vastly easier!

I use the round side of the rasp to establish a curve on the imaginary line from where the neck joins the top (the edge of my slot for the sides) round that heel and joining up at the equivalent place on the opposite side.

20160826_160656_zpsxdm9dfmf.jpg


20160826_160706_zpsu47hcpna.jpg


As you can see, I don't take it right back into the angle where neck meets top, though you could.

Then smooth away the hump between my new curve and the neck shaft (this picture is close but not completely there yet), again using the rasp very carefully so as not to put gouges into the neck shaft.

20160826_161436_zps0v0s3tnb.jpg


Then round over the thinnest part of the heel and blend that into the curve to get my rough heel shape.

20160826_162043_zps4lubxr2k.jpg


From here I could work it to a fancy shape (stiletto heel?), but this looks pretty good, so I simply work carefully to remove lumps and bumps until it all curves smoothly together. If I wanted to make the heel smaller I wouldn't tough the neck block part, beyond the slots.

The next stage is to round over the neck shaft. I remove some of the remaining ridges (I use a cabinet scraper but sanding would work, though slower), and then use a strip of coarse sandpaper like a shoe shine. Keep working this until you can see that the whole of the back of the neck shaft is being sanded, and you will have a nice smooth round to it.

20160828_095742_zpsavlfrtv1.jpg


But, DO NOT sand all the way to the edge of where the fretboard will be - leave a 1-2 mm strip to be smoothed in via hand sanding, or you could sand away part of that edge!

After this there will be more blending at the heel, because you've lowered the back of the neck a little, and some blending into the headstock. No pictures because it's fairly obvious what needs to be done. Use scraper, rasp, chisel, knife, sandpaper - whatever you feel comfortable with. At this stage if you accidentally remove too much wood you either have to reshape the neck or live with the dent, so use something you can control easily.

And then sanding and more sanding, always going with the grain and switching to a higher grit until you're happy you've removed all the sanding marks. You have to back the sandpaper with a block, or your finger pressure can sand in dents. My block is a wine cork cut lengthways, which is a nice size for a soprano neck.

When you think you have sanded it perfectly smooth, splash some white spirit (mineral spirits in the US) on a paper towel and wipe it over your sanded surface.

20160828_114436_zpsxc12sr5y.jpg


See all those marks you still haven't sanded out? So keep going until you're content to live with the result!

By the look of it this neck will be pleasantly stripy when it's finished.
 
Looking forward to seeing how the thin sides are joined to the thin top with enough strength to hold up the stresses of playing.

Very informative so far.
 
custard":3ucomd39 said:
This is riveting reading!

=D>

How many hours work?

Hard to say - I do 15-60 mins at time when I have free moments.

I'd guess we're about 6 hours in so far, but if I used a drum sander and spindle sander I could be this far in about 2 hours, much of which is measuring (so with good templates, maybe 1.5 hours).

I usually estimate 40-50 hours to completion, all hand tools except the bandsaw. Power tools and spray finishing could halve that.

BTW I owe you a PM - got distracted!
 
Back
Top