How to check straightness of boards edges?

UKworkshop.co.uk

Help Support UKworkshop.co.uk:

This site may earn a commission from merchant affiliate links, including eBay, Amazon, and others.

SMALMALEKI

Established Member
UKW Supporter
Joined
30 Jan 2018
Messages
335
Reaction score
19
Location
Derby
Good morning all
I have been making my own workbench. I bought some beechwood and put them in the garage on my sawhorses. I thought it’s a good idea to have them adopting to the room before working on them.
Unfortunately when I picked them up to edge join them there were all sort of bending and bowing in them. I hand planed them and edge join them as per picture.

Last night I put the two halves together to measure for the size of the leg rails. To my surprise there was a gap. It tells me there is still some bump in the middle but I can’t identify it with my 600mm straightedge.

Beside getting a longer straightedge what other ways would you suggest to check and straighten them?
 

Attachments

  • E1EE5D8D-F533-4BA6-A11B-D10BCC6308C2.jpeg
    E1EE5D8D-F533-4BA6-A11B-D10BCC6308C2.jpeg
    2.6 MB · Views: 446
  • 44BBB22E-A08C-4AFB-9F51-CC287FDA7C96.jpeg
    44BBB22E-A08C-4AFB-9F51-CC287FDA7C96.jpeg
    2.7 MB · Views: 445
A work bench is a great place to learn about edge jointing, the quality standards are lower than with furniture so it's a gentler introduction into what can be quite a frustrating process.

You don't need ever longer straight edges, I edge joint boards for 16 seater tables with a 600mm straight edge. For a workbench the fact that the two boards are swivelling when offered up edge to edge, tells you all you need to know, some well executed stop shavings (well executed=maintaining a perfectly square edge) is adequate to fix the problem.

There's loads more about edge jointing here,

how-to-edge-joint-t112936.html
 
I have had a look. I can not see any noticeable unevenness. Running my straightedge I couldn't find any point either. When i put them together with a middle tools strip it shows itself.
 
If you have access to a track saw with a long enough track you could kerf cut them (snug them up, secure them in place and run the track saw down the join line) and be done. It won't help improve your edge jointing with a hand plane skills though ;)
 
I would rub chalk on one edge, rub the other board edge on it then plane of the chalk marks from second edge. Continue until you get a perfect fit.
 
You don't need a straight edge.
If you are joining boards the other board is the straight edge (even if it isn't straight). You sit one in the vice and stand the other on it and see immediately if it's square on, or if there are gaps. Rock the loose one about a bit and you can feel where it pivots, and so on.
If you aren't joining boards and just looking at the finished edge - judge straightness by looking at it. If it looks straight then it's straight enough.
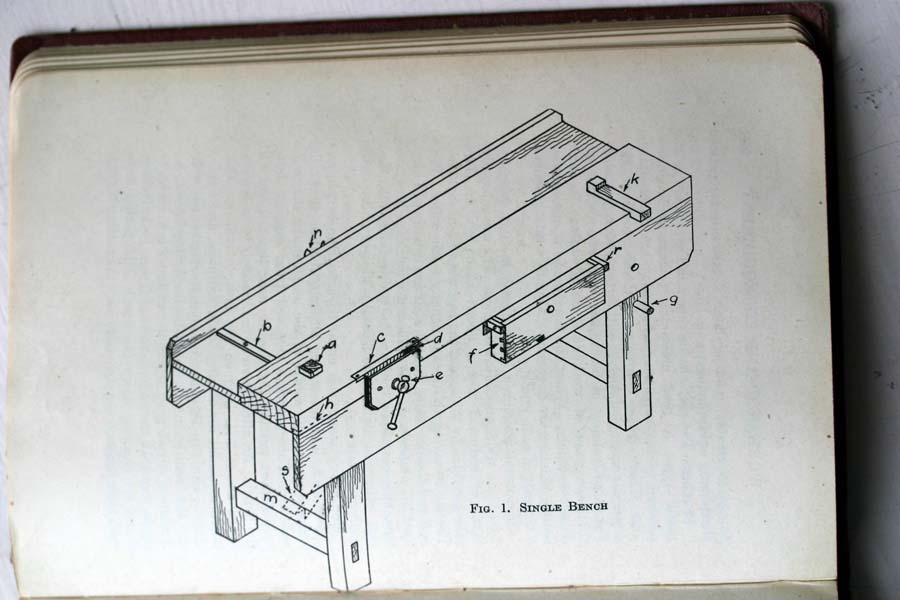
The most common and best design for a woodwork bench is well established and compared to the fashionable "heavy table" model is much easier to make and keep flat, having just one front "beam" and a back apron to keep co-planar , or a double bench with beam on both sides.
This is the single
bench1.jpg
 
Have you tried some thin string (or thick twice) pulled taut? String is a cheap and arbitrarily long straight edge.
 
Jacob":2tia5zvu said:
You don't need a straight edge.
If you are joining boards the other board is the straight edge (even if it isn't straight). You sit one in the vice and stand the other on it and see immediately if it's square on, or if there are gaps. Rock the loose one about a bit and you can feel where it pivots, and so on.
If you aren't joining boards and just looking at the finished edge - judge straightness by looking at it. If it looks straight then it's straight enough.
The most common and best design for a woodwork bench is well established and compared to the fashionable "heavy table" model is much easier to make and keep flat, having just one front "beam" and a back apron to keep co-planar , or a double bench with beam on both sides.
This is the single
bench1.jpg


I was making the same one but as I could not do the rebate on the side I followed Paul sellers old style bench.
I have made a small tool strip which is going to have some holes for chisels and is just wide enough for a hand plane.
I have had couple of suggestions which a blue chalk might be an easy one to try.

Thank you for your advice I will take it onboard.
 
Just4Fun":2o922ach said:
Have you tried some thin string (or thick twice) pulled taut? String is a cheap and arbitrarily long straight edge.


I will try the builders blue chalk to see if it works. That is a simple and practical way. I will remember it for ever.
 
Chalk lines don't make a clean enough line for joinery. It's fine for green oak framing etc, but not for edge jointing planed boards. Don't look for shortcuts for skills, smalmeleki. Learn and practise the skills, rather than trying to bypass them.
 
To be clear I wasn't suggesting a chalk line, which is certainly too broad and "fuzzy" to be exact. However a fine line pulled tight can usually show a gap between the line and the edge of the board.
 
Just4Fun":3mnlqvzd said:
To be clear I wasn't suggesting a chalk line, which is certainly too broad and "fuzzy" to be exact. However a fine line pulled tight can usually show a gap between the line and the edge of the board.
Well yes but it's easier to just squint down the board instead of fiddling about with string, straight edges, expensive gadgets, etc.
But straightness isn't the issue anyway - it's more about whether or not it fits nicely against the joining board - which you verify by the time honoured ancient process of "offering up". Easiest done vertically with one board in the vice and the next one balanced edgeways on top.
 
Jacob is completely right IMO. There is a lot of fashion when benches are mentioned. The traditional apron bench that Jacob highlights came out of generations of experience. A thick heavy bench is only useful if you regularly use hand tools. The front heavy thick surface is what is used for a planing reference. If your facing or edging a plank your only ever going to need a reference surface that’s circa 6 to 8” wide. This needs to be flat and true and is used as your main reference surface for all joinery planing activities. Larger areas just have to look flat and true....ie table tops etc. You don’t need a true surface for that. The proverbial fire door is more than adequate.
Jacobs highlighter way of edge jointing is also right and the traditional way of doing it. It’s not about getting long edges absolutely straight and true, but getting a good joint along the entire edge. If it looks straight and meets all the way along it’s good to glue.
 
Jacob":30dja6of said:
Just4Fun":30dja6of said:
To be clear I wasn't suggesting a chalk line, which is certainly too broad and "fuzzy" to be exact. However a fine line pulled tight can usually show a gap between the line and the edge of the board.
Well yes but it's easier to just squint down the board instead of fiddling about with string, straight edges, expensive gadgets, etc.
But straightness isn't the issue anyway - it's more about whether or not it fits nicely against the joining board - which you verify by the time honoured ancient process of "offering up". Easiest done vertically with one board in the vice and the next one balanced edgeways on top.

Hi Jacob

I totally agree with you. But I had some problem with the traditional way of offering the ends to the board.
1- as I mentioned before my timbers had gone wonky and almost had every possible bending.
2- I had flatten the top side and edges. It not the underneath it as it might had caused the bench top to become to thin
3- As it is seen in the picture I have a strip of Sapele in the middle which is to hold hand tools
4- I have now fully flattened the underneath the boards and put them on two saw horses they are touching in two ends and there is a small gap of about 2-3mm
5- I was planing to fit the Sapele like a wedge between two parts. Which is going to be difficult if they don’t match straight.

I am a novice and can not detect a small curb of 2-3 mm in 2 meter board ( sorry).

I am happy to take any criticism and learn from my mistakes.

Regards
 

Attachments

  • 7D408F79-395E-4483-BED1-A1629F7ADED8.jpeg
    7D408F79-395E-4483-BED1-A1629F7ADED8.jpeg
    2.7 MB · Views: 265
"I am a novice and can not detect a small curb of 2-3 mm in 2 meter board ( sorry). "

A 2-3mm curb isn't small, but rather very noticeable when sighting down the edge of a board.
Nothing comes to mind as a practice routine you could try, though.
Can't remember how I got the hang of it, as it was quite a long time ago. :)
 
deema":2567crgg said:
Jacob is completely right IMO. There is a lot of fashion when benches are mentioned. The traditional apron bench that Jacob highlights came out of generations of experience. A thick heavy bench is only useful if you regularly use hand tools. The front heavy thick surface is what is used for a planing reference.............

Why are we suddenly talking about planing references? There is no such thing involved in edging-joining boards. You reference only the two meeting edges, to each other.
 
SMALMALEKI":34j7kc8u said:
.......- I.......put them on two saw horses they are touching in two ends and there is a small gap of about 2-3mm .....

That's not small. That's a big gap.

All you do is note where they are touching, and plane a bit off that area, then offer up again. Keep on offering up and adjusting until there is no gap. I always then like to finish with one complete full-length pass with the plane, just to clean up the face after the adjustments.
 
deema":19dt4c2e said:
Jacob is completely right IMO. There is a lot of fashion when benches are mentioned. The traditional apron bench that Jacob highlights came out of generations of experience. A thick heavy bench is only useful if you regularly use hand tools. The front heavy thick surface is what is used for a planing reference. If your facing or edging a plank your only ever going to need a reference surface that’s circa 6 to 8” wide. This needs to be flat and true and is used as your main reference surface for all joinery planing activities. Larger areas just have to look flat and true....ie table tops etc. You don’t need a true surface for that. The proverbial fire door is more than adequate.
Jacobs highlighter way of edge jointing is also right and the traditional way of doing it. It’s not about getting long edges absolutely straight and true, but getting a good joint along the entire edge. If it looks straight and meets all the way along it’s good to glue.
I don't know what a "reference surface" is exactly. I've never knowingly used one!
Your work bench front beam doesn't need to be perfect, just as good as you can get it in a sensible amount of time. It's just got to support the workpiece which may itself be bent all over the place and isn't going to sit flat on a perfectly flat bench anyway. But thats OK you are working on the top face of the workpiece - the bench or the bottom face don't matter at all. If it rocks about or bends you slip a wedge or two underneath.
Then you check your progress on the top face by looking at it. Check across for cupping etc with a combi square ruler or similar. Check for twist with a pair of winding sticks. Mark high points with a soft pencil, plane off high points etc.
 
The whole point of the work bench top when planing is that it forms a solid support for the stuff being planed. If the surface you use to plane on is not flat and true, the stuff your planing will also not be flat and true as the stuff will flex over the undulations. The reason the effort is put into flattening the work bench top is to generate the ‘reference’ surface you put the wood onto to plane.

I will add before there is a barage of comments that the ‘work bench reference surface’ comes into its own after you have flattened one side. It’s an aid to speeding up flattening the other side.

You can achieve a flat true surface without having a flat a true work bench ‘reference’ surface but then you have to faff around swinging the wood etc to find the low and height points.

Jointing a board can be done in a vice, however if the stuff is long it will drop where it’s not gripped. You can place bench dogs to support / travelling steady, but again this also allows the stuff to droop under the pressure of the plane. The best way to quickly joint is to use a planing stop and do it on the work bench top.

Work benches were usually made to be the length of the longest stuff to be planed.....typically doors. So 6’6”~7’ was a typical length. For a small workshop, where hand tools are primarily used for 4 squaring the wood, the bench should be ideally the length of the longest thing you think you will make and no longer.
 
Back
Top