Hayward Workbench Build - Finished!

UKworkshop.co.uk

Help Support UKworkshop.co.uk:

This site may earn a commission from merchant affiliate links, including eBay, Amazon, and others.
RickG":5qamco8v said:
Nice work Bodgers. When I come to build a bench, I hope mine looks half as well made.

Silly question relating to the sloped back legs; will the narrower top restrict the bench-depth available for the threads of the bench vice?
There's a good Sketchup version of this bench at: https://3dwarehouse.sketchup.com/model/ ... ench?hl=en

I'm sure the threads I have on my Record 52 that are waiting to go in are longer than the 10" that's in the Sketchup version I've looked at.
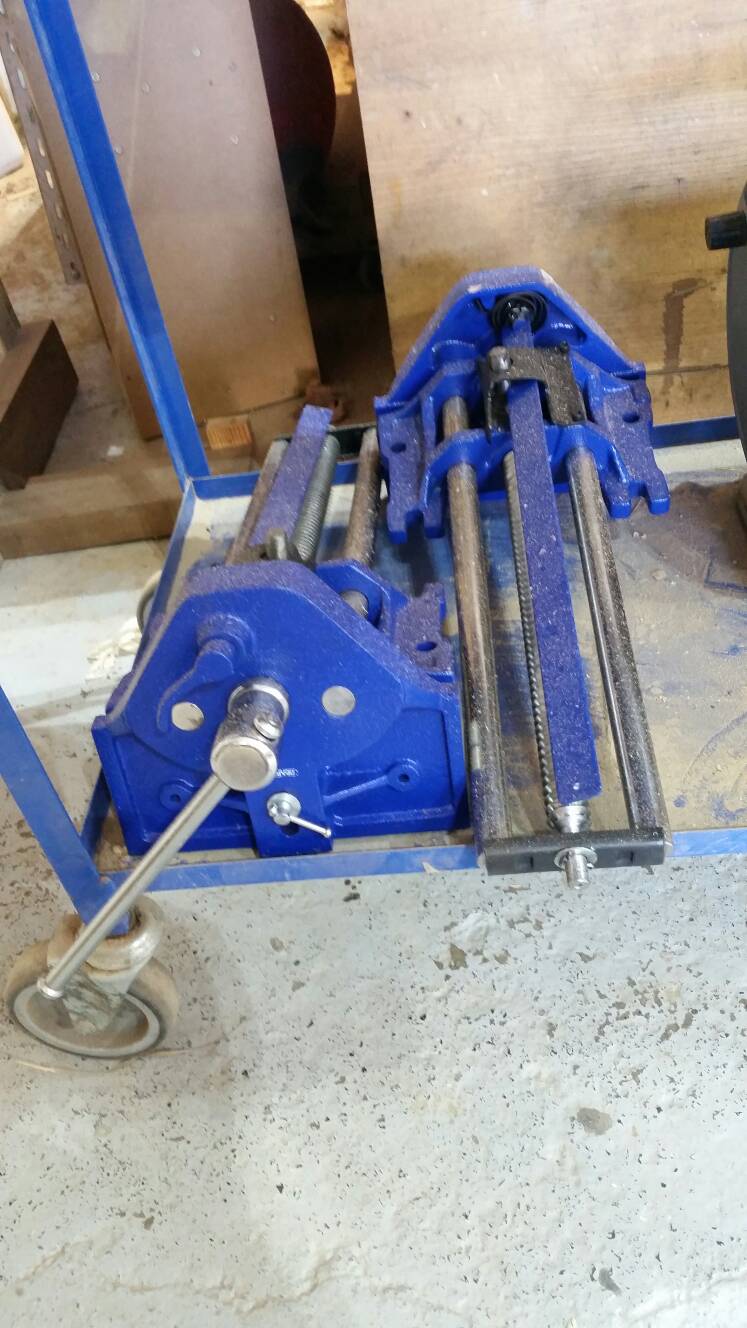
It is a good question. I have a used and old Record 52 1/2 quick release vice and I have long suspected that it will be too big. It is a nice vice though, but needs some cosmetic work.

It is 430mm from the back jaw to tip of the threaded rod. If I recess it a bit into the front apron there is about 360mm before it hits the back apron. The only option then is to add 50mm to the underside of the bench where the vice sits do it lowers it to clear the back apron and tool tray.

Total width including the tool tray is about 585mm.

Shame, I might have to resort to a 7" vice. The one in Hayward's book looks even smaller!


Sent from my Redmi Note 5 using Tapatalk
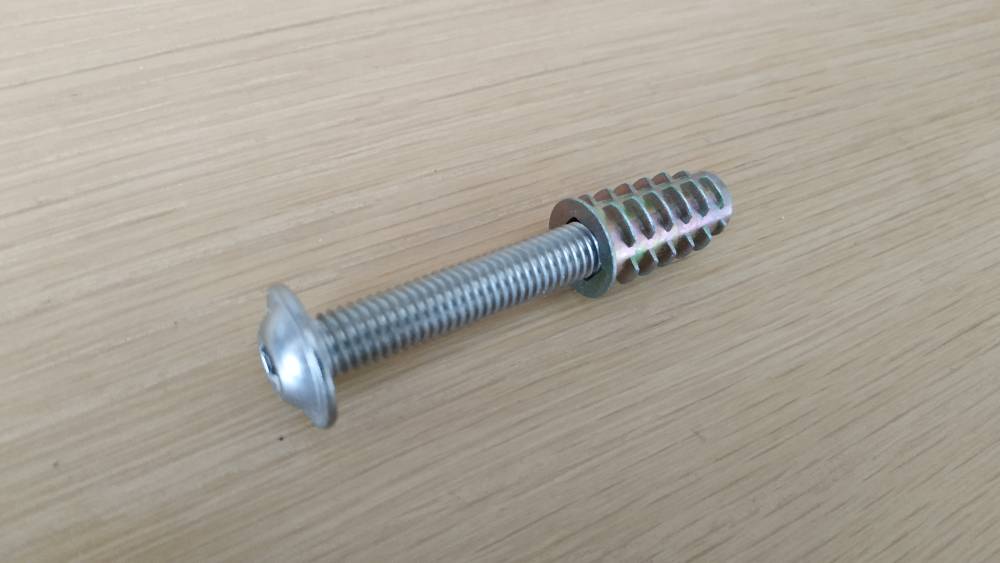
 
Bodgers":2y55f6g6 said:
The only option then is to add 50mm to the underside of the bench where the vice sits do it lowers it to clear the back apron and tool tray.

Unless the top is really thick you'd have to do that anyway with a 52 1/2, so there's every chance you'll be okay.

And if not, well it's not the end of the world. For moderate scale projects (and they're the only ones that stand a decent chance of actually being completed!), a smaller vice is perfectly adequate.

And provided you use beefy screws like no 12 or 14, they'll be fine for attaching the apron, it's not like you'll be parking a locomotive on it.

So, all in all, I reckon you're looking good!
 
Bodgers":o3ea3dbu said:
I am about to start ordering some hardware for the knock down elements. Hayward states that the stub tenons with bolts are stronger anyway on the rails. I am ordering M10 cross-dowels rather than just nuts for these, as I think if those were around in 1949 he would have used them.
Perfect alignment or you're stuffed... are you sure you want to set yourself up for that? You are drilling quite deeply into end grain where many bits have a tendency to wander and follow the grain.

I'm sure you've seen lots of other bench designs of more recent vintage that use a similar fixing methed, they almost always use a slightly oversize drilled hole, mortise or D-shaped recess to set the nut into and provide some wiggle room to ease the fitting.
 
Bodgers":173j8lh6 said:
......... I have a used and old Record 52 1/2 quick release vice and I have long suspected that it will be too big.
No it's the bench which is too small. Madness not to fit one of the best vices you can get if you've already got one.
Shame, I might have to resort to a 7" vice. T.........
If you can't fit the big vice then you need to modify the bench design until you can. To fit a smaller and inferior vice is to get your priorities utterly wrong! Unless you don't intend to use the bench of course.
 
Another way of looking at it is that I have redo hours of milling to gain me 50mm extra opening width. I don't want to make room for a wider bench anyway.
 
Bodgers":3upub6sn said:
I don't want to make room for a wider bench anyway.

Exactly.

For years I was a hobbyist woodworker in central London with a tiny workshop. I had a 5' bench fitted with a Record 52E quick release vice, and here is that exact vice, shown next to its big brother a 52 1/2.
Vice-52-12-and-52E-01.jpg


Vice-52-12-and-52E-02.jpg


Would have I preferred the 52 1/2? Yes, of course.

Was I in any way disadvantaged with the 52E? Absolutely not.

Using a bandsaw, a lunch box/bench top thicknesser, and a small lathe I still produced a houseful of high quality hardwood furniture plus loads of windsor chairs.

The key lessons for successful working in small spaces is to scale everything accordingly, and resist the temptation to fill your limited space with cheap crepe machinery.
 

Attachments

  • Vice-52-12-and-52E-01.jpg
    Vice-52-12-and-52E-01.jpg
    72.2 KB · Views: 932
  • Vice-52-12-and-52E-02.jpg
    Vice-52-12-and-52E-02.jpg
    64 KB · Views: 933
Thanks Custard, that's a useful side by side. The 52 1/2 looks like the exact one I have. It is huge. I will hang on to it anyway, because you never know.

Got my eye on a few 52Es on the site who's name shall not be mentioned.
 
I'm thinking of remaking my spare bench after chopping 2 foot off and having a ripsaw on the end of it a few years ago. I looked on ebay for second hand ones before settling on some drapers for £90 each.
21f88f98d68eaed7b26ef99427144794.jpg

I couldn't stretch to the price of new records and didn't think it was worth trying to renovate some second hand ones. Fingers crossed they'll do the job.

Sent from my SM-G900F using Tapatalk
 
Bodgers":2l6dsesi said:
Thanks Custard, that's a useful side by side. The 52 1/2 looks like the exact one I have. It is huge. I will hang on to it anyway, because you never know.

Got my eye on a few 52Es on the site who's name shall not be mentioned.

I'm still not convinced the 52 1/2 won't slot straight onto your bench. The 52 1/2 is designed to fit on a bench where either the bench top, or the top plus packer, is about 92mm thick. So if you need at least a 50mm packer to clear the back apron then any top that's 42mm or less gets you there. And a 42mm thick, solid Beech top is more than adequate for your purposes. Even if you're planning on using the bench to chisel out deep hardwood mortices then you'd do the heavy bashing over a leg.
 
More progress today. At this rate I'll be finished before the year's out.

I have the first joint on the work bench done. And its an angled one. I am tackling the 'bare-faced' tenons at the back of the 'A frames' here. Entirely hand cut other that than the initial cut down the length of the tenon. My cheap ECE tenon saw isn't good, and I haven't the skills to compensate. My dazoku hasn't the depth to cut that either. So one bandsaw cut got me out of a spot. A bit naff, but I gorilla glued an offcut on to the workpiece to get the cut angle right on the bandsaw.

IMG_20180707_110005.jpg


Shoulder was cut with the dazoku:

IMG_20180707_140956.jpg


I cut way too conservatively away from my knife lines, so I had a load of chisel pairing and planing to do. The router plane didn't quite have enough depth. Anyway, I ended up with this:

IMG_20180707_101417.jpg

IMG_20180707_101249.jpg


I moved on to the mortices, which for the back legs I chickened out and did a sort of bridle joint. I used an off-cut to guide the chisel (something seen in the Hayward book):

IMG_20180707_150451.jpg


After much tweaking the joint came together and was square. More timber framing standard than fine woodworking, but it's a start:

IMG_20180707_181724.jpg

IMG_20180707_181842.jpg

IMG_20180707_202447.jpg


Back sticky out thing will be trimmed flush.

And this mess on a workmate is why I need a bench with a tray:

IMG_20180707_150613.jpg
 

Attachments

  • IMG_20180707_140956.jpg
    IMG_20180707_140956.jpg
    198.8 KB · Views: 915
  • IMG_20180707_110005.jpg
    IMG_20180707_110005.jpg
    182.8 KB · Views: 915
  • IMG_20180707_101417.jpg
    IMG_20180707_101417.jpg
    182 KB · Views: 915
  • IMG_20180707_101249.jpg
    IMG_20180707_101249.jpg
    255.2 KB · Views: 914
  • IMG_20180707_181724.jpg
    IMG_20180707_181724.jpg
    197.6 KB · Views: 916
  • IMG_20180707_181842.jpg
    IMG_20180707_181842.jpg
    179.6 KB · Views: 916
  • IMG_20180707_202447.jpg
    IMG_20180707_202447.jpg
    250.2 KB · Views: 915
  • IMG_20180707_150451.jpg
    IMG_20180707_150451.jpg
    179 KB · Views: 916
  • IMG_20180707_150613.jpg
    IMG_20180707_150613.jpg
    225.4 KB · Views: 915
Some more progress.

Chopped out the front mortises.

IMG_20180716_103858.jpg


Cutting the tenons. Used a tip I saw from Jeff Miller (chair guy) by clamping a guide down to cut the shoulder of the tenons. Works very well.

IMG_20180713_144831.jpg

IMG_20180713_144527.jpg


Finished A frame. Things got a little 'wild' on the glue-up, hence the mess :) I have two of these now. Moving on to the stretchers next; I have a plan to make a jig to drill out for the cross-dowel hardware...

IMG_20180716_164606.jpg
 

Attachments

  • IMG_20180716_103858.jpg
    IMG_20180716_103858.jpg
    125.9 KB · Views: 791
  • IMG_20180713_144831.jpg
    IMG_20180713_144831.jpg
    98.8 KB · Views: 791
  • IMG_20180713_144527.jpg
    IMG_20180713_144527.jpg
    144.4 KB · Views: 791
  • IMG_20180716_164606.jpg
    IMG_20180716_164606.jpg
    156.9 KB · Views: 791
With the A-frames finished, and the stock for the stretchers prep'd, I have moved on to the business of attaching these in Hayward's recommended way - knock down bolts.

Undeterred by ED65's warning on the cross-dowels/bed bolts, I pressed on and made a jig. This jig is inspired by a Fine Woodworking article, and I liked this one as it actually works with the idea that you won't be able to drill the hole square.

This is it:
bedbolt-jig.jpg


Fairly simple, a thin bit of ply in a groove (made with my Record plough plane) that acts as a fence. You push a dowel or drill bit into the hole you've drilled for the bolt (which can be out of square) and then place the jig and its fence up against the dowel/drill bit. The distance between the fence and the guide part of the jig is half that of the width of the whole (in this case 5mm, in a 10mm hole). You can then draw a line that follows the path of the hole and intersects where you need the cross dowel.

Test piece with an intentionally misaligned hole:

bedbolt-testpiece.jpg


Lining up the jig:

bedbolt-check.jpg


After drilling at the intersect, and pushing a drill bit into the hole you can see it aligns perfectly:

bedbolt-alignment.jpg


Bolt in place:

bedbolt-finish.jpg
 

Attachments

  • bedbolt-jig.jpg
    bedbolt-jig.jpg
    160.6 KB · Views: 733
  • bedbolt-alignment.jpg
    bedbolt-alignment.jpg
    81.5 KB · Views: 734
  • bedbolt-check.jpg
    bedbolt-check.jpg
    166.8 KB · Views: 733
  • bedbolt-finish.jpg
    bedbolt-finish.jpg
    90.5 KB · Views: 733
  • bedbolt-testpiece.jpg
    bedbolt-testpiece.jpg
    160.5 KB · Views: 733
Bodgers":3r04jtw9 said:
With the A-frames finished, and the stock for the stretchers prep'd, I have moved on to the business of attaching these in Hayward's recommended way - knock down bolts.

Undeterred by ED65's warning on the cross-dowels/bed bolts, I pressed on and made a jig. This jig is inspired by a Fine Woodworking article, and I liked this one as it actually works with the idea that you won't be able to drill the hole square.

Good for you!

Every cabinet maker I've met uses a similar jig for bed bolts, some are more sophisticated and use a pair of dowels sized to match the drill bit, others basically follow your chosen method of using the drill bit itself as a reference surface.

Well done for figuring out the solution, and well done for first testing it's effectiveness on a piece of scrap. It's refreshing to read a post that's about practical solutions to practical problems, instead of endless agonising over this tool versus that.

=D>
 
Watching with interest ;) I like the jig; simple, effective, cheap!

Do you intend to join the top to the apron in any way? I don't recall seeing it mentioned in Hayward's instructions. On my bench I joined the two using chunky dowels for alignment only (no glue). Over time as the bench has settled, a gap has opened up between the apron and top at one end. I have thought about taking them apart and glueing them together permanently.
 
DTR":rl39enju said:
Watching with interest ;) I like the jig; simple, effective, cheap!

Do you intend to join the top to the apron in any way? I don't recall seeing it mentioned in Hayward's instructions. On my bench I joined the two using chunky dowels for alignment only (no glue). Over time as the bench has settled, a gap has opened up between the apron and top at one end. I have thought about taking them apart and glueing them together permanently.
Thanks. In the book he just says to nail or screw it on. Nails would be quite interesting given I am building with his recommended timber - beech.

My current idea is this:

5418a40a3bb856753029e70a46b2219f.jpg


Basically the apron piece is rebated to match the legs (as in the diagram) and at this point I plan to drill holes and tap these M8 inserts in, possibly with a bit of epoxy. Two on each side. The bolts will be counter bored in the apron so they don't stand proud. Hopefully it won't fall apart.

Edit: I just realised you meant apron to the top and not to the frame.

Good question! The book is silent in this. I assume they aren't glued together to allow for wood movement. But the problem there is when the wood moves there might be a lip or gap where the two meet at right angles - as you have said.

I notice in a kids bench version of this, the guy from Walkemoore tools does glue them together so they are one piece (as a sort of one piece giant L-profile). Which is my preference, but very unsure.

Maybe the solution is to glue it at the front and only allow the wood to move towards the back... suggestions needed...:)
 
Wood movement between the top and the apron shouldn't be a problem as the grain is in favour..... unless you meant something else??
 
Bodgers":13fsc43e said:
Maybe the solution is to glue it at the front and only allow the wood to move towards the back... suggestions needed...:)

Not glue. Coach bolts are best, failing that really thick steel screws. In both cases screw up through the cross rails into the top. If you screw at a slight angle pointing out then you've given yourself a bit of play for movement, and that's all you'll ever need for this job.
 
custard":1c8jezn9 said:
Bodgers":1c8jezn9 said:
Maybe the solution is to glue it at the front and only allow the wood to move towards the back... suggestions needed...:)

Not glue. Coach bolts are best, failing that really thick steel screws. In both cases screw up through the cross rails into the top. If you screw at a slight angle pointing out then you've given yourself a bit of play for movement, and that's all you'll ever need for this job.

That covers the top to the frame, but I was more thinking the front apron to the top itself. Show they be attached to each other in anyway to avoid a gap or lips where they meet at 90degrees?
 
Personally I wouldn't glue the apron to the top. Without glue it's an easy matter to whip the top off in the future if you want to adjust the vice or pass the top through a thicknesser. But that's just my reasoning, it's probably not a huge deal either way.
 
Back
Top