Extending Dining Table - Timber Selection (page 3)

UKworkshop.co.uk

Help Support UKworkshop.co.uk:

This site may earn a commission from merchant affiliate links, including eBay, Amazon, and others.

OPJ

Established Member
Joined
31 Jul 2005
Messages
5,566
Reaction score
1
Location
North Somerset
Hi guys,

Good news is, I have been asked to make dining tables for two different people! :D In both cases, they will need to extend from four-seaters to six-seater tables. There, drop-leaves are out of the equation as they'd only get in the way of four chairs.

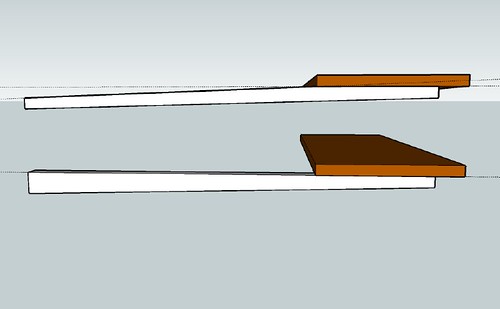
Some kind of extending or 'expanding butterfly' table is what I'm after, where the top slides apart two central sections unfold from below. Trouble is, while I can see how this works and have even found a great design for doing most of this in wood and brass, I'm having trouble getting the proportions right and would appreciate some feedback and advice here.

One of these tables will be my competition entry, by the way. :wink:

Okay. While I've drawn these out with square ends, it's quite possibly the final design will be move oval-shaped or elliptical... Perhaps I should draw that out first? I'm sure the shape will have some effect on the dimensions of the frame work... :?

3493779231_378b4916d5.jpg


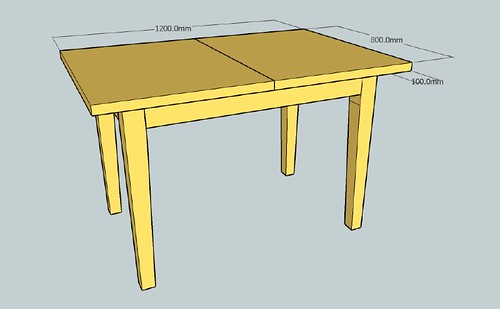
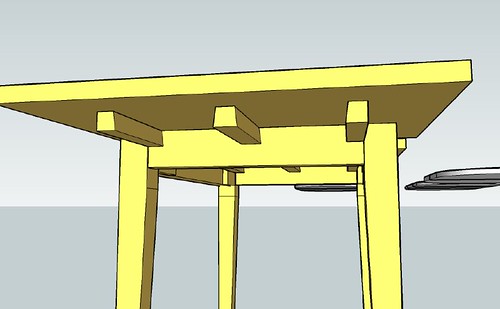
Please ignore the design of the legs and rails for now; it's the top we're most interested in. I've stated off with 100mm overhang at each end.

3494596880_9418a08c97.jpg


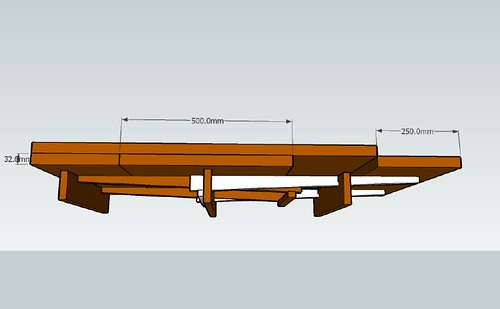
Looking at the second photo, I'm thinking that 350mm overhang is too much? Most sources recommend 600mm as an ideal spacing for one person. I've drawn the central sections at 500mm to try and reduce some of the overhang but, it hasn't made much of a difference...

For what it's worth, the second table I have to make will be slightly shorter than this one in its length. Any thoughts on setting this out correctly would be much appreciated - sadly, that information is lacking in the otherwise excellent I found. :roll:

Also, (DaveR? :wink:) I'm looking for guides or walkthroughs on drawing ellipses in SketchUp.

Thanks for reading,

Olly. :)
 
Right. I've figured out how to draw the ellipse - drawing a Circle and using the Shift tool (S) to elongate it. :oops: It's not exactly what I'm looking for; too oval-shaped... :oops:

So, instead, I've drawn two circles to give me curved ends, which looks more appropriate. This does require so re-working of the frame so, bear with me... :)
 
Might have something to help you out there Olly. I'm at work till 10 but will post a pic of something in the morning.
 
Ellipses? The Shift key?

To draw an ellipse, draw a circle first. Then select it and get the Scale tool. Hold Ctrl (option on Mac) to invoke Scale about Center while you pull/push a scale handle in the center of one of the sides of the bounding box.

If you only need part of an ellipse, you might like the shape you get from a 2 degree Bezier curve instead.
 
The overhang of 350 looks quite a lot to cantilever off the frame.

How much is inside the rail? Is it 200 less the width of the rail?

With someone leaning on the extended top at each end would your hardware be beefy enough to hold?

Mick
 
Sorry OPJ can't find them at the moment to take a picture, I must have put them in the loft but it's a metal table mechanism so when you pull out one side the other extends. It's a salvaged item but it really good condition. Its not the best quality but works well, would be hidden anyway and runs off wires and pulleys rather than rack and pinion. There's one for each side. Any use to you?
 
DaveR, thanks for the tip, although I figured it out not long after my original post... :oops: :)

Mick, sorry, I don't understand your first question...

In response to your second though, here's a drawing which illustrates the 'dovetailed bearers/runners' that I would like to use. At the other end (on the inside) will be a brass plate to prevent them from sliding two far so, the top can't come off the end of the frame with the plates attached. Elongated holes will allow the top to expand and contract.

3495873943_fb010e12a9.jpg


(Please ignore the UFOs in the background!! :D)

I was looking at some other extending tables on Google last night and they all seem to overhang by a fair amount. :shock:

Dom, your mechanism sounds interesting. Thanks for the offer, it does sound interesting but, I'm in favour of working with as much wood as possible on this one. I'm sure someone else is building a similar table for the competition - perhaps they'd be interested?
 
Hi Opj,

The mid 20th. century 'Utility' furniture had a draw leaf table in which the top was the center portion. This stayed in place as either one, or both, leaves were pulled outwards into place. These leaves were mounted on wooden runners which formed cantilevers under the centre section when in use. Over extension was prevented by metal pegs to limit the movement. Any weight applied to the leaves was transmitted to the large centre section giving a stable top surface.

I cannot imagine how this approach could work with a non-rectangular top, but it is essentially all wood and fairly robust in use.

xy
 
Xy, this idea sounds very intriguing - do you have any links or photographs to illustrate further? I've tried searching the 'net (Google) but, as you would expect, I'm generally coming up with all the imported 'catalogue' furniture! :?

One of these tables will be rectangular, it has been confirmed. It would be nice to attempt two different mechanisms for each of the two tables, if they're appropriate. :)
 
I'll see now what I can come up with in SketchUp. I think this draw-leaf option will work well with the smaller table, which is 1m long x 750mm, extending to 1500mm in length. Thankfully, both ends will be square as well. I've tried setting this one out in the butterfly style but, there isn't enough room between the legs for the central section and a decent length of runners.

Splayed legs are out of the question as we've already agreed on 70mm square with no tapering. Looking at this diagram, the leaves, top and centre board look only 19mm thick - is there any reason I can't keep them at 32mm :?: Maybe I should be looking for 1¼" stock and a 25mm top? :?
 
Hi,

Thank goodness you found the image. I cannot think how to sketch that. Now I have one of these tables, it always amazes those who come across it for the first time.

The top is 1060mm, closed, with two leaves of 300mm each. making a 'full' top of 1660mm. Width is 760mm.

If I can figure out how to take a useful 'photo I'll do that but in the mean time the drawing you found is spot on. By the way the ends on my table are curved, not greatly, but enough to add character.

xy


p.s.
Ok! figured it out. I could not relate to the 'Top will rock' bit. On the table I have there is no centre board, which will allow the rocking movement. The gap between the leaves, in the closed positon, is filled by a batten fixed to the underside of the top on each edge. When a leaf is extended the top is therefore able to drop to be supported on the table frame. Right so the top is lower, or if at one end sloping slightly, but in 20 years I've never found a problem with this.

xy
 
If you are able to take and upload some photos Xy, that would be much appreciated. :) I think I've got the gist of how the drawing works although, I'm still struggling a little with the slides/runners...

3499734471_6b82719395.jpg


I've drawn them 19mm thick at the narrow end, also assuming they would need to increase by the top thickness (32mm) at the wider end.

I can see how the leaves slide out in to position but, not how the raise up so they are flush with the top. I think I may need to add a partial taper (not full-length) to the top edge of the slides, so they clear the centre section :?:

It probably would've been easier to draw the final position first and add the notches from there... :)
 
Olly
The top will be 38mm thick when closed, because there are two layers, one on top of the other. And even when open, the centre section will still be 38mm. It's only the pull-out ends that will be 19mm.

The leaves have to rise by 19mm to ensure that they are level with the (main) top when they are extended. So the taper must be 19mm over the length of the pull-out. As the leaf is withdrawn, the main top is lifted up and up, until the leaf is fully extended, when the top drops back down the 19mm so that it sits flat on the runners again.

The problem with all extending-leaf tables, it seems to me, is that when extended, 4 people have a table leg in the way of their own. My dining table is built in two halves, so that the whole leg assemblies separate and the center is filled with a butterfly.No-one has a leg in the way. But it is rather heavier to operate, needs two people really, and you can't do it after the cloth has been laid, whereas you can pull out an end-leaf if grandad pops round just as you are sitting down to Sunday Lunch.
 
Olly,

Ok! First thing is SWIMBO says Thanks!. The bit of carpet under the dining table has been vac'd for the first time since christmas, well not really but in some time anyway.

I've taken some photos, hope they help.

Table with 'centre top' removed and one leaf partly open.
DLTable1.jpg


Table frame with whole top removed to show woodwork. The guide rail structure is screwed together.
DLTable3.jpg


Underside of leaf, note offset runners.
DLTable4.jpg


Underside of leaf taken from side to show shape of runners. Note the knocks in the runners to prevent over extention. Of course when you look at a familiar object closly you remeber things about it. The top does not drop as the leaf is extended, the leaf runners are shaped to lift the leaf as it passes over the table end rail.
DLTable5.jpg


Underside of top with leaves closed. You can clearly see the overhang from the table frame. Note the metal fittings to prevent the top sliding and the rails to the side to close the gap between the leaves when seen from the edge.
DLTable6.jpg


Underside of top with one leaf fully extended.
DLTable7.jpg


I tried to take 'photos which would give me all the information I would need to produce a table like this, but may well have forgotten something. If you would like larger images or more information let me know.

You will have noticed, certainly SWIMBO has reminded me, that this table is part way through restoration. I must admit it has been for some time.

xy
 
Xy, those photos are brilliant - thanks for taking the time and effort to get them uploaded for me. :) Thanks also to Steve for clearing things up. I was also looking for a design where the frame slides apart. But, as you suggest, it would require two people and I think that would be a problem for my client anyway.

Xy, I can also understand and see now what you were referring to with the battens and, how the 'gap' between the two leaves is hidden by a pair of rails; in effect, creating a 'hollow' panel. :)

I'd still like to get these runners sorted though...

3501775400_ebdcf24694.jpg


The lower of the two in the drawing above is what I originally had in mind, which I now believe is incorrect. So, should I be looking at something like the top runner, where it is effectively tapered on both top and bottom edges? Except, on the top edge, the taper starts after the flat which is fixed to the leaf... Hopefully, the guidelines I've left in will help to illustrate what I'm trying to say :? :wink:

Whatever I do, I think that I'll end up making a softwood and MDF mock-up of this before getting the oak out! :D
 
Okay, thanks Steve. :oops: :D In that case, I need to make the slots deeper in the stretcher rail to accommodate the widest part of the taper. Of course, it won't tilt in its resting 'position' because it's sat on top of the rails! But, once extended the tapers will sit in the notches, holding it in place - I think I get it now! Cheers. :)
 
Back
Top