


Mr Ed
Established Member
This is a project I've been meaning to do for years, but only just got round to it. None of the commercially available toolboxes suit very well the set of tools for joinery work in my view. I've long thought that the traditional style of joiners toolbox with the drop front is ideal and a thread some months ago on 'the other side' on this subject convinced me.
I needed a box for joinery tools for jobs on my house refurb, the occasional jobs I do for other people and the bits of snagging and finishing off that I end up doing at the end of projects at work. My travelling tool collection is mainly the stuff I started out with, chisels for example, which have since been replaced with better/flashier stuff that stays in the workshop.
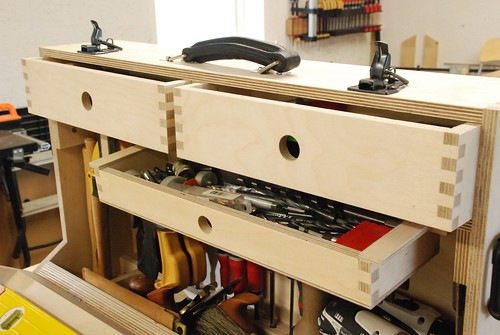
My box is made in 1/2" birch ply throughout, with hand cut box joints on the corners and the panels biscuited into the carcass.
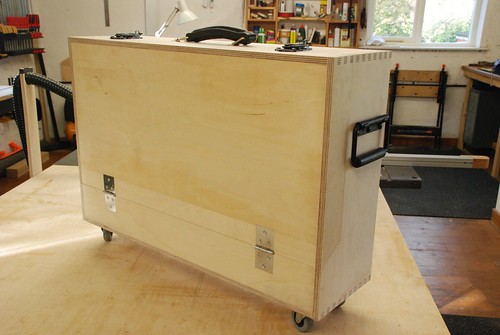
The fittings are mainly from Maplin, from the range of hardware they have for flight cases (thanks for the tip Boz)
The box is 700 X 450 X 200, which is based on the minimum needed to get it all in, with still being able to move it when full. The width allows the planes to sit and the bottom, and also the drill/impact driver and charger to fit. The ply is reinforced with a second thickness of ply where the hinges are fitted.
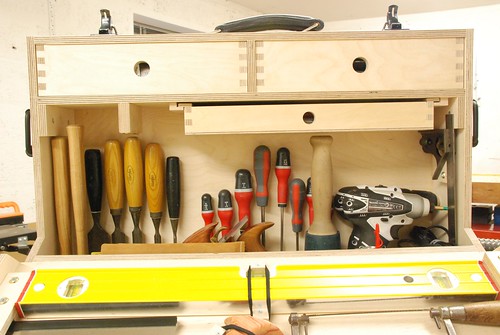
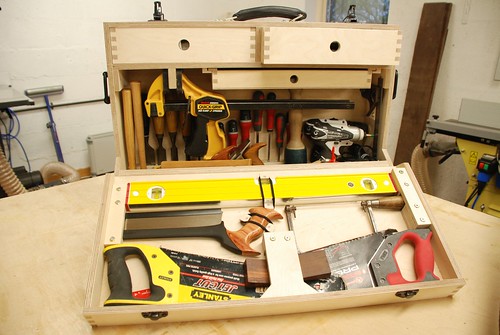
Chisels and screwdrivers stored in slots at the back, hammer and mallet at the left, combination square at the right. The pair of quick-grip clamps are fitted to a small fin of ply sticking down from the shelf.
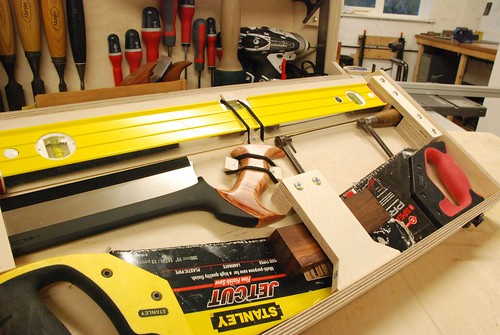
Spirit level, panel saws, coping saw and LV dovetail saw (doing duty as small tenon saw here) fit on the lid. The saws are held in with a pair of wedges which firstly means that slightly differing saws can be fitted over time without changing the box, but also means 2 wedges are available for wedging doors etc. on site.
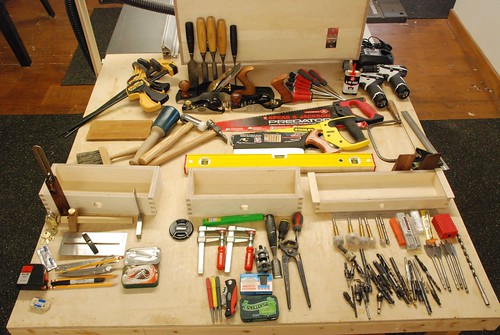
The trays contain;
1. Measuring and marking gear (left)
2. General tools - knife, pincers etc. (right)
3. Drill and screwdriver bits (underslung)
Finally a shot of everything unpacked to show what I managed to squeeze in;
In the end it took me 3 weekends and a few evenings to finish, which is a lot longer that I planned. Would have gone quicker without the box joints but I liked the look of them and they will hopefully extend the lift due to their strength.
Thanks for looking, Ed
I needed a box for joinery tools for jobs on my house refurb, the occasional jobs I do for other people and the bits of snagging and finishing off that I end up doing at the end of projects at work. My travelling tool collection is mainly the stuff I started out with, chisels for example, which have since been replaced with better/flashier stuff that stays in the workshop.
My box is made in 1/2" birch ply throughout, with hand cut box joints on the corners and the panels biscuited into the carcass.
The fittings are mainly from Maplin, from the range of hardware they have for flight cases (thanks for the tip Boz)
The box is 700 X 450 X 200, which is based on the minimum needed to get it all in, with still being able to move it when full. The width allows the planes to sit and the bottom, and also the drill/impact driver and charger to fit. The ply is reinforced with a second thickness of ply where the hinges are fitted.
Chisels and screwdrivers stored in slots at the back, hammer and mallet at the left, combination square at the right. The pair of quick-grip clamps are fitted to a small fin of ply sticking down from the shelf.
Spirit level, panel saws, coping saw and LV dovetail saw (doing duty as small tenon saw here) fit on the lid. The saws are held in with a pair of wedges which firstly means that slightly differing saws can be fitted over time without changing the box, but also means 2 wedges are available for wedging doors etc. on site.
The trays contain;
1. Measuring and marking gear (left)
2. General tools - knife, pincers etc. (right)
3. Drill and screwdriver bits (underslung)
Finally a shot of everything unpacked to show what I managed to squeeze in;
In the end it took me 3 weekends and a few evenings to finish, which is a lot longer that I planned. Would have gone quicker without the box joints but I liked the look of them and they will hopefully extend the lift due to their strength.
Thanks for looking, Ed
")