Dovetailed pine boxes with captive bottoms

UKworkshop.co.uk

Help Support UKworkshop.co.uk:

This site may earn a commission from merchant affiliate links, including eBay, Amazon, and others.

AndyT

Established Member
Joined
24 Jul 2007
Messages
12,028
Reaction score
539
Location
Bristol
It's been ages since I posted anything about making any woodwork, as I haven't been making anything for too long. (Custard knows that I am going to make a table and is being very patient waiting for me to start - I will make it before much longer, honest. ) But I've been asked to make a set of five wooden boxes and since they are not for me I have pulled my finger out and got on with it, rather quickly by my standards. I haven't finished yet but I thought I would share some of my ramblings so far and see if it's of any interest.

These need to match some shelving which is made of glued-up strips of softwood, so that takes care of the choice of material. Fortunately, our local excellent DIY shop sells "carpenter's pine" boards and not only do they charge about the same price as the big sheds, they will cut to size as well, at no extra cost. So I'm off to a flying start with 20 accurately and square cut pieces, exactly as ordered.

boxes001.jpg


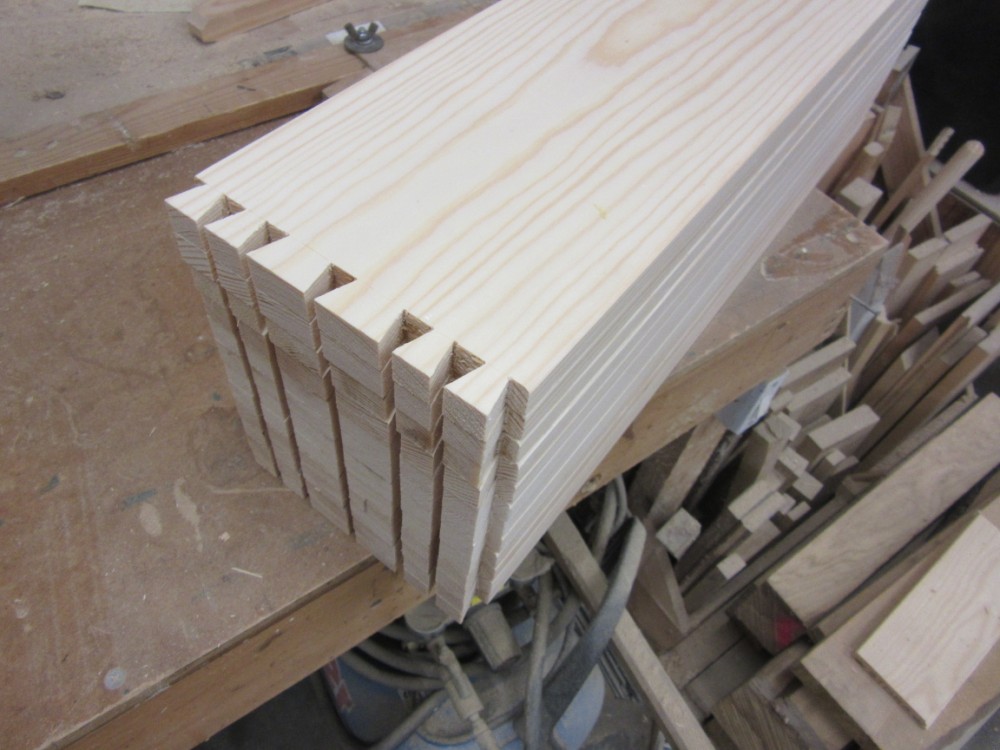
I have some leftover plywood to make the bottoms from. It's nominally 6mm, but skinny enough that a 6mm cutter makes a very sloppy fit. Fortunately I had a spare 1/4" cutter which I ground down to size on the bench grinder. Here it is in a Record 044C plough plane, with my comfy wooden replacement for the original blue plastic handle. Cutting the grooves is the first step. It defines the position of the end dovetail and it provides a really clear indication of which way up and which way round the pieces go.

boxes004.jpg


As I'm using this cheap pine there are plenty of knots and resin pockets which can't be avoided. Sometimes I needed to do a bit of chiselling by hand to tame unruly grain, but on the whole the plough plane worked down through the rough bits nicely.

boxes005.jpg


boxes006.jpg


I do like to try out different ways of making things but I need this job to succeed, so I decided to stick with the method I know best and go for tails first. (The recent thread on tails or pins first convinced me I ought to try the other way, but not on this job.)

So here I am marking and cutting two sets of tails at the same time.

boxes007.jpg


boxes008.jpg


I wanted to fit the ply bottoms into grooves rather than rebates. I knew this could be done by cutting a mitre to cover the groove but couldn't find a good diagram of the joint. I half-remembered a website from someone called Geoff that I thought covered it and found this - dovetail construction - which was nearly what I wanted in diagram 1 - but was not quite right.

In writing this up for the forum I have now re-found Jeff Gorman's site which has a better diagram here in option D - which is what I managed to work out for myself, but it still took some careful thought when cutting it for the first time. (It's also very good at covering some of the details which others gloss over or avoid. A recommended read.)

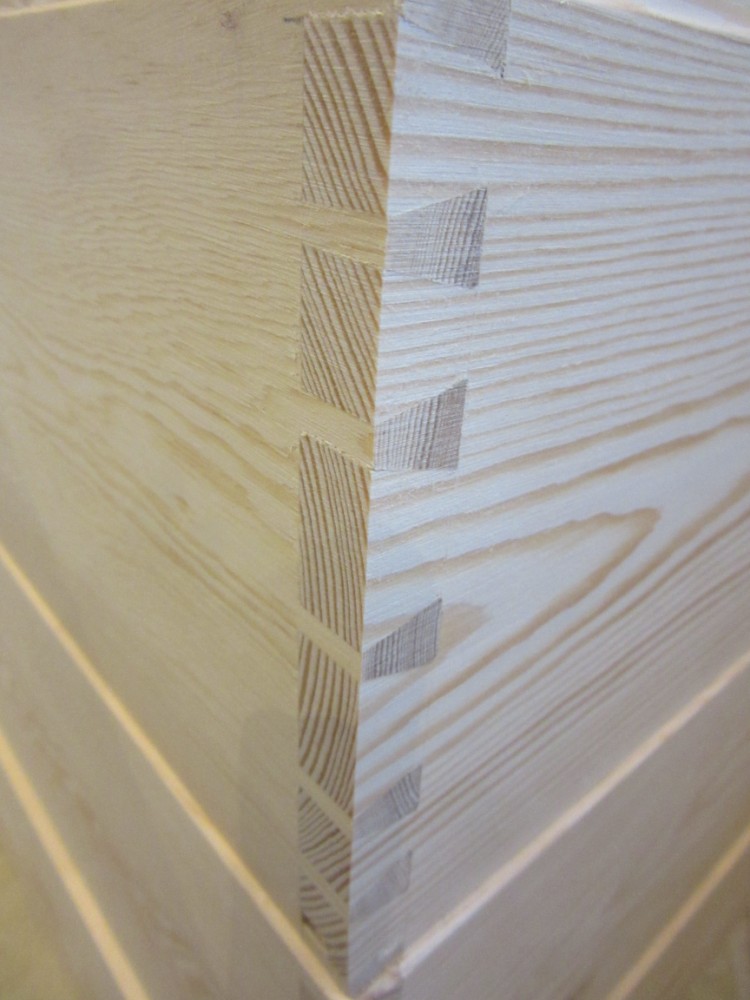
This is what the tails look like. There's a straight down cut in line with the base of the groove, next to the last sloping cut.

boxes020.jpg


The tails look like this:

boxes021.jpg


It's really important not to make a vertical cut at the edge in the same way as for the tails - that line marks a cut which is at 45°, only visible on the inside of the groove.

I cut two sets of tails at the same time for two reasons. One is that it saves time by eliminating unnecessary marking - my only marks were on the front face of the front board of the pair. The back only needs a baseline, done with a cutting gauge. There's no point making marks you can't see when cutting.

The other reason is that it's easier to get the cuts square across the end if you make the end double thickness - on a single thin board it's harder to see errors.

Having done the saw cuts I needed to remove the waste.

For the first box, I did what I have done several times before and used my nice old treadle powered fretsaw. It's quite good for this and using it justifies the amount of floor space it takes up.

boxes010.jpg


boxes009.jpg


Having got fairly near the baseline I could pare away the rest without the usual problem that comes from soft pine, where great divots of wood come out like pulled teeth, leaving a rotten cavity covered by a pair of fragile veneers.

I did also take the precaution of using a proper old bevel edge chisel.

boxes014.jpg


On the first two boxes I used my rather nice "Moxham style" vice that Douglas made me, which lets me work at a comfortable height and register the chisel on a broad guiding surface.

Transferring the marks to the other boards to mark out the pins was very traditional, using a plane on its side as a handy square support. There are two little extras which I think are worth mentioning - to help get things lined up, I put a handy offcut of suitable thickness into both grooves:

boxes012.jpg


and I added an extra weight to keep the top board under control

boxes011.jpg


That's it for now. The next installment will cover alternatives for marking and cutting and my thoughts on marking out to make clamping up easier.
 
Thanks for posting - really interested to see how it works out with pine. I've used it a lot when starting out and have grown to loathe it, so I'm very interested to see how the dovetails turn out
 
Pine can work out OK for dovetails, if you keep everything really sharp. I did my kitchen and bedroom drawers by hand last year:

qRbg1pC.jpg


zbV5guM.jpg


zK5L0aK.jpg
 
Wow, Mike, those look perfect - loads better than mine.

How many did you cut at once?
How did you fit the bottoms?
Were the outsides planed up or do I see the marks of a belt sander?
 
Watching with interest Andy :)

It's interesting that you ploughed the groove first. I've always ploughed the groove after cutting the dovetails, but not for any reason in particular. Your method has several advantages, not least using that offcut to align the boards. Very clever!

Also, nice dovetails MarkG =D>
 
AndyT":3lmdiq2g said:
Wow, Mike, those look perfect - loads better than mine.

How many did you cut at once?
How did you fit the bottoms?
Were the outsides planed up or do I see the marks of a belt sander?

Thanks Andy, and yes, I sanded them. Planing pine is a mission. Great most of the time, then horrible. And besides, these drawers will never be seen again. There are something like 18 drawers altogether, done in two batches, and I think I cut the tails in pairs, from memory. The bottoms are ply, set in a rebate/ groove run on a router table.
 
Following with interest Andy. I have also used your method for lining up the grooves - works well.

John
 
DTR":1svmve14 said:
Your method has several advantages, not least using that offcut to align the boards. Very clever!
Seconded; and thanks to AndyT for the great article and photos.

BugBear
 
With dovetails, you have to remove the bulk of the waste before you can do any fine cuts to get the bottom of the socket straight and square.
For the first box I used the treadle fretsaw to cut the sockets on the pin boards - it's safe enough to do the oblique cuts by lifting the board on my fingers, or on a scrap of wood - not something I'd attempt on an electric saw - but it's a bit slow and fiddly. So I swapped to sawing the waste out with my "olde concepts" saw

boxes013.jpg


This was ok too, and probably a little bit better than my ordinary Bahco fretsaw, as the blade can be tensioned a little higher.

For marking, there was another alternative I wanted to try, the use of blue masking tape, as shown by Derek Cohen. The idea is that you use a knife to cut through the tape, then peel it off from what will be the waste. It leaves a nice clear boundary to align the saw cuts:

boxes015.jpg


This worked well, but it seemed to be really rather fiddly and for me, on this project, with this wood, the quality of fit was no better. So I'll file the technique away for next time I am using some dark timber where pencil marks are invisible. I am keen to find the right trade-off between accuracy, effort and time taken, so for this job it's back to the simple pencil. I did plan the dovetails so there is sufficient room to get a pencil in, even though I'm cutting the tails first. (Incidentally I also made sure that I could get a suitable chisel in on the baseline without having to nibble away with a tiny one all the time.)

Another thing I did to speed up marking was to stop bothering to mark the waste, trusting that I was cutting enough similar joints for even my old brain to stop me going wrong. I also stopped marking face sides and edges - the groove does that, and I wasn't adjusting the shop-cut ends before starting on the joints.

I did carry on marking the ends of the boards with pairs of letters, so I knew which end went on which side. With all the spacing being pretty much the same, it would probably be possible to force an end onto the wrong side, at the cost of maximum accuracy. I've avoided that error so far, though I still have one box to make.

I experimented a bit with the way I marked the baselines on the ends. At first I was making a very faint line with a cutting gauge, then sawing the vertical cuts, then making a heavier cut across the base of each socket. As shown here

boxes024.jpg


I later switched to just using the cutting gauge for this. It worked fine and was quicker, though it did matter that I had the blade freshly sharpened and the right way round, with the bevel into the waste:

boxes045.jpg


boxes044.jpg


boxes043.jpg


The traditional pattern of cutting gauge lets you start and stop a line within tight boundaries quite neatly, which I think is another of its good features.

One aspect of making through dovetails which I hadn't thought much about is the question of how deep to make the sockets. For the first box, I set the gauge at the thickness of the wood, which should mean that a finished joint comes up even and is easy to clamp. But it didn't quite do so and there were little gaps underneath the side boards, where the clamps did not pull it up properly tight.

I always like the stage when you plane away the end grain and the joints suddenly look accurate, so for the next one, I set the gauge a little bit wider so the tails protruded, but this made clamping even worse. I got round it by cutting slivers of wood to sit over each tail but that did make the glue-up unnecessarily fiddly. Planing up was nice - but it was too slow. (I had about 1mm of end grain and if I had just gone straight to planing it there would have been fractures at the back edges, so I needed to pare round with a chisel first, at least to the extent of severing the fibres on the outside of each joint.)

By the third box I think I got this right. I set the gauge a little shy of the thickness of the wood. Here's how a finished joint looked after glueing:

boxes034.jpg


Here it is after initial planing but before sanding:

boxes035.jpg


And after initial sanding

boxes049.jpg


You can see that I have still not touched the end grain. The planing is easier as it's all side grain. The clamping is better as all the pressure is where it is needed. This is the same method I used when I made my chest of drawers, where it's important not to reduce the effective width of the fronts, which have been sized to the openings before dovetailing starts.

That's all for now: more ramblings tomorrow.

[Edited to add third picture of knotty end.]
 
I've never understood* the standard notion of making everything all-but-flush. Hang that....I will happily make both tails and pins 3mm longer than necessary, then plane or sand back after the glue is dry. That's not what is taught, apparently. (I'm self-taught, and my teacher is rubbish.) You clamp with packers just to the side of the protruding bits of wood, if you need to clamp at all. I sometimes clamp just to pull everything together then let the clamps off.

*OK, I do understand it. It's so that the over-all size of the box/ drawer is more certain. I simply work from internal measurements.

Have you cut those boards to length on a radial arm saw, Andy? That's what my RA saw does to pine, too. Another good reason to make everything over-long. Marking knife? That's a Stanley in my workshop......
 
Too late to make packers - only one to go!
Yes, the boards were cut on a radial arm saw, but not by me. They were cut at the shop where I bought them. In fact, I bought two boards both 400mm wide, one 2.4m long and the other 1.2m long. They were ripped into four equal strips just under 200mm wide, then cut to lengths of 19, 17, 15, 13, 12, 10 and 9.5 inches. All spot on. I'm happy to trade a little splintering at the back for the convenience.
 
One comment if I may, Andy, and it applies somewhat to the dovetails you see in my photos above. You seem to be working quite hard to keep all the tails the same size. This gives them the appearance of being machine made, and frankly, if you've gone to all the trouble of making something like this by hand you want people to see that this is the case. My suggestion would be to try to vary the size of the tails (but still keep the pins uniform). Mine are bigger in the middle, and get smaller as you go outwards towards the edges, but I should have made the size changes much more obvious.

The other thing I would do next time I have a big batch to do is to run a very shallow rebate across the end of the boards (on what will be the inside face) before marking out the tails. This would give me something to register to when marking up the pins and make that job very much quicker and less prone to cock-ups. It may help with chiseling somewhat too.
 
MikeG.":3e3snmeq said:
Pine can work out OK for dovetails, if you keep everything really sharp. I did my kitchen and bedroom drawers by hand last year:

qRbg1pC.jpg


zbV5guM.jpg


zK5L0aK.jpg
Phwoar !

Sent from my SM-G900F using Tapatalk
 
AndyT":20yfbwr3 said:
Fortunately, our local excellent DIY shop sells "carpenter's pine" boards and not only do they charge about the same price as the big sheds, they will cut to size as well, at no extra cost.

You're blessed.

A few more shops like that around the country and woodworking as a hobby would be ten times more popular!
 
MikeG.":12228dog said:
I've never understood* the standard notion of making everything all-but-flush. Hang that....I will happily make both tails and pins 3mm longer than necessary, then plane or sand back after the glue is dry. That's not what is taught, apparently.

*OK, I do understand it. It's so that the over-all size of the box/ drawer is more certain. I simply work from internal measurements.

That's right.

The piece work Victorian cabinet maker would have banged out his drawers straight from the saw with no further tinkering. Fair enough. But if you want immaculately finished, piston fit drawers, then you need a different approach. Basically you cut a drawer front so it precisely fits the drawer opening, you cut an identical drawer back, and you cut sides that only just fit into the drawer cavity.

Having got such a precision fit you can't trim down the width of the drawer front if, after dovetailing, the front is sitting proud of the sides. If you do that you'll have loose, rattling drawer. So you arrange things so the drawer sides (the tail boards), after dovetailing, are fractionally proud of the drawer front. The way to do that is to set the gauge line on the drawer front to be 0.5mm less than the thickness of the drawer sides. After assembly the drawer sides will then sit 0.5mm proud of of the front, you then plane it down until it's flush and then one or two additional fine plane strokes deliver the perfect piston fit drawer.

It's a good idea to lay out the drawer sides so that, once assembled, the grain direction will allow fair planing from front to back, that removes any risk of spelching on the drawer front.

It's all a bit of a faff, but if you follow the process you're guaranteed flawless, piston fit drawers time after time,

Shaker-Cab-Drawers-1.jpg
 

Attachments

  • Shaker-Cab-Drawers-1.jpg
    Shaker-Cab-Drawers-1.jpg
    87.5 KB · Views: 1,629
AndyT":3p8g5o45 said:
without the usual problem that comes from soft pine, where great divots of wood come out like pulled teeth, leaving a rotten cavity covered by a pair of fragile veneers.

Too true, Pine is a right pain in that respect. Sometimes you get the same thing on spalted timbers, Yew, slightly soft hardwoods like Poplar, and even Brown Oak if it's turned slightly punky. I keep a couple of chisels in dovetail sizes ground at about 18-20 degrees and honed at about 20-22 degrees. This only works with decent quality traditional carbon steel chisels, but it pretty much guarantees ultra crisp and clean results...provided you steer clear of knots, when the delicate chisel edge will as often as not chip and fracture!
 
custard":3htlm9lu said:
......if you want immaculately finished, piston fit drawers, then you need a different approach.......... if you follow the process you're guaranteed flawless, piston fit drawers time after time,...

At the risk of stirring up controversy, I reckon this is the maker pleasing himself and his peers rather than his customer. Piston fit drawers are a nuisance for a piece of furniture in regular use.
 
Picking up on Custard's last point...

Having decided that I preferred just chopping these dovetails rather than fiddling about with fretsaw or coping saw, I was soon up against the problem of trying to cut through the rather hard stripes in pine, which are supported on soft crumbly stuff. It's a bit like trying to cut a fresh crusty loaf and - as has been said by everyone else - the cure in both cases is sharper tools.

I usually look on chisel sharpening as something where the angle doesn't matter much, it's the frequency of sharpening that makes the difference. With pine, you really do need both. At first I was getting results like this:

boxes039.jpg


Ok at the top, but where it goes out of focus at the bottom, there's a big void. I know it's hidden inside the joint but there's the risk of opening up a cavity when I plane and sand the outsides, and I don't want that. I measured the angle of the chisel I was mainly using and found that it was somewhere over 30° so I took it to the ̶g̶r̶i̶n̶d̶e̶r̶ ̶a̶n̶d̶ ̶o̶i̶l̶s̶t̶o̶n̶e̶ sorry, non-specific non-controversial sharpening equipment and reduced the angle to 25-ish. It made a huge difference.

I should also say that I sharpened the chisels and plane iron before each box.

This meant that far more of the sockets looked like this:

boxes040.jpg


This also helped with speed a bit - I could take reasonably quick chopping cuts as shown here on some pin sockets

boxes046.jpg


and then a final slice on the baseline which was about 1mm thick like this:

boxes042.jpg


Another new habit which helped speed and consistency was that when chopping a row of sockets I would always do the same step on each socket in turn, finishing them all together. This is better than finishing a single one, then completing the next. There's a trad way of cutting dovetails that I have seen illustrated, where build a staggered stack of board ends under a cramp or holdfast, working one side of all the dovetails before turning over - or even without, if they are lapped dovetails for drawer fronts. I can't find a picture at the moment but I expect someone else will. It makes sense as the bits are all in pretty much the same position so you would be doing the same movements repeatedly.

For the bottoms of these boxes, I am using some very ordinary nominal 6mm ply. I have about half a sheet left and there isn't room to get that into my tiny workshop, so this is what I do instead. I lay it on the floor, measure and mark a line

boxes032.jpg


then cut along it with a Stanley knife.

boxes033.jpg


This is easier if you have a convenient step, where you can press down on the piece and open up the cut a little.

Having got the bottom cut to size, I assembled one side and two ends, slid the bottom in and added the other side. No action shots of this stage, but one here after everything was safely in place:

boxes018.jpg


Anyway, I've nearly finished making these and will be on to the finishing stage soon. These are the first four lined up for inspection.

boxes050.jpg


It's a lot of work, but a lot of enjoyment too.
 
They look impeccably square, when they're lined up on the bench there are no gaps along the adjoining sides.

=D>
 
Back
Top