Dovetailed Infill - First Fumblings

UKworkshop.co.uk

Help Support UKworkshop.co.uk:

This site may earn a commission from merchant affiliate links, including eBay, Amazon, and others.
Thanks Gary

A conical reamer at 60 or even 70 degrees would be ideal. I wonder if such a thing exists. :?:

I remember seeing the thing Karl Holtey uses somewhere in his vast blog. I'll have another trawl through it later. (Any excuse :) )
 
Richard,

When I was building the ghastly Shepherd infill smoother kit, which is extensively described in my third book "Handtools and Methods", I consulted Karl on the riveting bevel question.

Now this comes from my memory and should be treated with caution. He recommended using a three sided engineer's scraper to flare the neck of the holes at a slight angle. Maybe only 5 degrees ?

The three square scraper can be conveniently made by grinding and honing the teeth from a 3 sided triangular file. The sharp edges are used as a scraper to flare the top of the holes. This worked very well.

If in doubt e mail Karl.

Best wishes,
David Charlesworth
 
Thanks very much for that David. It certainly makes a lot of sense. A very slight, smooth flare would be perfect.
I've just been doing a bit of Googling and turned up plenty of Faithful and Eclipse triangular engineer's scrapers. The all describe the length but never the width. I must have a few larger, balding saw files knocking around somewhere .. I'll give grinding one up a go.

Sorry to disturb you Karl ... mustta bin another another feller. :)
 
Got the frog plate filed flush.

frog.jpg

It helps to alternate between cross and draw filing. That way I could see the previous marks disappear and make sure I was still on the same plane, checking the angle every so often.

angle2.jpg


Last thing yesterday I started to file the compounds out. First with a triangular saw file and then into the corners with a small half round.
filing5.jpg
 
Richard mate...

Tremendous work.

I was looking at this thread and pondering about how many I have seen which detail the making of these old masters in the last research pass I made...and it is almost none.

None that do it by hand that is.

It is absolutely vital that we retain the various techniques and tips for the future...if not just for historical reasons but I believe, for new design based on some of these well-honed techniques.

I just wanted to make sure you realised how vital the pictorial part of your work was....it's wonderful.

Jim
 
Thanks Jim,
If you mean almost no details about coffin shaped (Bill Carter calls them boat shaped - much more cheery) I fully concur. I have a folder in my "tools" file entitled "Coffin Clues" - all the related pictures I have found on line showing hints as to the construction methods. I've said it before but there is a new problem at every turn with a curved sided plane. Cutting it is about the only aspect unchanged by the shape. Measuring, marking and just holding it are problems that require at least one jig each.


Glad the photos are appreciated. I've tried to marry photo opportunity with work this time. I must remember to add one of the double vise I've knocked up - also out of nessessccity for this plane but will be useful for future straight sides too.
 
Cheers Richard...you have a PM

I think my first dovetail will be a mitre plane.

For a few reasons really...mostly because I love the shape, then because I want to use it on a shooting board and lastly...because the flat sides are a LOT easier!

I shall be putting in the traditional tongue and groved mouth...and probably use gunmetal or similar for the sides...although this is by no means a certainty at this stage.

Your tips and wrinkles on your journey have prevented my from making similar mistakes...

I shall be free to find my own errors now! :mrgreen:

Keep up the good work!

Jim
 
MickCheese":76eah2ix said:
Richard

I have no intention of making a plane but am really enjoying reading your thread and marvelling at the workmanship.

Fantastic.

Mick

Ditto!

It did cross my mind that if you wanted to mark the finished item with a brand name of your own, "Holdfast" might be an appropriate one to use!
 
Thanks Mick, thanks Andy - I think if I ever got around to selling both, the planes also being called Holdfasts might get a bit confusing .... bit of a price difference too.. coincidentally I am designing a plane that has all the best features I can think of and I thought about calling that one "Dreadnought" hoping that no one would confuse it with the file (or the HMS)

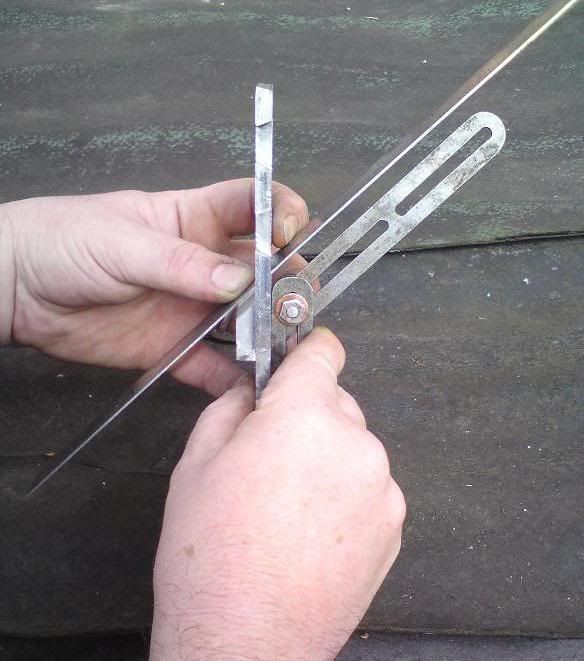
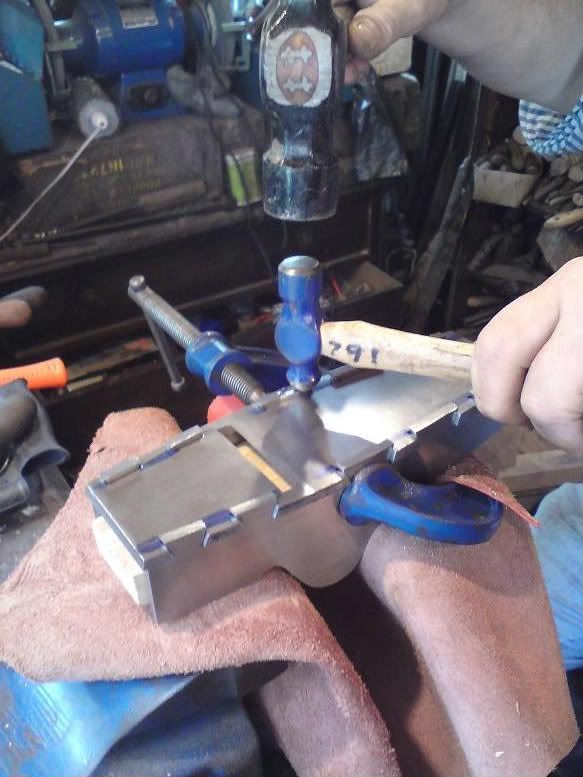
Anyway, here is the vise arrangement I've been using to great effect to see into the corners.

vices2.jpg


vices3.jpg


It looks like a design by Mr. G. Bennet, but it works really well in providing a good view of the tiny scribe marks I was trying to file exactly to and not past.

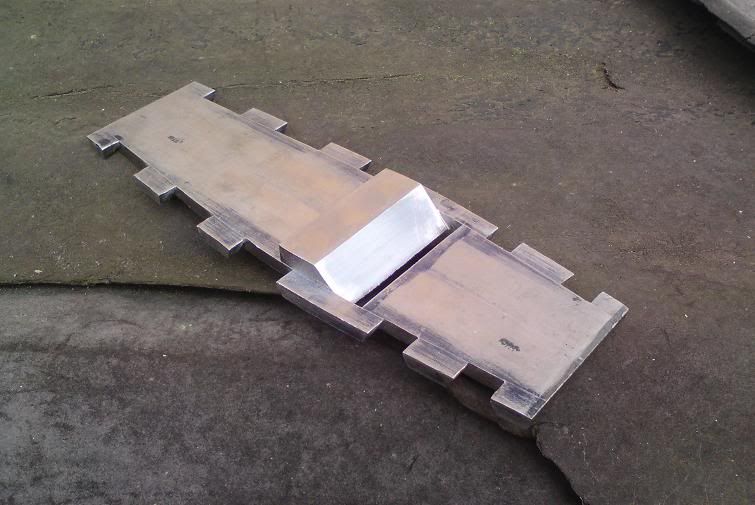
Now here's the first of the you - know - what ...
peined.jpg


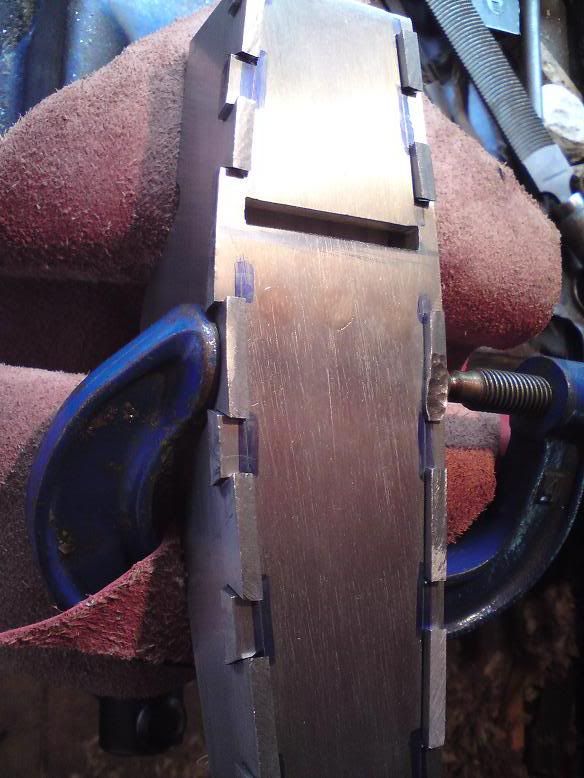
Underside of dovetail peined from the centre to the corner moving steel into the shoulder socket in the pin.

peining.jpg


My "punch" - a 1/4lb hammer ball down hit with the 1lb hammer face down. It really helps direct the flow using a punch and less stray hammer marks on the sole too (still some though :roll: )

peined4.jpg


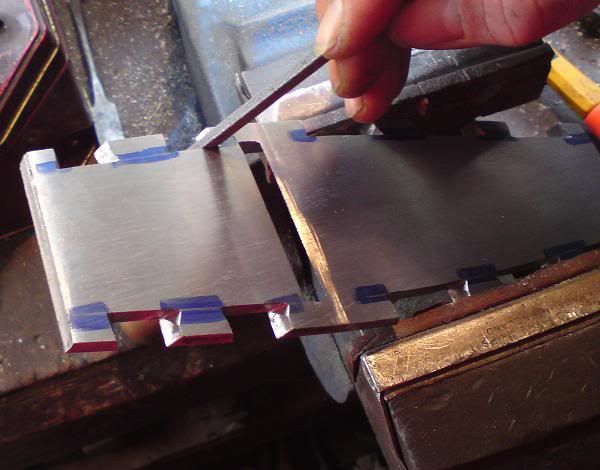
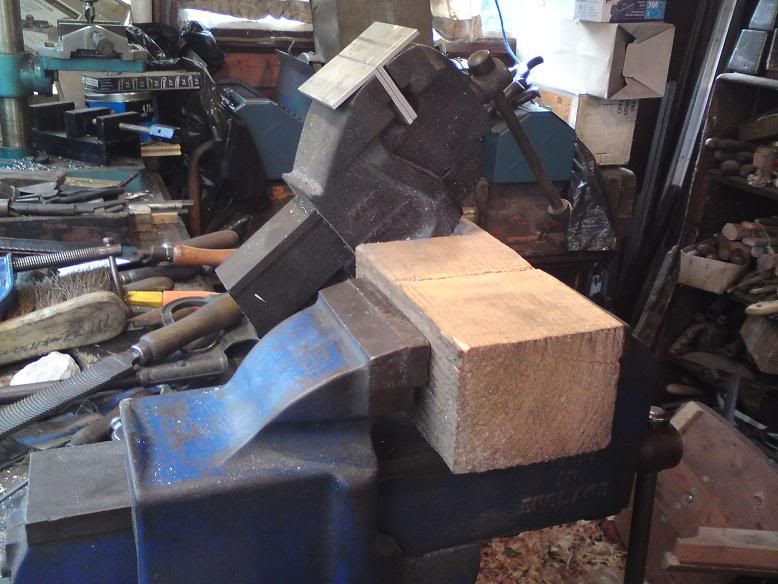
My high tech clamping system - wooden form inside plane, G cramp on bit being worked, double folded leather over vise jaws. It's crude but it's ok.

wellpeined2.jpg

As far as I got a couple oh hours ago. I've since done 'em all but two at the back.
I must say this is much quicker than cutting them. I love it!
 
One of the benefits of having 1/4" all around is that you have more material to pein into the corners!

I wonder what it would be like for 1/8" sides and 1/4" sole ala Spiers?

Excellent photo essay as others have said Richard...vital importance as this is perhaps one of the only WIP series that I have seen detailing the making of a curved sided coffin smoother with dovetails.

Watching with interest my friend! =D>

Jim
 
I've been doing all that with ball pein..... Blacksmith training hints that the spreading of the tails should have been done with cross pein .... I think that's right. Side to side and not all directions.
 
I had left too much steel sticking out to pein - I think you know when there's too much, it folds back over and you can't see if the joint is closing properly or not. So I've filed it all back to a reasonable amount to work with.
Note to self. Don't leave as much to begin with and save an awful lot of extra sawing too.
I'm terrified that when I file it flush there will be tell - tale lines along the bottom. Hard to know when it's definitely done...
 
Mr Kingshott suggested 1/8" protruding.

Incidentally....did you read up on the most difficult bit...the fitting of the through rivets to hold in the infill wood?

You need to pein one side then the other and he suggests the use of a blank sheet 1/8" thick with a hole in it to fit the bit of rivet sticking out of the far side when you pein the near side first. This prevents the far side from retracting. Once the nearside is done...flip it over and remove this protecting plate to do the final side rivetting.

It makes sense when you think about it but you have to think about it first. He didn't on his first attempt and had to knock the rivet out and start again.

Also the use of a sprung shelf pin pair in the lever cap...allows for removal of the lever cap in the future without knocking out the rivets. Or are you going to screw it ala old Spiers?

Jim
 
This really is the most fascinating WIP, thanks for posting in such detail.

I'm a bit jealous really; I have neither the time, experience or bottle to attempt something of this order, even having read this from the start I wouldn't know where to begin! Maybe in the future... famous last words!
 
I think I left 1/8" Jim. It was useful for pulling into the cutaway corners but with a bit more work I could have pulled more steel from the middle. After that, when trying to expand the tail in the joint, I was merely expanding the excess out side the joint. So I filed some off and carried on. Maybe I'll leave 3/32" next time.
I haven't re - read up on the handle rivets yet, no. To sleeve or not to sleeve? (Mind you, I haven't got the handles yet. First, plant thy Walnut ... ) I think I would, as before, pre dome, especially in something that long.

Lever cap pins ... short and screwy I think, bronze perhaps. I've got plenty of round bar.


Hey Scouse - other than grinding the scale off at the start, this has been the perfect Luddite occupation. I did use an electric pillar drill but I know you have that area covered. :)
 
Back
Top