Disston 6 PPI refurb .......with some extras

UKworkshop.co.uk

Help Support UKworkshop.co.uk:

This site may earn a commission from merchant affiliate links, including eBay, Amazon, and others.

Bluekingfisher

Established Member
Joined
16 Mar 2009
Messages
1,524
Reaction score
8
Location
Land o' Burns.
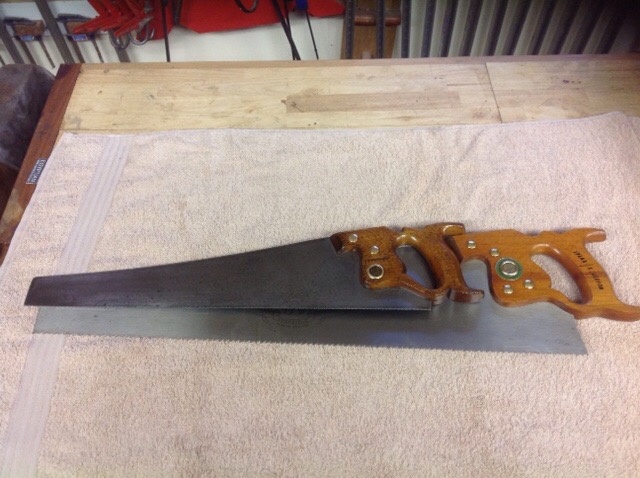
Here is another saw I recently brought back from near death. It is a Disston 6 PPI crosscut saw with a 26" plate. Although in a rough state the plate was good and straight with little pitting. The handle on the other hand had seen some heavy wear. I never really like the " block" shape of the handle so I took the time to reshape it to fit my hand with a little carving for aesthetic.

IMG_3172.JPG


IMG_3179.JPG


IMG_3180.JPG


The first job was to disassemble the saw, a fairly straight forward process.

IMG_3181.JPG


Getting started in stripping the old finish from the handle, then a little shaping with hand tools to suit my hand.

IMG_3192.JPG


I cleaned the plate with wet and dry paper then buffed it on a polishing wheel. Once done I set about jointing sharpening and setting the teeth.

I managed to miss a tooth on the first pass, (should have gone to Spec Savers) not to worry, move on.

IMG_3183.JPG
.

I use one of these for assisting with the angles invaluable, can't go wrong.

IMG_3184.JPG


I kept the tooth geometry fairly standard for general cross cutting. A 15 degree rake with 25degrees of fleam.

A little setting and the plate was done.

IMG_3186.JPG
.

I applied a couple of coats of stain until I achieved a colour I like then applied several coats of an oil/poly mix. I think about 6 or 7 coats. I let the finish "cook for a couple of days then reassembled the saw.
 

Attachments

  • IMG_3172.JPG
    IMG_3172.JPG
    70.7 KB · Views: 1,048
  • IMG_3179.JPG
    IMG_3179.JPG
    79.3 KB · Views: 1,048
  • IMG_3180.JPG
    IMG_3180.JPG
    57.3 KB · Views: 1,048
  • IMG_3181.JPG
    IMG_3181.JPG
    92.3 KB · Views: 1,048
  • IMG_3192.JPG
    IMG_3192.JPG
    82.1 KB · Views: 1,048
  • IMG_3183.JPG
    IMG_3183.JPG
    91.4 KB · Views: 1,048
  • IMG_3184.JPG
    IMG_3184.JPG
    96 KB · Views: 1,048
  • IMG_3186.JPG
    IMG_3186.JPG
    80.2 KB · Views: 1,048
IMG_3191.JPG


The handle looks and feels a lot better, least I think so.

IMG_3190.JPG


IMG_3189.JPG


IMG_3188.JPG


I have completed several more saws, more to come.
 

Attachments

  • IMG_3191.JPG
    IMG_3191.JPG
    86.9 KB · Views: 1,043
  • IMG_3190.JPG
    IMG_3190.JPG
    87.7 KB · Views: 1,043
  • IMG_3189.JPG
    IMG_3189.JPG
    92.6 KB · Views: 1,043
  • IMG_3188.JPG
    IMG_3188.JPG
    100.9 KB · Views: 1,043
Unless the saw plate is particularly warped, bowed, pitted or the teeth are in a particularly poor state the longest part of the refurb is waiting for the coats of finish to dry on the handles. As a result, I had several saws all in various stages of completion. That way I was assembling one, maybe two saws per day.

Below are some photos, unfortunately I did not take any WIP images of these saws although I can say most were in a similar state to the Disston shown earlier.

Here are the entire batch after completion.

IMG_3200.JPG


Ranging in tooth pattern from 4 PPI crosscut to 12 PPI rip cut as below.

IMG_3197.JPG


This one was my grandfathers saw. He died in 1979, it's been hanging on a peg ever since. The teeth were badly shaped so required filing all the way flat to the plate. I kept the original geometry, 6 PPI fil d for cross cut. 15 degree rake with 20 degrees fleam.

IMG_3196.JPG


The saw below was probably a boot fair purchase some years ago. A non branded saw with three saw nuts. It too was 6 pointer filed for cross cut. I reshape the handle and stained it and polished the saw nuts. When I removed the handle I noticed there were four nut holes drilled so I figured I would add a spare medallion I had. I think it looks better with four, rather than three.

IMG_3204.JPG


IMG_3203.JPG


IMG_3202.JPG


Below is a Spear and Jackson 5ppi rip cut saw. This saw really only required a little cleaning and a touch up of the teeth. The saw below is a small 18" saw with 12 PPI filed for rip cut. On the plate the makers name is "Fitchburg Co, Chicago.

IMG_3194.JPG


A final one of them all nestling on the saw till a made for them several years ago. At least now they are all ready should I need them and I have just about every conceivable tooth pattern known, with a couple of spares.

IMG_3201.JPG
 

Attachments

  • IMG_3200.JPG
    IMG_3200.JPG
    118.9 KB · Views: 1,030
  • IMG_3197.JPG
    IMG_3197.JPG
    80.5 KB · Views: 1,023
  • IMG_3197.JPG
    IMG_3197.JPG
    80.5 KB · Views: 1,030
  • IMG_3196.JPG
    IMG_3196.JPG
    106.9 KB · Views: 1,030
  • IMG_3204.JPG
    IMG_3204.JPG
    106.6 KB · Views: 1,030
  • IMG_3203.JPG
    IMG_3203.JPG
    105.8 KB · Views: 1,030
  • IMG_3202.JPG
    IMG_3202.JPG
    109.1 KB · Views: 1,030
  • IMG_3194.JPG
    IMG_3194.JPG
    107.5 KB · Views: 1,023
  • IMG_3194.JPG
    IMG_3194.JPG
    107.5 KB · Views: 1,030
  • IMG_3201.JPG
    IMG_3201.JPG
    97.6 KB · Views: 1,030
Super job, thanks for sharing. I’ve only done one saw refurb myself, and nowhere like your standard, but it gave me great satisfaction.

F.
 
Make me ashamed of my one plastic handled panel saw with i have no idea how many teeth that i think i last used for cutting breize blocks :-(
 
... when needs must!

Dont worry i DO appreciate quality tools, and would never mistreat anything like your saw collection. It made me jealous to see what you have ...
 
Seeing these old saws come back to life gives me hope that I can do the same to the one I got from my recently departed grandfather's garage. All rusted up but with a nice looking handle and a medallion in there. Only 6ppi I think and there might be a slight kink on the blade, but I've not had a real good look at it yet.
 
One of the refurbed saws was my grandfathers too. If it is a 6 PPI saw then jointing/sharpening/setting should not be difficult. The teeth are large and easy to work on. Even if the blade is a little twisted or kinked you may still be able to salvage it, although that may involve chopping it a little. No big deal and easily done. I should imagine it will be a cross cut saw and you may wish to keep that configuration, although filing for rip cut is a little more straight forward.

If you have not sharpened a saw before I would practice on a couple of old throw aways before working on your grandpas.

It doesn't take long to get the hang of it, so give it a go. Even if you never use it it's something to pass down the family line.

Good luck with it.

David
 
Thanks for the info David.

From what I recall from a brief look at it I think it might have actually been a rip cut but it was such a brief glance and so covered in gunk that it could well be a cross cut.

I've not yet had need to sharpen a saw but will have a go on some others before trying on that one, I do already have a #77 set and a saw file to be getting on with. Frankly even if al I do is clean it up and hang it on the wall, it would be nice.

My grandfather was never a woodworker as far as I recall, he worked as a TV repair man until he moved into chauffeuring. I think the saw was probably just one he had bought for doing the jobs that needed doing many years ago.

It'll be interesting to see and I'll be sure to keep you apprised!
 
I just bought a Disston to refurb at a car boot last weekend, on the strength of having seen threads like this. Seems in good nick, but the blade has a slight curve though, gentle across the length. Is that much of an issue, how would one properly and carefully go about setting it right?
 
Dokkodo":2hbzcy62 said:
I just bought a Disston to refurb at a car boot last weekend, on the strength of having seen threads like this. Seems in good nick, but the blade has a slight curve though, gentle across the length. Is that much of an issue, how would one properly and carefully go about setting it right?

This discussion may help
straightening-saws-t89937.html
 
Many moons ago I had a go at saw straightening; straightening-a-bent-sawblade-t61086.html

There are a couple of other methods not mentioned in that thread. One is just to bend the saw as far as it will go (right back on itself - toe end to handle) opposite way of the curve, and see if that straightens things out. Then there's dunk it in boiling water, and bend as above.

However, after my fiddling around, I'd say that unless you feel like taking up saw doctoring as a hobby rather than working wood, it's not worth the bother. There are plenty of 'straight enough' saws out there.

(PS - As an aside, for some reason I googled 'saw straightening', and that old thread came up as the second entry. That's REALLY frightening - if all Google second entries are written with as much ignorance as I have on straightening saws, the world has big problems!)
 
DBT85 - it was my intention too just to have his old saw hanging on the wall. My grandfather was not a woodworker either, he was a painter and decorator, so like you mention, probably just a saw for the odd job around the house.

Give it a go, i found it a really interesting learning curve. Just take your time, don't go at it like a bull in a china shop. I actually found it quite a therapeutic experience, hence why I restored so many lol.

I would be intèrested to know how you get on.

Dokkodo - good for you, nothing ventured nothing gained, very satisfying once you are able to cut wood with an old saw with the knowledge you can sharpen it again when it dulls. Unless you are cutting wood regularly or hit some metalwork, sharpening need not be regular occurrence.

With regards to straightening a bowed blade. If the curve is only slight then as mentioned in this post, bending the blade backwards away from the direction of the curve Is quite effective. Don't worry about snapping the blade, it is almost impossible to do so by just bending the toe of the plate back towards the heel. It may take a couple of bendings and If it doesn't straighten it completely, it should reduce the bow at least to make it useable. If the blade has a kink in it, it is almost toast(depending on how far back the kink is towards the handle). Scrap the saw for the saw nuts and handle and use the blade for scrapers and such.

Setting is very, very simple. Firstly you do not need very much set on the teeth, (unless you are cutting fibrous or green wood) just enough set to let the plate travel through the wood. Less is more as they say. The other major issue to consider when setting is always set the tooth in the same direction as is existing on the saw. I.e. DO NOT bend it back the other way, you are sure to snap a couple of teeth in the process. I have never snapped a tooth when setting 'with the grain' as it were.

There are plenty of instructional videos online. However with your Disston I suspect you will have 6-8 PPI.? Setting should only take 5 - 6 minutes with 6ppi. I would start with a low set first off. If you need more set, move up one digit on the saw set. If your saw then cuts straight you are done. If not you can do one of two things first off. If the saw drifts to the right for example, then you have too much set on the teeth leaning in that direction, they are cutting more aggressively. If the drift is minor lay the saw on its side, in this case with the right side facing up and draw an oil or diamond plate a couple of times lightly along the top (edge) of the teeth from back to front. Retest, if still drifting then set only the teeth facing left only ( with the same set setting) Depending on the amount of set you apply, you may not see the tooth bend much, if at all. Don't worry, just apply even pressure to each tooth on the left. This should all that needs doing, provided the teeth are sharp and jointed. Uneven teeth or missing teeth could cause the kerf to drift off line.

Once I have set the teeth I always give each tooth half a stroke with the file To sharpen again, although this is not necessary, just me being a little OCD.

Once you have done it once it will all make sense. Good luck with it.

David
 

Latest posts

Back
Top