Router for biscuit joining.

UKworkshop.co.uk

Help Support UKworkshop.co.uk:

This site may earn a commission from merchant affiliate links, including eBay, Amazon, and others.

leadhead66

Established Member
Joined
6 Nov 2013
Messages
77
Reaction score
2
Location
Portsmouth
Has anyone a good method of biscuit jointing with an ordinary router on a router table. Specifically the line up, since no reference is present on the router base?
Could make a sliding jig as per y/tube examples but if there is a simpler method, I would be grateful if you could share your experience.
Not quite ready to purchase the proper kit. So would like a temporary expedient!
 
I have not done it using a router but if would lay the pieces out, mark the centre of the biscuits across both boards. Then mark the router table fence with the start and finish of cut and That is assuming you are making an edge joint and assuming that you have to move the workpiece to make a slot. If the cutter cuts it with one action, just mark the centre on the fence.

Maybe I am not understanding the issue? If you are doing other joints, you may need to clamp some guides in place on the table. The biscuits are not generally to within a mm by the way that they are cut with a blade. The advantage can be that you have some wiggle room for alignment.
 
I bought a cutter to make biscuit joints on my router table occasionally. My cutter requires more than a single plunge. First I make a test cut with the correct bearing; my cutter having come with three different bearings for the three common biscuit sizes. I measure the biscuit's length, add a couple of millimetre, subtract the length of the test hole and halve the difference. I mark up the centres on both pieces as described above, and then make marks at half the difference, either side of the centre. Then I can put the workpiece on flat on the table, move it to plunge the cutter in up to the bearing with the bearing centred on one mark and then move the work piece until the centre of the bearing has reached the mark the other side of the centre. (At least I'm pretty sure that's what I do, without actually trying it now.) Without the bearing, I can see that it would be trickier. Is that what you mean? You don't want to buy a biscuit cutter/bearing set yet?

The main thing to catch you out that I found was moving the work piece and keeping it perfectly flat against the table. With both my router table and my insert plate each having bows :( , that can be tricky, especially with longer pieces. If the board moves up or down, you don't get a snug fit. (I am assembling parts to make another router table but haven't found a nice piece of worktop offcut yet; whenever I eventually spot a piece in a skip, I'm a day or two late and it's been in the rain, wrong side up, for a couple of days. Another story though.)
 
Given how cheap you can get a biscuit jointer for now, less than fifty quid, I'm not sure trying to build jigs to get a router to cut the slots seems a bit of a waste of effort. You'll end up paying a significant proportion of the cost of a machine on the router cutter anyway.
One of the key advantages of using biscuit joints is the speed and ease of use of the jointer itself.
 
Some time ago when I was in a bit of a rush and didn't always use hand tools, I used my little 1/4" Bosch electric router to make some light weight doors which I put together with biscuits.
Instead of using ordinary straight cutters, where the router base would have needed to be held on the narrow edge of the work, I bought a 4mm slotting cutter from Axminster. This let me make a slot of the right size for a biscuit, referenced off the surface of the work, using the router freehand. Minimal outlay, quick to do, and the doors are still in one piece.

This sort of thing:

666275_inset1_xl.jpg


http://www.axminster.co.uk/axcaliber-2-wing-slotting-router-cutters

IIRC, they were a lot cheaper then.
 
i had assumed that is what we were taking about. was the OP using a straight cutter?
 
phil.p":l7jqjv4j said:
Probably just a fixed (bearing less) router slot cutter.

I too have a router fixed under my home made bench, using a biscuit cutter about 40 mil dia. it does not fit the normal biscuits. Previously I used a Triton biscuit cutter and attachment. However the Triton biscuits were a different shape ,far rounded, so the fit was good, now I find that I have to make an elongated slot. Not too happy with the fit.
I am doing a chair cushion seat frame so am going back to dowells as the biscuits (No 10 ) are longer than the framework.
Richard
 
All the biscuit cutters I've seen for routers are around 20-30mm* radius.

This is a lot less than the main curves on biscuits, which are intended to match the dedicated machine's cutter, at around 4" (say 50mm radius).

The original Lamello handheld design was based on a small disc grinder and they still are. You couldn't easily use a router with a cutter of that size. I believe grinders gain mechanical torque advantage through the right-angle gearbox (crown wheel probably), but most routers would stall as they couldn't deliver the necessary torque.

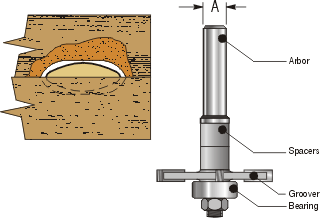
That leaves a problem, shown in Wealden's diagram:
Img096.gif

The biscuits only fit the slot's thickness, not its depth nor width. It's both good news and bad news really - the slot can be shorter than the one made by a proper jointer, so theoretically you can set up the joint with almost no sideways slip in it, but the joint is also slightly weaker (in end grain), as there is less support for the glue surfaces towards the ends of the biscuit.

You also can't make biscuit slots in the midle of a board, because the router physically won't fit.

I have two router biscuit cutters: an expensive Trend one with swappable bearings and an el-cheapo, one-size Screwfix one that came with a router bought on eBay. Both are "deficient" in that you have to waggle the stock slightly to get the correct shape. This inevitably leads to a bit of slot thickness widening too. Addressing the stock to the cutter, rather than the other way round (with a proper jointer), is the biggest single reason for sloppy joints in my experience.

I've recently had a big shelf split (made of pine staves). It was made some years ago, and being the top of a boxing-in in the bathroom, it's suffered serious humidity changes. The biscuited joints have failed, and I think the main reason is that they were done on the router table, before I bought my jointer.

There was a _very_ slight wind to the wood, which would have had a negligible effect on the jointer, but caused a bit of wobble on the flat router table, and widened the slots, so that the biscuits didn't grip well enough. OK, I should have squared it first, I know, but you live and learn, and at the time I didn't have the tools to do that easily.

I used the router table for a number of years before buying a proper Makita joiner. I don't regret changing over one bit. The joints are much stronger, mainly because the thickness is better controlled. Setup is much faster and easier, it's less messy and more useful (for most small jobs the dust bag is good enough).

IMHO, it's also safer too. I watched with horror one 'expert" on YouTube ("Jimmy's jig" or something) showing how you can forget a whirling cutter and almost lose a thumb. Router cutters leave nothing that can be stuck back on, no matter how good the surgeon.

The 4mm cutters on the router table are nice grooving/slotting cutters though, as the relatively large radius gives a nice finish compared to using a small cutter vertically (and the RPM can be a lot lower, and you can take one pass to depth usually as long as you feed at the right speed). Beyond that I don't think there's any point, and I'd always reach for the jointer instead.

E.

*Wealden do a "heavy-duty" 4mm cutter that's 60mm diameter (on an 8mm shank). It's not cheap though. They don't class it as a biscuit cutter, either, although I'm not sure why.
 
if you are edge joining boards you getter a stronger joint by just rubbed gluing plus cramps. Biscuits/dowels etc may help locate the pieces but they introduce a point of weakness. Best avoided altogether and improve your cramping system instead.
 
Jacob":2ko8s515 said:
if you are edge joining boards you getter a stronger joint by just rubbed gluing plus cramps. Biscuits/dowels etc may help locate the pieces but they introduce a point of weakness. Best avoided altogether and improve your cramping system instead.

Makwes sense. The board that's failed was made up in adverse circumstances, I was short of materials and wanted to do the whole thing in one go too, rather than several passes to build up the width.

Older and wiser, and with better tools for making rubbed joints now. That said, biscuits are still good for location, and they do help to stop the joint springing...

... thinking about your comment, there are a lot of occasions where loose tenons are used side-grain to side-grain, and it's not always for alignment. It would be very interesting to experiment to see what sorts of joint have what strength. I have a couple of these:
Img128.gif

at different sizes. They're great for increasing the glued area as well as alignment (used for flat boards). there is a bit of wastage, though you can minimise this.
 
I always used loose ply tongues. Route a 15mm x 6mm grove in all the edges and cut 29 mm strips of ply. I'm sure it's a strong joint, but started to think it was a bit over kill. I now use buiscuits cut with a slot cutter. And have never had a joint fail (hundreds of glue ups).
 
Mar_mite":348q7di6 said:
I always used loose ply tongues. Route a 15mm x 6mm grove in all the edges and cut 29 mm strips of ply. I'm sure it's a strong joint, but started to think it was a bit over kill. I now use buiscuits cut with a slot cutter. And have never had a joint fail (hundreds of glue ups).
What I found was that if I didn't get a good glue spread any joint additions such as ply inserts would add very little strength if any, but with a good glue spread you don't need the joint. I was quite pleased about that as it makes table tops etc a lot easier - though you have to juggle about with your clamping methods to get flush joints.
 
Jacob":1rv37xu7 said:
Mar_mite":1rv37xu7 said:
I always used loose ply tongues. Route a 15mm x 6mm grove in all the edges and cut 29 mm strips of ply. I'm sure it's a strong joint, but started to think it was a bit over kill. I now use buiscuits cut with a slot cutter. And have never had a joint fail (hundreds of glue ups).
What I found was that if I didn't get a good glue spread any joint additions such as ply inserts would add very little strength if any, but with a good glue spread you don't need the joint. I was quite pleased about that as it makes table tops etc a lot easier - though you have to juggle about with your clamping methods to get flush joints.

Yes I agree. If I'm doing a table top or a worktop now, I only use a few biscuits for a alignment. The loose tongue method can get a bit fraught if your doing a large glue up and the glue starts to grab.
 
As Jacob says, gluing up boards for a table top or similar, the strongest joint is simply having butt joint which is a large gluing area. The difficulty with this is that if clamping with sash cramps it is almost impossible to keep the joints flush as the wet glue adds lubrication. Biscuits help solve this, you only need one at each end and 1 or maybe 2 in between, but they are for location not adding strength. It isnt even really necessary to glue the biscuits in place just pay attention to an even coating along the board edges.
 
RobinBHM":3ase37k2 said:
As Jacob says, gluing up boards for a table top or similar, the strongest joint is simply having butt joint which is a large gluing area. The difficulty with this is that if clamping with sash cramps it is almost impossible to keep the joints flush as the wet glue adds lubrication. Biscuits help solve this, you only need one at each end and 1 or maybe 2 in between, but they are for location not adding strength. It isnt even really necessary to glue the biscuits in place just pay attention to an even coating along the board edges.
I've worked out a system.

1 Have two vices on opposite sides of the bench - one pair of boards is glued and cramped in one and you work on another pair in the other
2 Glue two boards at a time only. Put one in the vice edge upwards and balance the other on top to see that its lying straight - check with straightedge etc and adjust the two meeting edges until they fit perfectly. Mark them up faces and edges so you get them the same way round.
3 Leave one in the vice and spread glue over the whole of both edge surfaces. I use a palette knife. Too much glue is essential - too little is a mistake
3 Still in the vice cramp together with sash cramps. The boards then tend to slide out of line. The trick is to reset the cramps at a slight angle so that they pull the boards back into line. You do this a few times checking the joint by feel on the face edge joint (have a damp cloth to wipe the glue off your fingers) but quite quickly the glue grips and it stops slipping.
4 Leave the two boards in the vice while you repeat the operation on two more boards in the other vice. When done this you take first boards out and lean them against the wall etc still in the cramps until the following day and start on your next pair, and so on.
5 The following day you have pairs of boards well glued together. Take the cramps off and glue these pairs together as above. You might want to clean them up with a plane first.
You need loadsa cramps. I like Record 135s but I haven't really tried any others.
There's a decision to be made about when you thickness. You could just face and two edges at the beginning and thickness at the end. Or thickness the pairs. The later you leave it the more thickness you have to rectify errors but the harder it is to do over a wide table top
 
My original post was an appeal for a feed in alignment method on the table. The simple solution for me was to make a cross side table guided off the face slide table. Suitably marked, clamped and centered on the cutter. Then just slide it in to the bearing stop as suggested above. Disadvantage is the need to space the cutter up from the collet. So restricting the thickness of timber to be machined. But it did the job quite well for me.
 
Jacob":230sair0 said:
cramp together with sash cramps. The boards then tend to slide out of line. The trick is to reset the cramps at a slight angle so that they pull the boards back into line. You do this a few times

Sounds like a recipe for a disaster, particularly if you are working on your own.......

Cheers :wink:

Paul
 
Paul Chapman":3gwf1jln said:
Jacob":3gwf1jln said:
cramp together with sash cramps. The boards then tend to slide out of line. The trick is to reset the cramps at a slight angle so that they pull the boards back into line. You do this a few times

Sounds like a recipe for a disaster, particularly if you are working on your own.......

Cheers :wink:

Paul
Not sure why you think that Paul - it works really well for me, working on my own. You are only dealing with one joint - one pair of boards at a time and normal PVA gives you just enough time to get them sorted, before you move on to the next pair.
 
Back
Top