Scottish Infill Smoother Restoration

UKworkshop.co.uk

Help Support UKworkshop.co.uk:

This site may earn a commission from merchant affiliate links, including eBay, Amazon, and others.
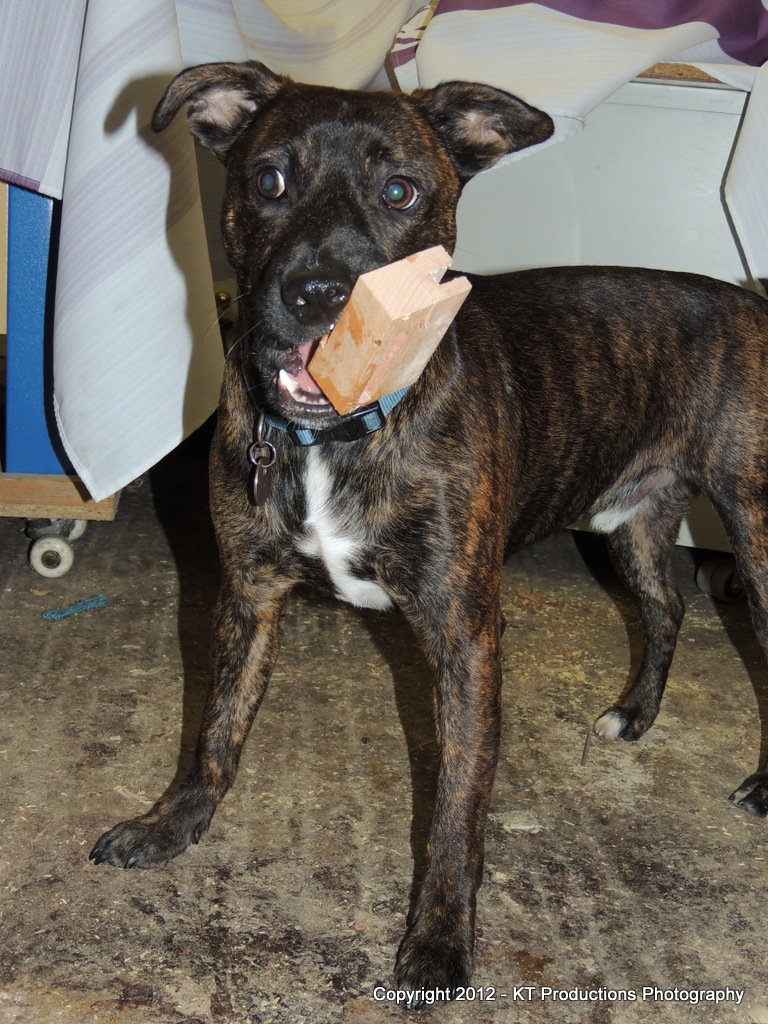
Time for an update I think. Things have been busy around here lately and I haven't had the time I had hoped to get out to the workshop but I managed a bit more today..into the early hours!

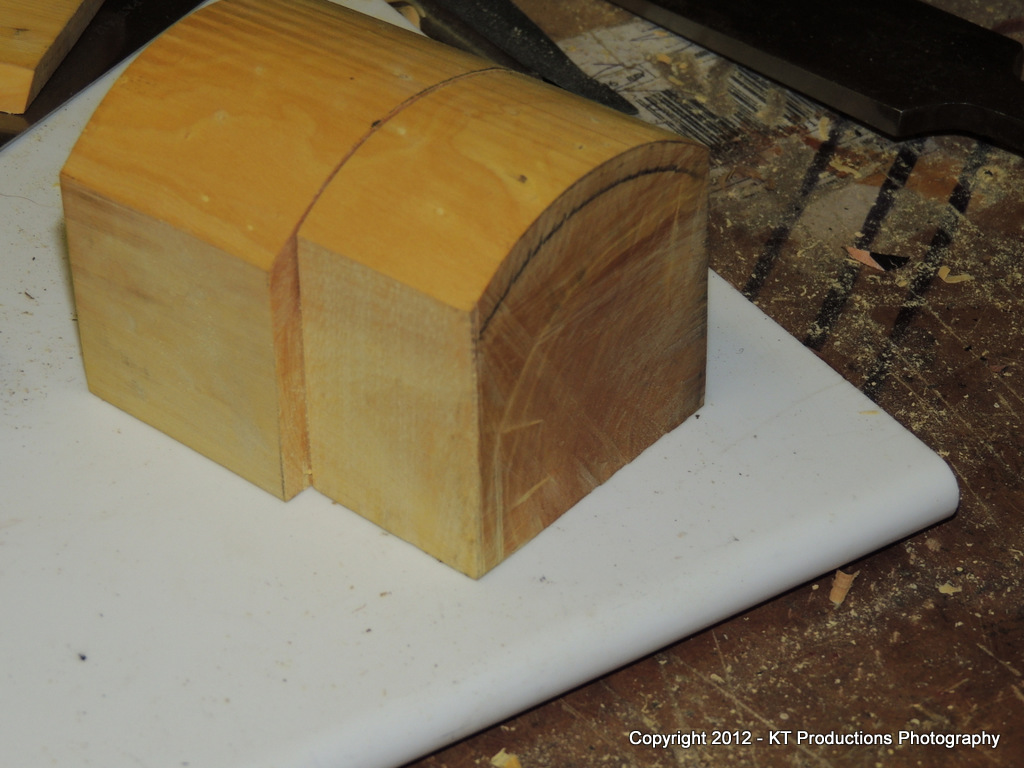
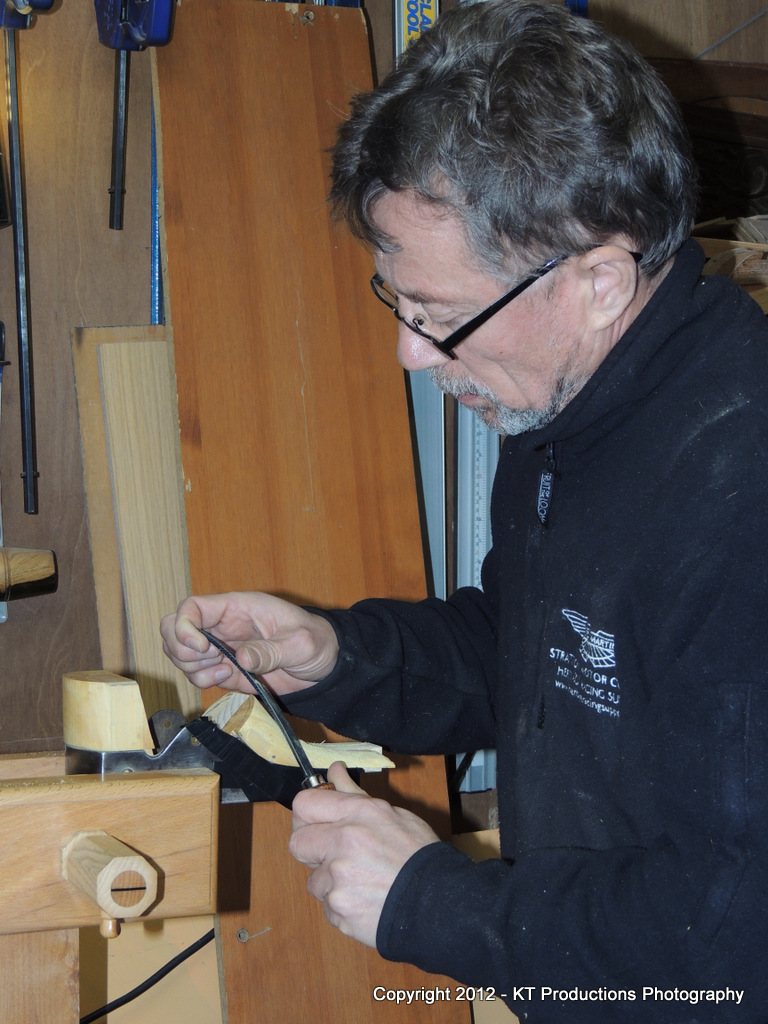
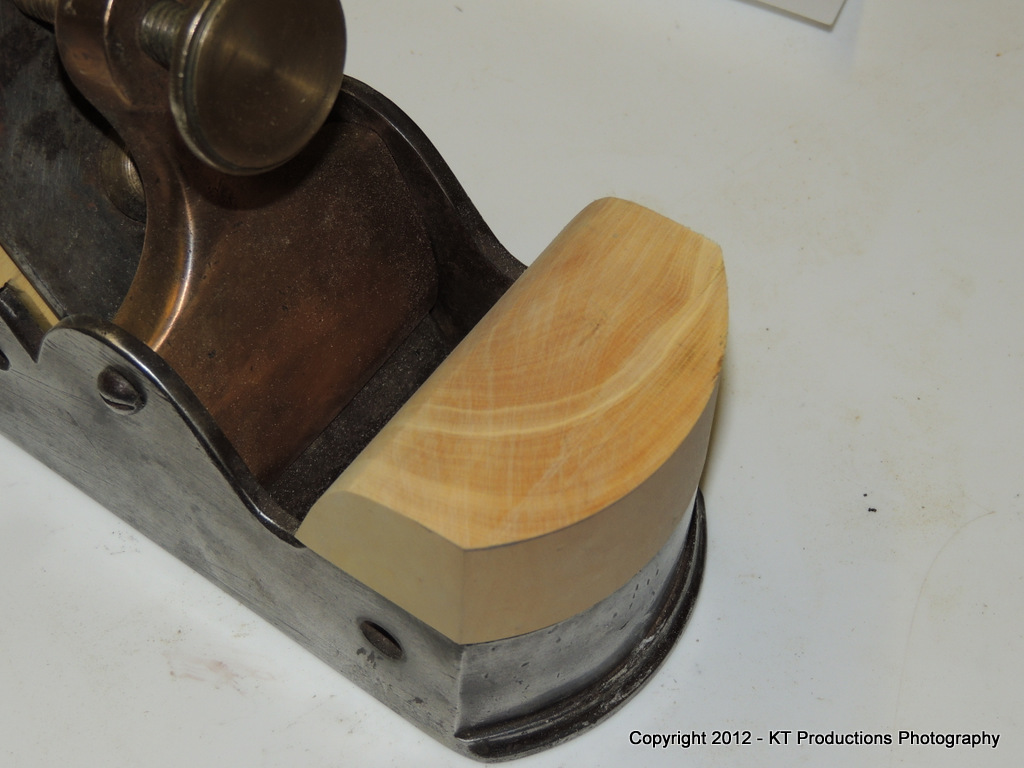
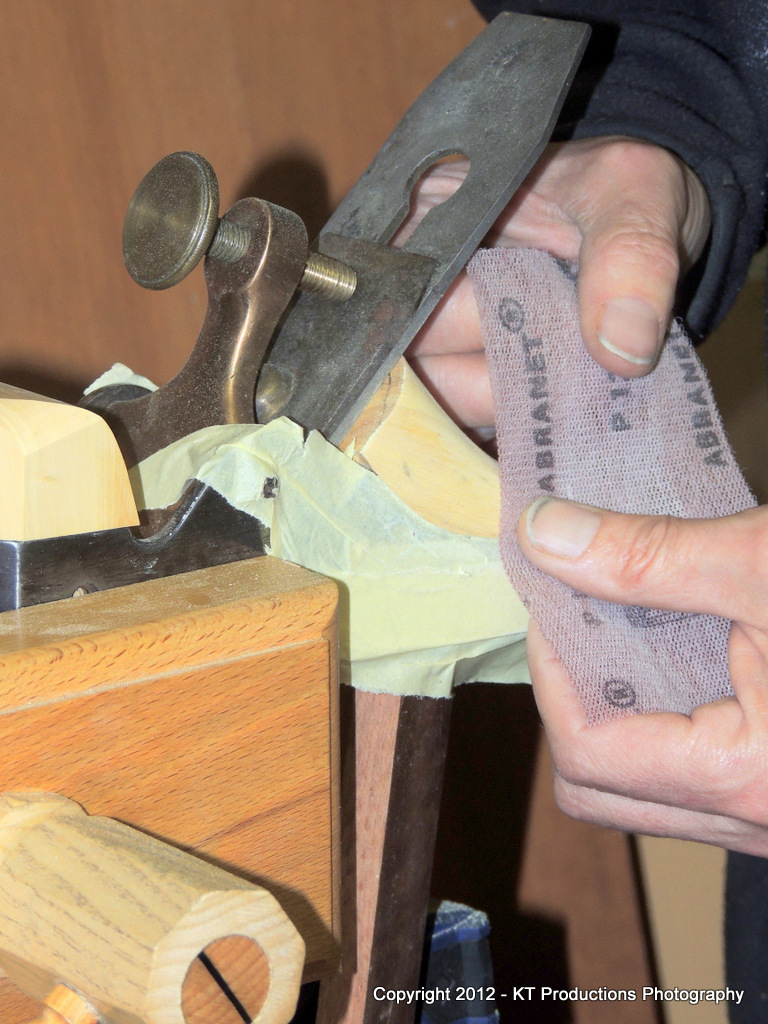
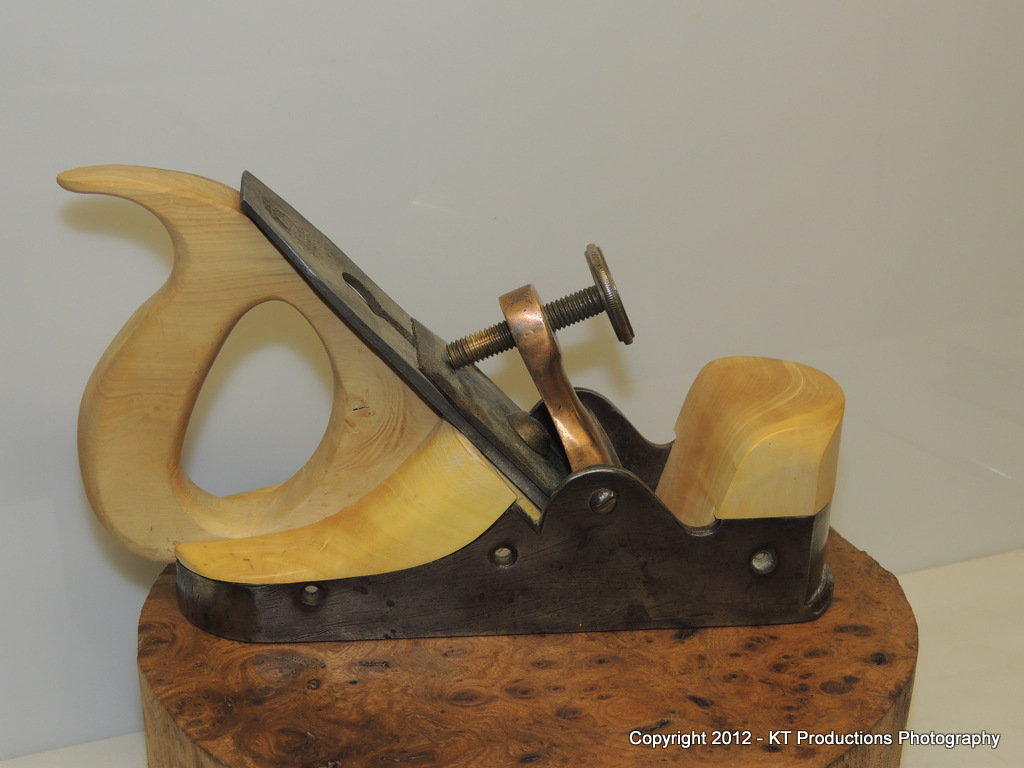
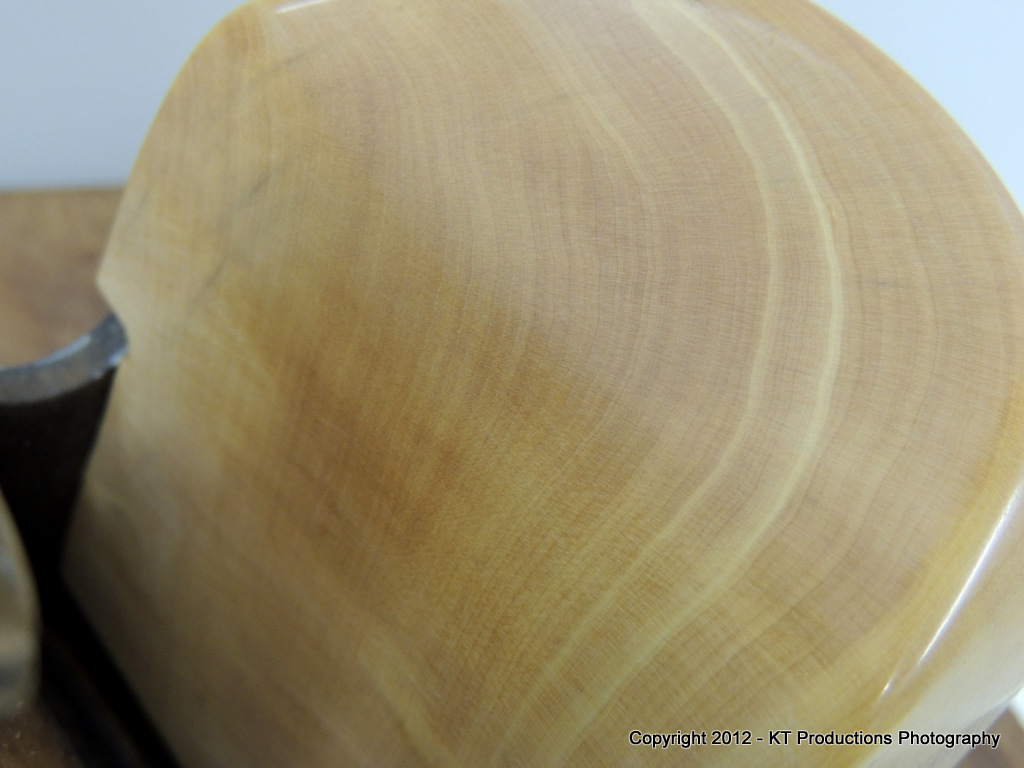
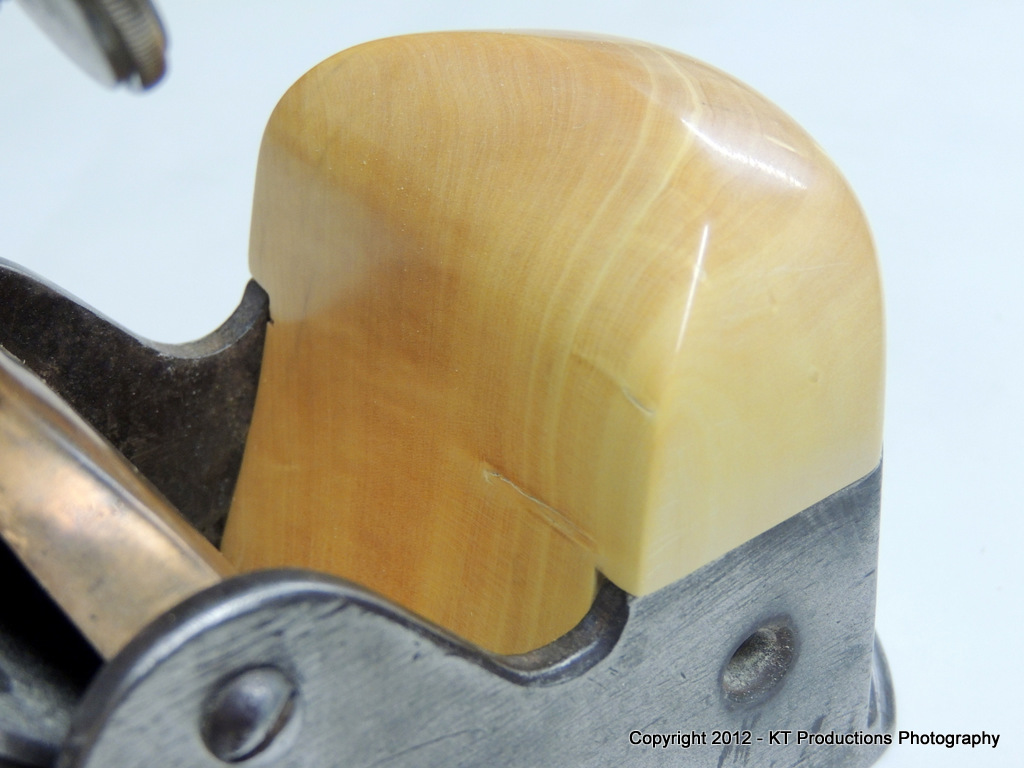
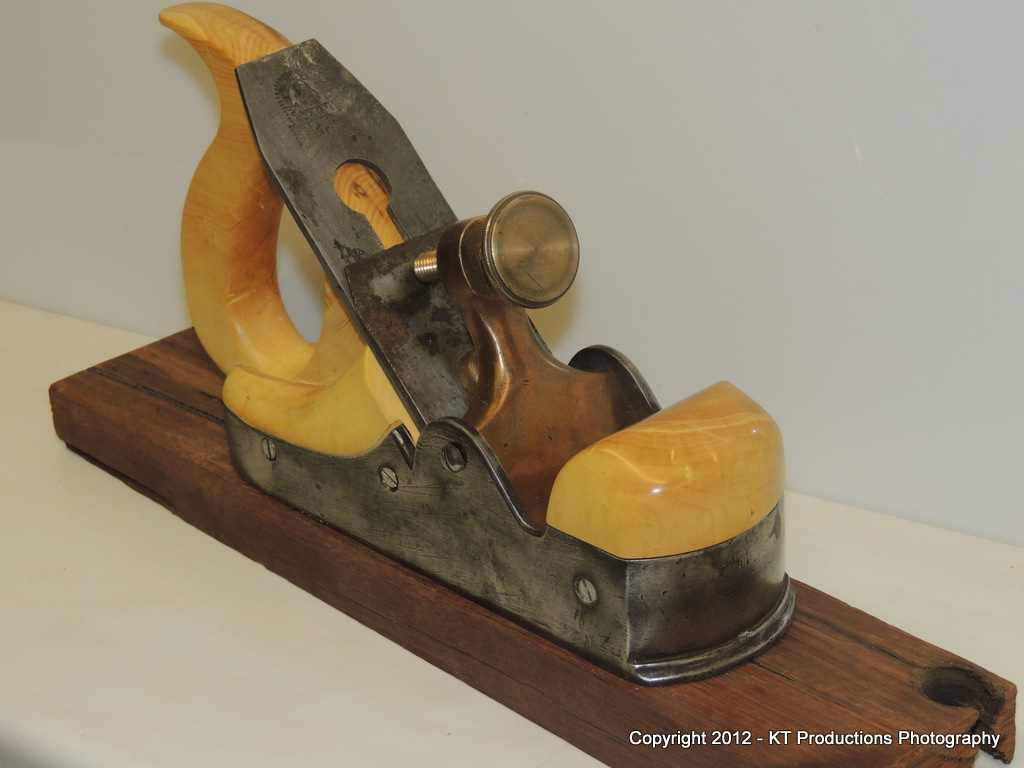
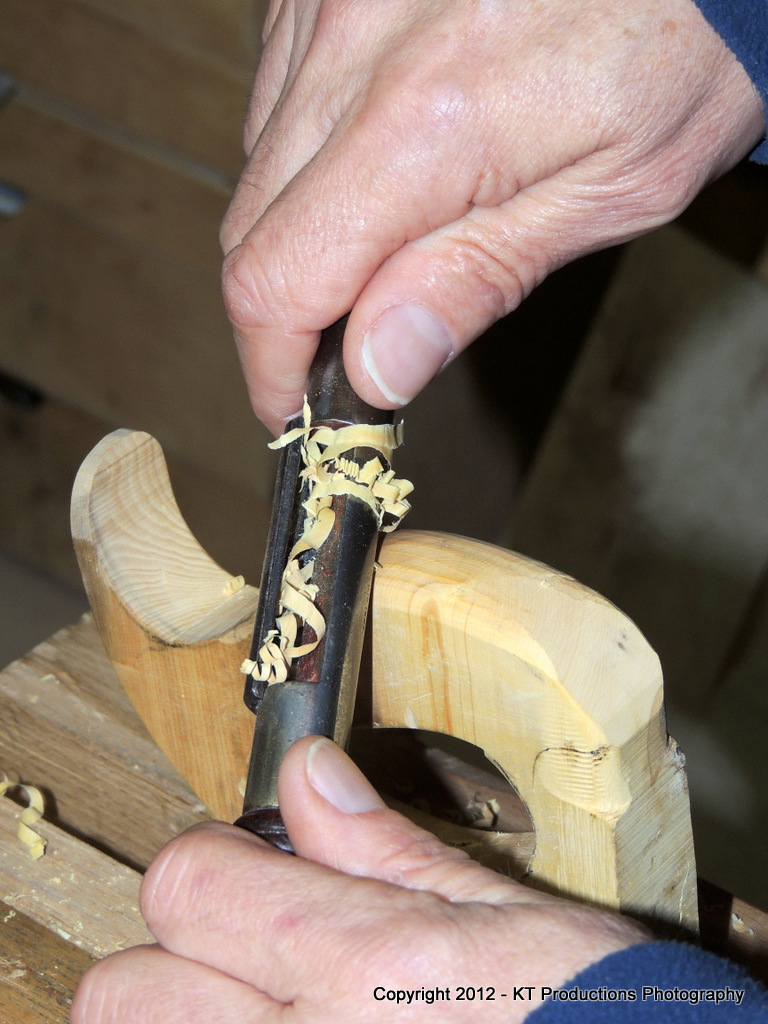
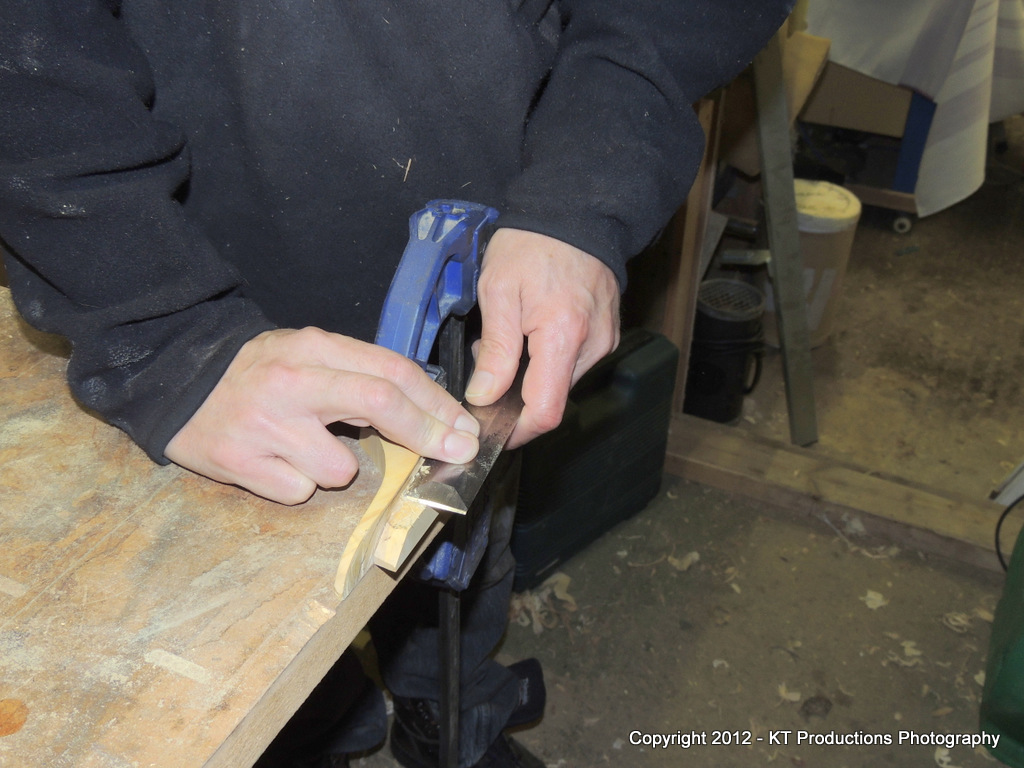
I thought I would try shaping the outside of the handle with the Millers Falls MF1 "cigar" shave...it is a rather versatile tool and I thought it might work...I was not wrong....

DSCN0338.JPG


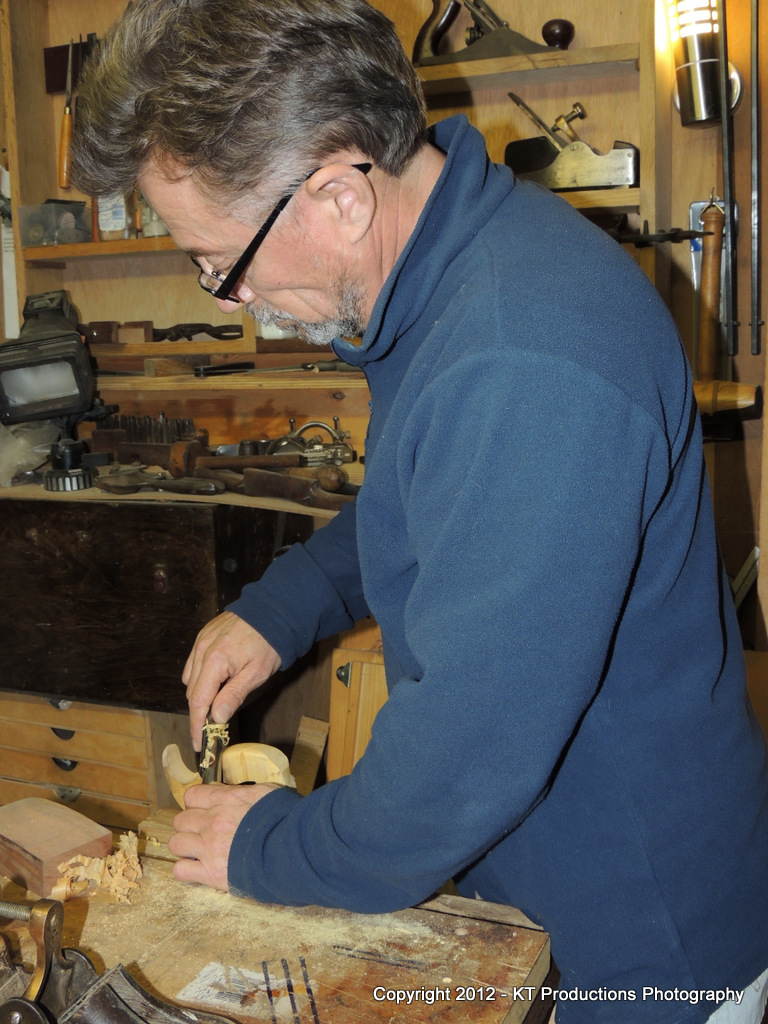
Getting the MF1 tuned is a black art but as long as the "flat" part of the curved cutter is totally flat it seems to do wonders....

DSCN0340.JPG


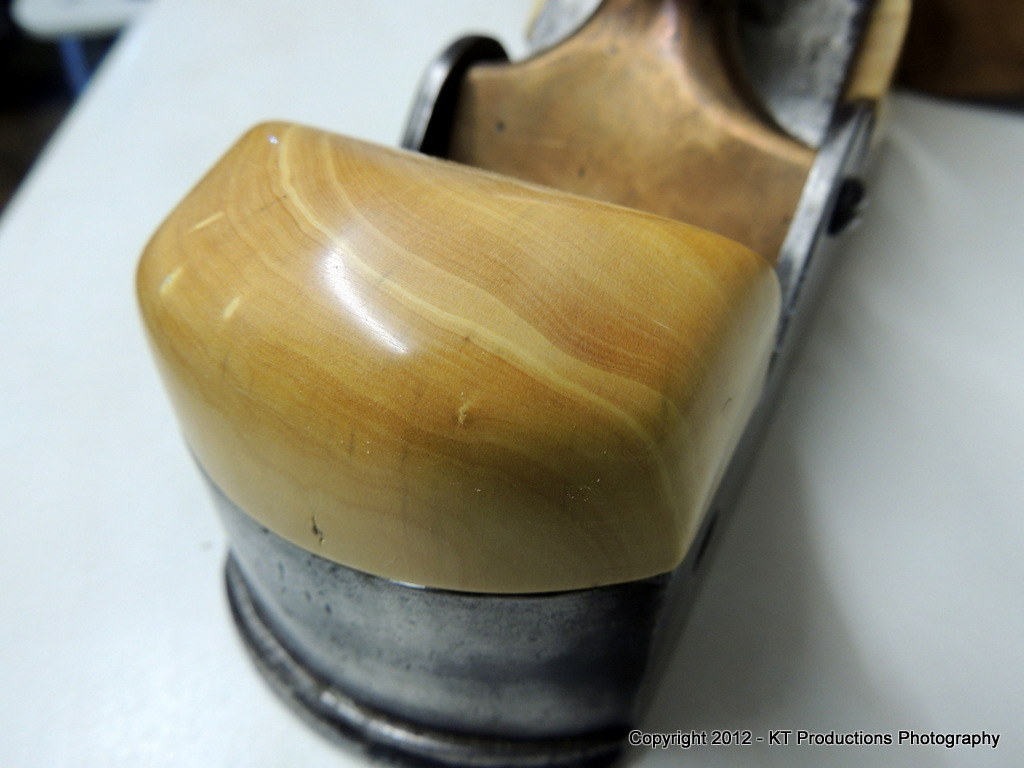
This really was accurate...fast and easy and only required some sanding to get the final profile....

DSCN0347.JPG


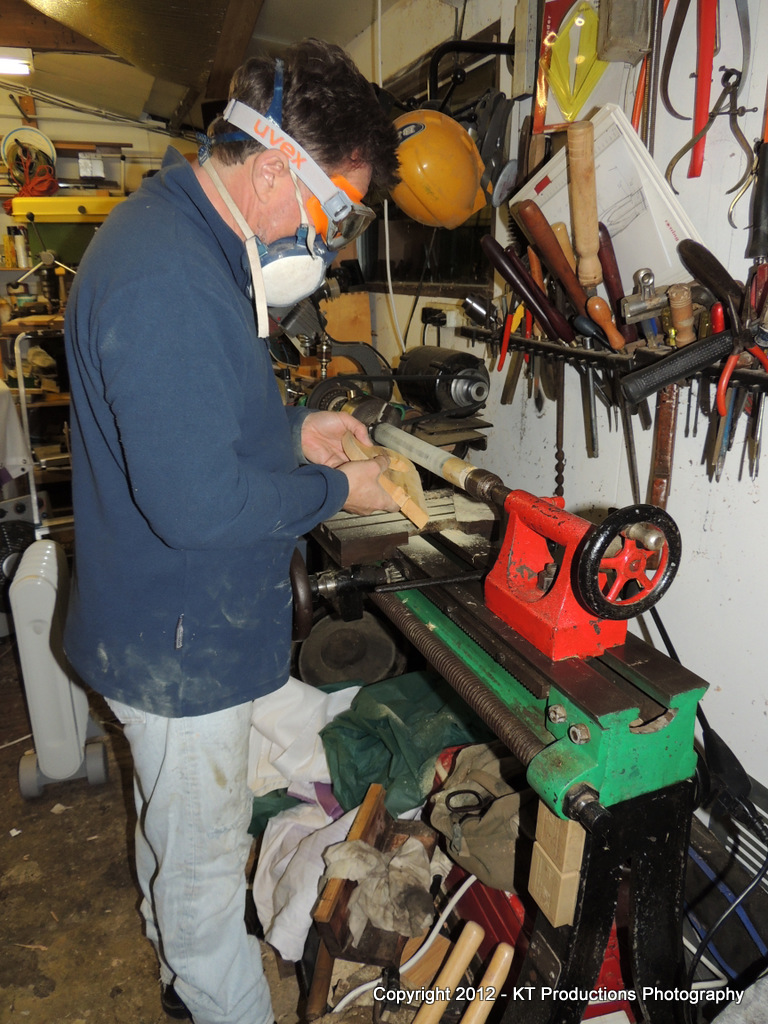
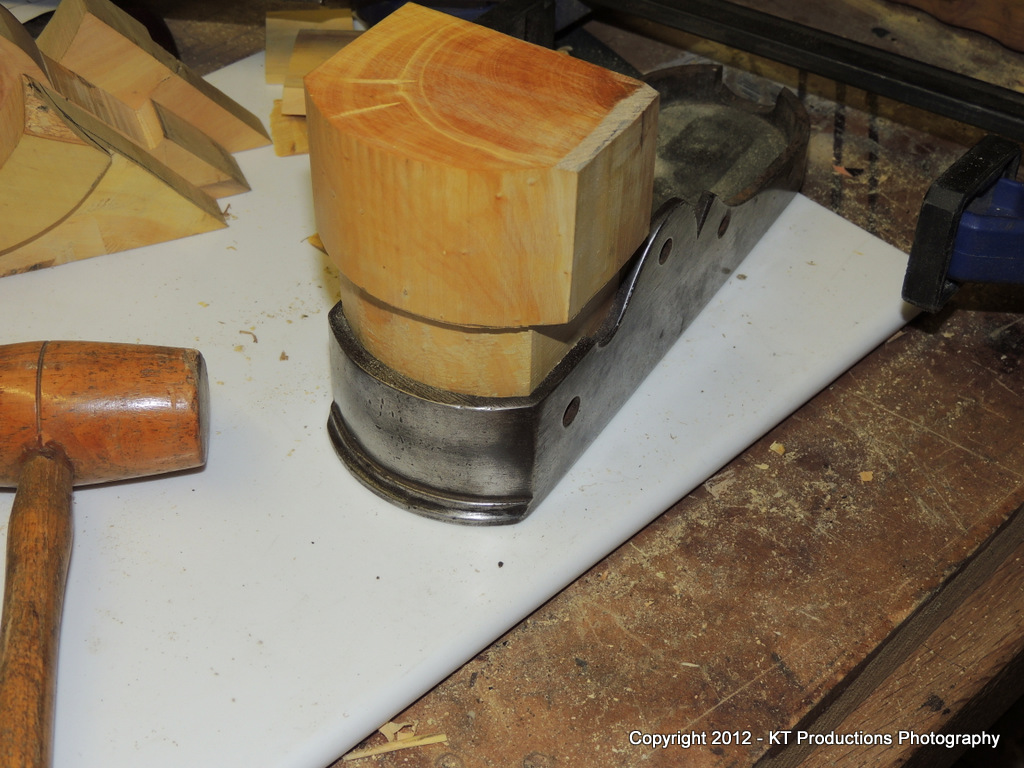
Not being able to afford a bobbin sander...I stole the LN idea I saw on their video and made a roller one for the lathe...the bobbin is then me!

DSCN0350.JPG


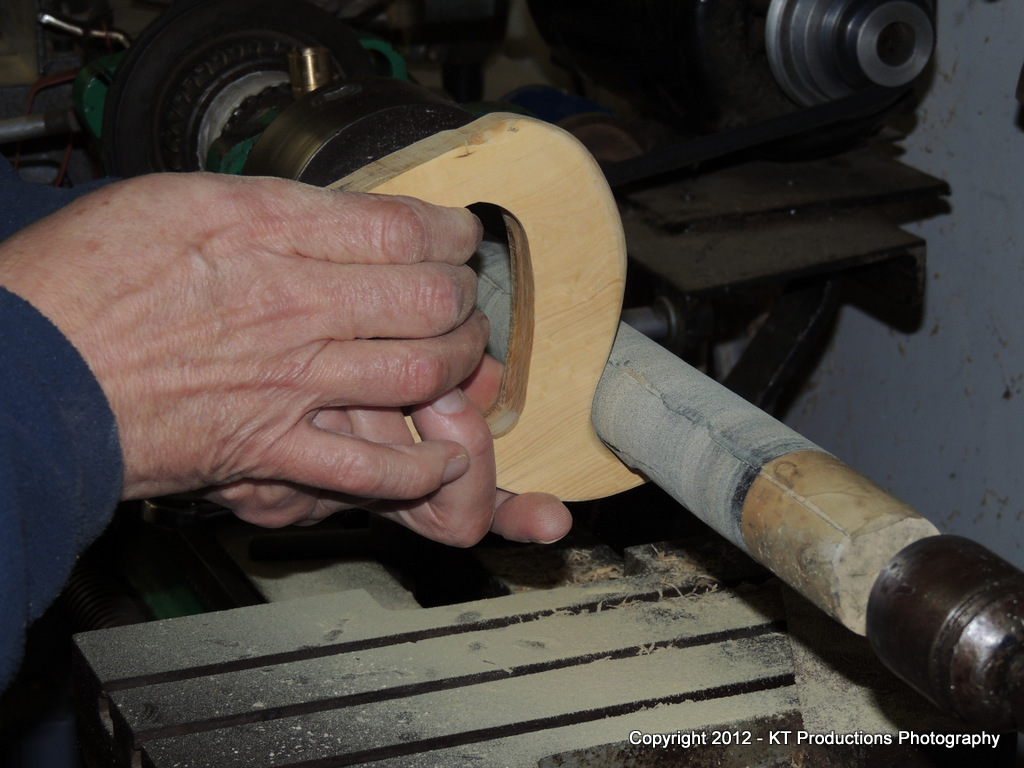
It works well as we shall see.

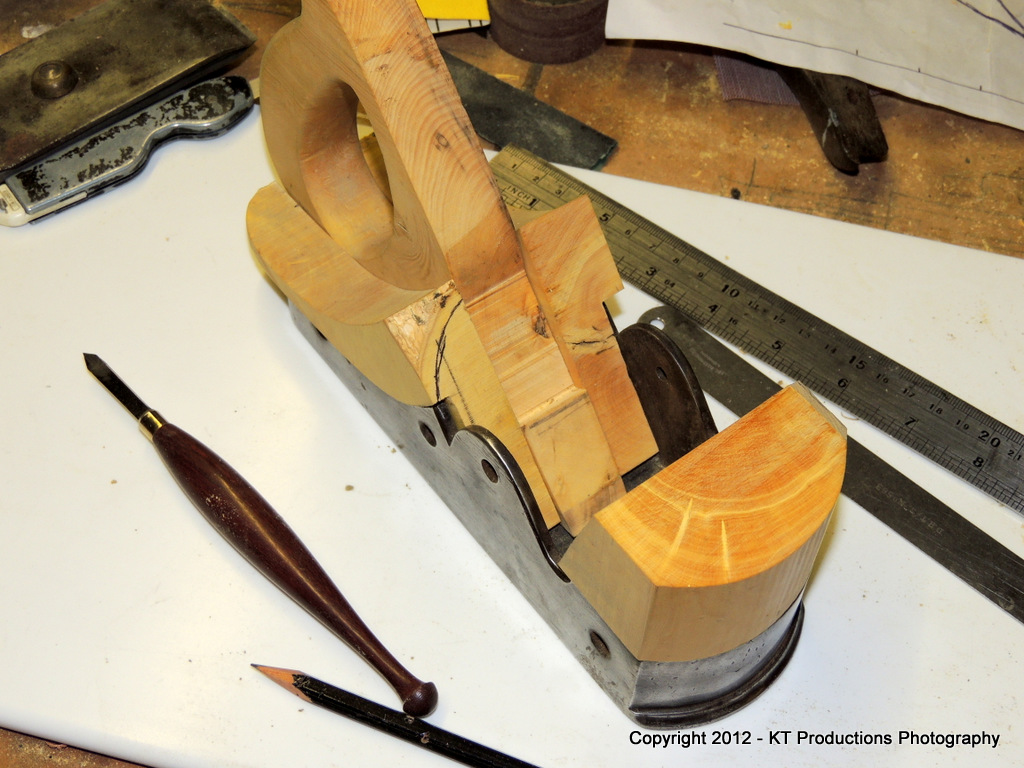
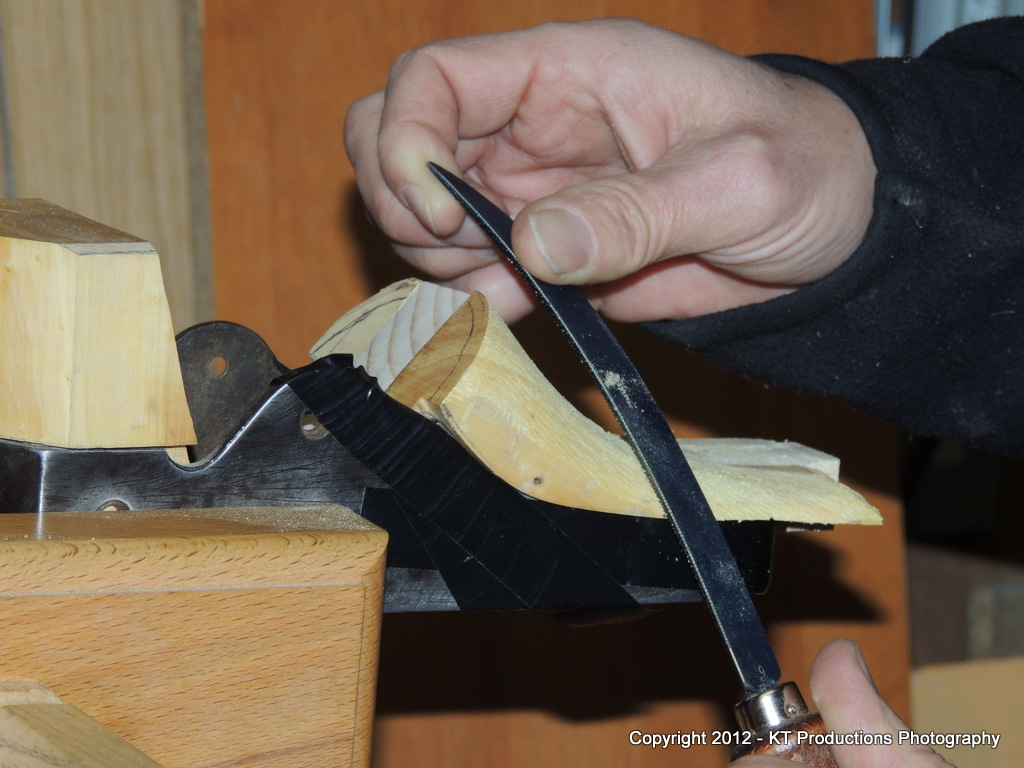
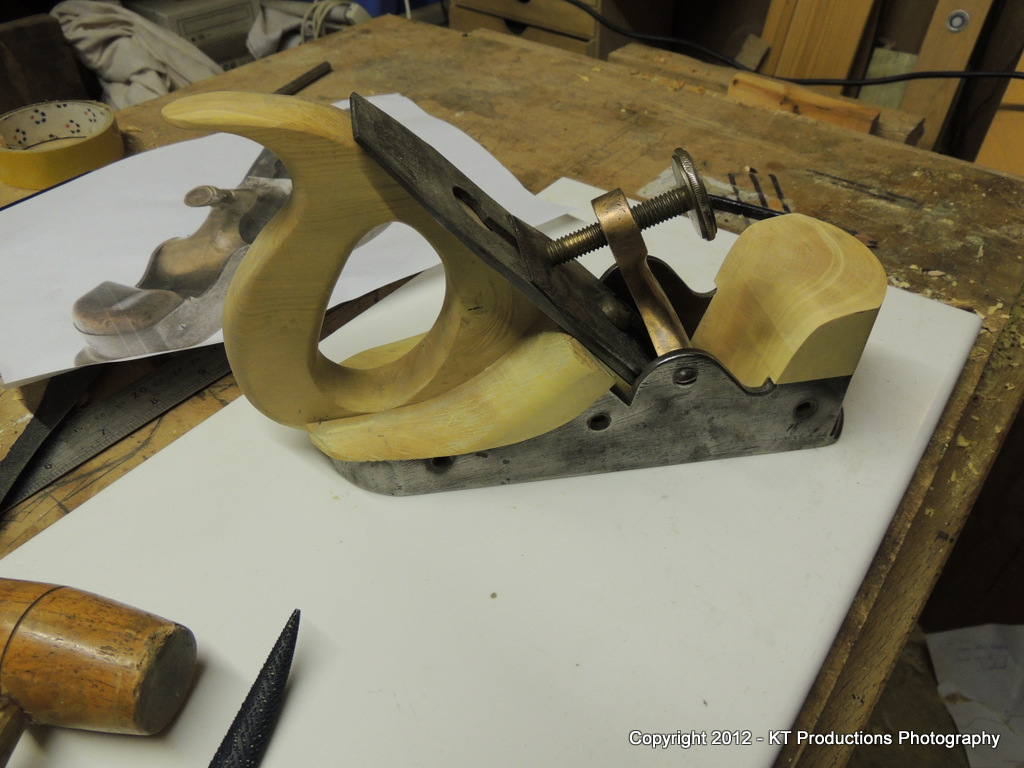
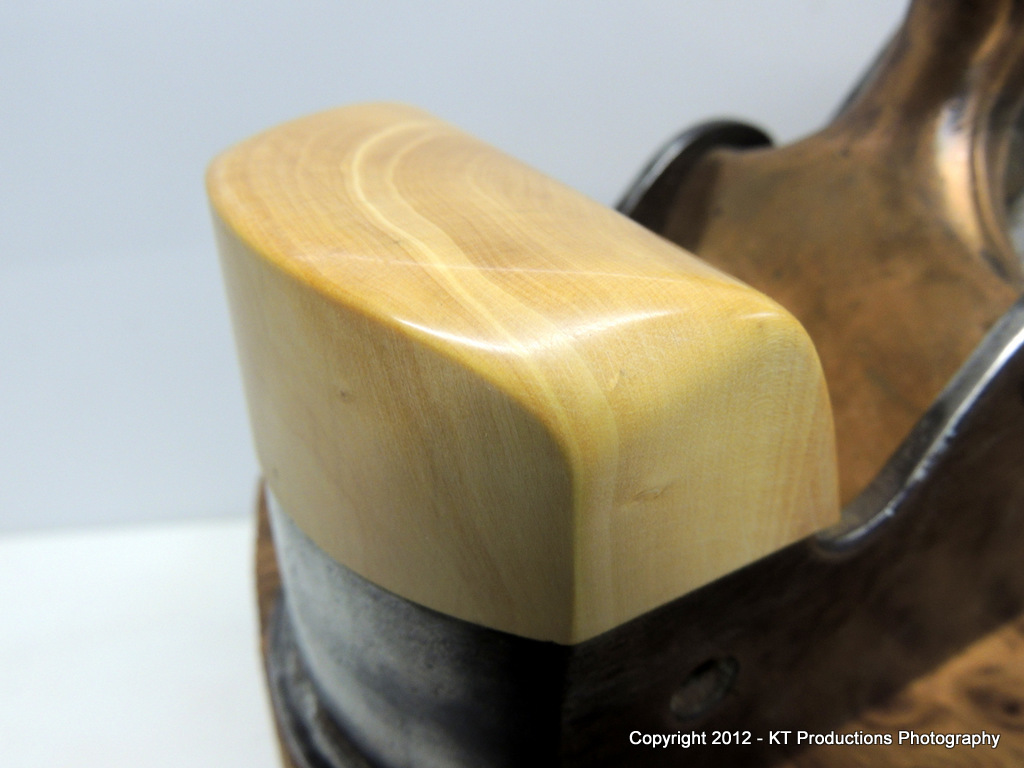
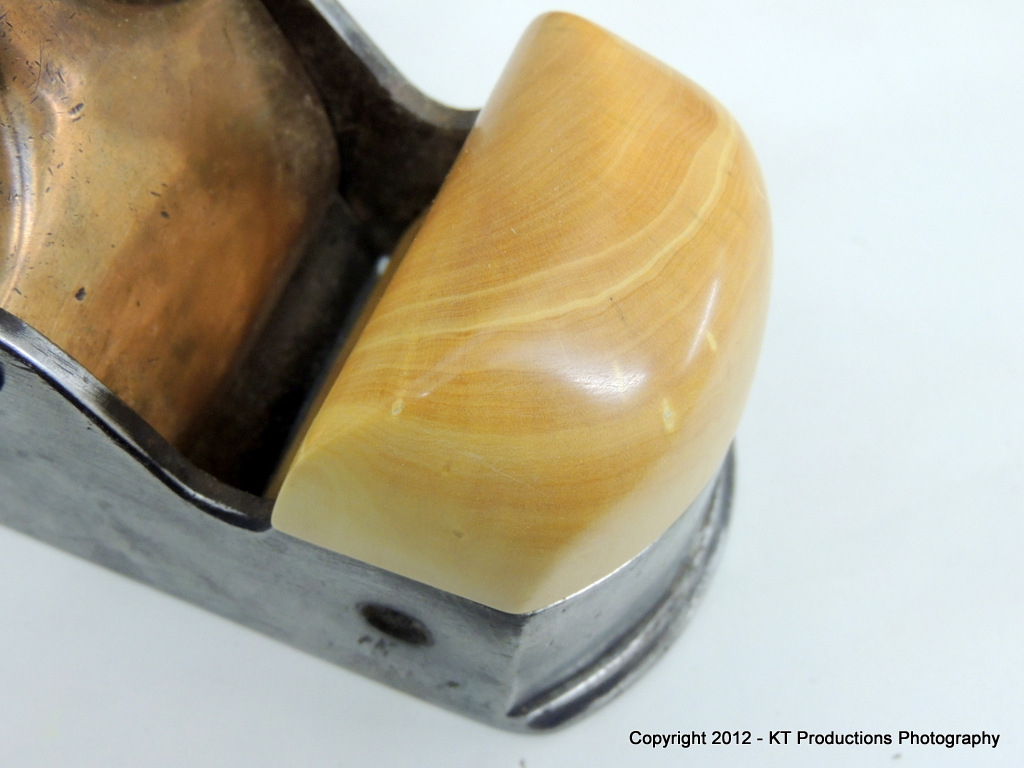
Next was the bit I thought would be "interesting" to get right...the cheeks.

Using the original ones I sized two scales a bit over thick and cut the recess on the outside. It was then simply a case of refining this with a paring chisel...

DSCN0361.JPG


....not just any paring chisel but my beautiful I.Sorby "Punch" one...sharpened to dangerous levels by Douglas.....

DSCN0360.JPG


First time I have used it in anger and boy was it worth the wait. There is nothing like paring with a super-sharp old piece of steel...wonderful control! Thanks Douglas!

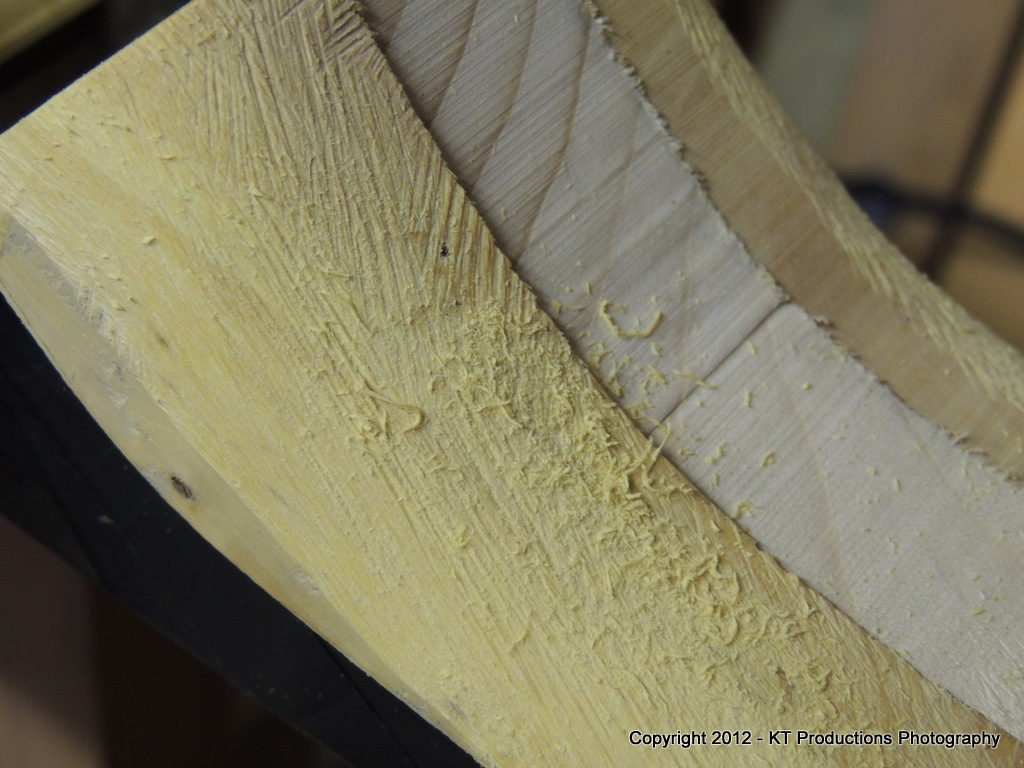
Note I have left the tail oversized and also the bed...both can be trimmed back precisely to the steel and iron when I have them fitted perfectly....

DSCN0352.JPG


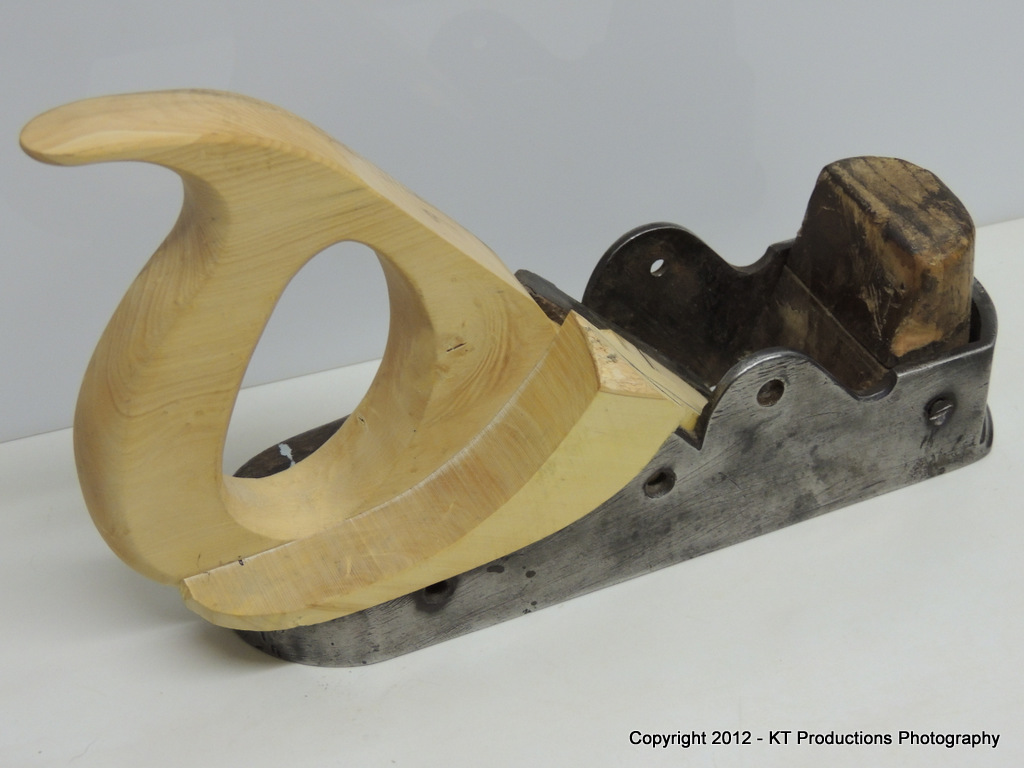
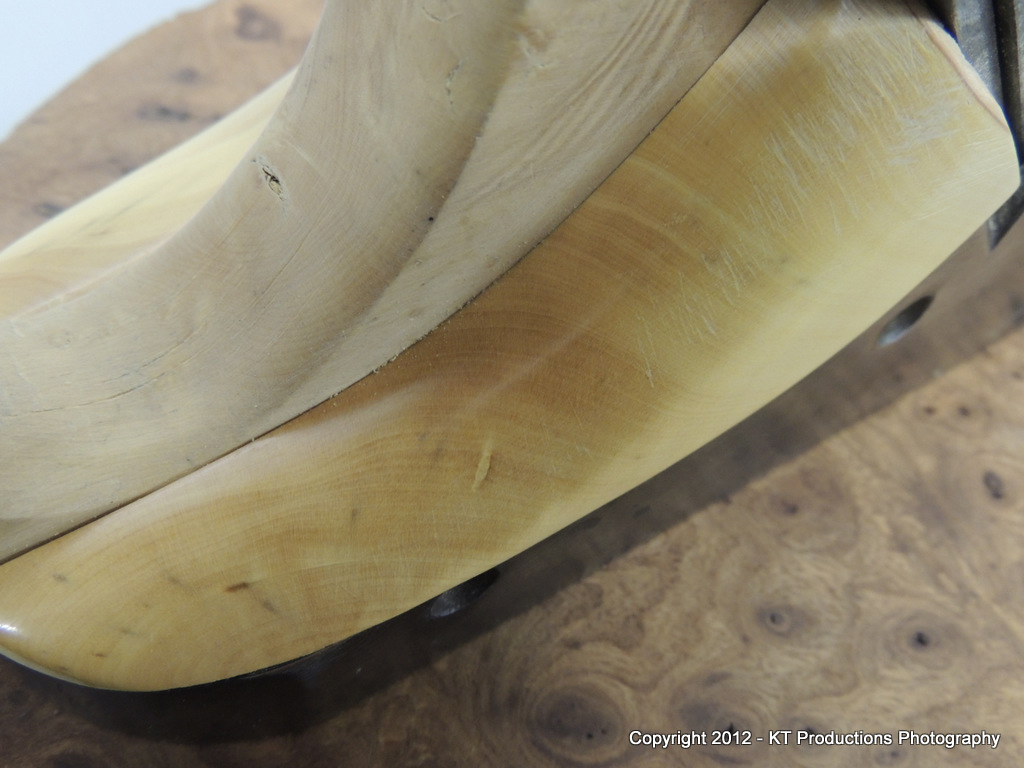
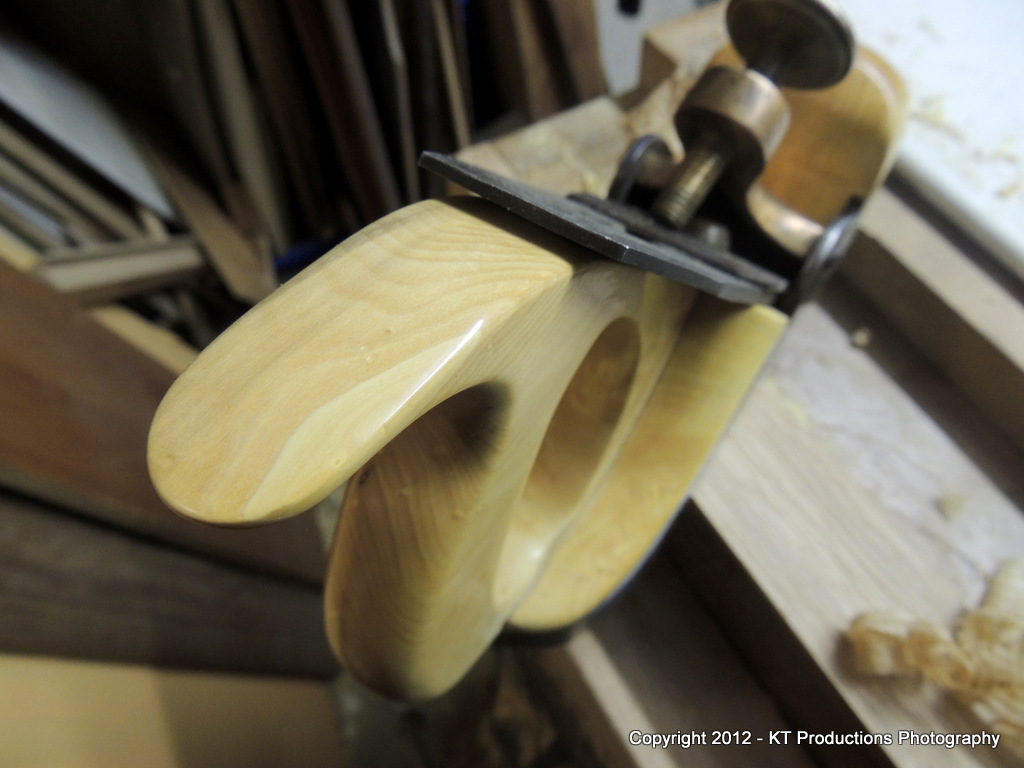
I used the other old cheek to size the thickness of the new one...this way the handle core will be central.

DSCN0358.JPG


The cheek is also a perfect fit against the handle.

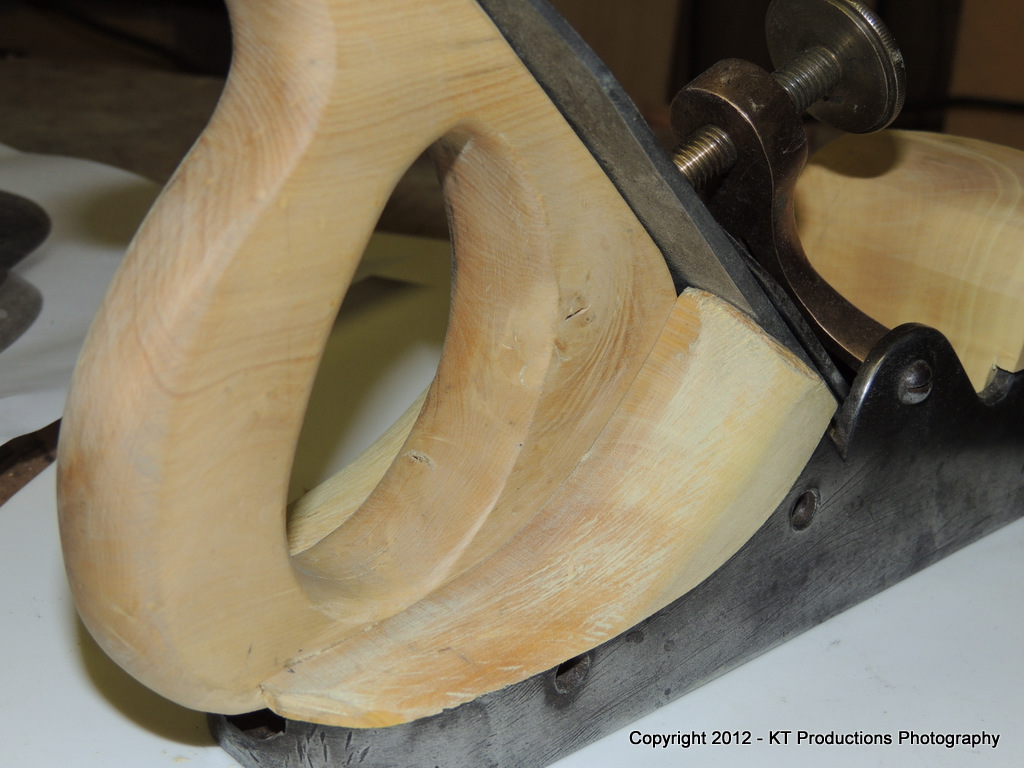
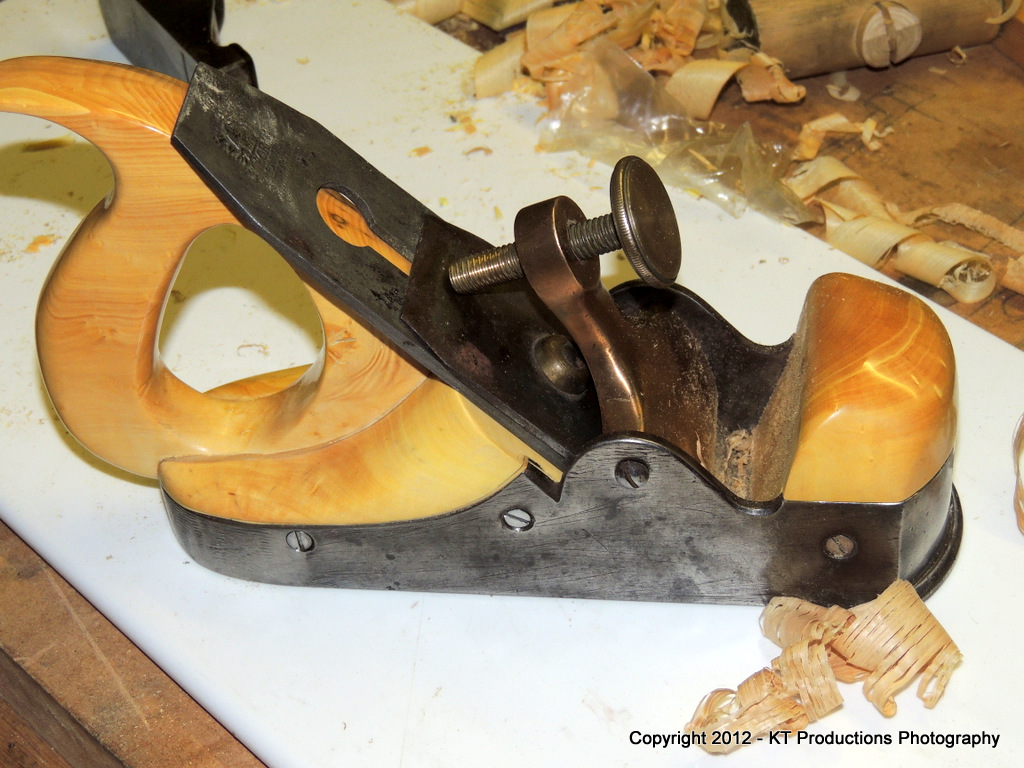
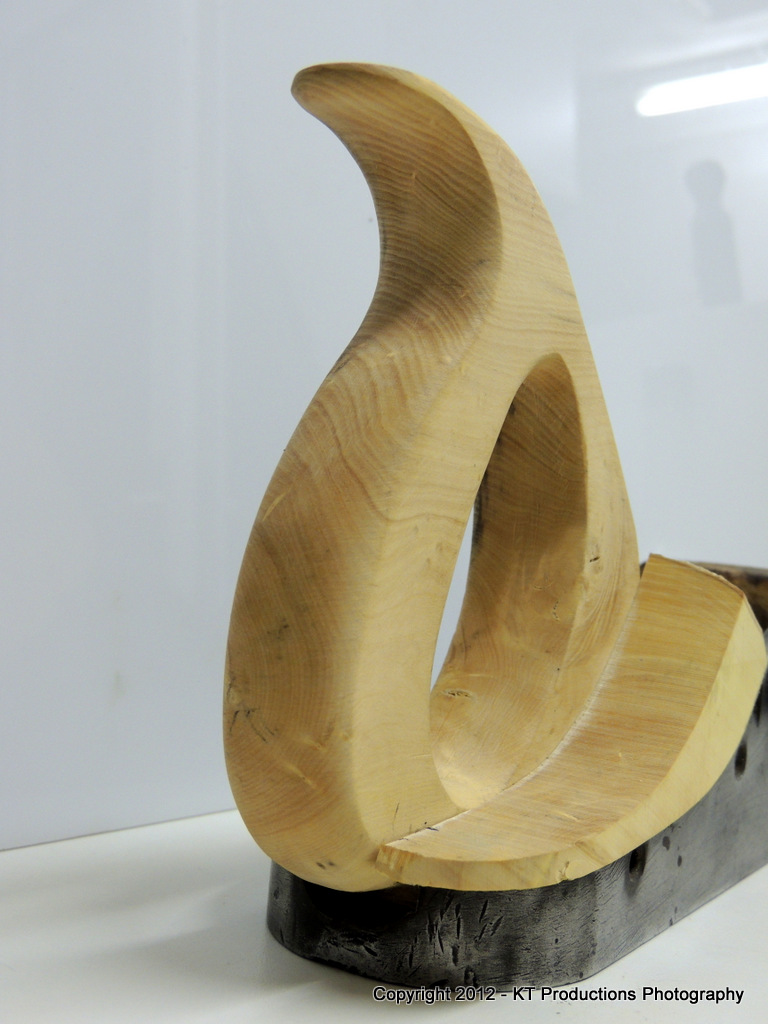
Then it was simply a case of making the other cheek....avoiding the obvious mistake that I always make when I forget this has to be a mirror of the other one! Not this time...but it was close!

DSCN0371.JPG


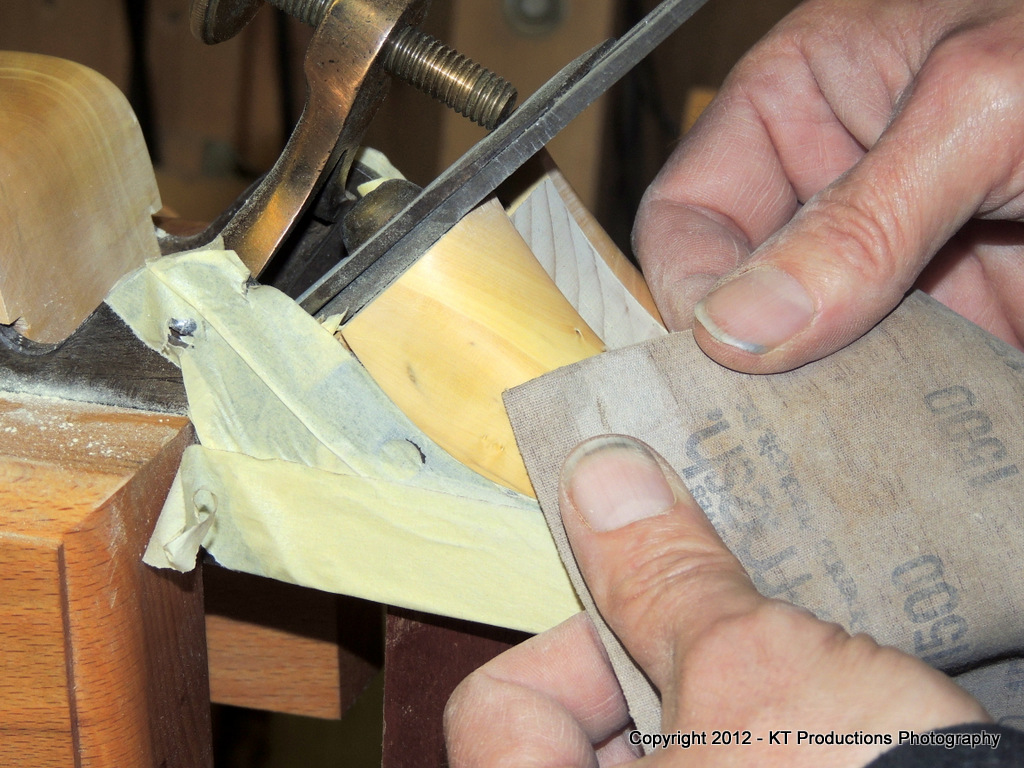
I'm scratching my head at the moment wondering how I can do the cheek roundovers perfectly...I will probably make a scratch which has the profile of the largest radius and use that...but the jury's out on that one at the moment.....any suggestions (apart from waiting for the rasp!!!)....?

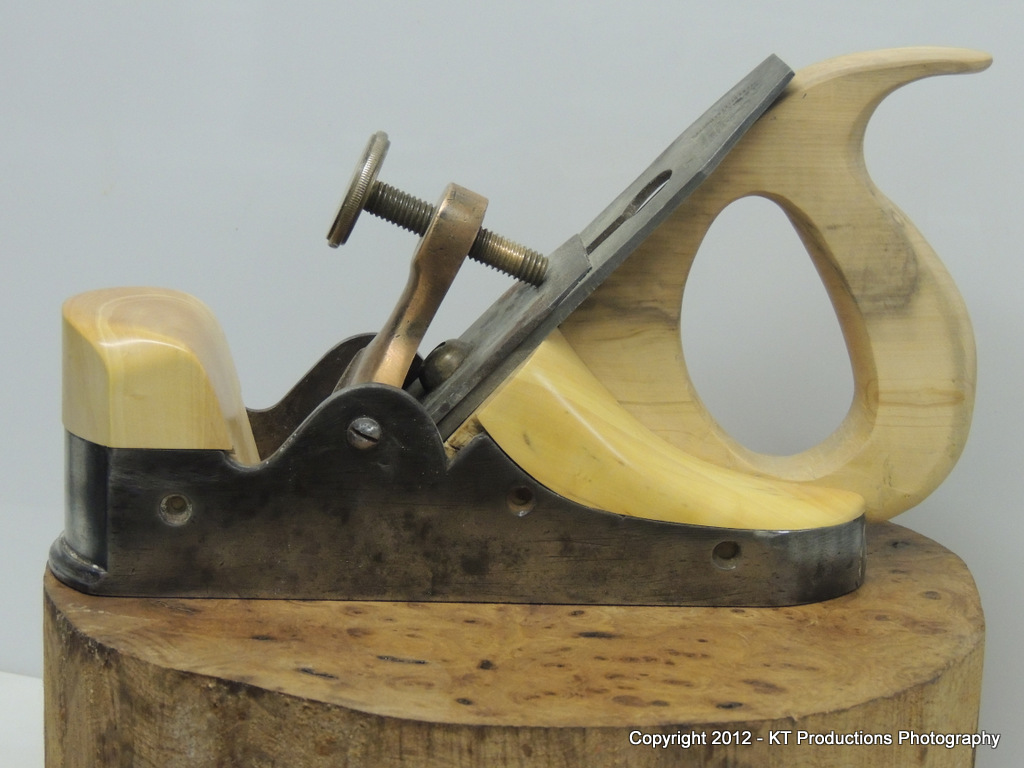
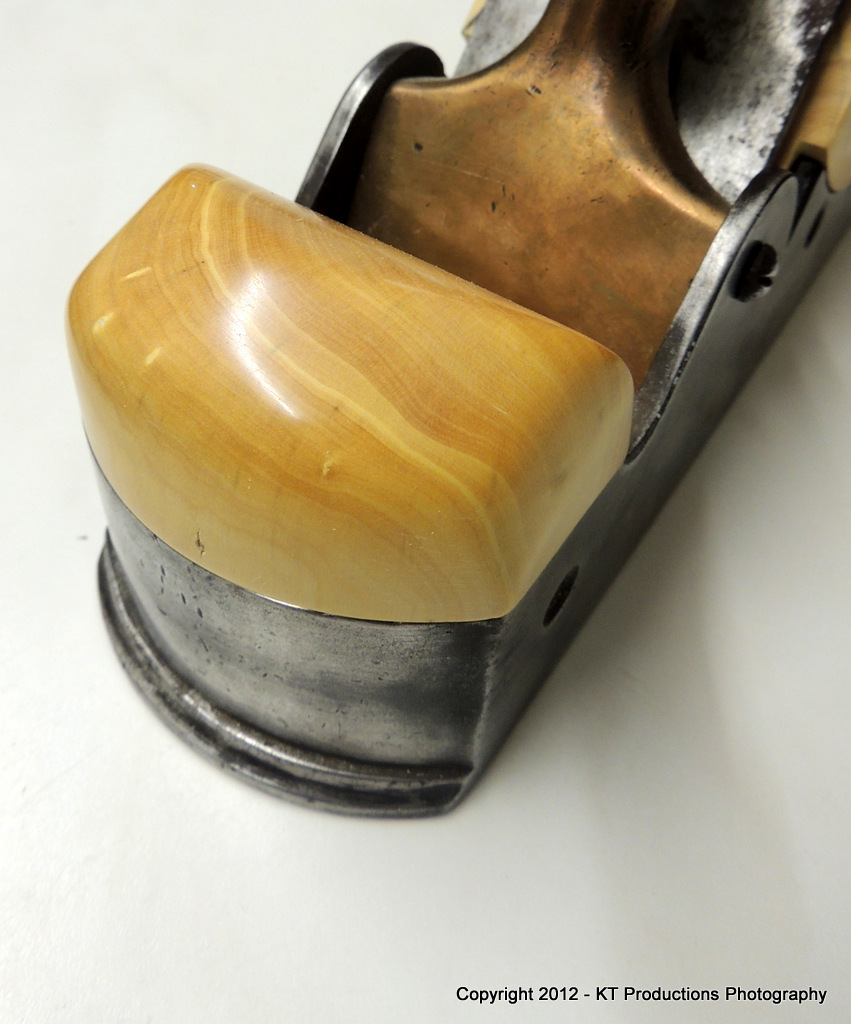
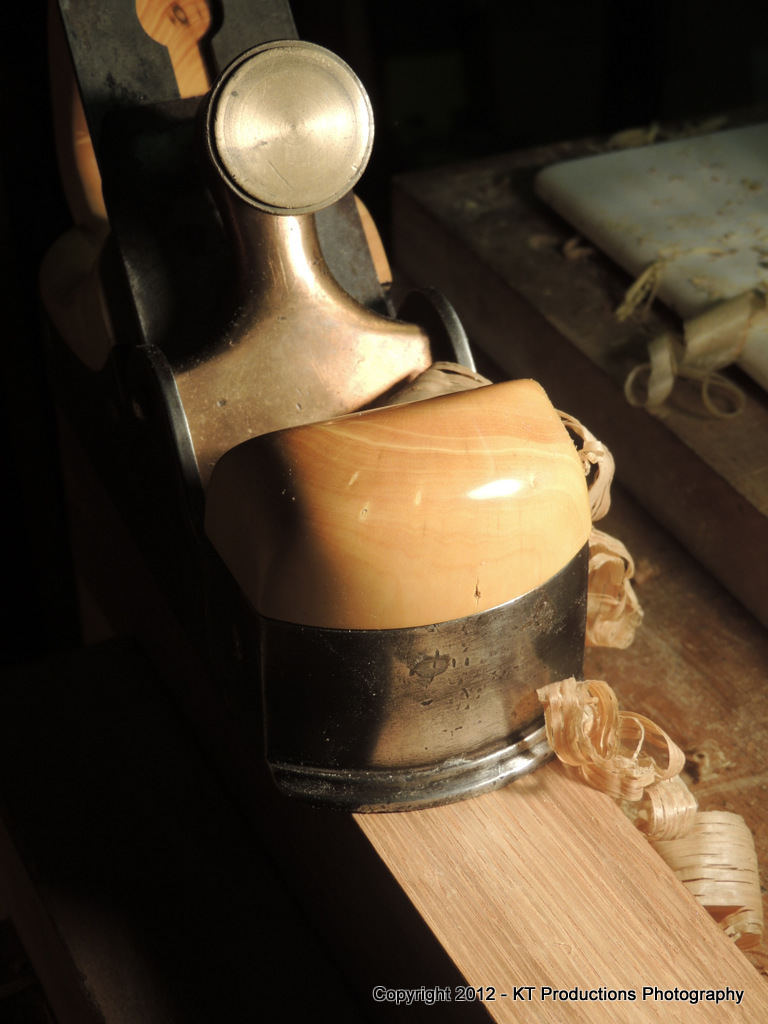
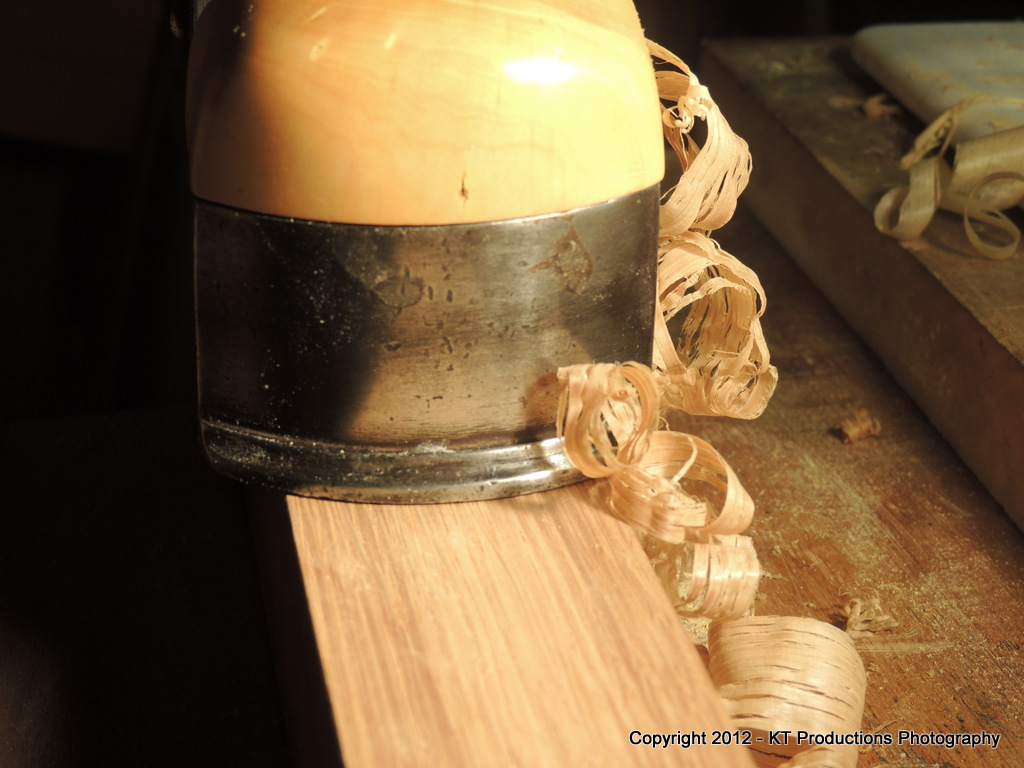
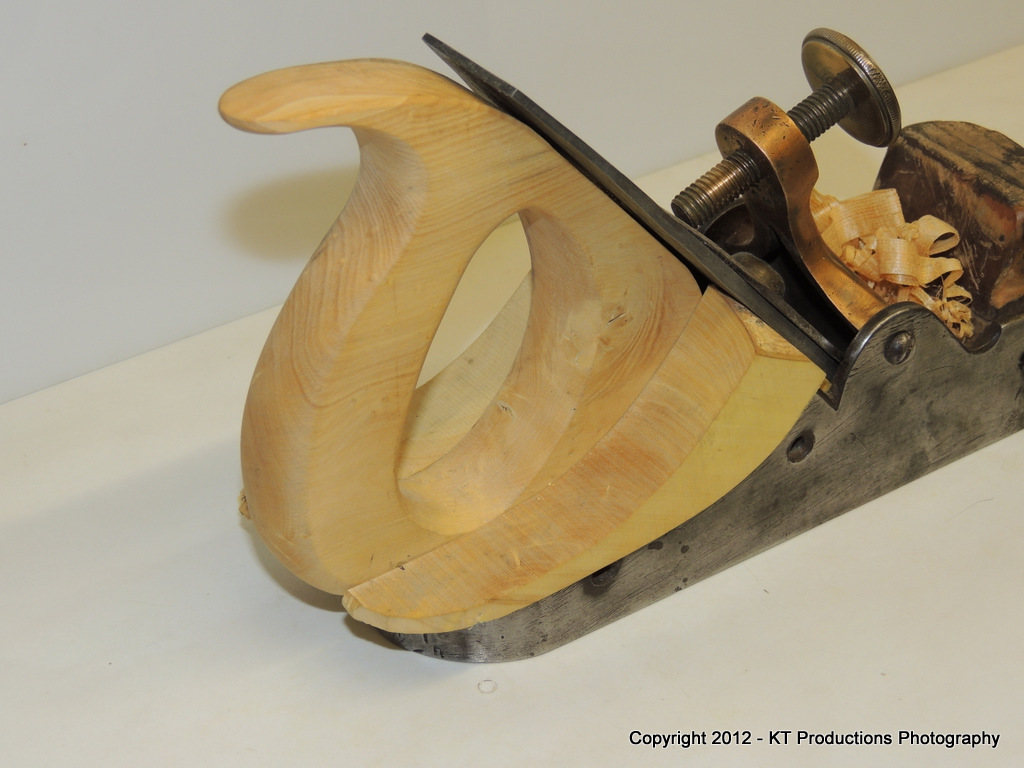
So...you may notice that I am constantly testing the iron in the plane...(the shavings!)....

DSCN0369.JPG


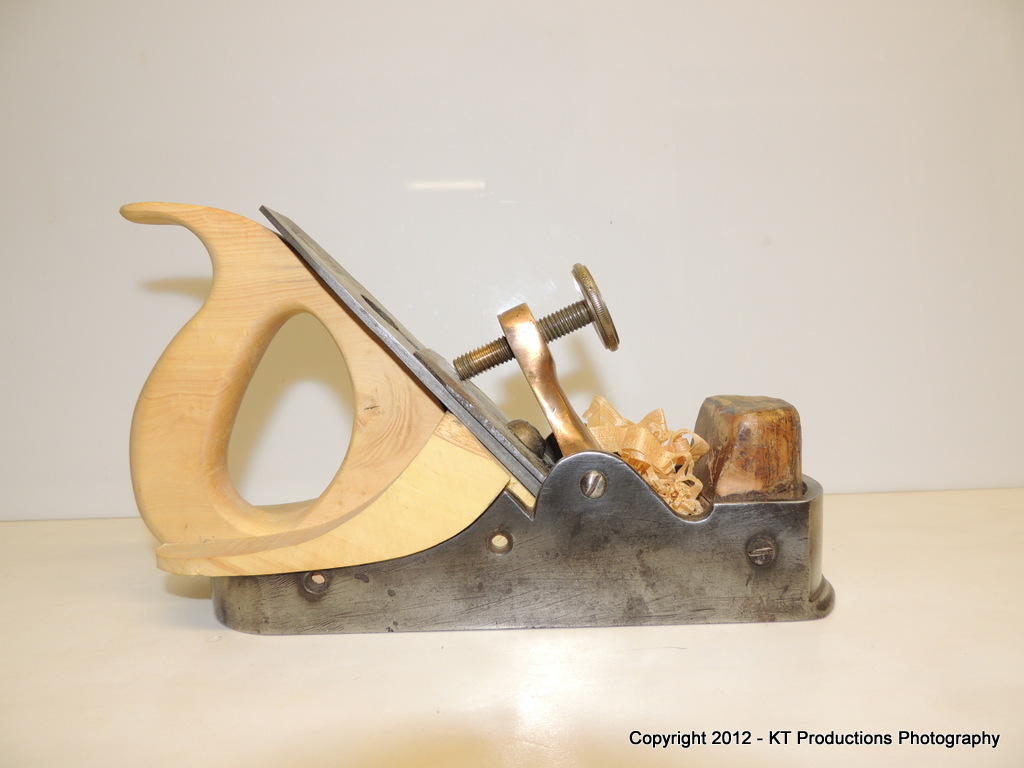
....and I need to make a slight tweak to the cheek on this side (a hairline gap is just visible) and, once the cheeks are glued to the handle...set the bed....but so far it's going quite well.

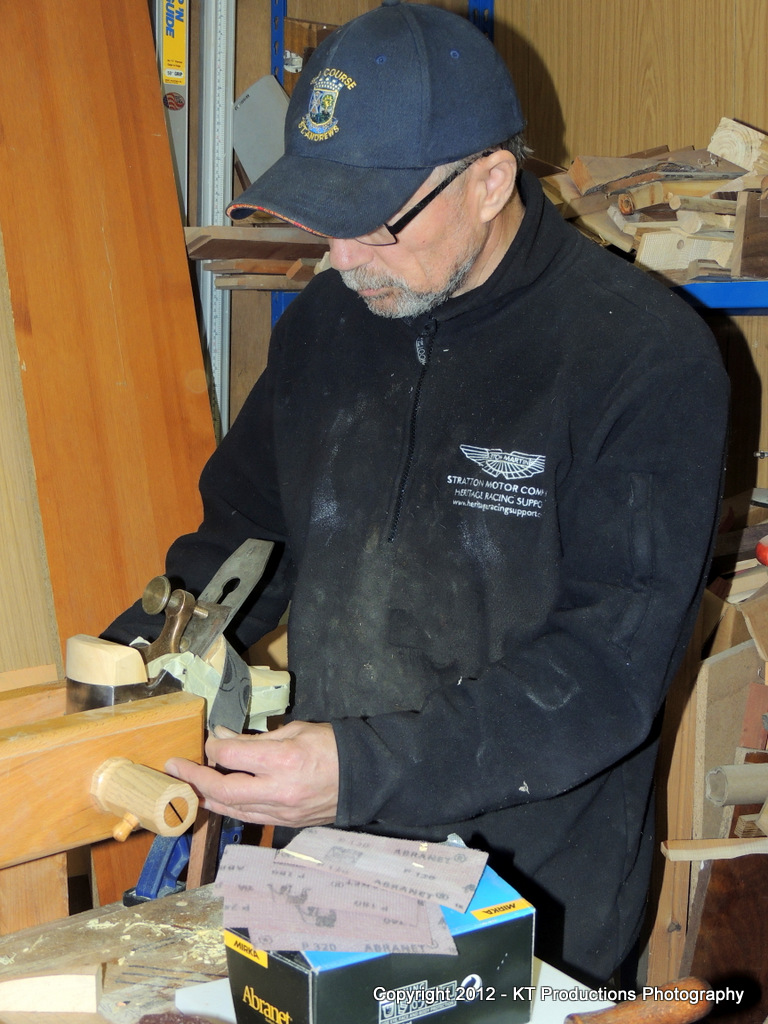
I can hardly wait to get out the Abranet and Micro-Mesh...that's when this wood will really come to life!

More later! Night all!

Jimi
 
Oddly ... I've found that a flat file is more controllable on curves in wood than a round one. Less likely to dig in/cut too deep in one place.

Looking fabbo thus far matey. =D>
 
Very nice! I think you've got the hang of this infill plane business rather well. :) I wonder if Bill Carter is watching? Perhaps someone close to him could give him a little nudge - I've a feeling he would approve.

I do think you should leave some shaping to do with the left-handed rasp though. That is likely to be quite a special tool.

Have you decided what finish to give the finished article?
 
That's the metalworker in ya Richard!! :mrgreen:

I certainly did use a number of rough files during the shaping and the flat one was quite useful in closing in on the line on the recess.

I have learnt the hard way that when over stuffing...you should always leave twice as much as you think you needed. The old saying that you can always take wood away...etc....is very true when putting down fat infill!

It looks like a dollop at the moment but once I get this trimmed back, the correct profile will be exposed. There is a lot to play with!

Hi Prof......

Having appreciated Bill's work and finally having the pleasure of meeting him and his lady wife at MAC Timbers recently....I can only aspire to his craftsmanship...the Grand Master indeed! I know he loves boxwood and I shall be following his lead in the use of linseed oil only in the finish.

As Klaus mentioned earlier...boxwood needs to be finished with the progressive abrasive technique...and once again I will use the tried and tested Abranet 120-400G and MicroMesh 1500-12000M treatment.

I find that the linseed oil soaks in better when the surface is rough...as with any finish...so I tend to go for pre-treatment then the polishing...then a soak for a few hours.

The rasp will come into its own on the cheeks and the bun I think...can hardly wait! 8)

Jim
 
ALFIE and me decided that, even though it was blinkin' freezing in the workshop tonight...we would go out and work on the bun.....

ALFIE started out by studying the old one...and a nice picture from the Internet to get ideas...

DSCN0395.JPG


But this was all a sham to fool me into a false sense of security while he nicked a nice bit of beech I was using as a sanding block...

DSCN0396.JPG


I'll get that back later! Ok...so after finding a suitable offcut from the handle I thought I would push the old Burgess for the final time on this one....

Straight cuts are fairly normal stuff on this amazing machine now...even at full depth....

DSCN0376.JPG


Now this is over 7cms thick!! Astounding! And this TUFFSAW blade is over six months old and has done miles of cutting.

So...do I risk this depth on a curve? What do you think? :mrgreen:

DSCN0380.JPG


...and look how close to the line you can get with no smoking...faltering or jamming....

DSCN0382.JPG


Following this I then marked out an overstuffed line...again well over what I need all around...and then used the Huntley Oak Japanese saw....

DSCN0384.JPG


...to trim off the waste.

DSCN0386.JPG


Again this saw makes some really accurate deep cuts....just what is needed here.

Perfect!

DSCN0388.JPG


All the lips are well over...which is just what I wanted to achieve...

DSCN0390.JPG


Well ALFIE approves at least...

DSCN0392.JPG


Now...to get on with the clearing up....

DSCN0403.JPG


Later we will decide what bun design we like the best and what goes best with the handle.

I must say..the grain on the bun is going to be absolutely stunning...right in the core! Wonderful stuff boxwood!

Jimi
 
To screw or to rivet; that is the question. Whether 'tis nobeler in the mind to suffer the slings and arrows of outrageous misfortune when, having riveted, the horn gets bust. Which is yer actual Shakespeare.

Looking very good Alfie. I wonder if anyone has tried slobber as a finish before? :)
 
Richard T":2fq3c7dk said:
Looking very good Alfie. I wonder if anyone has tried slobber as a finish before? :)

Maybe not as a finish, but it would raise the grain nicely before finish sanding.

By the way, you can get coloured wax filler sticks to deal with the chewed bits.
 
Cheers Gazza! I used to shy away from showing WIP ....warts and all because I found that most people couldn't see through the rough to the fine but I now think that it beholds us all to show all of the processes so that someone might be encouraged who will be far more skilled and restore these gems for future generations. Also I found that the constructive criticism is very helpful before I make a move...

Aside from that...the generous help you get from most people here for bits and bobs and ideas!

Richard...what say you to old original screws back in again? I think I might distress the boxwood (if I can stand the idea) a little after it's finished...to match the war wounds on the body...but I am reserving all these thoughts for last...I'm not sure I have the guts to whip the boxwood with a chain!!!! :shock:

Have you never tried phlemseed oil before guys!!? :p Hey! I may get ALFIE to do some controlled chewing...that would distress it! 8) And me!!!! Oh and Richard...I had the same problem when I was choosing my pencils...2B or not 2B.... :lol:

I can't use wax sticks...he's eaten most of them! Other dogs don't hold a candle to him!!!! :oops:

Ok....I'm heading for the door...coat in hand...promise!!! :mrgreen:

Jim
 
How are the original screws? It would certainly be easier than rivets - getting a hole through the wood to be a direct hit with the hole on the other side of the plane, I found to be an impossibility and had to mess around from either side.

Also we don't know how the casting would respond. I reckon screws would be both safer and easier.
 
Richard T":pkqo066i said:
How are the original screws? It would certainly be easier than rivets - getting a hole through the wood to be a direct hit with the hole on the other side of the plane, I found to be an impossibility and had to mess around from either side.

Also we don't know how the casting would respond. I reckon screws would be both safer and easier.

Indeed my friend. I think the screws would look "right" back in place but if not I will go for brass and spot mill them down to avoid damaging surrounding steel. They will fade in quite quickly...especially with a bit of "assistance!" :mrgreen:

Cheers

Jim
 
Having received the great looking Liogier rasp yesterday...it was time to test it out...firstly on the cheeks....

DSCN0450.JPG


I was going to cut some of the excess off on the bandsaw but these cheeks don't have any flat reference base anymore so it wasn't going to be easy so I made a pad the shape of the handle..inserted the sandwich into the plane and it was tight enough to hold in place while I tested the rasp cut.

DSCN0449.JPG


I needn't have worried...this thing cuts like the proverbial knife through butter. Within a few minutes I had the profile I wanted and found myself marching towards the line so fast I had to pull back for fear of getting the profile wrong!

This thing is amazing and worth every penny. I don't know how better this sapphire model is but I don't really care...it's lovely!

The interesting thing is that you can adjust the angle of cut to get really coarse stock removal and then back it off to get a very smooth finish...both are shown here....

DSCN0452.JPG


At the same time I tinkered with the bun...

DSCN0457.JPG


I needed to edge the block in the recess to the front to get the right overhang...and I reached for a file and thenI remembered the rasp! (homer)

It worked there as well and very consistently! Not something I would have thought of using it for but the curve was just right. It took seconds to adjust the profile correctly.

Ok...it still overhangs too much..like an infill on steroids...

DSCN0454.JPG


....but that's what I want so I can now take the profiles...tweak them and finish up with a smooth infill of the correct shape.

DSCN0459.JPG


It was getting late and darn cold out there...even with a heat blaster...so I will leave finishing this until tomorrow...but we're that much closer and all down to that wonderful Liogier rasp....

I may sound like I am exaggerating the capabilities of this tool...but if anything...I am trying to remain restrained.

It's the bees knees!

More later....

Jim
 
She's turning into a real beauty after all of the work you've so far invested into her and very well done too Jim :) I honestly think there's very real justification in investing in the rights tools for the job and the proof of the pudding is certainly in the eating.
 
Today I finished the cheeks and got the bun to the stage where I can ponder the shape.

The rasp was used to even up the contour of the cheeks and then I hit the pair together in the plane with the dummy handle infill to keep them separated correctly....starting with 80G silicon carbide:

DSCN0531.JPG


Then it's straight to Abranet which will take me from rough to smooth (120G to 400G). I have ordered some 80G today because the paper stuff doesn't come near to Abranet for even finishing and sheds grit all over the shop!

DSCN0533.JPG


Note, I taped up the steel just in case I get a bit over enthusiastic!

I want to describe this restoration as fully as possible so excuse me if I state the obvious for some but others who have had less experience with finishing may benefit.

The key to getting an even, scratch-free finish is to use as many grits as you can and at each stage ensure that the scratches from the previous stage are fully removed. The steps for Abranet I use are 120, 180, 240, 320, 400.

I have found that the overlap from Abranet to Micromesh is happy at this point but I am getting 600G in the next pack so I will try that as well. Occasionally I get left over scratches which I think it owing to this jump.

I start the MicroMesh at 1500 mesh (not grit!).....

DSCN0536.JPG


...then I go up the grades 1500, 1800, 2400, 3200, 3600, 4000, 6000, 8000, 12000M

DSCN0540.JPG


The box has come up as predicted for such an old piece...gorgeous....

DSCN0555.JPG


...but now we can see where I have cocked up at an early stage! The rasp/80G scratches on this side were nowhere near eliminated during the first progression of coarse Abranet. Start all over again Jim!! :roll:

Mind you...my excuse is I didn't do this in daylight...it was dark by then and I much prefer daylight to see where you've missed.

Where I could see on the bun...although it's not at the final contour yet...

DSCN0553.JPG


....I only did the top face to see the amazing grain but you get the idea of what it looks like when it is done properly! :mrgreen:

Note...there is no polish whatever on this wood or oil....I will soak this in linseed oil when I finish to bring out the grain amazingly!

DSCN0558.JPG


If I go for a plain bun...this one will need curving at the front and more at the sides...but I want to curve the slope from the mouth correctly first.

I could also go for the standard "wedding cake" profile....opinions on what I should do, gratefully received! 8)

DSCN0562.JPG


So...more perhaps tomorrow although I must finish my SS....

Just a note about the gaps....the whole thing will move forward a few thou to close the gap at the front of the cheeks and line up the rear...I just need to align all three components and surface finish the bed bringing it forward in the process. Once these are one, I can then consider the fixing!

More later!

Jim
 
You made my day, Jim!

Looking this bun, I know why I do love Boxwood. This surface without any finish, amazing!

The plane already IS a beauty. After the last steps are done, it will be a true work of art, I'm sure about that. You did it stunningly good so far. And I'm happy that you shaped the rear infill cheeks flush to the rear end of the plane body. That's classy and that is truly beautiful.

Now finish it and it will be a winner!

Cheers
Klaus

P.S. Not sure if I'd finish this wood with linseed oil. The linseed oil does yellow the wood. The Boxwood already is yellow but in a subtle kind of this colour, that I find very attractive. So I would probably go with a colour neutral oil like poppy oil or with Tru-Oil. Both of them leave the natural colour of the wood.
 
Hi Klaus

Thank you my friend and I am glad you like the wood...this is the reason why it is one of my most favourites...along with it's dense grain and tame character. You can make almost anything with it.

Now...I have a treat for you. I decided to finish the bun above before I had profiled it to enable me to determine what to do with it...which way the grain was flowing and what would be revealed should I add more grain transitions...

I opted for the simple "Spiers" type bun...and I'm glad I did...

DSCN0587.JPG


Hundreds of years old with many stories in those rings! A truly amazing piece of nature.

DSCN0589.JPG


See the little radial shoots...they are going to be tremendous when finished as is the transition between the sap and the heart which is virtually indistinguishable at the moment.

The reason I want to use linseed oil...and it's the only wood I use it on..is that it naturally highlights these variations in the rings. Bill Carter uses this to great effect in is boxwood planes and this is another thing that is virtually unique to boxwood...English especially.

If you ignore the macro distortion for a moment...you see the different wood structure best in this shot...

DSCN0595.JPG


Those Jovian flows will stand out really well with a soaking overnight.

Yup...this is going to be a real eye candy infill!

DSCN0578.JPG


Now to tackle the handle again now I have the rasp!

Jim
 
Hm, Jim, maybe I've to rethink my reservation on using linseed oil on Boxwood! The bun turned out magnificently to say the least. Judging from the pics, the surface of this bun is so clear that it nearly gets the look of being translucent like polished marble would be. Very impressive ... and inspiring!

Klaus
 
Klaus Kretschmar":3t4mcwjr said:
Hm, Jim, maybe I've to rethink my reservation on using linseed oil on Boxwood! The bun turned out magnificently to say the least. Judging from the pics, the surface of this bun is so clear that it nearly gets the look of being translucent like polished marble would be. Very impressive ... and inspiring!

Klaus

Hi Klaus

There are a number of woods I feel are so beautiful that I am reticent to put any "barrier" finish on them...just oil.

Linseed oil can be a bit of a mixed bag with regards to its use as a "finish" but I think there are two woods it works very well indeed on...boxwood and beech.

Both tend to soak it up really well and the character it adds to these woods makes it unique.

My next finish of choice is indeed Tru-Oil as you mentioned...which (as you probably know) is a polymerized linseed oil anyway...but is actually a true "finish" in that it is a barrier rather than being totally absorbed and a conditioner. Tru-Oil will yellow remarkably quickly on light woods and indeed...I used to use it extensively on new guitar necks with the certain knowledge that they would age to an antique yellow...ideal for vintage restorations.

It also has the added advantage of being tactile in that it is non-sticky...making it fantastic for guitars where slick, rapid movement of the hand is required. It's true that it does wear faster than nitrocellulose but it can be refreshed with thinned coats periodically...giving a new "burnt-in" finish.

This is why it is so popular with gun owners...and its waterproof properties protect the wood from the elements.

I think it also smells much nicer than boiled or raw linseed oil. But what it doesn't do is soak in which I think I would prefer for infills. I want the wood to acquire a vintage patina pretty quickly so that it will blend in with the rest of the plane. I think this will be the best option in this case.

I am going to consider Tru-Oil as a finish for the UK Workshop Project Infill Jointer though...I think it will be ideal for the burr oak and give a wonderful rich glow.

Jimi
 
Nearly completed now and with the addition of a proper lever cap which arrived today but to late to do anything with until tomorrow now...I decided to finish the handle...and fit all parts temporarily.

It all went together rather well....

DSCN0620.JPG


..you can see all the cock-ups like not realising that the original casting sides were not exactly flat/level on the right hand side so I have to put a little filler in there but after the oil and aging...it won't show...I just know it's there and so do you now!

This needs a bit of finishing now with linseed oil but I wanted to try the bed out to see if it's right...so straight in the deep end with some oak...

DSCN0609.JPG


Well...it does what it says on the tin...rough to smooth in the blink of an eye.

The iron needs tweaking/changing and maybe just a slight evening of the bed but I'm pleased with this...

DSCN0610.JPG


I kept the general shape of the original maker's handle...not exactly traditional but remarkably comfortable...

DSCN0619.JPG


The Bristol Designs lever cap casting is supposed to be "raw" but it's so well done I hardly have to do much to it...just adjust the width a slight bit and polish it up really....should be an hour's work at most.

DSCN0625.JPG


Back later with that.

Jim
 
Back
Top