Newbie seeking advice

UKworkshop.co.uk

Help Support UKworkshop.co.uk:

This site may earn a commission from merchant affiliate links, including eBay, Amazon, and others.

masopa

Member
Joined
5 Aug 2015
Messages
14
Reaction score
0
Location
Glasgow
Ok, I'm new to this and pretty much completely inexperienced so go easy (ish). I'm not even sure I've posted this in the right area...

I have some limited ability at general handywork and have a few cheap and poor quality handheld power tools (circular saw, jigsaw, reciprocating saw) - you know, the kind of things that novices buy cheaply when we don't know better, in order to do a job which could be done with hand tools if we were a bit more capable (or patient). The one upgrade I've made to the circular saw, which I use more than anything of the rest is to swap the blade for a marginally better 40t combi blade from Saxton (only a tenner but seems a lot smoother than the ripping blade for everything, including ripping!) I have cordless powerdrills and the like too.

Over the last however many years, I've built a series of "bookcase" shelves in my study which are functional, butt-ugly but straight, solid enough and highlight where I need to improve my skills (design and execution). Basically, I know which end of the saw to hold and can use it in a fairly utilitarian fashion.

We are moving to a new house and I would like to "get into" woodwork far more. I have young children, so the eventual possibility of making stuff for them (and for the house) appeals massively. Our new house will have a large enough garage to act as a workshop and storage area for kit, so that's that part sorted. I won't have enough space for huge fixed standing equipment but anything on castors which can be folded to less than 1m wide should be feasible. I have time at weekends, although this is shared between spending it with my family, potentially having to do stuff with the new house, hillwalking and climbing, photography and cooking. A few calls on my time, so the ability to spend 8-10 hours every weekend planing, turning, chiseling and handsawing is just not practical - hence the reason I'm focusing on the power tool side of woodworking (sorry to the "proper" woodworkers out there).

Aside from longer term objectives, what do I want to build? Things like frames for canvasses (so not visible - hence I'm assuming easier) and eventually maybe even picture frames, but I realise they are far more mm-perfect so not for the beginner (but would be useful for my photography). More functional, but hopefully more attractive, workstations etc. for my study (doesn't need to be as pretty as cabinets or fine furniture) could also be an eventual aim.

So, a very long journey ahead of me, but one I'm willing to invest in slowly as I build up my skills (and get sign off from the boss inside to buy & keep more kit). The question is, what should I invest it, apart from spending as much time as possible practicing, making stuff (even badly) and following youtube instructional videos? My poorly informed thoughts at the moment are:

1. Buy some essential (non-powered) tools: speed or combination square, spring clamps and quick release U clamps, 1m metal rule, depth gauge for lining up on homemade jigs and some decent woodglue
2. Buy two 3' saw horses and get my hands on a big straight, thick piece of old timber as a worksurface - an old flat door perhaps. Buy a sheet or two of 12mm or 18mm ply for "playing"
3. Build a couple of fences for my circular saw for rip cuts and cross cuts (maybe also a 45 degree mitre) for frames and things like cornerclamps, wedges etc. for fixing.
4. Get building! Canvas frames and maybe even simple utilitarian boxes for tools which can eventually hang on the wall (or go onto draw rails and into an eventual housing) - stuff that will be hidden away from sight but gets me used to using the tools I have and jigs to build things square and accurately (ish). Get used to trying to cut to the nearest mm with homemade jigs and fixing sides square with clamps and homemade corner clamps etc.
5. Eventually move onto a table saw - buy vs convert the circular saw? Head is telling me to stump up some readies for a good quality second hand one rather than try to cobble something together which won't be square
6. Anything else? I don't envisage cutting wiggly shapes, so a bandsaw isn't a priority (unless you think it is) and worst case I have a jigsaw to make do for occasional requirements. Mitre saw? Again, the circular saw with jig should be able to deal with what I need, most of the time? Maybe a cheaper brad/nail gun for quick fixing?

Sorry for the long and rambling post - especially if it's in the wrong bit of the forum (moderators feel free to move as necessary)... just after a bit of advice. I'm not likely to be in a position to set up shop before we move as we're moving into temporary (smaller) accommodation for two months at the end of this month and won't have much space. So I have plenty of time with just essentials to play and learn...

Thanks in advance.
 
Welcome masopa!

Lot's of info there but a few things I would say are, instead of an old door on saw horses I'm using a 25mm 5'x3' bit of MR MDF and it works really quite well. The MDF is heavy and the stanley saw horses sturdy and have good grip. It's all easy to put out of the way if I need the space. I had the MDF CNC locally cut for Festool MFT dog holes for use with my Festool TS55 track saw and clamps, but you don't have to do that of course.

Gear wise It's all down to how you like to work and how much you want to spend. I find the Festool stuff (TS55, Domino) great for a small shop with kids around as dust extraction is excellent.

As you say you probably don't need a bandsaw, but since I got mine a month or two ago I have to say it's one of those things you use loads once you have it. Quiet and flexible!

I would say have a good think about what the first 2 or 3 things you are likely to want to build, sketch them out, then decide what you genuinely need to achieve them and start there. Review after your first couple of projects and then perhaps invest in that bit of gear you think would have really made a difference to the results and your enjoyment of getting there.

All the best,
Carl.
 
Read, read, read and read some more. Find out what are good and bad brands, both for hand and power tools, also what is good condition, poor condition, and avoid at all costs condition.

Armed with that, get up early on a few Sunday mornings, personally I arrive at 05:30, and hit up a few car boot sales ... in the past few weeks I picked up a mint Record bench vice (£5) pair of 6" G-cramps (£4) and a Stanley No 5 Jack Plane that is perfect (£5)

Also hit up Gumtree, all sorts on there for cheap, Bench Pillar drills are always going up on mine for £20-40, as is a local guy that seems to have an endless supply of decent size Birch ply off cuts from a furniture manufacturer (they CNC/laser cut the bits they need, the rest of the sheet is scrap to them apparently)

My bench is a 78x30 fire door on a basic frame I made, rock solid and sturdy, drawer suspended beneath for essential "to-hand" items, drill bits, allen keys etc etc.

Hope that helps!
 
Thanks guys!

Pike/Carl: that's a good idea about planning out what I want to build first. I might actually start trying to build them out of the basics I have already (the only things I'm missing are cheap and absolutely essential items for everything anyway: a square, woodglue and clamps!) At the very least, it will show me first-hand what I'm missing - both in terms of knowledge and any potential kit. I expect for things like canvas frames, I'll get by with what I have and hopefully have quite a bit of fun making jigs for my circular saw and corner clamps etc. - which will also be educational in itself.

I'll need to buy some wood of course - for canvas frames I'm expecting 1" square softwood should do the job and it's fairly cheap. I'll probably buy a sheet of 12mm ply as well, although I might upgrade that to 18mm as that would be better for making the corner clamps. Drat it, I might just buy a sheet of each since I can't imagine a scenario where it just sit there unused for years...

JSW: thank you, that's a cracking idea about car boots. Also encouraging that doors or MDF work well (and cheaply) as workbenches...

Great stuff guys, I'll get thinking, reading and car booting!
 
Just a quick update here... I realise my post above was nearly two years ago! Thanks again for the tips provided - they were worth their weight in gold.

I ended up not buying much at all - I have been making do with a simply circular saw and a couple of jigs and - err, that's about it! I have a drill and a very rubbish jigsaw which is so out of alignment, it's basically unusable. But the circular saw with a simply straight cut jig has done me well. I wouldn't mind a pillar drill at some point but again, I can probably knock together a jig which will make do?

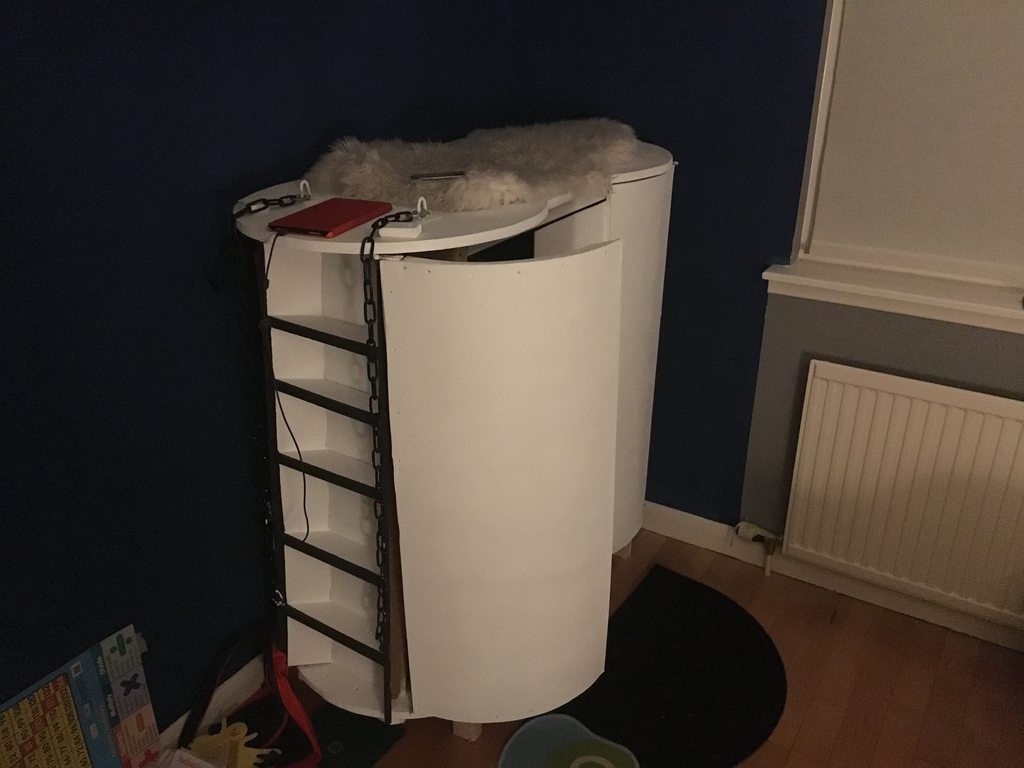
I've made my son a reasonably nice chest (which I'm quite pleased with in terms of "look") and a wardrobe/climbing frame (I know, sounds odd!) which is very sturdy, very "true" but doesn't look quite as neat as I'd have liked. Didn't help that I designed it to have curved doors, which was a lunatic idea in hindsight! But it has some good hanging space inside, a staircase for him to climb up on the top and a good "den area" up top for him to sit and play. Combines something useful with some fun space for him.

My next challenge is going to be one of the following:

1. a proper table saw for my circular saw to bolt underneath; or
2. a bunk bed for my son

I realise #2 might seem a bit ambitious, but designing the plans for these things is something I'm very comfortable with, so it will be over-engineered to hell and almost certainly a lot more robust than any bunk bed I'd buy.

Sense tells me to do #1 first, since it'll come in handy for doing #2...

I have a fairly cheapy circular saw (almost certainly bought from B&Q and not a "brand") so I'm thinking I might look for a second hand branded one and then get my hands on some more plywood sheet and build a proper table saw.

I've been spending hours on youtube watching the experts make them and I'm going to guess I need to take my time to get the fence true. Should be fun though...

Any thoughts before I crack on?
 
I looked into building a table saw but in the process of looking realised that table saws generally frightened me! Would your self-build one be as safe and easy to use as one from the shops? I can't see why it couldn't be, just a thought?
 
Sure.
1. a proper table saw for my circular saw to bolt underneath..
Don't do this. Seriously, just don't. The cheapest, nastiest, fold-up portable table saw you could buy will be vastly better and, crucially, safer, than anything you can make by bolting a circular saw upside down. Yes, I've seen "experts" on YouTube do this (as an aside, you do realise that anyone can start a YouTube channel, right? Even me...) but it remains a terrible idea; we're these "experts" American, by any chance??

Making yourself a guiderail for your circular saw, or buying a cheap tracksaw would be a much better bet IHMO.

As for bunk beds, they're pretty straightforward; four corner posts connected by rails, there's lots of 'bed bracket' type hardware readily available, and bed slats are cheaper to buy from Ikea than to try and make, all so you'd really need to do is make the ladder - and the slide :)

HTH, Pete
 
Thanks Peter, I know why you're saying that - I've seen some horrific videos on youtube on where things have gone wrong. And in a lot of cases that's been with "proper" shop bought TSs. These can be stupidly dangerous machines even when assembled to decent tolerences, so the warning is appreciated.

However, part of the reason for wanting to build one is to understand how to get it as spot on as possible. I'll over-engineer some things and the fence system will be a case in point. Will I get it right? Almost certainly not... will I learn from doing it? Definitely. I'll probably also have a fair few attempts at various elements of the TS - all of which is building my understanding of woodwork, assembly and the importance of precision. Even building the leg assemblies was a slightly different challenge - using a combination square and framing square at the same time to get it 90 degrees in two dimensions. It's not perfect, but it's a better job than I would have done last week... so I'm moving my skills in the right direction.

I do want to try to build the fence and saw attachment to allow reasonably fine adjustment. Again, I'm not under any illusions that it'll be 100%, but if I give myself enough degrees of freedom (and reliable mechanisms to lock down each in turn) then hopefully I'll get something at least usable. My callipers only measure down to 0.05mm but let's see how close I can get my 5 cut test of the fence :)

I've managed to pick up a solid but dirty second hand Bosch GKS 85 S for £30. It had a knackered and warped base plate (which wasn't advertised!) but it's somewhat unusual in that the whole baseplate is removable and allows the saw itself to be attached directly to a table with M4 bolts. So, the knackered base plate wasn't an issue. I gave it a good blast with WD degreaser and it's now looking a lot more serviceable. It came with a horrible 10t blade (230mm) so I've replaced that with a new general purpose Freud blade - slightly larger at 235mm, which should give me the full 85mm DOC less the thickness of my table.

I made the table and legs today after the Lions game - The table is pretty big at about 180cm wide but not that deep (maybe 65cm). I'm planning to add an extension behind the blade as needed. I won't need it for sheet cutting any time soon (and I'd be better off using a guide rail for that) but I will be doing a fair bit of cross cutting with long length CLS etc. I know I could use a chop saw for that, but I'd still have the problem of supporting the timber, so this is a more stable option.

The idea is the whole workbench breaks down: the table (inc saw) comes off and hangs on the wall - it needs to at nearly 2m long! The legs, which are configured as pairs of ends, so only 60cm odd wide, detach and again hang on the wall. Finally there's a base sheet which hooks over the bottom of the two pairs of legs and gives structural stablity at the bottom - again, this is flat and just hangs up. So the whole workbench / TS hangs off the wall and should only protude the depth of the circular saw itself (so about 25cm) at that one point - the rest is flat.

I haven't yet sunk the saw into the table. I need to remove the riving knife obviously and then extend the saw hole. I do want to add a top guard - I'll make that out of 12mm ply and I'm planning to drill a small hole into the top of the riving knife to attach it. That will lose me some cutting depth (about 15mm at a guess) but I could remove the guard if I had to do a cut which would otherwise be fouled by it. I'll also need to remove it when I build a crosscut jig, but that jig will have a perspex sawguard anyway. My eventual aim is also to build a 1.5m wide crosscut jig for long lengths of timber - complete overkill but it will allow me to build the bunk bed a bit quicker. Might cost a fair bit to build the jig in timber, mind...

It's all a bit of a mission / adventure, but it should be fun. As long as I don't slip up - hence the reason for guards, riving knife etc. to try to keep it a bit safer.

Again, just to reiterate - I appreciate the sensible warning. I'm not ignoring you - quite the opposite, it's the reason I went for the saw I did (came with a riving knife) and will be building guards into the plan.

Cheers
 
Update... I built the table and installed the saw at the weekend. I'm delighted with my efforts! It's about 1.8m wide and after trueing up I've got th fence tolerance down to 0.07 degrees (5 cut method to test). Plenty good enough I think for the things I'll be making.

I need to route in the mitre slots - given the width I will add four and that way I can install my router to the far end to do box joints as well.

The table top is a heavy sod but it should hang on the wall ok when I want to take it down.

Petty chuffed with how it's worked out - I will have to post the first thing I make with it (which will be my crosscut jig!)
 
That looks like an ingenious solution to your problem. Unconventional, but so what! But you are making one very basic mistake. No photos!!! Please post pics of your saw/bench both hanging on the wall and assembled, and of the cupboard/climbing frame you made! You obviously have lots of creative ideas and it would be nice to share them.

As you acquire more tools, I do recommend the French Cleat method of storing them. In my workshop I have cleats more or less all round, and tools in 250 or 500 mm racks. The beauty of it is that you don't have to decide where tool racks go before you build them. Change your mind, or buy another bigger tool which makes the old layout wrong, and you can change it in a jiffy.
 
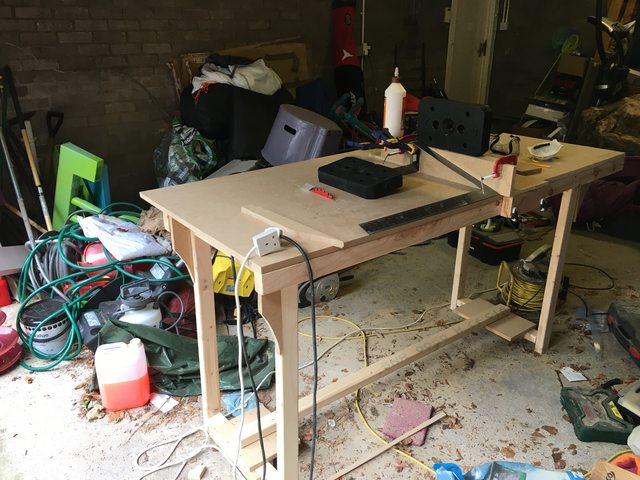
Good point! Excuse the devastation in the background - there was a big tidying up job after :(

This pic was taken while I was waiting for the fence glue to dry - you'll see I have it set as square in as many dimensions as I could manage!

19UChlgl.jpg
 
Three (dimensions) is enough :)

Looks good. The fence looks sturdy and square, simple and clever.

Might be worth adding diagonal bracer to the legs to stop back-and forth movement? Could just be bolted on for easy disassembly.

It is a rule that messy backgrounds are ignored, otherwise we'd hardly ever post a thing!

Now the wardrobe/climbing frame?

Keith
 
Yes, I had thought about finding a better way of bracing the leg pairs... I was tempted to get some 6mm sheet as that should provide decent rigidity without too much weight.

I am about to head off on hols so it will be a fortnight before I'm back to take a pic of the wardrobe!

Edited to add: the fence has a bit more to it than probably is obvious from the pic. It is a single piece of 18mm as a base, which reaches towards but not to the far end of the table. It also overhangs the near edge enough for the brace to attach.

The brace is three pieces of 18mm glued together and then glued and screwed at 90 deg under the overhang. This runs parallel to the CLS and edge of the table. Obv key to get that flush and 90.

The fence base sheet then has he vertical bit attached. This was a bit more complex: it is two pieces of 18mm glued (like the brace) which is glued and screwed vertically. It forms a clean 90 degree corner with the base. A wider piece of 18mm is then attached, but all the way down to the table - it is this you can see as the glued pair are hidden behind it. This is not glued and instead, screws from the back of the fence penetrate through all three sheets which allows me to change the angle of that unglued piece. Four screws allow micro adjustment of both the vertical and horizontal angle :)

Also, that adjustable vertical only goes to the middle of the sawblade which should reduce the risk of kickback.
 
Ok, table saw now reworked to be far more robust and consistent.

Whoever said your first table saw build will be your worst was right. I've basically upgraded what I originally built and the only part which has been disposed of is the fence.

Cuts are far more consistent with virtually no play in the thing now. Result!

I've also added some thin sheet hardboard to the back and the sides of the legs for stablity. Feels solid now.
 
And sorry for the delay, here is the wardrobe-climbing frame-creation with one of the curved doors ajar...

eZjV9ieh.jpg
 
Back
Top