Bread bin wip

UKworkshop.co.uk

Help Support UKworkshop.co.uk:

This site may earn a commission from merchant affiliate links, including eBay, Amazon, and others.
MattRoberts":365agcw4 said:
Top panel doesn't cover the depth of the dovetails? Thanks for the progress updates, great to see how you're getting on :)

No, that bit's ok - the top moves back to cover the dovetailed ends, and the front stands up against it when closed, between the ends, then flips down as a cutting board. Having its edge exposed makes it easy to open.

(In my head, anyway... :) )
 
Here's the mistake I was on about. I managed to change my idea about the grooves, realising that they needed to be stopped where they meet the dovetails at the back. However, they ought to have been stopped at the front as well, where the front flap will fit between the sides.

IMG_5388_zpsmrjvd7ch.jpg


I'll need to fill in the ends of those grooves with some little slips of matching wood.

Meanwhile, I completed the dovetails. Conventional techniques - hold the pin board vertical in the vice, lay the tail board over it, hold it down with a flatiron, mark around the tails.

IMG_5389_zpssnsmk3s5.jpg


Cut out the waste on a pedal-powered fret saw

IMG_5390_zpsdgjnurwg.jpg


where it's quite ok and safe to get the angle at the end of the cut by lifting the wood with your fingers -

IMG_5391_zpssclcdueb.jpg


- do people with electric fretsaws do the same? When doing this, I really enjoy the way that the speed of the cut changes without needing a hand on a control - I just imagine the action going slower or faster as required, and it happens automatically!

Finished pins

IMG_5392_zpszdwyimh6.jpg


and a test assembly

IMG_5393_zpsagiuae4u.jpg


You may notice that the dovetails at the back don't look quite right - that's because, in a classic error, I started treating pins as tails and cut the wrong bits off! :oops: Correction due later.

Error clearly visible here, where I was bevelling off the square edge of the back, to line up with the sides.

IMG_5395_zpslbwuw53q.jpg


The front flap needs to be rounded on its bottom edge so it can pivot and lay flat as a cutting board, so I marked out a curve on the ends,

IMG_5410_zpsh8bihbax.jpg


and planed it

IMG_5411_zpsjpkq97qp.jpg


I'll fit the flap and top after initial glue-up of the main body. Glue up is a good time to tidy up and check that everything is ready.

IMG_5413_zpsawsjrdqh.jpg


I assembled one end

IMG_5414_zpsk54agqhz.jpg


then added the other, with some cramps to draw the joints tightly together.

IMG_5415_zpsaovl5ksz.jpg


My new cramps work nicely!

Last job for today was to stick back the missing bits of the dovetails - I hope these will blend in well enough not to be noticeable to anyone except me.

IMG_5416_zpszj9dyfuu.jpg


Next time, recovery from two more errors if what I have in mind works, and just possibly the finished item!
 
A few more crumbs of progress...

I cleaned up the dovetails a bit. Not strictly necessary yet, but I like doing it. It also shows how good square-bodied wooden handscrews are, since you can cramp them to the work, then use another one, or a holdfast, to hold them down to the bench. Necessary, since this breadbin is about 1/32" too long to fit into my vice.

IMG_5417_zpssu8weumj.jpg


A fiddly little job was to fill in the wrongly exposed grooves. Fortunately, I still have all the offcuts, so I was able to use a couple of pieces from the next bit of wood along from the error. Here's one, glued in and held with a little homemade cramp (from Robert Wearing's design).

IMG_5419_zps50yynqw5.jpg


When the glue had dried, I carefully sawed and chiselled the excess wood away.

IMG_5420_zps9nglaels.jpg


Not perfect, but good enough.

Another design error was that I was missing a bit of wood where the top, front and sides meet. The front goes between the ends and rests against the edge of the top, but needs to be wider at its upper edge, as wide as the top. Pity I'd already cut it!

Fortunately I've thought of a way to make the front stay in place when closed. If I add a wider strip of wood to the front, it can lift up into place and drop down again. It's hard to describe but there will be pictures soon. Meanwhile, I need to add some wood back - from the exact same piece I cut off. So out comes the panel cramp again. The extra bit is bigger than needed at present - I'll do a trial fitting, mark it from the rest of the box, then trim it back to size.

IMG_5421_zpsn5uybvfs.jpg


I also drilled the holes for the hinge pins. Actually I could't find the brass rod I was going to use for pins, so I am using screws. These will be fitted into the bottom edge of the front, through slots at the bottom of the sides. So here goes with some holes.

IMG_5422_zps2hezldel.jpg


I fixed a backing piece in place first, to avoid any risk of splitting at the back. I drilled two holes, then enlarged them into a slot with files. (These are really cheap Chinese files, which seem fine on wood.) I'll add countersinking when I know if my guess for the length is ok.

IMG_5423_zpsu4dpouc3.jpg
 
Looking good Andy.
When I did a furniture making course a few years ago our tutor told us that "a good cabinet maker is not one who makes no mistakes but knows how to fix his mistakes". It stuck with me that quote.
 
Today's work has been fun, but doesn't look much. I've done lots more fitting and fiddling, which I find quite enjoyable.

I did several trial fittings of the front flap, trying to get it to sit nicely between the ends and flop back to meet the stops on the sides evenly. I realised that although I had put a convex round on the bottom edge of the flap, I needed a matching concave groove behind it to allow it to hinge freely. One of the nice things about using hand tools is that it is perfectly possible to do something such as cutting a groove in the edge of a board between ends. I just carved it freehand, first with a nice thin, flexible paring gouge

IMG_5424_zpszep39n2r.jpg


and then with a slightly larger out-cannel gouge

IMG_5426_zpshvq2vje0.jpg


To finish the shape, I wrapped some 80 grit sandpaper round a slip of wood with a rounded edge, and sanded the groove.

IMG_5427_zpse4vwy7ln.jpg


Just a few minutes work.

I trimmed off the extra wood that I had added to the front flap, nearly to the finished size - I'll do the final planing with it in place, using the top of the finished bread bin as the reference.

The ends of this extra bit need to stick out on either side, to fill in the gaps at the top corner. I decided to leave these a bit long for now, so they can be used to open the flap. So they need to be rounded off - a nice little vertical paring job

IMG_5428_zpsl54hpikd.jpg


followed by some chiselling and sanding.

I'm not sure if these are a good idea or not. I may well cut them off and carve a finger notch on the front flap. What I don't want to do is cut them off now and then have to glue something else on later. Opinions welcomed - should they stay or go?

Another fiddly job was with the slotted holes. Having adjusted these a little bit more by filing, I needed to countersink them for the raised head brass screws. I know from experience that a rotary countersink will just mess up a slot like this in soft wood, so I carved the countersinking with a small gouge. (Now I see the photos on a big screen close up, I think I may need to remove another tiny sliver of wood toget this right.)

IMG_5429_zpsawlwo6gn.jpg


IMG_5430_zpsqlo9g0cv.jpg


With that done, I sanded the inside with an Abranet hand pad on the vacuum cleaner, adjusted the fitting of the top and glued it on. Here it is in the clamps, waiting for another rainy day, when I can plane and sand the outside, possibly change the fastening method and finish off.

IMG_5431_zps8jl85i69.jpg
 
Nice work as usual Andy.

Nice use of hand tools, it shows just how useful and quiet they are.

Pete
 
I really like the use of the old iron :D

That paring gouge must be pretty flexible to be able to do that with an in cannel gouge. Good result though. Regarding the handles / finger recess, bearing in mind that you need to be able to lift the flap and pull it forward, I wonder if your "ears" might not be easier than a finger notch. Presumably a handle is out if you need the door to lie flat as a carving board. But they might make opening it a two handed job, which isn't ideal. Definitely worth leaving them on until you've tried it out !
 
Yep, very flexible. There's an episode of the Woodwright's Shop where Roy makes decorative grooves (I think it's on a pine cupboard) in a similar way. I was glad of an excuse to try it!

You're right about the ears too. Maybe a pair of finger notches would work, one on the inside for opening the flap, the other on the outside for lifting the flap off the worktop.
 
How about a handle like your chest of draws that will keep the flap off the worktop so you can get your fingers underneath it?

A piece of nice wood would look good.

Pete
 
Racers":3flr9tm8 said:
How about a handle like your chest of draws that will keep the flap off the worktop so you can get your fingers underneath it?

A piece of nice wood would look good.

Pete

Hmm... At first, I thought that wouldn't work - a handle would prevent the flap from lying flat, and I want it to be usable as a cutting board. But I could put rubber feet on the bin, of the same depth. I'll try some mock-ups next session.
 
Andy, just a thought. What about a recessed handle hinged with some brass rod maybe? Bit like a flush pull ring type handle but you could make it from wood? Cut the recess, fit a flush handle so you can open easily but would sit flush again on the worktop while using as a breadboard. Maybe rout a small 'finger pull' groove in the top edge of the lid so you can easily lift when it's flat?
You'd have to iron out the physics lol. :)
I'm just an ideas man. :| like some faceless team of experts paid fortunes to improve efficiency, my ideas may be unworkable and have no sound basis but look good on paper before you try to implement them in real life. I still demand 27 % of all pre tax profits though.
Enjoying the thread mate.
Regards
Chris
 
Thanks guys and sorry for the long silence - but you know I don't like to hurry.

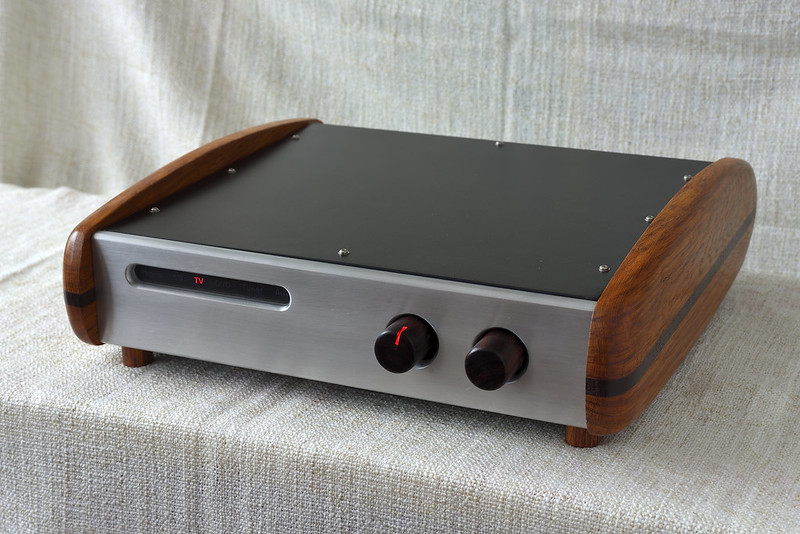
The handles/feet discussion was really helpful and enabled me to make up my mind. I experimented on a scrap with carving a finger recess, but it was too small and looked a mess, so I decided to add a little handle and some feet instead. Separate feet, a bit like your amplifier Pete, but square not round. Chris, I like the idea of a finger ring but haven't risen to it this time. Nevertheless, I shall send you a cheque for your share of the profits. Indeed, it's in the post! :---)

I used a scrap of lovely old mahogany, left over when I turned a discarded Victorian table leaf into a shelf and needed to cut one corner out. I kept the corner, since the wood was such a nice colour and so easy to work.

For the handle I settled on a simple tab. The top side is horizontal, the underside is bevelled at the same 1:8 slope as everything else, as are the ends. In use, it's the same depth as the feet. I cut them square, with the sides bevelled to the same angle. I didn't photograph every slow, plodding step, but this is how I laid them out, drilled holes and planed them off level.

IMG_5434.jpg


IMG_5435.jpg


IMG_5436.jpg


In cutting the sides, I thought of the job as being like cutting dovetails, so missed a trick. If I had laid them out the other way round, I would have been able to plane the bevel rather than chisel it and the holes would have all been properly central. Never mind, I'll do that next time.

Having made the feet, I bought some Osmo Polyx and applied a few coats. It looked so nice I decided to finish the inside as well, so please don't tell me that was a mistake...

IMG_5437_zpsjht8rqva.jpg


And here it is, completed, only six months after first cutting up the alder wood. :lol:

IMG_5444.jpg


I'm sure everyone reading this will know how, when you finish a project, you mostly see the mistakes. I do, but I hope other people won't, and will be distracted by something else.

I'm pleased with the made-up-as-I-went solution to keeping it shut. The front flap is free to lift a litle, then hangs on the angled slope in the corners. No need for catches, magnets or hardware.

IMG_5445.jpg


In use, the flap folds down level.

IMG_5446.jpg


It'll do for now!
 
=D> looks lovely, nice work. Do you think it will be ok that the grain on the top is running at 90 to the grain on the side pieces, I mean with regards to seasonal movement?
 
Woodmonkey":29jf5f88 said:
=D> looks lovely, nice work. Do you think it will be ok that the grain on the top is running at 90 to the grain on the side pieces, I mean with regards to seasonal movement?

Yes, well, that's one of the little blunders that I hope non-woodworkers won't notice!

You're quite right that the ends ought to have the grain running vertically so the whole thing is like a conventional box, rotated 90°. By the time I realised, I'd cut the pieces too close to change them. I'm hoping it is small and dry enough to be stable. I'm encouraged by the way that there was no distortion when I ripped the original lump into four.
 
Nicely done Andy, and a loaf straight out of the bread maker as well!

Pete
 
I think the handle and feet was the right choice. Adds some contrast and easy to use one handed. The latch is a clever idea too. And the alder looks good with the Osmo. I hope you've allowed enough time for the turpentine smell to blow off before the bread went in !
 
Thanks for the kind words Tony but don't worry, that's a posed shot with the loaf. (With the distinctive breadmaker groove.)
It won't go into use for a month or more. I don't like to rush!
 
Back
Top