Traditional wedge abutment smoother.

UKworkshop.co.uk

Help Support UKworkshop.co.uk:

This site may earn a commission from merchant affiliate links, including eBay, Amazon, and others.

swagman

Established Member
Joined
13 Feb 2008
Messages
1,295
Reaction score
0
Location
Victoria, Australia
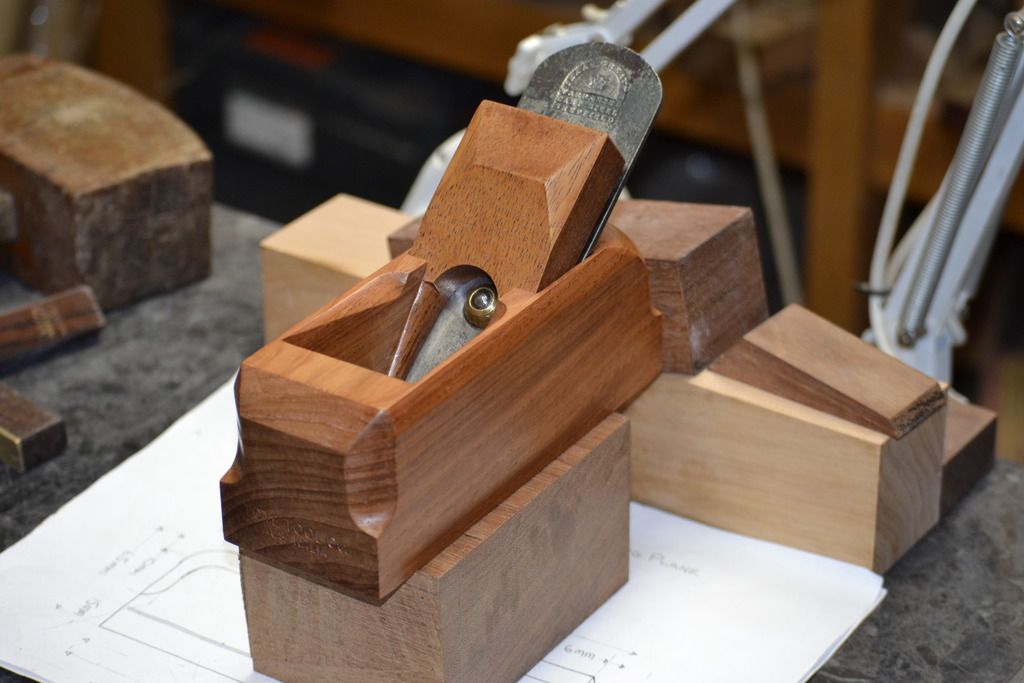
Completed the following 7 inch; double iron smoother 2 days ago. The iron is bedded at 40 degrees; with a 1 degree right to left skew to induce more slicing action of the wood fibres. The body of the plane is made using east indian rosewood, and the wedge is made from merbeu. The mouth opening started off at 1mm, but I decided to increase that to around 2mm to allow the plane to pass a much heavier shaving without clogging. The wear was set at 80 degrees to the bottom line of the abutments (1/4 inch), with the remaining wear (3/4 inch) set at 85 degrees. The cutting edge of the iron has a primary bevel of approx. 24 degrees with a secondary at 25 degrees. The iron was sharpened to 1200 grit from the stone. The front of the chipbreaker was eyeballed to about 0.8mm from the cutting edge of the iron. Enough commentary; here are the photo's of the plane.

Stewie;


The following shows the smoother in action. Fine and medium thickness shavings in both directions of grain. The test wood used was Oregon. Excellent results.

Stewie;


A beautiful plane Stewie and I imagine really nice to use. I wish I had the skill to make one.

John
 
Very beautiful - I particularly like the way you curved the ends of the chamfers, very elegant and an inspiration,

Cheerio,

Carl
 
Beauty! What a gorgeous little plane.

I have a question about your emphasis on the bevel honing angle, surely doing it that shallow doesn't matter much since this is a BD plane? And with a steeper angle wouldn't you get better edge retention (in tougher woods especially) without any noticeable impact on cutting performance?
 
Others have suggested that a primary angle closer to 30 degrees does improve edge retention.

My personal preference based on historic performance is to commence with a 25 degree primary bevel on my bd plane irons.

Stewie;
 
Looks good, stewie. That should provide you with a good bed for experimentation of one type of smoother vs. another.

(I keep most of my irons final bevels slightly above 30 degrees, but I rely on them to not have any chips at all in case I want to apply finish directly after them).
 
D_W":2szchy63 said:
Looks good, stewie. That should provide you with a good bed for experimentation of one type of smoother vs. another.

(I keep most of my irons final bevels slightly above 30 degrees, but I rely on them to not have any chips at all in case I want to apply finish directly after them).

Thanks David.
 
Very nice plane, I have always thought wedged abutment planes were the planes to make. Too bad my own experiments have produced lackluster results.

Did you skew the wedge from layout or just adjust it to fit on ad hoc basis?
 
Beautiful work, well done.

Just an observation, if the blank had been turned by 90 degrees it would have been closer to QTR sawn and perhaps a little more stable on the sole.
 
That's yet another really excellent piece of toolmaking Stewie.

Out of interest, did you find the very slight skew to be easier/harder to produce than a more pronounced skew angle? And did you measure the angle out exactly at layout, or start by creating a flat bed and then add the skew by applying slightly uneven pressure to your float until it looked/felt about right?
 
I do like the look of that, especially the way the chamfer on the front visually "rhymes" with the chamfer on the wedge.
Having made my own crude wooden plane, I also appreciate the skill required to make something so precise.
 
Biliphuster":3qfwkiah said:
Very nice plane, I have always thought wedged abutment planes were the planes to make. Too bad my own experiments have produced lackluster results.

Did you skew the wedge from layout or just adjust it to fit on ad hoc basis?

The bed was mortised out to include a 1 degree skew; the bed line was then followed to mark out the wedge abutments. The solid template used to mark out the wedge abutments is shown on the far right of pics 1 & 2.

Stewie;
 
Jelly":bu4km846 said:
That's yet another really excellent piece of toolmaking Stewie.

Out of interest, did you find the very slight skew to be easier/harder to produce than a more pronounced skew angle? And did you measure the angle out exactly at layout, or start by creating a flat bed and then add the skew by applying slightly uneven pressure to your float until it looked/felt about right?

The skew bed was marked out 1st then mortised to suit. To match the front edge of the skewed iron the cap iron itself needed to be skew fitted. The resulting hang over on 1 side of the cap iron needed to be ground back to match the tolerance set by the iron. The slot within the iron also had to be filed back 0.5mm on 1 side to allow the cap iron bolt to mate correctly. Extra 30 min work all up.

Achieving a close fit of the wedge within its abutments was done using chalk as a transfer marker. The following photo shows this chalking technique being used.


The chalking technique is also used to identify high areas on the surface of the irons bed.

Stewie;
 
Lovely handsaw I can see in the last picture. Is that also one of your creations?
 
Back
Top