


StevieB
Established Member
OK, well I have been muttering on for so long about rebuilding my cellar into a workshop that its about time I posted some pictures of what I have been doing! The set-up I have is that its two cellar rooms in a Victorian house, the back room is approx 4m x 4m and the front room is about 5m x 4m. There is an original set of stone steps down into the back cellar which are worn and slippery and really need to come out and a wall which supports these steps with clay infill underneath that also needs to come out as it’s a source of damp. The front cellar will be my workshop, and the rear cellar which the staircase runs into is to be a playroom / den for the kids. The major problem I have is that the cellars are both full – one side with all my tools and kit, the other with all the things you usually find in a cellar like bicycles, lawnmower, xmas tree, old LP collections and since we don’t have a loft all the detritus which is usually hidden away in most houses. First step then is to have a bit of a clear out. The pics in this build are a bit sporadic since they have been taken as I remember over the course of the last 12 months and I still have some way to go. So once the clear-out has begun I am starting with this:
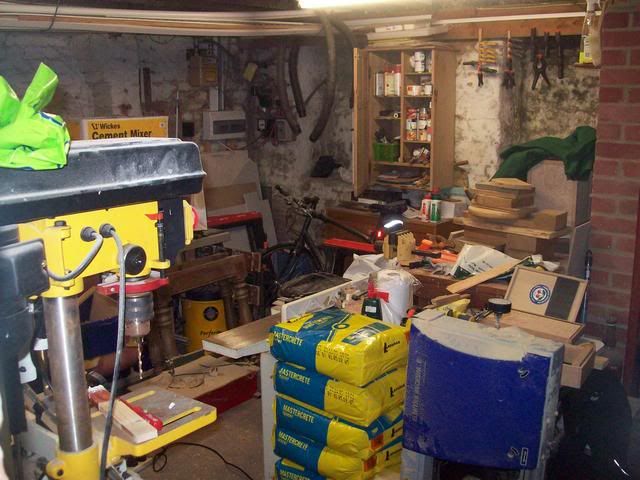

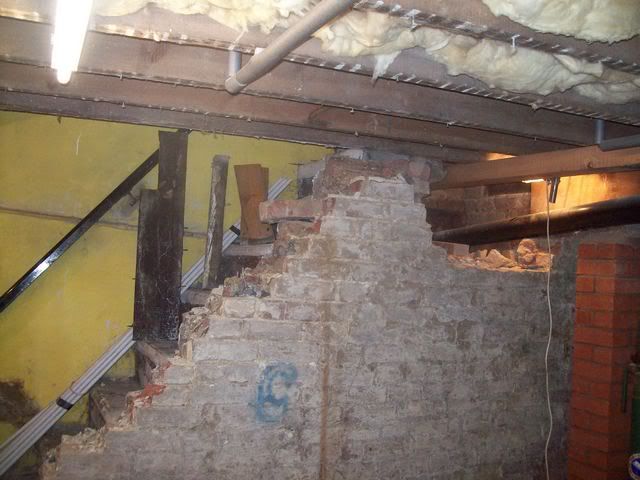
Note the very poor window in the second photo – this is the only source of daylight into the cellar and looks like it is the original window judging by the rottenness of the frame and timbers. This mess is after the clear-out and explains why I have done very little woodie stuff lately! So once cleared (!) its time to start on the stairs. This is the before photo, showing the stone stairs and adjoining wall. The wall itself is not supporting the ceiling, only the stairs themselves, so can safely come out as well. Doing so will give me an understairs cupboard or an extra 3 feet wide by approx 10 feet long of floor space:

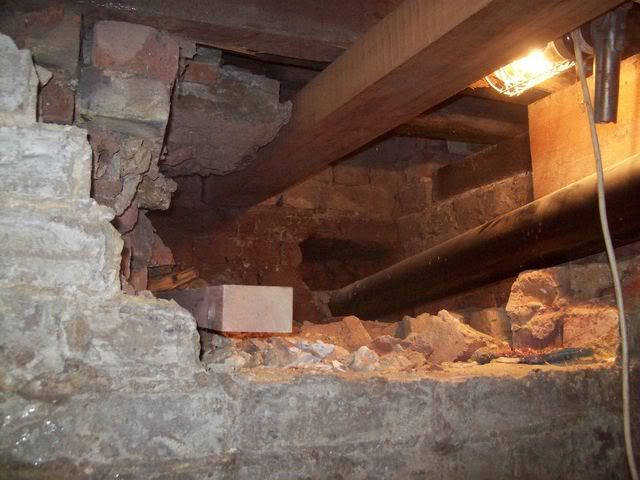
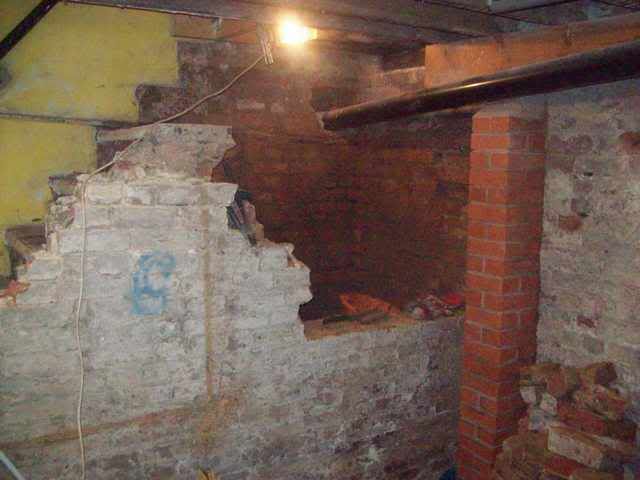
One skip later and a bit of bashing later and we come to the first problem – the upstairs floor is resting on the top of the staircase, the top of the staircase is resting on…. well nothing actually. The entire downstairs hall floor is supported by a couple of Victorian bricks.
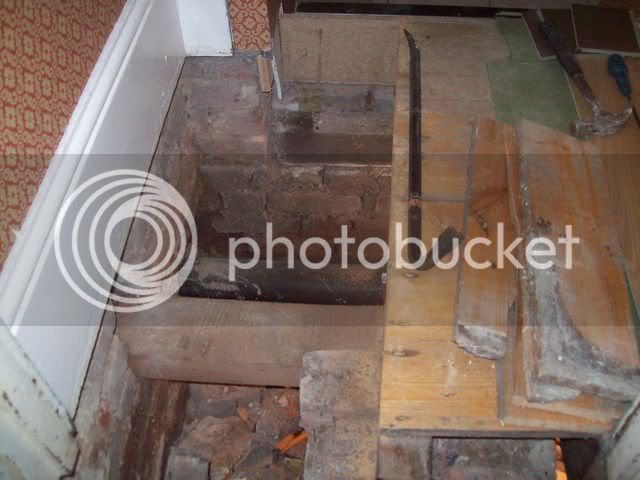
The large baulk of timber is a 4” square of beech I had put by for a bench build, and its jammed into a socket in the wall to support the floor above while I make some emergency repairs!
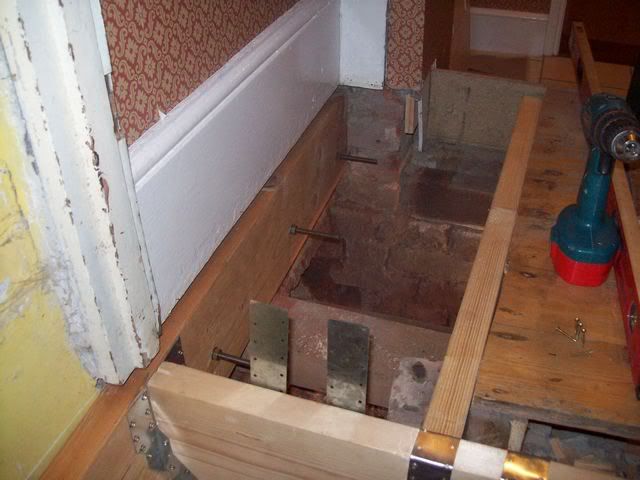
Lifting the floorboards above you can see the soil pipe from the downstairs toilet and the baulk of beech and not a lot else. Stuck in a nice 8” x 2” timber bolted to the wall to provide some support, and some joist hangers and further timbers hanging off that and we can once again walk on the floor
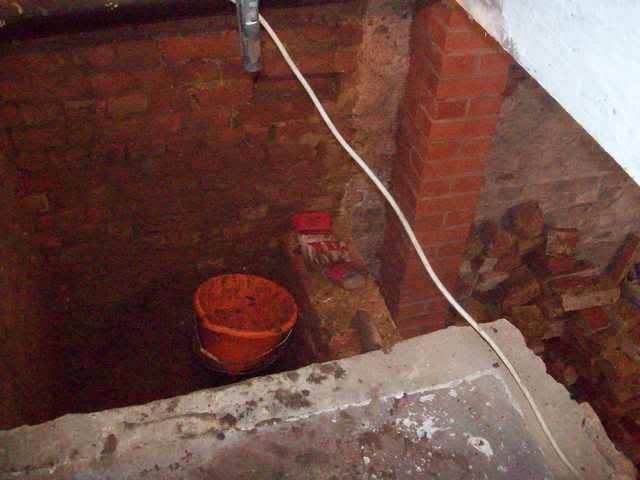
So the stairs can now start to come out bit by bit, taking down the wall and excavating the backfill behind the stairs as I go. This was light top-soil at the start but by about 3 feet in its got to being heavy clay and believe me was a real pipper to shift – had to hack it out in lumps with a trowel as there was no room to dig it with a spade. Nothing exciting in it either except a few bits of Victorian clay smoking pipe
Its at about this point you realise that taking out the only set of steps into a cellar leaves you with a large problem – namely how to get up and down without them. I left the stairs for as long as I dared unsupported and was clambering over the gap with buckets of clay and bricks for a while
But eventually the gap got to big or I got too nervous given the void I was crossing each time
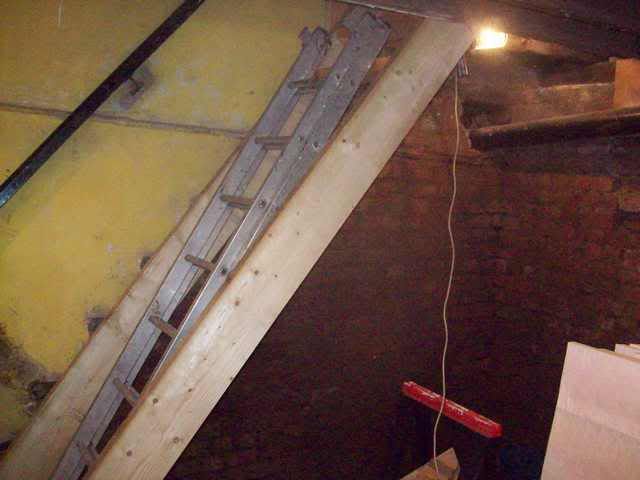
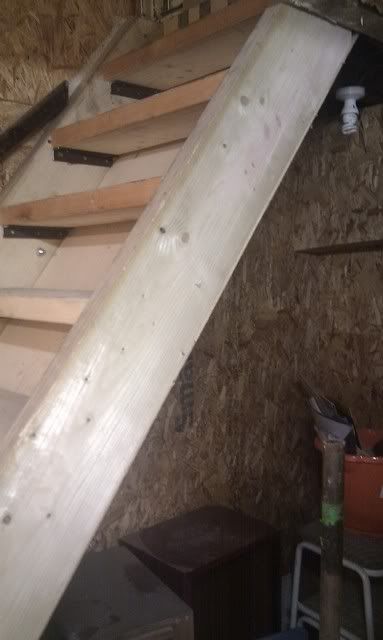
So time to start putting in some temporary stairs
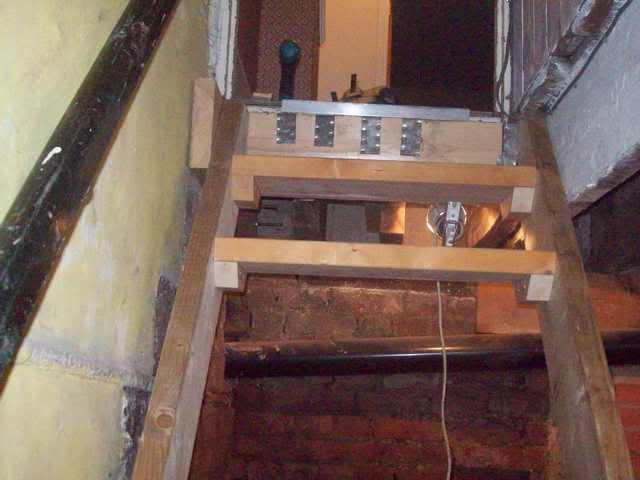
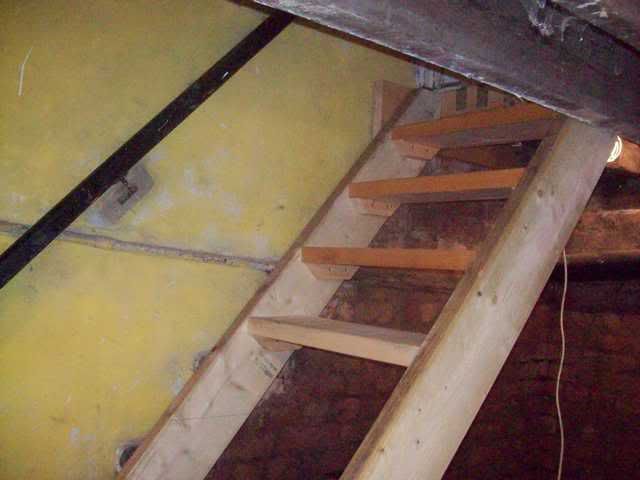
I do not recommend the use of wooden supports for treads in this manner by the way, and in later photos you will see I have shifted to steel angle which is much more stable. This was only temporary however and useful for support to get the rest of the spoil out, first with a ladder and then with further treads as space became available:
OK, that was the major demolition part, so now time to start rebuilding. First take a perfectly good Victorian cobbled floor and clean it off
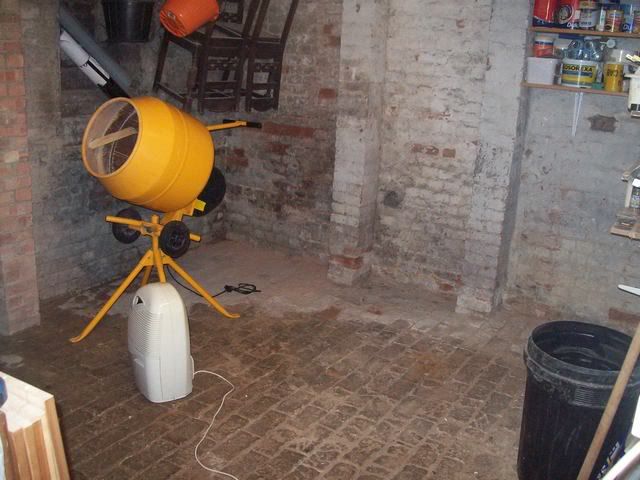
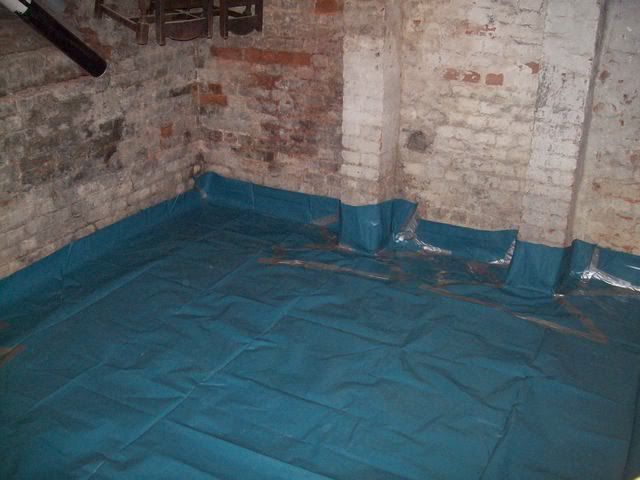
Then cover it in a DPM as the cobbles were laid directly onto earth and this accounted for a large part of the musty damp pervading the cellar. Careful application of gaffer tape on all joins to go round the annoying pillars
Then almost give yourself a hernia getting 2 tonnes of ballast and cement down the stairs in 25kg bags to lay a nice new concrete floor
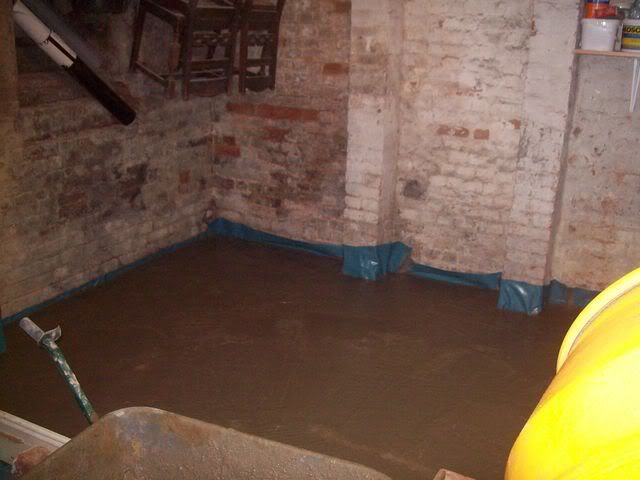
So far this has all been the back half of the cellar. There is a bit of a jump in terms of photographs now for no obvious reason other than there is only so much interest you can get from watching concrete dry. The same concreting process was applied to the front half of the cellar as well however so I have a flat, 4” thick concrete floor across both rooms. This involved another 2 tonnes of concrete, all carried down by hand. SWMBO was not impressed by this feat of manly prowess however, instead simply moaning about the dust I was making through the house
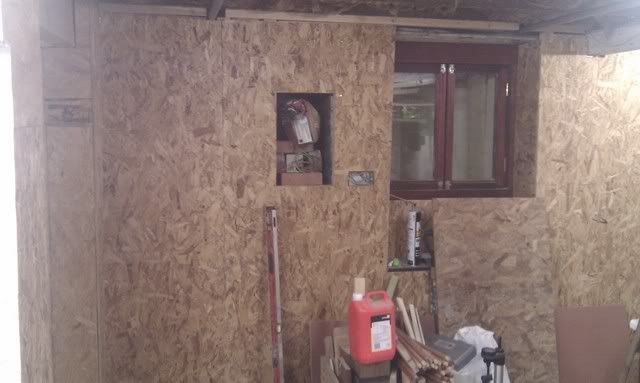
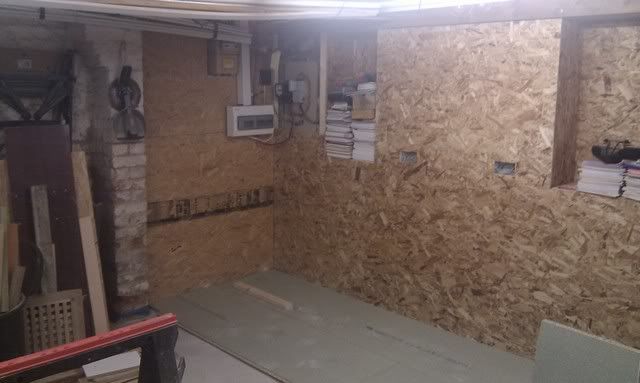
So, once the floors were dry it was time to start on the walls. This was after copious shifting of the cellar contents from one room to the other since all of the items in photos 1 and 2 remained in the cellar while I did all of this work. Time to start on studding and insulating and then boarding the walls. Decided after a lot of agonizing to go with 3” x 2” CLS with 32mm Kingspan sheet as insulation and 11mm OSB over the lot. Studs fixed top and bottom (oh the joy of timber joists to fix to in the ceiling!)
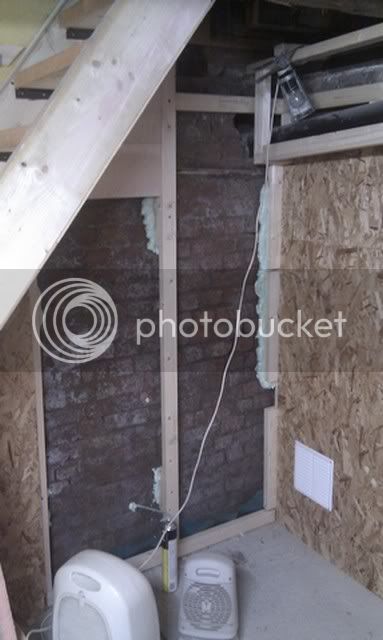
This is under the new staircase (I know there is no side on it yet – as soon as I banister it I cannot get an 8x4 sheet into the cellar and as I am the only one going in and out it will stay like this until I have finished building!) with copious amounts of expanding foam to hold the studding. There is a 2” gap between the studs and the wall here as I took Mike’s advice and installed a bathroom fan to blow air down behind the wall at this point to give some ventilation. The fan is a constant rated fan and I have got it on a 6hr on and 6hr off cycle. Bit of tumble dryer tubing off the back directs the air down behind the wall. The reason I have it here is where the clay backfill was under the old stairs this is the dampest part of the cellar. It is now fairly dry but the ventilation will not hurt. Grilles down below allow air to exit into the room and once boarded:
Bit further round in the front cellar room where the electrics are showing the sheet insulation
And the same view from a bit further back showing the horror of trying to build a workshop around the contents of a workshop – not recommended if at all possible!

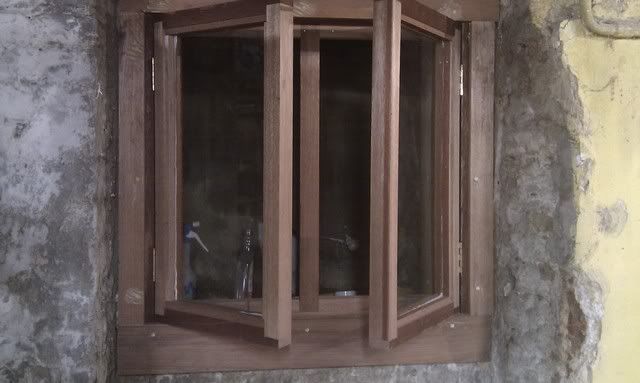
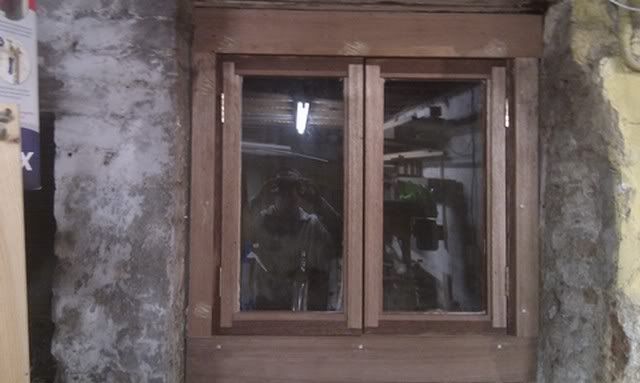
Remember that old window in an earlier picture – took a bit of time out from studding the walls to make a new window from some old hardwood I had knocking around, and I think I posted pics of this before in more detail but if not:
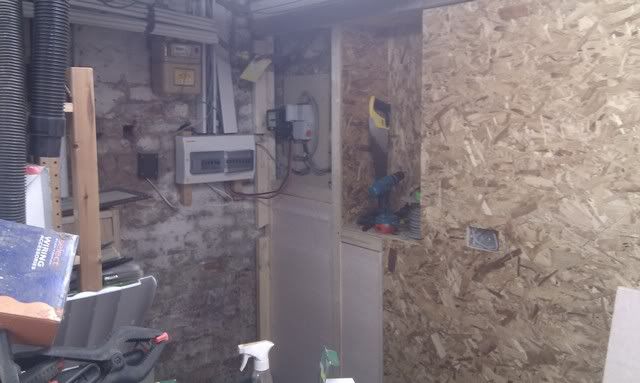
Getting almost up to date now! Spent this weekend having a move around and trying out some P5 chipboard for the flooring, notice the revamped electrics – had to lift the consumer unit off the old brick wall and board behind, and took the opportunity to tidy up some of the house wiring as well. Still have the cellar itself to wire into the CU but it’s starting to come together a bit
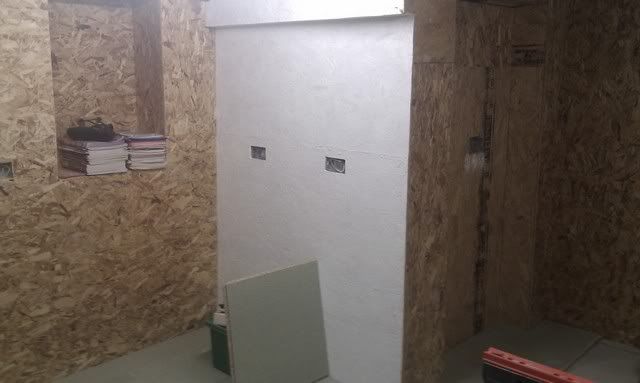
Just (!) need to decide on the finish. Tried painting one wall with emulsion and it makes things brighter but I prefer the wood to be honest. The back room will be plasterboarded over the OSB to make it into a suitable room like the rest in the house. That’s overkill in the workshop side though so it will be white OSB in there.
Still got two walls to stud and OSB in the front, ceilings to plasterboard both sides, trim carpentry on the stairs, door to fit between the two rooms, workshop benching and units to build, cupboard under the stairs, flooring to consider and loads of other things! Taking a long time due to serious lack of funds, cramped working conditions and too little free time. It might also seem to be a funny sort of build order with half a floor down and not all the walls done but most of this is logical if you are there – if you have a bit of floor space then floor it before you need to move the contents of the workshop again! Spent most of the last 12 months with 30 sheets of Kingspan insulation taking up a lot of space but am down to the final 6 sheets now which has cleared some space. Afraid the pics are a bit disjointed as well but given this has taken over a years so far hope it tells a bit of a story. Will try and keep updating with more but progress will still be slow so don’t expect too much too soon. Moral of the story is that if you have a shed in the garden be grateful – having a workshop in the house is not quite the dream solution we all think it might be")
Steve
Note the very poor window in the second photo – this is the only source of daylight into the cellar and looks like it is the original window judging by the rottenness of the frame and timbers. This mess is after the clear-out and explains why I have done very little woodie stuff lately! So once cleared (!) its time to start on the stairs. This is the before photo, showing the stone stairs and adjoining wall. The wall itself is not supporting the ceiling, only the stairs themselves, so can safely come out as well. Doing so will give me an understairs cupboard or an extra 3 feet wide by approx 10 feet long of floor space:
One skip later and a bit of bashing later and we come to the first problem – the upstairs floor is resting on the top of the staircase, the top of the staircase is resting on…. well nothing actually. The entire downstairs hall floor is supported by a couple of Victorian bricks.
The large baulk of timber is a 4” square of beech I had put by for a bench build, and its jammed into a socket in the wall to support the floor above while I make some emergency repairs!
Lifting the floorboards above you can see the soil pipe from the downstairs toilet and the baulk of beech and not a lot else. Stuck in a nice 8” x 2” timber bolted to the wall to provide some support, and some joist hangers and further timbers hanging off that and we can once again walk on the floor
So the stairs can now start to come out bit by bit, taking down the wall and excavating the backfill behind the stairs as I go. This was light top-soil at the start but by about 3 feet in its got to being heavy clay and believe me was a real pipper to shift – had to hack it out in lumps with a trowel as there was no room to dig it with a spade. Nothing exciting in it either except a few bits of Victorian clay smoking pipe
Its at about this point you realise that taking out the only set of steps into a cellar leaves you with a large problem – namely how to get up and down without them. I left the stairs for as long as I dared unsupported and was clambering over the gap with buckets of clay and bricks for a while
But eventually the gap got to big or I got too nervous given the void I was crossing each time
So time to start putting in some temporary stairs
I do not recommend the use of wooden supports for treads in this manner by the way, and in later photos you will see I have shifted to steel angle which is much more stable. This was only temporary however and useful for support to get the rest of the spoil out, first with a ladder and then with further treads as space became available:
OK, that was the major demolition part, so now time to start rebuilding. First take a perfectly good Victorian cobbled floor and clean it off
Then cover it in a DPM as the cobbles were laid directly onto earth and this accounted for a large part of the musty damp pervading the cellar. Careful application of gaffer tape on all joins to go round the annoying pillars
Then almost give yourself a hernia getting 2 tonnes of ballast and cement down the stairs in 25kg bags to lay a nice new concrete floor
So far this has all been the back half of the cellar. There is a bit of a jump in terms of photographs now for no obvious reason other than there is only so much interest you can get from watching concrete dry. The same concreting process was applied to the front half of the cellar as well however so I have a flat, 4” thick concrete floor across both rooms. This involved another 2 tonnes of concrete, all carried down by hand. SWMBO was not impressed by this feat of manly prowess however, instead simply moaning about the dust I was making through the house
So, once the floors were dry it was time to start on the walls. This was after copious shifting of the cellar contents from one room to the other since all of the items in photos 1 and 2 remained in the cellar while I did all of this work. Time to start on studding and insulating and then boarding the walls. Decided after a lot of agonizing to go with 3” x 2” CLS with 32mm Kingspan sheet as insulation and 11mm OSB over the lot. Studs fixed top and bottom (oh the joy of timber joists to fix to in the ceiling!)
This is under the new staircase (I know there is no side on it yet – as soon as I banister it I cannot get an 8x4 sheet into the cellar and as I am the only one going in and out it will stay like this until I have finished building!) with copious amounts of expanding foam to hold the studding. There is a 2” gap between the studs and the wall here as I took Mike’s advice and installed a bathroom fan to blow air down behind the wall at this point to give some ventilation. The fan is a constant rated fan and I have got it on a 6hr on and 6hr off cycle. Bit of tumble dryer tubing off the back directs the air down behind the wall. The reason I have it here is where the clay backfill was under the old stairs this is the dampest part of the cellar. It is now fairly dry but the ventilation will not hurt. Grilles down below allow air to exit into the room and once boarded:
Bit further round in the front cellar room where the electrics are showing the sheet insulation
And the same view from a bit further back showing the horror of trying to build a workshop around the contents of a workshop – not recommended if at all possible!
Remember that old window in an earlier picture – took a bit of time out from studding the walls to make a new window from some old hardwood I had knocking around, and I think I posted pics of this before in more detail but if not:
Getting almost up to date now! Spent this weekend having a move around and trying out some P5 chipboard for the flooring, notice the revamped electrics – had to lift the consumer unit off the old brick wall and board behind, and took the opportunity to tidy up some of the house wiring as well. Still have the cellar itself to wire into the CU but it’s starting to come together a bit
Just (!) need to decide on the finish. Tried painting one wall with emulsion and it makes things brighter but I prefer the wood to be honest. The back room will be plasterboarded over the OSB to make it into a suitable room like the rest in the house. That’s overkill in the workshop side though so it will be white OSB in there.
Still got two walls to stud and OSB in the front, ceilings to plasterboard both sides, trim carpentry on the stairs, door to fit between the two rooms, workshop benching and units to build, cupboard under the stairs, flooring to consider and loads of other things! Taking a long time due to serious lack of funds, cramped working conditions and too little free time. It might also seem to be a funny sort of build order with half a floor down and not all the walls done but most of this is logical if you are there – if you have a bit of floor space then floor it before you need to move the contents of the workshop again! Spent most of the last 12 months with 30 sheets of Kingspan insulation taking up a lot of space but am down to the final 6 sheets now which has cleared some space. Afraid the pics are a bit disjointed as well but given this has taken over a years so far hope it tells a bit of a story. Will try and keep updating with more but progress will still be slow so don’t expect too much too soon. Moral of the story is that if you have a shed in the garden be grateful – having a workshop in the house is not quite the dream solution we all think it might be
Steve